background image

Operating

11

Oper

ating

3

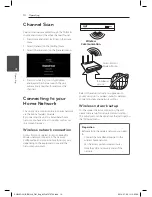
1.  Press Home and select [Application] on the 

Home menu.

2.  Select [All Apps] on the [Application] menu.
3.  Select [Settings] on the [All Apps] menu.
4.  Select [Wi-Fi] and select a desired SSID of 

wireless network. 
If you have security on your access point, you 
need to input the security code as necessary.

How to check the internet 

connection

You can check the internet connection.
1.  Press Home and select [Setting] on the Home 

menu.

2.  Select [General] on the [Setting] menu.
3.  Select [Network Information] on the [General] 

menu. Information for internet connection is 
displayed.

Notes on Network Connection


y

Many wireless home network connection 
problems during set up can often be fixed by 
re-setting the access point or wireless router. 
After connecting the unit to the home network, 
quickly power off and/or disconnect the power 
cable of the home network router. Then power 
on and/or connect the power cable again.


y

Depending on the internet service provider (ISP), 
the number of devices that can receive internet 
service may be limited by the applicable terms 
of service. For details, contact your ISP.


y

Our company is not responsible for any 
malfunction of the unit and/or the internet 
connection feature due to communication 
errors/malfunctions associated with your 
broadband internet connection, or other 
connected equipment.


y

Some internet contents may require a higher 
bandwidth connection.


y

Even if the unit is properly connected and 
configured, some internet contents may not 
operate properly because of internet congestion, 
the quality or bandwidth of your internet service, 
or problems at the provider of the content.


y

Some internet connection operations may not 
be possible due to certain restrictions set by the 
Internet service provider (ISP) supplying your 
broadband Internet connection.


y

Any fees charged by an ISP including, without 
limitation, connection charges are your 
responsibility.


y

The use of a “Router” may not be allowed or its 
usage may be limited depending on the policies 
and restrictions of your ISP. For details, contact 
your ISP directly.


y

The wireless network operate at 2.4 GHz 
radio frequencies that are also used by other 
household devices such as cordless telephone, 

Bluetooth® 

devices, microwave oven, and can be 

affected by interference from them.


y

Turn off all unused network equipment in 
your local home network. Some devices may 
generate network traffic.


y

For the purpose of the better transmission, 
placing the unit from the access point as close as 
possible.


y

In some instances, placing the access point or 
wireless router at least 0.45 m above the floor 
may improve the reception.


y

Move closer to the access point if possible or re-
orient the unit so there is nothing between it 
and the access point.


y

The reception quality over wireless depends on 
many factors such as type of the access point, 
distance between the unit and access point, and 
the location of the unit.


y

Set your access point or wireless router to 
Infrastructure mode. Ad-hoc mode is not 
supported.

SH940C-LN_BIDNLLK_OM_Eng_MFL67370759.indd   11

2014-07-23   �� 10:45:57

Summary of Contents for SH940C-LN

Page 1: ... 37 LG1 00301 0414 SH940C LN ENGLISH OWNER S MANUAL Please read this manual carefully before operating your set and retain it for future reference SH940C LN_BIDNLLK_OM_Eng_MFL67370759 indd 1 2014 07 23 10 45 52 ...

Page 2: ...d circuit That is a single outlet circuit which powers only that appliance and has no additional outlets or branch circuits Check the specification page of this owner s manual to be certain Do not overload wall outlets Overloaded wall outlets loose or damaged wall outlets extension cords frayed power cords or damaged or cracked wire insulation are dangerous Any of these conditions could result in ...

Page 3: ...he AC Adaptor 3 Operating 8 Initial Setup 9 Menu Operations 10 Channel Scan 10 Connecting to your Home Network 10 Wireless network connection 10 Wireless network setup 11 How to check the internet connection 4 Troubleshooting 12 Troubleshooting 5 Appendix 13 Specifications 14 Trademarks and Licenses 14 Open source software notice 14 Important Information Relating to Network Services 15 Maintenance...

Page 4: ...s Rear Panel a b c d e f g a POWER 12 V 0 2 A Connect the supplied AC adaptor b VIDEO OUT Connect to the VIDEO IN jack on a TV or monitor c AUDIO OUT L R Connect to the AUDIO IN L R jack on a TV or monitor d HDMI OUT Connect to the HDMI IN jack on a HDMI compatible TV or monitor e USB Port Connect an USB device containing video audio and photo files If you want to record on external HDD connect an...

Page 5: ...nowledges menu selection Ch Scans up or down through memorized programmes Vol Adjusts the sound level of the unit Back Returns to the previous screen Home Displays Home menu Menu Displays and exits a menu c Coloured buttons Selects the color buttons for interactive applications c Scan Searches backward d M Play Pause Starts or pauses playback Play backs or pauses time shift for a live TV programme...

Page 6: ... Cable Set the TV s source to HDMI refer to TV s Owner s manual y y If a connected HDMI device does not accept the audio output of the unit the HDMI device s audio sound may be distorted or may not be output y y When you use HDMI connection you can change the resolution for the HDMI output y y Changing the resolution when the connection has already been established may result in malfunctions To so...

Page 7: ...it to VIDEO AUDIO IN on TV with AV cable such as VIDEO with yellow AUDIO Left Right with white red VIDEO IN L AUDIO IN R Rear of this unit Video Audio Cable y y Do not connect the unit through a VCR The image could be distorted by the copy protection system y y For high definition video it is recommended to use the HDMI connection Note Connecting the AC Adaptor Connect the unit to the power supply...

Page 8: ... on pages 10 11 Step 2 Maximize your screen area Maximize your screen area to just barely cover the edge of your TV screen using W S A D and OK Step 3 Legal By using this device you confirm that you have read and agreed to the Google Terms of Service and Additional Terms of Service and that you have read the Google Privacy Policy Step 4 That s it Shows tip about modifying the settings Step 5 Help ...

Page 9: ...services Search Displays the search menu and you can use the search function by entering keywords Application You can select and launch an application installed on the unit PlayStore YouTube Chrome and All Apps that includes Live TV Search Settings etc Widget Setting You can change the settings of the unit in the menu y y Picture You can change the settings for the picture Resolution and Screen Si...

Page 10: ...ccess Point or a wireless router is needed for Wireless network connection The network configuration and connection method may vary depending on the equipment in use and the network environment Wireless Communication Access Point or Wireless Router Broadband service Refer to the setup instructions supplied with your access point or wireless router for detailed connection steps and network settings...

Page 11: ...nd configured some internet contents may not operate properly because of internet congestion the quality or bandwidth of your internet service or problems at the provider of the content y y Some internet connection operations may not be possible due to certain restrictions set by the Internet service provider ISP supplying your broadband Internet connection y y Any fees charged by an ISP including...

Page 12: ...lution to one that your TV accepts y y Check the signal strength and quality There is no sound or the sound is distorted y y Connect the audio connection securely y y The input source setting on the amplifier or the connection to the amplifier is incorrect y y The sound volume is low or muted y y Check that the connected amplifier is compatible with the audio format output from the unit y y The un...

Page 13: ...le with 802 11b g Wi Fi networks Connectors VIDEO OUT 1 0 V p p 75 Ω sync negative RCA jack x 1 AUDIO OUT 2 0 Vrms 1 kHz 0 dB 600 Ω RCA jack L R x 1 HDMI OUT video audio 19 pin HDMI standard Type A USB Port 4 pin USB 2 0 standard x 2 Tuner Channel CABLE IN OUT Connector F Type IEC 169 24 Female Input Frequency Range 54 MHz to 862 MHz Impedance 75 Ω Input Level Range 64 QAM 15 dBmV to 15 dBmV 256 Q...

Page 14: ...ownloads files text images photographs graphics videos webcasts publications tools resources software code programs applets widgets applications products and other content Content and all services and offerings Services provided or made available by or through any third party each a Service Provider is the sole responsibility of the Service Provider from whom it originated The availability of and ...

Page 15: ...aces are extremely dirty use a soft cloth lightly moistened with a mild detergent solution Do not use strong solvents such as alcohol benzine or thinner as these might damage the surface of the unit Keeping the exterior surfaces clean y y Do not use volatile liquids such as insecticide spray near the unit y y Wiping with strong pressure may damage the surface y y Do not leave rubber or plastic pro...

Page 16: ...PT LG ELECTRONICS INDONESIA Kawasan Industri MM2100 Blok G Cikarang Barat Bekasi Jawa Barat 17520 INDONESIA SH940C LN_BIDNLLK_OM_Eng_MFL67370759 indd 16 2014 07 23 10 45 57 ...

Reviews: