- 14 -
1. Application Object
This instruction is for the application to the LCD Projection
2. Notes
(1) The power source insulation of this LCD Projection is not
charging type and you may not use the transformer for
insulation. But you’d better adjust the set after operating it
with insulation transformer between power supply cable
and input part of the set for protecting the adjusting
equipments.
(2) The adjustment must be performed under the correct
sequence.
(3) The adjustment must be performed in the circumstance of
25
!
5°C of temperature and 65
!
10% of relative humidity if
there is no specific designation.
(4) The input voltage of the receiver must keep 230V, 50Hz in
adjusting.
(5) The set must be operated for 5 minutes preliminarily
before adjustment if there is no specific designation.
The preliminary operation must be performed after
receiving 100% white pattern,but reception of the moving
picture may also be possible in unavoidable case.
3. Composition of Adjustment Mode
(1) All adjustment mode are entered by pressing the ADJ key
on the remore control,after adjustment pess the ADJ key to
come out.
(2) Below picture is screen composition when press the first
ADJ key.
(3) Select menu to adjust with using (CH+(
D
),CH-(
E
)) key
above screen and press (
G
)key to adjust on the
wanting menu.
(4) Adjust the value of adjustment with using the volume
+(
F
),volume -(
G
) key.
(5) Press the ADJ key to come out after adjustment.
(6) ex.) Composition of each adjustment mode.
1). RGB Alignment:This is the sub adjustment item by
selected Adjust key.
2)
F
,
G
(Vol +/ -): This is the key to change the data.
3)
D
,
E
(CH +/ -):This is the key to change the sub menu.
4. LCD adjustment
4-1. NRS adjustment
[When the LCD pannel load data on regular pixel using high
speed charge/ discharge with sample & holder, the drain width
of TFT gradually dicreases and the non-resistance increases,
and comes out regular noise on screen (shows vertical line by
12 pixel]
(1) Required Test Equipments
1) PC Pattern generator; 16 Gray Pattern
2) Fixation stand
3) Remote control of adjustment
4) Circuit thing Jig for adjustment (Except Driver Board Assy)
(2) Equipment composition : Refer to <Fig 2>
(3) Preparation for Adjustment
1) Connect PC PATTERN GENERATOR to JIG SET as
shown <Fig 2>.(Except drive part of a circuit block)
2) Select 16 Gray pattern of PC PATTERN GENERATOR
(4) Adjustment Sequence
1) Turn on power supply in the JIG for adjustment.
2) Press the INPUT key to select RGB_PC mode.
3) Press the ADJ key on remote control for adjustment to
enter the adjustment mode.
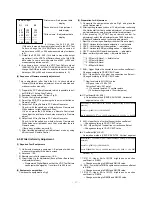
4) Select the ‘62352’ and press the
G
key. Then select 6.
RNRSH, 9.GNRSH, 11.BNRSH of ADJUST MODE to
adjust.
5) Let’s decrease vertical line Noise by using Volume button.
(Input a R, G, B input signal, then adjust it individually)
6) When finishing the adjustment, get out of adjustment mode
by pressing Adjust key.
4-2. VCOM ADJUSTMENT
(1) Required Test Equipments
1) PC PATTERN GENERATOR ; Pattern Generator which
can generator each R, G, B signal and can observe the
FLICKER best (ex : me Character Pattern)
2) <Fig.2> Equipment composition
3) Remote control
4) Circuit thing Jig for Adjustment (Except Driver Board Assy
of adjustment model)
(2) Equipment Composition
RT52SZ30RB [V*.*]
RGB Alignment
62352
Uniformity Adj
Gamma Adjust
AD9883 Adjust
Sub Micom Ver. **
Main Micom Ver. **
RGB Alignment
9.DXOUTB
D
10.H_positon
F
0
G
E
ADJUSTMENT INSTRUCTIONS
<The first screen of adjustment mode>
Adjustment Jig
Screen
PC Pattern
Generator
Optical measuring equipment
Optical box
Circuit for
Adjustment
Set stand
PC
<Fig 1.Adjustment of circuit>
Summary of Contents for RT-52SZ30RB
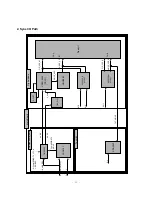
Page 24: ... 24 5 General Control Signal ...
Page 25: ... 25 PRINTED CIRCUIT BOARD MAIN TOP ...
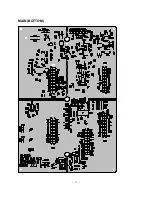
Page 26: ... 26 MAIN BOTTOM ...
Page 27: ... 27 COMPONENT TOP COMPONENT BOTTOM SIDE A V PRE AMP LED AC INPUT ...
Page 28: ... 28 LCD DRIVER TOP CONTROL ...
Page 29: ... 29 LCD DRIVER BOTTOM ...
Page 30: ... 30 DIGITAL BOTTOM DIGITAL BOTTOM ...
Page 31: ... 31 TUNER TOP TUNER BOTTOM ...
Page 32: ... 32 SMPS POWER S W INTERFACE BALLAST ...
Page 33: ...MEMO 33 ...
Page 46: ...P No 3854VA0117A S1 1 2 2003 6 21 ...
Page 47: ...P No 3854VA0117A S1 2 2 2003 6 21 ...
Page 48: ...P No 3854VA0117A S2 1 2 2003 6 21 ...
Page 49: ...P No 3854VA0117A S2 2 2 2003 6 21 ...
Page 50: ...SVC SHEET 3854V A0117A S1 SVC SHEET 3854V A0117A S2 SVC SHEET ...


