background image

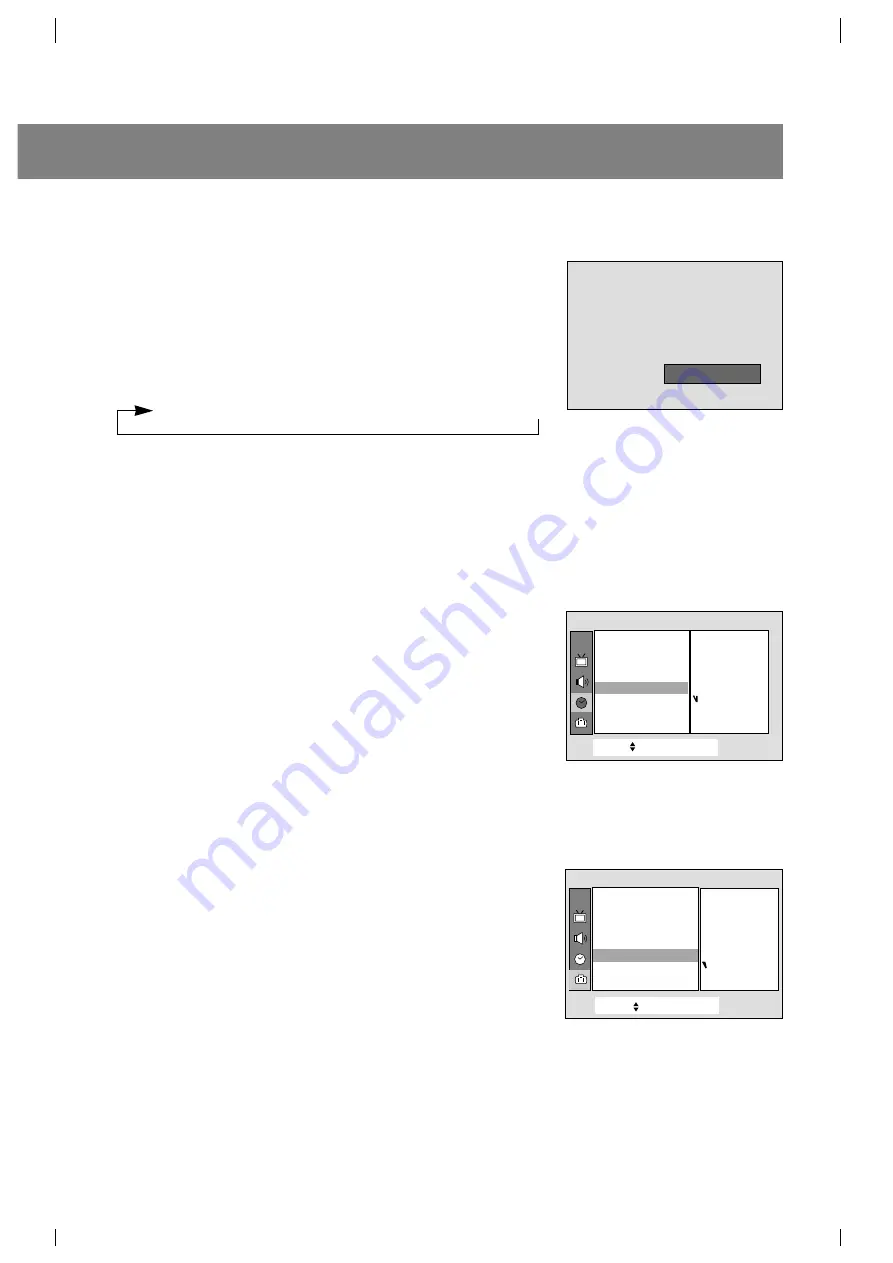
Fijación del temporizador para dormir 

Con estas funciones usted no tendrá que preocuparse por activar el
modo de espera (standby) en su televisor antes de quedarse dormido.
La función Sleep Timer automáticamente apagará el televisor,
después de que haya transcurrido el intervalo de tiempo prefijado.
Presione el botón de

SLEEP

para seleccionar la hora de dormir.

Cada vez que presione este botón, usted podrá ver la secuencia de
tiempos como se muestra abajo y seleccionar el tiempo deseado.
El temporizador empieza a contar disminuyendo desde la cantidad de
minutos seleccionada.

Notas: 

•En pocos segundos, el tiempo de dormir seleccionado

desaparecerá y funcionará automáticamente.

• Para ver el tiempo de dormir que queda, presione una vez el

botón de 

SLEEP

y podrá verlo en la pantalla.

• Para borrar la hora de dormir, presione el botón 

SLEEP

continuamente hasta que 

Sleep 

- - - se exhiba.

Apagado automático

Luego de 10 minutos de no recibir señal el televisor cambiará a modo
standby automáticamente.

1. Presione el botón 

MENU

y luego presione el botón 

D

/

E

para

seleccionar el menú especial.

2. Presione el botón 

G

y luego 

D

/

E

para seleccionar 

Auto off

.

3. Presione el botón 

F

/

G

para seleccionar 

On

Off

.

4. Presione el botón 

MENU

para salir.

Usando el desmagnetizador de pantalla

Debido a que este TV puede ser afectado por el campo magnético de
la tierra,  la puerza de color de la imagen pude verse afectada por
campos magnéticos cercanos a la instalación del TV. Algunas rayas
pueden aparecer en su pantalla o el color puede que no sea igual en
la esquina. Usted puede disfrutar del programa con una alta calidad
de color operando el Degauss

1. Presione el botón 

MENU

y luego presione el botón 

D

/

E

para

seleccionar el menú especial.

2. Presione el botón 

y luego 

D

/

E

para seleccionar 

Degauss

3. Presione el botón 

G

y utilice después los botones 

D

/

E

para

seleccionar  

On

Off

.

Después de operar la función Degauss, automáticamente
cambiará a modo Desactivado.

4. Presione el botón 

MENU

para salir.

Nota:

•No opere frecuentemente esta función, la vida del CPT puede

acortarse.
•Si usted no puede ajustar las condiciones de pantalla a través
de Degauss, intente nuevamente después de 4 minutos.

11

e

Sleep

eee    

_ _ _

CH.

Selecc.

++

+

E ntrada{

+

Volver}

Reloj

{

Timer 

+

off

{

Timer 

+

on

{

Auto

+_

off

+

{

Temporizador

Auto

+_

off

+_

{

On
Off

CH.

Selecc.

++

+

E ntrada{

+

Volver}

Idioma

{

Entrada

{

PIP

+

Entrada

{

Bloqueado

{

Caption

+

{

Degauss

{

+

Degauss

{

On
Off

- - -

→  

10  

20  

→ 

30   

→ 

60  

→ 

90  

120  

→ 

180  

→ 

240      

Especial

Summary of Contents for RP-34FC35P

Page 1: ...tenidamente este manual antes de poner en funcionamiento su televisor Conserve el manual para futuras consultas Anote el número de modelo y serie del aparato Anote la información de la etiqueta ubicada en el panel posterior su distribuidor se la pedirá en caso de cualquier solicitud de servicio La Cara del Futuro ...

Page 2: ...tos y a la misma unidad Coloque la unidad en un mueble recomendado por el fabricante o vendido con el receptor de televisión Siga las instrucciones del fabricante para aquellos televisores que se colocan en la pared o en los anaqueles y utilice el soporte aprobado por el fabricante Las ranuras en la parte superior atrás y abajo del televisor son para ventilación y aseguran un buen funcionamiento d...

Page 3: ...lgunos modelos 14 Control automático de la Imagen Algunos modelos 14 VM Modulación de Velocidad Algunos modelos 15 ACC Control Automático de Color Algunos modelos 15 Ajuste de la Imagen 15 CONTROL DE SONIDO 16 Disfrute de la transmisión ESTEREO SAP 16 Control Automatico de Sonido 16 Turbo Sonido Algunos modelos 17 Ajustandoelecualizado modousuarioASC 17 Ajustando el Balance 18 AVL Auto Volume Leve...

Page 4: ...ONES VOLUMEN F G Para incrementar o disminuir el nivel del volumen Para entrar o ajustar el menú seleccionado cuando el menú está exhibido en la pantalla 7 BOTONES DE LA VIDEO GRABADORA VCR Controlan un magnetoscopio LG 8 BOTON SLEEP Para fijar el tiempo de apagado si desea dormir 9 BOTON EYE Algunos modelos Para activar o desactivar la función de Ojo Mágico Refiera a la Disfrutando de la Función ...

Page 5: ...LECCION Para seleccionar la señal de entrada de la sub imagen BOTON STILL BOTON DE FIJAR Para congelar la imagen BOTON DE POSITION POSICION Para mover de posición la sub imagen dentro de la imagen principal BOTON PARA CAMBIAR SWAP Para intercambiar la sub imagen por la imagen principal BOTON CH SEARCH BOTON DE BUSQUEDA DE CANAL Para buscar una a una las imágenes de todos los canales programados a ...

Page 6: ... 6 MENU TV VIDEO VOL CH ON OFF TURBO S P 2 20 21 13 14 5 5 6 ON OFF TV VIDEO MENU VOL CH 2 20 21 22 13 6 14 ON OFF MENU VOL CH VOL TV VIDEO 2 21 20 13 6 14 ON OFF TV VIDEO MENU VOL CH 2 20 21 13 14 6 ON OFF TV VIDEO MENU VOL CH 2 20 21 13 14 6 MENU TV VIDEO VOL CH ON OFF 2 20 21 13 14 6 20 INDICADOR MODO DE ESPERA STAND BY o r r Se ilumina en color rojo cuando el televisor está en modo de espera R...

Page 7: ...n TV VIDEO CH D E en el equipo o los botones POWER TV VIDEO CH D E ENUMERADO del control remoto El número del canal se exhibirá en la pantalla La exhibición en la pantalla desaparecerá luego de algunos segundos Presione el botón POWER en el control remoto esto hace regresar al modo de espera Para apagar el TV presione el botón POWER en el Televisor Seleccionando el idioma en pantalla 1 Presione el...

Page 8: ...ón A PROG 2 Presione el botón G o A PROG La PROGRAMACION AUTOMATICA empieza inmediatamente Si quiere detener la programación automática presione el botón ENTER Notas Si la señal programada es de baja calidad memorice nuevamente en la Programa auto La PROGRAMACION AUTOMATICA salva todos los canales admisibles sin importar la recepción de la señal RF cable Si los canales generales de TV y los de cab...

Page 9: ...leccionar Nombre canal Usted puede crear los nombres de canales 8 Presione el botón G y después F G para seleccionar una posición Presione los botones D E para accesar al alfabeto de la A a la Z númerosl 0 al 9 o espacios en blanco 9 Repita los pasos 3 y 8 arriba mencionados para memorizar otros canales 10 Presione el botón MENU para salir Selección de Canales Presione el botón D E para selecciona...

Page 10: ...l temporizador de encendido Esta función es para encender automáticamente el televisor a la hora y canal establecidos 1 Presione el botón MENU y luego presione el botón D E para seleccionar el menú temporizador 2 Presione el botón G y después D E para selccionar On timer 3 Presione el botón G y luego D E para ajustar la hora 4 Presione el botón G y luego D E para ajustar la minutos 5 Presione el b...

Page 11: ... para seleccionar Auto off 3 Presione el botón F G para seleccionar On u Off 4 Presione el botón MENU para salir Usando el desmagnetizador de pantalla Debido a que este TV puede ser afectado por el campo magnético de la tierra la puerza de color de la imagen pude verse afectada por campos magnéticos cercanos a la instalación del TV Algunas rayas pueden aparecer en su pantalla o el color puede que ...

Page 12: ... este viendo el TV Esta función se desactiva al desconectar el TV Tilt Algunos modelos La imagen de la TV puede inclinarse al lado izquierdo o derecho si se requiere Esta función es útil cuando desea compensar cierta inclinación Utilizando el botón de MENU 1 Presione el botón MENU y luego presione el botón D E para seleccionar el menú especial 2 Presione el botón G y luego D E para seleccionar Til...

Page 13: ... el botón G para dar inicio a la demostración automática Cuando la demostración llega a la última exhibición se reinicia comienza nuevamente desde el principio Para detener la demostración presione cualquier botón Booster Algunos modelos Para disminuir la interferencia entre los programas usted puede seleccionar Booster Off 1 Presione el botón MENU y luego presione D E para seleccionar el menú can...

Page 14: ...botón EYE nuevamente para activar la función de OJO Control automático de la Imagen Algunos modelos Puede seleccionar la imagen programada de fábrica como prefiera Utilización del botón APC 1 Presione el botón APC en el control remoto 2 Presione el botón APC para seleccionar Ojo magico Algunos modelos Nítida Optima Suave o Usuario 3 Presione el botón ENTER para salir Utilización del botón de MENU ...

Page 15: ...lo Color Nitidez Tinte de la pantalla como usted quiera Si la imagen que seleccionó no es satisfactoria usted puede seleccionar el preajuste de fábrica En el sistema de transmisión PAL M N el ajuste para Tinte no aparecerá 1 Presione el botón MENU y luego presione D E para seleccionar el menú Imagen 2 Presione el botón G y luego D E para seleccionar el modo de imagen deseado 3 Presione el botón G ...

Page 16: ... seleccionado Seleccione MONO si desea escuchar el sonido mono durante una transmision Estéreo SAP Control Automático de Sonido Usted puede disfrutar de un magnífico sonido sin la necesidad de ajustes Este TV automáticamente ajusta el sonido apropiado al tipo de programa que esta viendo Utilizando el botón DASP 1 Presione el botón DASP 2 Presione el botón DASP para seleccionar Plana Música Películ...

Page 17: ... luego D E para seleccionar DASP 3 Presione el botón G después D E para seleccionar Usuario y luego G para accesar al modo Usuario 4 Presione el botón F G para seleccionar la banda de sonido y presione los botones D E para ajustar el nivel deseado 5 Presione el botón MENU para salir 17 CH S e l e c c E n t r a d a V o V o l v e r V DASP AVL Balance Woofer Sonido Plana Música Películas Deportes Usu...

Page 18: ...el botón MENU y después D E para seleccionar el menú Sonido 2 Presione el botón G y luego D E para seleccionar Woofer 3 Presione el botón G y luego F G para ajustar el nivel de Woofer 4 Presione el botón MENU para salir Ajustando el DBS Sonido Dinámico Bajo Algunos modelos 1 Presione el botón MENU y después D E para seleccionar el menú Sonido 2 Presione el botón G y luego D E para seleccionar DBS ...

Page 19: ...s en el mismo canal Seleccionando MODO 1 o MODO 2 puede seleccionar cuál señal visualizar MODO 1 es la señal usual con los subtitulajes mientras que MODO 2 puede mostrar la información de demostración o programación El televisor puede no recibir señales de subtitulaje en las situaciones siguientes Se enfrentan condiciones de recepción deficientes Se reproduce una cinta de grabación vieja en mal es...

Page 20: ...s Operación del Subtitulaje Utilizando el botón CAPTION 1 Presione el botón CAPTION 2 Presione el botón CAPTION para seleccionar OFF Modo 1 Modo 2 Texto 1 o Texto 2 3 Presione el botón ENTER A para salir Utilizando el botón de MENU 1 Presione el botón MENU y luego presione el botón D E para seleccionar el menú especial 2 Presione el botón G y luego D E para seleccionar Caption 3 Presione el botón ...

Page 21: ...ermanece dentro de la imagen principal Utilizando el botón de MENU 1 Presione el botón MENU y luego presione el botón D E para seleccionar el menú especial 2 Presione el botón G y luego D E para seleccionar PIP Entrada 3 Presione el botón G y luego D E para seleccionar TV Video 1 Video 2 Video3 o S Video Algunos modelos 4 Presione el botón MENU para salir Moviendo la Sub Imagen en modo PIP Presion...

Page 22: ...mo la imagen principal Double Window la calidad de imagen puede ser pobre Programanción de canales para Sub imagen Presione el botón PIP CH D E para seleccionar el canal deseado para la sub imagen Búsqueda de Canal Esta es la función para buscar una a una las imágenes de todos los canales programados en la sub imagen Presione el botón de CH SEARCH una vez Las imagenes de todos los canales programa...

Page 23: ...ato 2 Conecte el cable de telecable CATV cable coaxial de 75 ohm al conector de la antena de 75 ohm Cable Plano de 300 ohm 1 Conecte el cable plano de 300 ohm a los tornillos en el adaptador de 300 a 75 ohm 2 Inserte el adaptador de 300 a 75 ohm en el conector de la antena de 75 ohm Cable Coaxial de 75 ohm 1 Conecte el cable coaxial de 75 ohm directamente al conector de la antena de 75 ohm Termina...

Page 24: ... Algunos modelos Conectandolas entradas AUDIO VIDEO 1 Conecte las salidas de AUDIO VIDEO del VCR a la entrada A V IN1 o IN2 Si usted conecta el JACK de audio solamente no podrá escuchar el sonido del televisor 2 Presione el botón TV VIDEO para seleccionar VIDEO 1 o VIDEO 2 Nota En algunos modelos si usted conecta la salida de audio video del VCR a la entrada IN 3 A V en la parte frontal o lateral ...

Page 25: ...Grabando un programa de otro equipo Algunos modelos 1 Conecte las salida del VCR reproductor en la entrada IN 1 IN 2 o IN 3 de su TV 2 Conecte las entradas del VCR de grabado a las salidas A V del TV 3 Presione TV VIDEO para seleccionar VIDEO 1 o VIDEO 2 4 Presione el botón PLAY en el VCR reproductor y fije el VCR para grabar Nota En algunos modelos mono cuando en los conectores de entrada en el p...

Page 26: ...ndo lo haya apagado 1 Cómo conectar Nota Panel trasero del DVD 2 Cómo Usar Encienda la unidad y presione la tecla TV VIDEO en el control remoto o la tecla TV VIDEO en el panel frontal del TV para seleccionar el COMPONENT Intente esto después de encender el DVD AUDIO PB PR Y R L Y IN2 PB PR DVD IN 480i VIDEO L MONO AUDIO R COMPONENT Panel de Conexión del TV TVINPUT Y PB PR DVDOUTPUT Cb B Y Pb PB Cr...

Page 27: ...izar el canal deseado VERIFIQUE ESTOS PASOS Y TRATE DE HACER EL AJUSTE Asegúrese que el cable de alimentación está enchufado Asegúrese que el televisor está encendido Verifique las baterías del Control Remoto Intente otra estación Problemas de transmisión Verifique la conexión de la antena Puede ser interferencia a nivel local Ajuste la antena Ajuste el control de imagen MemoriceloscanalesporPROG ...

Page 28: ...ww lge com Please read this manual carefully before operating your set Retain it for future reference Record model number and serial number of the set See the label attached on the back cover and quote this information to your dealer when you require service ...

Page 29: ...er may fall causing serious injury to a child or an adult and serious damage to the appliance Use only with a cart or stand recommended by the manufacturer or sold with the television receiver Wall or shelf mounting should follow the manu facturer s instructions and should use a mounting kit approved by the manufacturer Slots and openings in the cabinet and the back or bottom are provided for vent...

Page 30: ...y Modulation some models 15 ACC Auto Color Control some models 15 Adjusting the Picture 15 Sound control 16 Enjoying the Stereo SAP Broadcast 16 Auto Sound Control 16 Turbo Sound some models 17 Adjusting the equalizer User mode in Auto Sound Control 17 Adjusting the balance 18 AVL Auto Volume Leveler 18 Adjusting the woofer some models 18 Adjusting the DBS Dynamic Bass Sound some models 18 Closed ...

Page 31: ... standby VOLUME UP DOWN F G BUTTONS To increase or decrease volume level To enter or adjust the selected menu when menu is displayed on the screen 7 VCR BUTTONS To control LG video cassette recorder 8 SLEEP BUTTON To set the desired sleep time 9 EYE BUTTON some models To switch on or off eye picture Refer to Enjoying the Eye Function 10 MTS BUTTON To listen to the MTS sound MONO STEREO or SAP 11 A...

Page 32: ...cture on or off SELECT BUTTON To select the input signal of the sub picture STILL BUTTON To stand still the picture in sub picture POSITION BUTTON To move the sub picture to another corner of the main picture SWAP BUTTON To exchange the main picture and sub picture CH SEARCH BUTTON To search the pictures of all the programmed channels one by one on the sub picture CH D E BUTTONS To select the desi...

Page 33: ... 14 6 2 20 13 14 21 22 6 MENU TV VIDEO VOL CH ON OFF TURBO S P 2 20 21 13 14 5 5 6 ON OFF TV VIDEO MENU VOL CH 2 20 21 22 13 6 14 ON OFF MENU VOL CH VOL TV VIDEO 2 21 20 13 6 14 ON OFF TV VIDEO MENU VOL CH 2 20 21 13 14 6 ON OFF TV VIDEO MENU VOL CH 2 20 21 13 14 6 MENU TV VIDEO VOL CH ON OFF 2 20 21 13 14 6 20 STAND BY INDICATOR STAND BY or r r Illuminates red when the TV is in standby mode Refer...

Page 34: ...button on the set or POWER TV VIDEO CH D E or number button on the remote control A channel number will be displayed on the screen The on screen display will disappear after a few seconds Press the POWER button on the remote control It reverts to standby mode To switch the TV off press the POWER button on the set Selecting the on screen language 1 Press the MENU button and then D E button until th...

Page 35: ...G button 2 Press the G or A PROG button The AUTO PROGRAM starts now If you want to stop auto programming press the ENTER A button Only the channels searched up to that time are memorized Notes If the programmed signal has poor quality memorize again in the Auto program AUTO PROGRAM stores all receivable channels regardless of receiving signal RF Cable If channels of general wireless TV and cable T...

Page 36: ... the F button and then use D E button to select Ch name You can make a channel name 8 Press the G button and then use F G button to select a word position and then D E button to enter alphabet A to Z number 0 to 9 or blank 9 Repeat steps 3 to 8 to memorize or erase other channels 10 Press the MENU button to exit Selecting the Channel Press the D E button to conveniently select the upper or lower c...

Page 37: ...time operates Setting the ON TIMER This is the function to automatically turn the TV on at a preset time and channel 1 Press the MENU button and then use D E button to select the Timer menu 2 Press the G and then D E button to select On timer 3 Press the G and then use D E button to adjust the hour 4 Press the G and then use D E button to adjust the minute 5 Press the G and then use D E button to ...

Page 38: ... the F G button to select On or Off 4 Press the MENU button to exit Operating the degauss In this TV set the magnetic field of the earth may influence on the color purity of picture by neighbor magnetic substance or installation direction of the TV set The stripes may appear on the screen or the color may not be equal in the corner You can enjoy the program in high color quality by operating the D...

Page 39: ...s programmed to remember which option it was last set to even if you switch the TV from standby mode Tilt some models The picture of the set may tilt to left or right if the set is moved to another direction This function is to adjust the tilt Using the MENU button 1 Press the menu button and then use D E button to select the Special menu 2 Press the G and then D E button to select Tilt 4 Press th...

Page 40: ...ct Auto demo 3 Press the G button and the demonstration starts When the demonstration reaches the last display it starts again from the beginning To stop auto demonstration press any button Booster some models When the interference between programs appear select Booster to Off 1 Press the menu button and then use D E button to select the Channel menu 2 Press the G button and then use D E button to...

Page 41: ...and the picture is adjusted 2 Press the EYE button again to switch the Eye function off Auto Picture Control some models You can select picture modes programmed at factory as you prefer Using the APC button 1 Press the APC button 2 Press the APC button to select Magic eye some models Clear Optimum Soft or User 3 Press the ENTER A button to exit Using the MENU button 1 Press the MENU button and the...

Page 42: ...ast Brightness Color Sharpness Tint of the screen as you like If the picture you set is not satisfactory you can select a factory preset picture In the broadcasting system PAL M N the picture item Tint is not displayed 1 Press the MENU button and then use D E button to select the Picture menu 2 Press the G and then D E button to select the desired picture mode 3 Press the G button 4 Press the F G ...

Page 43: ...ly in Mono even though STEREO or SAP has been selected Select MONO if you want to listen to mono sound in remote fringe areas during stereo SAP broadcasting Auto Sound Control You can enjoy the best sound without any special adjustment because this TV set automatically adjusts the sound appropriate to viewing program character by self intelligence Using the DASP Button 1 Press the DASP button 2 Pr...

Page 44: ...d then use D E button to select the Sound menu 2 Press the G and then D E button to select DASP 3 Press the G and then D E button to select User then press G button to enter the User mode 4 Press the F G button to select the sound band and then press the D E button to adjust the desired level 5 Press the MENU button to exit 17 CH Move Next Back DASP AVL Balance Woofer Sound Flat Music Movie Sports...

Page 45: ...o exit Adjusting the woofer some models 1 Press the MENU button and then use D E button to select the Sound menu 2 Press the G and then D E button to select Woofer 3 Press the G and then F G button to adjust the woofer level 4 Press the MENU button to exit Adjusting the DBS Dynamic Bass Sound some models 1 Press the MENU button and then use D E button to select the Sound menu 2 Press the G and the...

Page 46: ... By selecting MODE 1 or MODE 2 you can choose which signal you view MODE 1 is usually the signal with the captions while MODE 2 might show demonstration or programming information Your TV might not receive caption signals normally in the following situations Poor reception conditions are encountered An old bad or illegally recorded tape is played Strong random signals from a car or airplane interf...

Page 47: ... and Text Using the CAPTION button 1 Press the CAPTION button 2 Press the CAPTION button to select OFF Mode 1 Mode 2 Text 1 or Text 2 3 Press the ENTER A button to exit Using the MENU button 1 Press the MENU button and then use D E button to select the Special menu 2 Press the G and then D E button to select Caption 3 Press the G button and then use D E button to select Off Mode 1 Mode 2 Text 1 or...

Page 48: ...ain picture one by one while the sub picture still remains within main picture Using the MENU Button 1 Press the MENU button and then use D E button to select the special menu 2 Press the G and then use D E button to select PIP input 3 Press the G and then use D E button to select TV Video1 Video2 Video3 or S Video some models 4 Press the MENU button to exit Moving the Sub Picture in PIP mode Pres...

Page 49: ...Large Double Window of the main picture the picture quality might get poor TV program selection for PIP sub picture Press PIP CH D E button to select a channel for PIP sub picture Channel Search This is the function to search the pictures of all the programmed channels one by one through the sub picture Press the CH SEARCH button once The pictures of all the programmed channels are searched throug...

Page 50: ...o 75 ohm adapter or the cable from the set if attached 2 Connect the CATV cable 75 ohm coaxial cable to the 75 ohm antenna jack 300 Ohm Flat Wire 1 Connect the 300 ohm flat wire to screws on the 300 ohm to 75 ohm adapter 2 Push the end of 300 ohm to 75 ohm adapter into 75 ohm antenna jack 75 Ohm Coaxial Cable 1 Connect the 75 ohm coaxial cable directly to the 75 ohm antenna jack 75 ohm Antenna Jac...

Page 51: ...ment some models Connecting AUDIO VIDEO IN Jacks 1 Connect the audio video output jacks of the VCR to IN1 or IN2 A V jacksonthesideorbackofTV If you connect the audio jack only you can t hear the soundfromtheTV 2 Press the TV VIDEO button to select VIDEO1 or VIDEO2 Note In some stereo models if you connect the audio video output jacks of the VCR to the IN 3 A V jacks on the front or side of TV sel...

Page 52: ...ct the output jacks of the playback VCR to the IN 1 or IN 2 A V jacks on the side or back of TV or IN 3 jacks on the side of TV 2 Connect the input jacks of the recording VCR to the OUT A V jacks on the back of TV 3 Press the TV VIDEO button to select VIDEO1 or VIDEO2 If you connect it to the IN 3 A V jacks on the side of TV you should select VIDEO3 4 Press the PLAY button on the playback VCR and ...

Page 53: ...if you turn the TV off 1 How to connect Note Back panel ofDVD 2 How to use Turn the set on and press the TV VIDEO button on the remote control or TV VIDEO button on the front panel to select COMPONENT Try this after turning on the DVD set AUDIO PB PR Y R L Y IN2 PB PR DVD IN 480i VIDEO L MONO AUDIO R COMPONENT TV connection panel TV INPUT Y PB PR DVD OUTPUT Cb B Y Pb PB Cr R Y Pr PR Y Y Y Y ...

Page 54: ... images Remote control does not work Cannot tune desired channel CHECK THESE THINGS Is power cord plugged in Is television turned on Check batteries in remote control Try another channel station trouble Check antenna connectings Check for local interference Adjust the antenna Adjust the picture control Program channel using AUTO PROGRAM 27 ...

Reviews: