background image

DLP Personal Projector

7

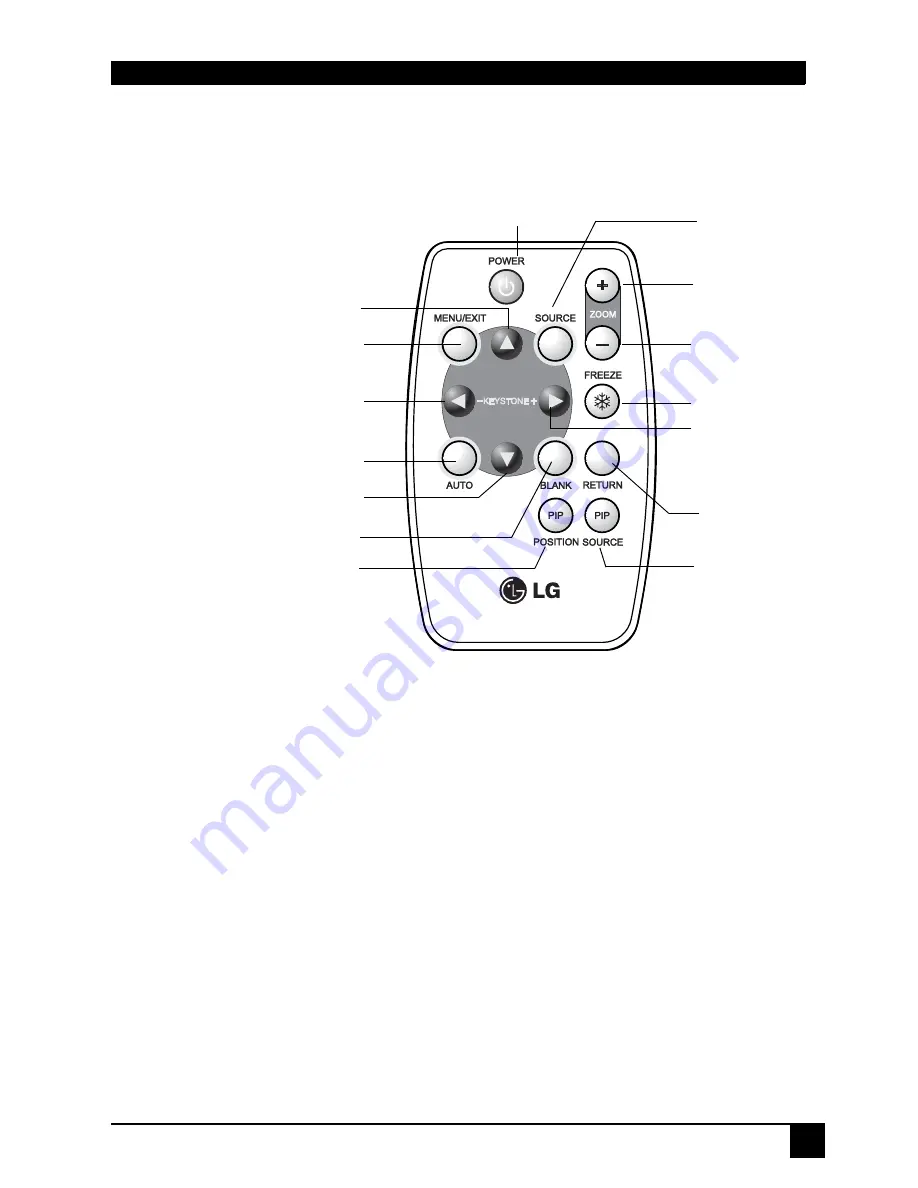
Remote Control Description 

The remote control sensors are located in the front/ back of the projector.  

Remote Control Functions

1.POWER, MENU/EXIT, SOURCE, AUTO, BLANK

The functions of these buttons are the same as those on the external control 
panel. Please refer to "External Control Panel" on page 5 for more 
information.

2. 

3

 LEFT / KEYSTONE - ,

4

 RIGHT / KE

Whe the OSD menu is activated, the buttons function as 

3

 Left / 

4

 Right. 

For the rest of time, the buttons function as Keystone - / Ke.

3. FREEZE

The image can be frozen when FREEZE is pressed. A "Pause" icon will 
appear in the lower right corner of the screen. To release the freeze function, 
press the FREEZE button again or press RETURN button.

POWER

MENU / EXIT

3

 LEFT /

KEYSTONE -

AUTO

ZOOM IN

RETURN

PIP POSITION

FREEZE

BLANK

ZOOM OUT

UP

4

 RIGHT / 

KE

PIP SOURCE

DOWN

SOURCE

Summary of Contents for RD-JT51

Page 1: ...the device Save this user s guide for future reference OUTLINE This DLPTM Projector can display various computer signals and NTSC PAL SECAM video signals FEATURES 1 High Brightness 2 High Resolution 3 Compact Size Feather Weight for Portability 4 RGB Input Terminal 5 One Touch Auto Adjustment Function 6 Easy Keystone Adjustment ...

Page 2: ...ise without the prior written permission of the company Disclaimer The company makes no representations or warranties either expressed or implied with respect to the contents hereof and specifically disclaims any warranties merchantability or fitness for any particular purpose Furthermore the company reserves the right to revise this publication and to make changes from time to time in the content...

Page 3: ...7 Remote Control Functions 7 Installing or Replacing Batteries 9 Installation 10 Display Size 10 Connecting to Various Equipment 12 Operation 13 Start Up 13 Digital Keystone Correction 14 Auto Adjustment 14 Source Selection 15 Blank 15 Menu System 16 1 Display Menu 17 2 Image Menu 18 3 Source Menu 19 4 Control Menu 20 5 PIP Menu 21 Shutdown 22 Maintenance 23 Lamp Information 23 Use and Replacement...

Page 4: ...blems Solutions 25 Status Messages 26 Specifications 27 Projector Specifications 27 Timing Chart 28 Suppoted timing for Analog RGB input 28 Supported timing for YPbPr input 28 Supported timing for Video and S Video inputs 29 Dimensions 30 ...

Page 5: ...plode on rare occasions 3 Never replace the lamp assembly or any electronic components unless the projector is unplugged 4 To reduce the risk of electric shock do not disassemble this appliance Take it to a qualified technician when service or repair is required Incorrect reassembly can cause electric shock when the appliance is subsequently used 5 Do not place this product on an unstable cart sta...

Page 6: ...tatement CLASS B This equipment generates uses and can radiate radio frequency energy and if not installed and used in accordance with the instructions may cause harmful interference to radio communications However there is no guarantee that interference will not occur in a particular installation If this equipment does cause harmful interference to radio or television reception which can be deter...

Page 7: ...n below If any of these items are missing please contact personnel at the place of purchase Optional Accessories 1 200W lamp module 2 Macintosh adapter 3 Ceiling mount kit 4 Deluxe soft carry case 5 HDTV cable YPbPr TOSHIBA LITHIUM BATTERY CR2025 3v JAPAN Projector User s Guide Quick Start Guide Remote Control Video Cable VGA Cable 3 2 Converter S A India Power Cord 240V 110V S Video Cable Battery...

Page 8: ...nal input S Video connector Video connector Main power switch AC power cord inlet IR remote sensor Projection lens adjuster External control panel see External Control Panel on page 5 for more detailed information Projection lens Front adjuster foot Ventilation grill IR remote sensor Lamp door Rear adjuster foot ...

Page 9: ... the projector 5 MENU EXIT Brings the OSD menu or leaves the OSD menu 6 SOURCE Selects signal sources from among Analog RGB YPbPr S Video and Composite Video 7 AUTO Automatically determines the suitable frequency and clock for current received signals The auto adjustment function will not affect the current brightness and colors settings 8 BLANK Uses BLANK to hide the screen image You can press BL...

Page 10: ...ability and ease of use The projector offers the following features Small and light for portability High quality manual zoom lens One key auto adjustment to display the best picture quality Digital keystone correction to correct distorted images Adjustable color balance control for data video display Ultra high brightness projection lamp Ability to display 16 7 million colors On screen menus in 8 ...

Page 11: ...or more information 2 3 LEFT KEYSTONE 4 RIGHT KEYSTONE Whe the OSD menu is activated the buttons function as 3 Left 4 Right For the rest of time the buttons function as Keystone Keystone 3 FREEZE The image can be frozen when FREEZE is pressed A Pause icon will appear in the lower right corner of the screen To release the freeze function press the FREEZE button again or press RETURN button POWER ME...

Page 12: ... is further reduced until it is restored to its original size To return to the normal display mode press the RETURN button This function can be used in combination with FREEZE 5 PIP SOURCE User can activate PIP and select the source between S Video and Video while the input source is Analog RGB The PIP source changes in the order of S Video Video and off 6 PIP POSITION While PIP is activated you c...

Page 13: ...ion if batteries are incorrectly replaced Replace only with the same or equivalent type recommended by the manufacturer Dispose of used batteries according to the manufacturer s instructions 1 Use a pointy sided stick to release the barttery tray Pull the tray off 2 Install or replace a battery 3 Snap the battery tray back into place ...

Page 14: ...4 79 57 5 2 200 0 98 97 8 1 20 119 8 10 120 4 89 58 7 5 99 71 9 2 5 250 1 22 122 3 1 50 149 7 12 144 5 87 70 4 7 19 86 2 3 300 1 47 146 7 1 80 179 7 14 168 6 85 82 2 8 39 100 6 3 5 350 1 71 171 2 2 10 209 6 16 192 7 83 93 9 9 58 115 0 4 400 1 96 195 7 2 40 239 6 18 216 8 80 105 7 10 78 129 4 4 5 450 2 20 220 1 2 70 269 5 20 240 9 78 117 4 11 98 143 7 5 500 2 45 244 6 2 99 299 5 22 264 10 76 129 1 ...

Page 15: ...2 2 200 0 90 90 1 1 10 110 0 10 120 4 51 54 1 7 00 84 0 2 5 250 1 13 112 7 1 37 137 5 12 144 5 41 64 9 8 40 100 8 3 300 1 35 135 2 1 65 164 9 14 168 6 31 75 7 9 80 117 6 3 5 350 1 58 157 7 1 92 192 4 16 192 7 21 86 5 11 20 134 4 4 400 1 80 180 3 2 20 219 9 18 216 8 11 97 3 12 60 151 2 4 5 450 2 03 202 8 2 47 247 4 20 240 9 01 108 2 14 00 167 9 5 500 2 25 225 3 2 75 274 9 22 264 9 91 119 0 15 39 18...

Page 16: ... following standards are supported in the HDTV function Please refer to Menu System on page 16 for information on the HDTV YPbPr OSD selections Connecting to Various Equipment It only takes a few seconds to connect your projector to your desktop or notebook computer VCR or other systems However a Mac adapter an optional accessory is needed for connection to Macintosh computers Notebook Computer Ma...

Page 17: ...old POWER to start the unit The Power Indicator flashes green and stays green when the power is turned on When the power is turned off there is a 90 second cooling period before the projector can be re started 4 Switch on all connected equipment 110V 220V AUTO BLANK SOURCE KEYSTONE KEYSTONE POWER MENU EXIT Projector Remote Control ...

Page 18: ...e Press 4 to correct keystoning at the bottom of the image Auto Adjustment In some cases you may need to optimize the picture quality To do this press the AUTO key on the control panel of the projector or on the remote control The built in Intelligent Auto Adjustment function will re adjust settings to provide the best picture quality This function is available only in Analog RGB mode AUTO BLANK S...

Page 19: ...ecause Analog RGB and YPbPr inputs share the same terminal in the back of the projector there s only one signal can be applied at one time Blank Uses BLANK to hide the screen image and press BLANK again or RETURN to bring the image back AUTO BLANK SOURCE KEYSTONE KEYSTONE POWER MENU EXIT Projector Remote control AUTO BLANK SOURCE KEYSTONE KEYSTONE POWER MENU EXIT Projector Remote control ...

Page 20: ...H Position V Position Color Temp Information Mirror Source Source Scan Blank Time Auto Off Language OSD Pos OSD Time Economic Mode Reset Lamp Hour Main Page PIP Source PIP Size PIP Pos H Position V Position More Options Sub Page Brightness Contrast Color Tint Sharpness System Y Pb Pr 480p 576p 720p 1080i Aspect Ratio Color Tint Color Temp Y Pb Pr 480i 576i Keystone Brightness Contrast Aspect Ratio...

Page 21: ...ailable when the input mode is Video S Video or YPbPr 480i 576i H Size Adjusts to fit in the desired image size This function is not available when the input mode is Video S Video or YPbPr 480i 576i Color Increases or decreases the color range R G B of the image This function is not available when the input mode is Analog RGB or YPbPr Tint Adjusts the image to make it appear more red or green This...

Page 22: ...hen the input mode is Analog RGB Color Temp Adjusts the color temperature to fit your preference Information Shows the current resolution System System information will be shown 1 NTSC 2 PAL 3 SECAM The input System cannot be changed by selection Sharpness Adjusts the image to make it look sharper or softer This function is not available when the input mode is Analog RGB or YPbPr Color Increases o...

Page 23: ...ivated and the projector starts to scan in the order of Analog RGB YPbPr S Video and Video when there is no signal detected When selecting OFF the projector only detects the last input source Blank Time Determines the length of time before the projector is shut off when Blank is activated Auto Off Sets the length of time before the system is shut off when no input is detected 1 Default 3 Rear scre...

Page 24: ... Korean Traditional Chinese and Simplified Chinese OSD Pos Selects a desired OSD position OSD Time Sets the length of time the OSD will remain active after the last time you pressed the button The range is from 5 to 60 seconds in 5 second increments Economic Mode Selects Economic mode to lower brightness and extend the lamp life Reset Returns all settings to their factory preset values Lamp Hour S...

Page 25: ... image V Position Adjusts the vertical position of the PIP image More Options Enables use of the 3 4 key to select more PIP functions including Brightness Contrast Color Tint Sharpness and System Brightness Adjusts the brightness of the PIP image Contrast Adjusts the degree of difference between dark and light for the PIP image Color Increases or decreases the color range R G B of the image Tint A...

Page 26: ...ned off there is a 90 second cooling period before the projector can be re started 4 Disconnect the power cord from the wall socket Caution Please do not unplug the power cord before POWER is shut down or during the 90 second cooling process If the projector is not properly shut down to protect the lamp the system will detect this and cool the lamp for 90 seconds automati cally before turning on a...

Page 27: ...TURN OFF THE PROJECTOR AND PULL OUT THE CORD FROM THE RECEPTACLE BEFORE REPLACING THE LAMP WAIT UNTIL THE LAMP BECOMES COOL MINIMUM 45 MINUTES TOUCHING THE LAMP WHEN IT IS HOT MAY CAUSE A BURN ON YOUR HAND A HIGH PRESSURE LAMP WHICH WHEN HOT MAY EXPLODE IF IMPROPERLY HANDLED To reduce the risk of injuries to fingers and damage to internal compo nents use caution when removing lamp glass that has s...

Page 28: ...reen for 30 seconds Red The lamp has been in operation for over 2000 hours The OSD message OUT OF LAMP USAGE TIME CHANGE THE LAMP will be displayed on the screen for 30 seconds Blinking Red Something is wrong with the lamp power supply Please turn off the projector within 3 seconds Temperature Indicator Red The internal temperature of the projector is too hot When the temperature inside the projec...

Page 29: ...roperly Adjust the brightness and contrast Remove the lens cap TRAPEZOID IMAGE ON THE SCREEN Try these solutions Reposition the unit to improve its angle on the screen Use the KEYSTONE correction key on the control panel of the projector or the remote control unit POOR COLOR Try these solutions Select the correct video system Adjust brightness contrast or color BLURRED IMAGE Try these solutions Pr...

Page 30: ...creen Messages Description SEARCHING Projector is searching for input ACQUIRING SIGNAL Projector has identified the input signal and is running the auto image adjustment function OUT OF RANGE Input signal frequency exceeds the projector s range LAMP WARNING CHANGE LAMP AND RESET LAMP TIMER The lamp has been in operation for 1900 hours Install a new lamp for optimal performance OUT OF LAMP USAGE TI...

Page 31: ...ens F Number F 2 6 Lamp 200W NSH lamp Electrical Power supply AC100 240V 3 2A 50 60 Hz Automatic Power consumption 285W Max Mechanical Dimensions 302 3 mm W x 91 7 mm H x 216 3 mm D Operating temperature range 0 C 40 C Weight 6 6 lbs 3 0 Kg Input terminal Computer input D SUB IN D sub 15 pin female Video signal input S VIDEO Mini DIN 4 pin port x1 VIDEO RCA jack x1 HDTV signal input D sub YPbPr RC...

Page 32: ...0 49 500 SVGA_75 53 674 85 061 56 250 SVGA_85 832x624 49 725 74 550 57 283 MAC16 1024x768 35 522 86 957 44 900 XGA_43i 48 363 60 004 65 000 XGA_60 56 476 70 069 75 000 XGA_70 60 023 75 029 78 750 XGA_75 68 667 84 997 94 500 XGA_85 60 134 74 700 79 857 MAC19 1152x864 67 500 75 000 108 000 SXGA1_75 1280x960 60 000 60 000 108 000 QuadVGA_60 1280x1024 63 981 60 020 108 000 SXGA3_60 Signal Format Horiz...

Page 33: ...ideo and S Video inputs Video mode Horizontal Frequency kHz Vertical Frequency Hz Pixel Frequency MHz NTSC 15 73 60 3 58 PAL 15 63 50 4 43 SECAM 15 63 50 4 25 or 4 41 PAL M 15 73 60 3 58 PAL N 15 63 50 3 58 PAL 60 15 73 60 4 43 NTSC4 43 15 73 60 4 43 ...

Page 34: ...30 DLP Personal Projector DIMENSIONS Unit mm AUTO BLANK SOURCE KEYSTONE KEYSTONE POWER 302 3mm 91 7mm 216 3mm MENU EXIT A A A ...

Reviews: