Maintenance and Service
Ownerʼs Manual
11
ENGLISH
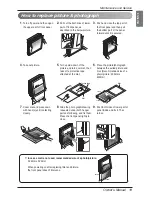
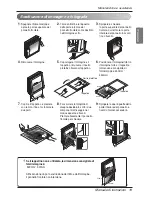
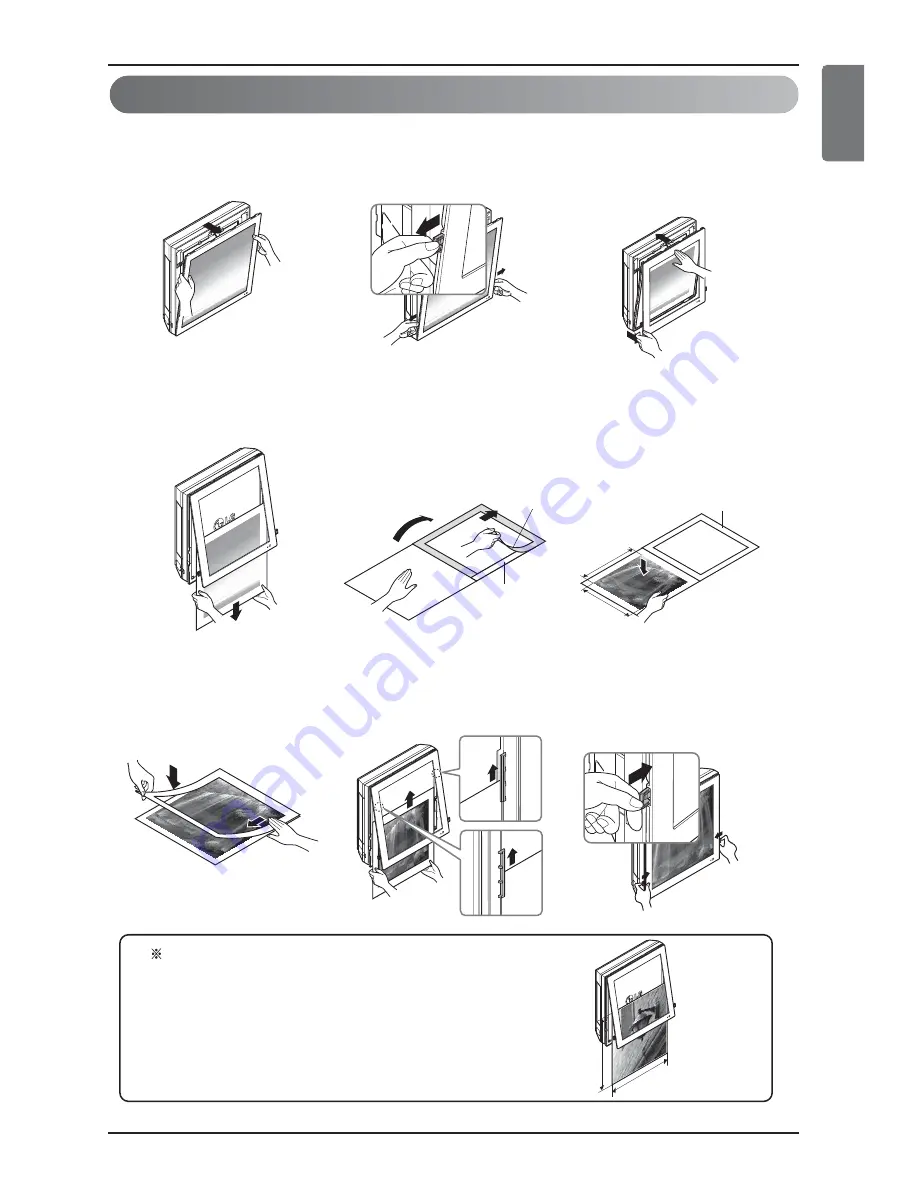
How to replace picture & photograph
1
.
Turn off power and then open
the upper part of front panel.
2
.
Pull out the both links of lower
part of front panel, as
described in the below picture.
3
.
Push and close the top part of
the front panel and then pull
the bottom part of the panel
forward until it is secured.
4
.
Take out picture.
5
.
Turn upside-down of the
picture and turn over mat, then
take off a protective tape
attached at the mat.
6
.
Place the picture/photograph
between the exited picture and
mat. (Recommended size of a
photo/picture: 450mm x
450mm)
7
.
Cover mat and press down
with hand(s) until contacting
closely.
8
.
Slide the photo graph/drawing
requested under both hanger
parts as following, and fix them.
Press the front panel lightly to
close.
9
.
Push both links of lower part of
panel inside and fix it. Then
turn on.
In case a mat is not used, recommended size of a photo/picture:
522mm x 522mm
When powering on after replacing filter and picture,
the front panel doesn't intervene.
Mat
450mm
450mm
522mm
522mm
Mat
Protective tape
Summary of Contents for PQRCVSL0
Page 14: ...14 Indoor Unit ...
Page 28: ...14 Unità interna ...
Page 42: ...14 Unidad interior ...
Page 56: ...14 Unité Interieure ...
Page 70: ...14 Inneneinheit ...
Page 71: ...ΕΛΛΗΝΙΚΆ Δ Ô ÂÈÚ Art Cool Gallery ...
Page 84: ...14 ÛˆÙÂÚÈÎ ÌfiÓ ...
Page 98: ...14 Unidade Interna ...
Page 112: ...14 Binnenelement ...
Page 126: ...14 Jednostka wewnętrzna ...
Page 140: ...14 beltéri egység ...
Page 154: ...14 Vnitřní jednotka ...
Page 168: ...14 Unitatea interioară ...
Page 182: ...14 Вътрешен модул ...
Page 196: ...14 unutrašnja jedinica ...
Page 210: ...14 Unutarnja jedinica ...
Page 224: ...14 Inomhusenhet ...
Page 238: ...14 ÇÌÛÚ ÂÌÌËÈ Â Ú ...
Page 239: ......

