background image

4

EN

Stacking Pedestal

Before Installation

•  If the washer or combo was previously 

installed, unplug it, disconnect the inlet hose(s)
from the faucet(s), disconnect the drain hose, 
and drain all hoses.

•  If dryer was previously installed, uninstall it as 

follows:


Uninstalling an electric dryer: 

1) Unplug the power supply cord. 

2) Pull the dryer away from the wall enough 

to loosen the vent clamp. Loosen the clamp 

and carefully remove the exhaust vent from 

the dryer exhaust outlet.


Uninstalling a gas dryer: 

1) Unplug the power supply cord, 

2) Turn off the gas supply. 

3)Pull the dryer away from the wall enough to 

loosen the vent clamp. Loosen the clamp and 

carefully remove the exhaust vent from the 

dryer exhaust outlet.

How to Stack

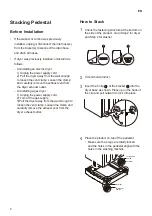
Check the fastening structure at the bottom on 

the side of the product. Go to Step 2 for dryer 

and Step 4 for washer.

Tilt and hold product.

Insert the T-clip 

a

 of the bracket 

b

 into the 

dryer base as shown. Press up on the back of 

the clip and pull outward to lock into place.

Place the product on top of the pedestal.

•  Make sure the 4 legs are totally locked 

and the holes in the pedestal align with the 

holes in the washing machine.

for washer/

combo
for dryer

for dryer

for washer/

combo

Summary of Contents for PEDESTAL WDPS1 Series

Page 1: ...1 INSTALLATION INSTRUCTIONS PEDESTAL Before beginning installation read these instructions carefully This will simplify installation and ensure that the product is installed correctly and safely Leave these instructions near the product after installation for future reference ENGLISH WDPS1 ...

Page 2: ...t the failure to follow the instructions can cause serious injury or death CAUTION This indicates that the failure to follow the instructions can cause minor injury or damage to the product WARNING WARNING To reduce the risk of explosion fire death electric shock injury or scalding to persons when using this product follow basic precautions including the following This appliance should only be ins...

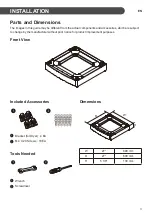
Page 3: ...subject to change by the manufacturer without prior notice for product improvement purposes Front View Included Accessories a a Bracket for Dryer 4 EA Bracket for Dryer 4 EA b b M 4 X 20 Screws 18 EA M 4 X 20 Screws 18 EA Tools Needed a a Wrench Wrench b b Screwdriver Screwdriver Dimensions D W H W 27 690 mm D 27 690 mm H 5 1 8 130 mm ...

Page 4: ...he power supply cord 2 Turn off the gas supply 3 Pull the dryer away from the wall enough to loosen the vent clamp Loosen the clamp and carefully remove the exhaust vent from the dryer exhaust outlet How to Stack 1 Check the fastening structure at the bottom on the side of the product Go to Step 2 for dryer and Step 4 for washer 2 Tilt and hold product 3 Insert the T clip a of the bracket b into t...

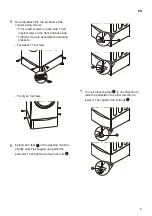
Page 5: ... screws to assemble the stacking brackets For washer 16 screws For dryer 8 screws 6 Extend all 4 feet a of the washing machine slightly until it is snugged up against the pedestal Then tighten the four lock nuts b 540 540 180 7 Turn all 4 leveling feet a in one direction to raise the pedestal or the other direction to lower it Then tighten the locknuts b ...

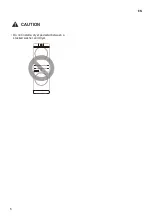
Page 6: ...6 EN CAUTION Do not install a dryer pedestal between a stacked washer and dryer ...

Page 7: ...N HOW LONG AN IMPLIED WARRANTY LASTS OR THE EXCLUSION OF INCIDENTAL OR CONSEQUENTIAL DAMAGES SO THE ABOVE LIMITATIONS OR EXCLUSIONS MAY NOT APPLY TO YOU THIS LIMITED WARRANTY DOES NOT APPLY TO 1 Service trips to your home to deliver pick up and or install the product instruct or replace house fuses or correct wiring or correction of unauthorized repairs and 2 Damages or operating problems that res...

Page 8: ......

Reviews: