background image

- 9 -

LEARN ABOUT YOUR MICROWAVE OVEN

This section discusses the concepts behind microwave cooking and introduces you to the basics you need to
know to operate your microwave oven. Please read this information before use.

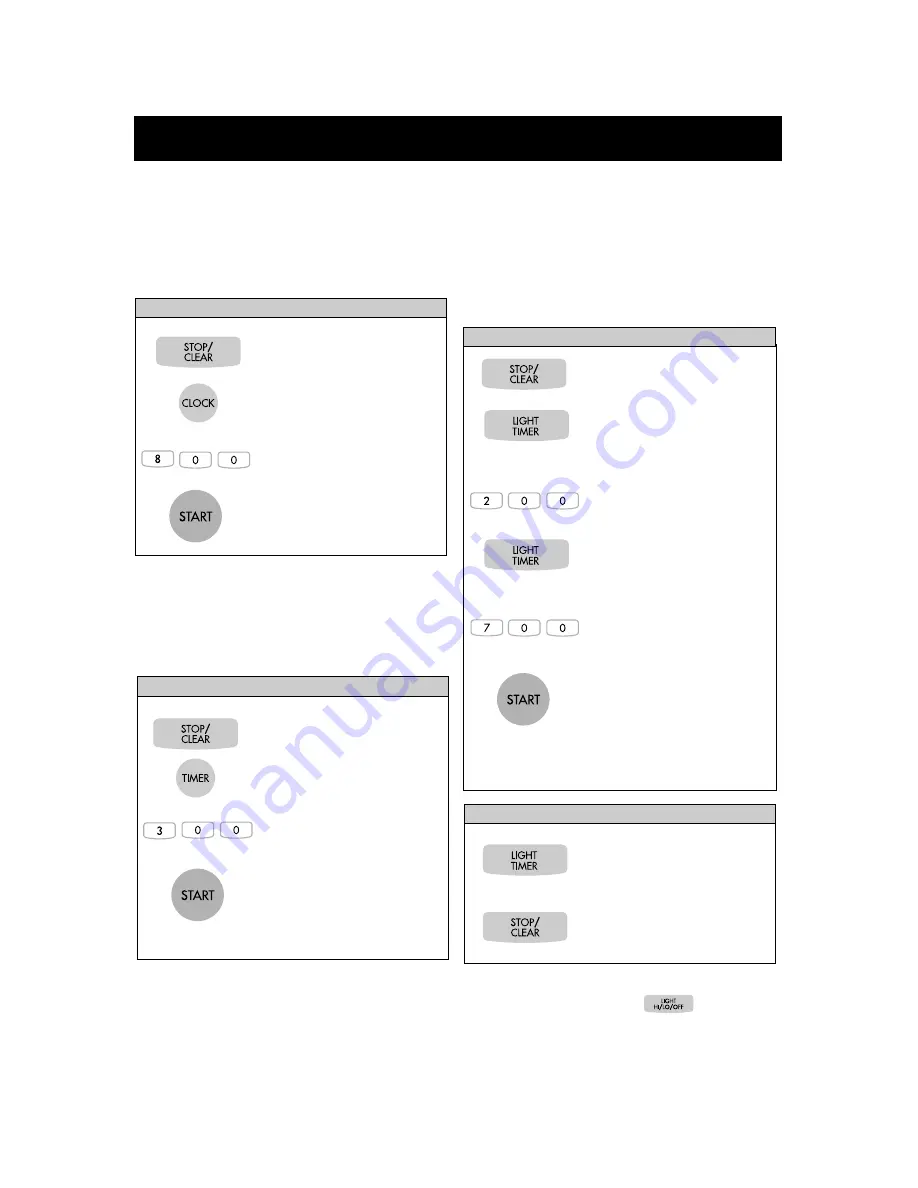
CLOCK (TIME OF DAY)

This oven includes a 24 hour clock. 

LIGHT TIMER

You can set the LIGHT to turn on and off automatically
at any time you want. The light comes on at the same
time every day until reset.

OPERATION

1. Touch STOP/CLEAR.

2. Touch CLOCK.

(Press once for AM,
twice for PM.)

3. Enter the time by using the

number key pad. 

4. Touch START.

Example: To set 8:00 AM.

1. Touch STOP/CLEAR.

2. Touch LIGHT TIMER.

(Press once for AM, 
twice for PM.)

3. Enter the time you want the

LIGHT to turn on.

4. Touch LIGHT TIMER again.

(Press once for AM, 
twice for PM.)

5. Enter the time you want the

LIGHT to turn off.

6. Touch START.

Example: Turn on 2:00 AM, turn off 7:00 AM.

1. Touch LIGHT TIMER.

2. Touch STOP/CLEAR.

NOTE: To reset that time to turn on and off the
LIGHT, repeat steps 2 to 6.

NOTE: If you want to cancel the LIGHT TIMER in
operation, you should touch                 key.

Example: To cancel the LIGHT TIMER.

1. Touch STOP/CLEAR.

2. Touch TIMER.

3. Enter the time by using the

number key pad. 

4. Touch START.

When the time is over, you
will hear seven beeps and
END will display.

Example: To count 3 minutes.

TIMER

You can use your microwave oven as a timer. Use the
Timer for timing up to 99 minutes, 99 seconds.

Summary of Contents for MV-1560T

Page 1: ...28W5A1970 Printed in Korea MV 1560T MV 1561T MICROWAVE OVEN OWNER S MANUAL PLEASE READ THIS OWNER S MANUAL THOROUGHLY BEFORE OPERATING website http www lgservice com e mail http www lgeservice com techsup html ...

Page 2: ...0 Help 11 Custom cook 11 Hold Warm 11 Ez On 11 More Less 12 Cooking at Lower Power Levels 12 Cooking at High Cook Power 12 Auto touch cook 12 Cooking Guide for Lower Power Levels 13 Auto Touch Cook Chart 14 Auto Defrost 15 Defrosting Tips 15 Auto Defrost Chart 16 Tow position metal rack 17 COOKING 18 Getting the Best Cooking Results 18 Fish Shellfish 18 Appetizers Sauces Soups 19 Meat 19 Poultry 2...

Page 3: ...in safety switches on the oven door The oven has several built in safety switches to make sure the power is off when the door is open If your oven is dropped or damaged have it thoroughly checked by a qualified service technician before using it again To avoid a fire hazard Do not severely overcook food Severely overcooked foods can starts a fire in the oven Watch the oven carefully especially if ...

Page 4: ...n Do not attempt home canning in your microwave oven Do not heat the following items in the microwave oven whole eggs in the shell water with oil or fat sealed containers or closed glass jars These items may explode Do not use this oven for commercial purposes It is made for household use only Do not cover or block any openings in the oven Do not run the oven empty without food in it Do not allow ...

Page 5: ...for the electric current The cord for this appliance has a grounding wire with a grounding plug Put the plug into an outlet that is properly installed and grounded WARNING If you use the grounding plug improperly you risk electric shock Ask a qualified electrician if you do not understand the grounding instructions or if you wonder whether the appliance is properly grounded Because this appliance ...

Page 6: ... Door Handle Window with Metal Shield Model and Serial Number Plate Glass Turntable Cooking Guide Vent Grille Oven Control Panel Cooktop Countertop Light Grease Filter Door Safety Lock System Two Position Metal Rack INFORMATION ...

Page 7: ... 7 OVEN CONTROL PANEL 1 2 11 6 3 15 20 7 8 14 17 19 5 12 18 4 9 10 13 16 21 INFORMATION ...

Page 8: ...programmed into memory See page 11 for more information 12 CUSTOM SET Touch this pad to change the oven s default settings for sound clock display speed defrost weight and demo mode operations See page 10 for more information 13 HELP touch this pad to learn how to use each oven function See page 11 for more information 14 HOLD WARM Touch this pad to keep hot cooked foods safely warm in your microw...

Page 9: ...STOP CLEAR 2 Touch LIGHT TIMER Press once for AM twice for PM 3 Enter the time you want the LIGHT to turn on 4 Touch LIGHT TIMER again Press once for AM twice for PM 5 Enter the time you want the LIGHT to turn off 6 Touch START Example Turn on 2 00 AM turn off 7 00 AM 1 Touch LIGHT TIMER 2 Touch STOP CLEAR NOTE To reset that time to turn on and off the LIGHT repeat steps 2 to 6 NOTE If you want to...

Page 10: ...ht light twice for night light or three times to turn the light off CUSTOM SET You can change the default values for beep sound clock display speed defrost weight and demo mode operations See following chart for more information 1 Touch STOP CLEAR 2 Touch and hold 0 more than 4 seconds LOCKED will appear in the display window with two beeps To set the child lock 1 Touch STOP CLEAR 2 Touch CUSTOM S...

Page 11: ... custom cook HOLD WARM You can safely keep hot cooked food warm in your microwave oven for up to 99 minutes 99 seconds You can use HOLD WARM by itself or to follow a cooking cycle automatically 1 Touch STOP CLEAR 2 Touch HOLD WARM 3 Touch START Example To use the hold warm 1 Touch STOP CLEAR 2 Touch Ez On twice Example To cook for 2 minutes NOTES HOLD WARM operates for up to 99 minutes 99 seconds ...

Page 12: ...en let you microwave oven cook your selections For more information see the Auto Touch Cook Chart on page 14 1 Touch STOP CLEAR Place popcorn in the oven and close the door 2 Touch POPCORN one time for 1 75 oz two times for 3 0 oz three times for 3 5 oz The oven begins the cooking you selected without the need to touch START Be sure to case the door before selecting categories Example To cook POPC...

Page 13: ...ib roast sirloin roast Cook less tender cuts of meat Reheat frozen convenience foods Thawing meat poultry and seafood Cooking small quantities of food Finish cooking casserole stew and some sauces Soften butter and cream cheese Heating small amounts of food Soften ice cream Raise yeast dough Standing time 10 HIGH 9 8 7 6 5 4 3 2 1 0 100 90 80 70 60 50 40 30 20 10 COOKING GUIDE FOR LOWER POWER LEVE...

Page 14: ...o adjust depend on size of slice and what toppings Place on paper towel Cover Use MORE LESS to adjust the desired doneness Before baking pierce potato with fork several times After baking let stand for 5minutes Cover with plastic wrap vented After cooking let stand for 2 minutes Follow the package directions Example of one frozen entree is Lasagna with meat sauce chicken with rice and sliced turke...

Page 15: ...s leg tips and fish tails but the foil must not touch the side of the oven Foil can damage the oven lining Shield areas of food with small pieces of foil if they start to become warm For better results a preset standing time is included in the defrosting time NUMBER AFTER DECIMAL EQUIVALENT OUNCE WEIGHT 10 20 25 30 40 50 60 70 75 80 90 1 00 1 6 3 2 4 0 4 8 6 4 8 0 9 6 11 2 12 0 12 8 14 4 16 0 One ...

Page 16: ... Turn over and rearrange Cover head and tail with foil Turn over Separate fillets when partially thawed if possible Rearrange and break apart Turn over and rearrange Turn over and rearrange GROUND MEAT POULTRY STEAKS CHOPS BEEF Ground beef Cubes for stew Hamburger patties Pot roast Rib roast Rump roast Check roast PORK Bacon Hot Dogs Sausage Links Sausage Patties Ribs Roast LAMB Ribs Roasts POULTR...

Page 17: ...e metal rack can be turned upside down to help fit taller containers on the bottom of the oven NOTE Rack must be on 4 supports when used Insert the rack securely into the four supports on the side walls of the oven Turn the rack upside down when using taller containers on the bottom of the oven WARNING DO NOT RUN THE OVEN EMPTY WITHOUT FOOD IN IT ...

Page 18: ...n the density and surface area of the food Wrapping in waxed paper or paper towel Sandwiches and many other foods containing prebaked bread should be wrapped prior to microwaving to prevent drying out Fish Shellfish Cooking Fish and Shellfish General Directions Prepare the fish for cooking Completely defrost the fish or shellfish Arrange unevenly shaped pieces with thicker parts toward the outside...

Page 19: ...e oven but will not come out crisp Cook sauces made with cornstarch or flour uncovered so you may stir them 2 or 3 times during cooking for a smooth consistency To adapt a conventional sauce or gravy recipe reduce the amount of liquid slightly Stirring occasionally will help blend flavors distribute heat evenly and may even shorten the cooking time When converting a conventional soup recipe to coo...

Page 20: ...ver halfway through cooking Let stand covered 5 minutes Temperature may rise about 10 F Place roast in cooking bag in microwavable dish Add seasonings and browning agent if desired Close bag loosely with microwavable closure or string After cooking let stand in bag 15 minutes Temperature may rise about 10 F Internal temperature of pork should reach 170 F before serving Pierce links and place on mi...

Page 21: ...a single layer in a microwavable baking dish with thicker pieces to the outside Brush with butter or browning agent and seasonings if desired Cover with waxed paper Cook until no longer pink and juices run clear Let stand covered 5 minutes Before cooking wash and shake off water Place breast side down on a microwavable roast rack Brush with butter or browning agent and seasoning if desired Cover w...

Page 22: ...sired Use a 2 quart microwavable baking dish and cover with vented plastic wrap for spaghetti and lasagna noodles Use microwavable lid or vented plastic wrap for macaroni and egg noodles Cook at Power Level HI as directed in chart or until water boils Stir in pasta cook covered at Power Level 5 as directed in chart or until tender Drain in a colander POWER LEVEL COOKING TIME DIRECTIONS Rice Cookin...

Page 23: ...rease filters slide each filter to the side Pull filters downward and push to the other side The filter will drop out 2 Soak grease filters in hot water and a mild detergent Rinse well and shake to dry Do not use ammonia or place in a dishwasher The aluminum will darken 3 To reinstall the filters slide it into the side slot then push up and toward oven center to lock NOTE Do not operate the hood w...

Page 24: ...allow metal to touch walls or door Q Sometimes the door of my microwave oven appears wavy Is this normal A This appearance is normal and does not affect the operation of your oven Q What are the humming noises that I hear when my microwave oven is operating A You hear the sound of the transformer when the magnetron tube cycles on and off Q Why does the dish become hot when I microwave food in it I...

Page 25: ...produces uneven cooking Also avoid metal skewers thermometers or foil trays Metal utensils can cause arcing which can damage your microwave oven METAL DECORATION Metal trimmed or metal banded dinnerware casserole dishes etc The metal trim interferes with normal cooking and may damage the oven ALUMINUM FOIL Avoid large sheets of aluminum foil because they hinder cooking and may cause harmful arcing...

Page 26: ...ay clock does not always keep correct time check that the power cord is fully inserted into the outlet receptacle be sure the oven is the only appliance on the electrical circuit If food cooks unevenly be sure food is evenly shaped be sure food is completely defrosted before cooking check placement of aluminum strips used to prevent overcooking If food is undercooked check recipe to be sure all di...

Page 27: ...perature probe Do not operate with oven empty Time of day incorrect Reset time of day Probe Light Flashes Is temperature probe properly plugged in Unevenly Cooked Foods Use approved cookware only Turn or stir food Completely defrost food Overcooked Foods Properly position temperature probe Use correct time Power level setting Use correct temp setting Undercooked Foods Use approved cookware only Pr...

Page 28: ... TECH 5310 89 ST T6E 5P9 403 468 5856 A1 A2 A3 A4 B1 B3 C1 E1 GRAND CENTRE CENTRE TV AND APPLIANCE SERV 5804 50TH AVE T0A 1T1 403 594 2425 A1 A2 A3 A4 B1 B3 B5 C1 GRANDE PRAIRIE G P ELECTRONICS SERVICE 10702 100TH STREET T8V 3X8 403 539 4240 A1 A2 A3 A4 B1 B3 B5 C1 GRANDE PRAIRIE T V KORNER 9827 97TH AVE T8V 0M9 403 539 4805 A1 A2 A3 A4 B1 B2 B3 B5 C1 C2 E1 PEERS KARLS TV SERVICE C 2 SITE 19 RR1 T...

Page 29: ...T SHOP 3147 PORTAGE AVE R3K 0W4 204 831 0862 A1 A2 A3 B1 B2 B3 E1 Z1 PORT RERRY PICTURE PERFECT TV SERVICE 72 WATER STREET L9L 1J2 905 985 9500 A1 A2 A3 A4 B1 B2 B3 E1 Z1 RICHMOND HILL ONE STDP ELECTRONICS SERVICE 85 WEST WILMOT ST 7 L4B 1K7 905 882 0700 F1 SARNIA DUAL ELECTRONICS 153 MITTON STREET NORTH N7T 6G9 519 344 2323 A1 A2 A3 A4 B1 B2 B3 E1 E5 Z1 SARNIA KEELANS SERVICE CENTRE 190 MAXWELL S...

Page 30: ...B2 B3 B4 E1 E5 MT ROYAL WESTMDNTREAL SOLACMAR INC 5785 PARE STREET H4P 1S1 514 341 1431 A1 A2 A3 A4 B1 B2 B3 E1 E5 QUEBEC ASTRO SERVICE ELECTRON IOUE 2665 BOUL PERE LELIEVRE G1P 2X9 418 687 2787 A1 A2 A3 B1 B2 B3 B5 C1 E1 E5 QUEBEC AUDYO EEAUDOIN TV INC 670 BOUVIER SUITE 108 G2J 1A7 418 623 8960 A1 A2 A3 A4 B1 B2 B3 C1 C2 E1 E5 REPENTIGNY ATELIERS G PAGUETTE INC 104 LAROCHE J6A 7M5 514 645 6744 A1...

Page 31: ...H ST SUITE A B4V 1W2 902 543 1313 A1 A2 A3 A4 B1 B3 B5 E1 COLDBROOK N B EATON MARKETING LTD 2687 POPLARD DRIVE B4R 1A9 902 679 1852 A1 A2 A3 B1 B2 B3 C1 E1 E5 DARTMOUTH E P BLIGHT 169 MAIN STREET B2X 1S1 902 434 8306 A1 A2 A3 B1 B2 B3 B5 C1 C2 E1 Z1 DARTMOUTH HALIFAX MUNRO ELECTRONIS SERVICE 75 AKERLEY BLVD UNIT J B3B 1R7 902 468 4991 A1 A2 A3 A4 B1 B2 B3 B5 E1 E3 KINGSTON GE KENNEDY ELECTRONIC RE...

Page 32: ... Imprimé en Corée MV 1560T MV 1561T FOUR À MICRO ONDES MANUEL DE L UTILISATEUR LISEZ ATTENTIVEMENT CE MANUEL AVANT DE METTRE L APPAREIL EN MARCHE website http www lgservice com e mail http www lgeservice com techsup html ...

Page 33: ...la lumière 10 Réglage sur mesure 10 Aide 11 Cuisson personnaliseé 11 Garde au chaud 11 Ez on Minute additionnelle 11 Plus Moins 12 Cuisson à puissance minimale 12 Cuisson à puissance èlevee 12 Cuisson automatique 12 Guide de la cuisson à puissance minimale 13 Décongélation automatique 15 Quelques trucs sur la décongélation 15 Tableau de décongélation automatique 16 Grille de métal à deux positions...

Page 34: ...ager les filtres Lorsque vous nettoyez la porte et les surfaces qui la touchent n utilisez qu un savon doux et non abrasif ou des détergents doux et une éponge Ne trafiquez pas les commutateurs de sûreté intégrés dans la porte du four Le four possède plusieurs commutateurs de sûreté servant à mettre l appareil hors circuit lorsque la porte est ouverte Si votre four a été échappé ou endommagé appor...

Page 35: ...Si vous utilisez mal le plat brunisseur vous pourriez endommager le fond du four Préservez la grille de métal Enlevez la grille de métal du four lorsque vous ne l utilisez pas N utilisez pas la grille de métal lorsque le four est vide La grille de métal peut devenir très chaude en cours de cuisson Servez vous de mitaines à four pour la retirer après la cuisson N utilisez pas de papier d aluminium ...

Page 36: ...lternative Cet appareil est muni d un fil adéquat et d une fiche dont l une des broches sert à la mise à la terre La fiche doit être branchée dans une prise bien installée et possédant la mise à la terre MISE EN GARDE Une mauvaise utilisation de la prise avec broche de mise à la terre pourrait présenter un risque de choc électrique Référez vous à un électricien qualifié si vous ne comprenez pas to...

Page 37: ...e Fenêtre avec blindage de métal Plague des numéros de modéle et de série Table tournante Guide de cuisson Grillage d aération Panneau des commandes Lumiére de cuisinière Comptoir Filtre contre les graisses Systéme de verrouillage Sécuritaire de la porte Grille de métal à deux positions ...

Page 38: ...RENSEIGNEMENTS IMPORTANTS 7 PANNEAU DES COMMANDES DU FOUR 1 2 11 6 3 15 20 7 8 14 17 19 5 12 18 4 9 10 13 16 21 ...

Page 39: ...ge de la vitesse de l affichage du poids de la décongélation et du fonctionnement du mode de démonstration Voir à la page 10 pour plus de détails 13 AIDE HELP Appuyez sur cette touche afin d apprendre à connaître chaque fonction du four Référez vous à la page 11 pour plus de détails 14 TOUCHE DE GARDE AU CHAUD HOLD WARM Cette touche sert à conserver la chaleur des aliments dans le four à micro ond...

Page 40: ...s sur AM deux fois sur PM 3 Entrez l heure en utilisant le clavier des touches numériques 4 Appuyez sur START Par exemple Allumer à 2 00 AM éteindre à 7 00 AM 1 Appuyez sur STOP CLEAR 2 Appuyez sur LIGHT TIMER Appuyez une fois pour AM deux fois pour PM 3 Entrez l heure à laquelle vous voulez que la lumière s allume 4 Appuyez de nouveau sur LIGHT TIMER Appuyez une fois pour AM deux fois pour PM 5 E...

Page 41: ... four à micro ondes ne parte automatiquement ou qu il soit utilisé par des enfants RÉGLAGE ÉLEVÉ FAIBLE HORS CIRCUIT DE LA LUMIÉRE Appuyez une fois sur la touche LIGHT pour obtener l éclairage le pous fort deux fois pour la lumière de nuit et trois fois pour l éteindre RÉGLAGE SUR MESURE Vous pouvez changer les valeurs par défaut de la sonorité du bip l horloge la vitesse de l affichage le poids d...

Page 42: ...ez au chaud dans une assiette doivent être recouverts pendant le garde au chaud EZ on MINUTE ADDITIONNELLE La fonction EZ on vous permet de cuire des aliments pendant 1 minute à 100 de la puissance de chauffage ou d ajouter une minute additionnelle au programme de cuisson On peut également utiliser cette touche pour prolonger le temps de cuisson en multiples de 1 minute jusqu à 99 minutes 59 secon...

Page 43: ...Par exemple Ajuster la touche de cuisson à une touche maîs soufflé pour en prolonger la durée 1 Appuyez sur STOP CLEAR 2 Appuyez sur POPCORN une fois 3 Appuyez sur MORE REMARQUE Appuyez sur la touche PLUS MORE ou MOINS LESS pendant le décompte du four Par exemple Cuire des aliments pendant 7 minutes 30 secondes à 70 de sa puissance 1 Appuyez sur STOP CLEAR 2 Entrez la durée de la cuisson 3 Appuyez...

Page 44: ...sauter les oignons céleris et poivrons verts 8 80 Tous les réchauffages Cuire les oeufs brouillés 7 70 Cuire rapidement les produits de céréales Cuire les mets avec fromage le veau Cuire les gâteaux muffins brownies et les petits fours 6 60 Cuire les pâtes 5 50 Cuire les viandes poule entière Cuire la crème anglaise Cuire un poulet entier dinde côtes levées rôti de côtes roisées rôti de surlonge 4...

Page 45: ...son désirée Avant de faire cuire percer la pomme de tette avec une fourchette Après la cuisson laisser reposer 5 minutes Couvrir d une pellicule plastique et taisser une aération Aprés la cuisson laisser reposer 5 minutes Suivre les directives sur l emballage Ex lasagne surgelée avec sauce à la viande poulet et riz poitrine de dinde tranchée avec riz et légumes Utiliser l emballage du maïs à éclat...

Page 46: ...s réduisez le poids de l aliment en programmant le four La forme de l emballage peut affecter la durée de la décongélation Les emballages rectangulaires peu profonds se décongèlent plus rapidement que les blocs épais Séparez les morceaux au fur et à mesure qu ils décongèlent Les morceaux que l on sépare décongèlent plus rapidement Vous pouvez vous servir de petits morceaux de papier d aluminium po...

Page 47: ...urner Retourner Retourner Recouvrir les parties chaudes avec de la feuille d aluminium Retourner Recouvrir les parties chaudes avec de la feuille d aluminium Comme ci dessus Retourner Placer la poitrine vers le bas pour poursuivre la décongélation Recouvrir les parties chaudes avec de la feuille d aluminium Séparer et réarranger les morceaux Retourner Recouvrir les parties chaudes avec de la feuil...

Page 48: ...nvers pour vous aider à mettre des contenants plus grands dans le fond du four REMARQUE Vous devez déposer la grille sur ses 4 supports lorsque vous l utilisez Insérez solidement la grille dans les quatre supports des murs latéraux du four Tournez la grille à l envers afin de pouvoir insérer des plats plus grands MISE EN GARDE Ne faites pad fonctionner le four à vide sans qu il n y ait de nourritu...

Page 49: ...urs résultats de cuisson avec le four à micro ondes lire et observer les directives ci dessous Température de conservation Il faut plus de temps pour cuire un aliment qui sort du réfrigérateur ou du congélateur qu un aliment qui se trouve à la température ambiante Les temps de cuisson indiqués dans cette brochure correspondent à des aliments qui se trouvent á leur température normale de conservati...

Page 50: ...s mais la panure ne sera pas croustillante Cuire une sauce à base de fécule de maïs ou de farine dans un plat non couvert pour pouvoir la remuer 2 ou 3 fois au cours de la cuisson et pour éviter la formation de grumeaux Pour adapter une recette conventionnelle de sauce réduire légèrement la quantité de liquide Remuer occasionnellement pour favoriser le mixage des saveurs et uniformiser la températ...

Page 51: ...etourner les côtelettes au milieu de la période de cuisson Période d attente de 5 minutes après la cuisson sans découvrir La température peut augmenter de 10 F Placer le rôti dans un sac de cuisson dans le plat du four à micro ondes Le cas échéant ajouter l assaisonnement et un produit de brunissage Fermer partiellement le sac avec un cordon ou dispositif compatible avec les micro ondes Prévoir un...

Page 52: ... teinte de la chair ait disparu et que le jus qui s écoule soit limpide Ajouter une période d attente de 5 minutes sans découvrir Avant la cuisson laver et secouer pour éliminer l eau Placer la poitrine vers le bas sur la grille de rôtissage du four à micro ondes Le cas échéant badigeonner avec du beurre ou un agent de brunissage et assaisonner Recouvrir de papier paraffiné Exécuter une période de...

Page 53: ...le de plastique comportant des évents pour les macaronis et les nouilles aux oeufs Chauffer au niveau de puissance maximum HI selon les indications du tableau ou jusqu à l ébullition de l eau Verser les pâtes en remuant poursuivre la cuisson au niveau de puissance 5 selon les indications du tableau ou jusqu à ce que les pâtes soient tendres Drainer l excès de liquide NIVEAU DE PUISSANCE TEMPS DE C...

Page 54: ...s sur le couvercle de la hotte sous le four lavez les dans l évier au moins une fois par mois 1 Pour enlever chacun des filtres glissez les en direction de chaque côté du four Tirez vers le bas et poussez les de l autre côté Les filtre vont tomber 2 Faites tremper les filtres dans l eau chaude et une solution de nettoyage douce Rincez et secouez pour les assécher N utilisez pas d ammoniaque pour n...

Page 55: ... nourriture afin d absorber l énergie des micro ondes Ne laissez jamais le métal toucher à la cavité interne ni à la porte du four Q Parfois la porte du four semble ondulée est ce normal A Cette impression est normale et n affecte en rien le fonctionnement du four Q Quels sont les bourdonnements que j entends pendant que mon four fonctionne A Vous entendez le bruit du transformateur lorsque le tub...

Page 56: ...le métal isole la nourriture des micro ondes ce qui produit une cuisson inégale Évitez d utiliser des broches de métal thermomètres ou plateaux d aluminium Les plats de métal peuvent provoquer un amorçage d arc et endommager votre four à micro ondes LES DÉCORATIONS DE MÉTAL toutes les assiettes et plats de cuisson avec rebords de métal La bordure métallique altère la cuisson et peut endommager le ...

Page 57: ...ans la prise de courant Assurez vous que le four est le seul appareil électrique sur le circuit Si la cuisson des aliments est inégale Assurez vous de disposer les aliments de façon uniforme Les aliments étaient ils complètement décongelés avant la cuisson Vérifiez le placement des morceaux d aluminium utilisés pour empêcher certaines parties de trop cuire Si les aliments ne sont pas assez cuits V...

Page 58: ...Le voyant lumineux de la La sonde n est pas branchée correctement sonde clignote Cuisson inégale des aliments Utilisez les plats de cuisson recommandés Retournez ou brassez les aliments Les aliments n étaient pas complètement décongelés Aliments trop cuits La sonde n est pas insérée au bon endroit Le niveau de puissance et le minutage de la cuisson n étaient pas réglés correctement Le réglage ther...

Reviews: