background image

Operating

13

Operating

3

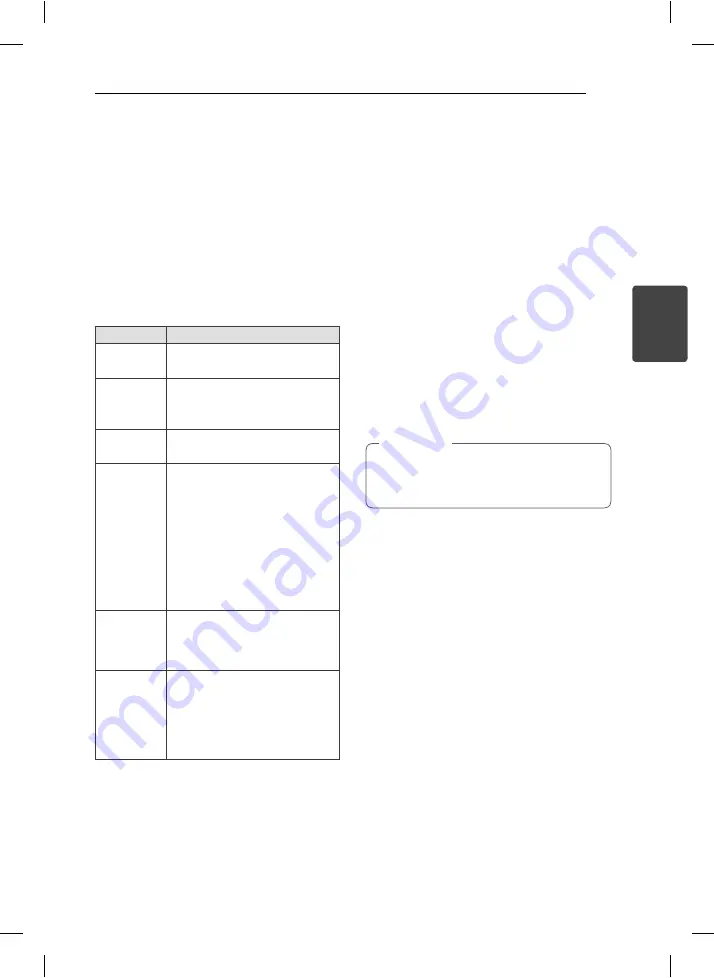
Basic Operations

CD/USB Operations

1.  Insert the disc by pressing 

OPEN/CLOSE

 or 

connect the USB device to the USB port.

2. 

Select the 

CD

 or 

USB

 function by pressing 

FUNCTION

 on the remote control or 

CD

USB

 button on the unit.

3. 

Select the disc by pressing


DISC SKIP

 on 

the unit or 

D.SKIP


on the remote control.

To

Do this

Stop

Press 

Z

 on the remote control 

or 

STOP

 on the unit.

Playback

Press 

d

/

M

 on the remote 

control or 


D


on the 

unit.

Pause

Press 

d

/

M

 on the remote 

control or 

SET/CD 

M

 on the unit.

Skipping to 

the next/ 

previous 

track/ fi le

During playback, press 

Cc

/

vV

 on the remote 

control or 

Y

/

U

 on the unit 

to go to the next track/ fi le or to 
return to the beginning of the 
current track/ fi le. 
Press 

Cc

 on the remote 

control or 

Y

 on the unit twice 

briefl y to step back to the previous 
track/ fi le.

Searching 

for a section 

within a track

Hold 

Y

/

U

 on the unit or 

Cc

/

vV

 on the remote 

control during playback and release 
it at the point you want to listen to.

Playing 

repeatedly or 

randomly

Press 

REPEAT 

on the remote 

control


repeatedly, the display 

change in the following order, 
REPEAT TRK -> REPEAT DIR (only 
MP3/WMA) -> REPEAT CD -> 
REPEAT ALL -> RANDOM -> OFF

Selecting a folder

1. Press 

PRESET/FOLDER 

W

/

S


on the remote 

control repeatedly until a desired folder appears.

2. Press 

d

/

M

 to play it. The fi rst fi le of folder will 

play.

Other Operations

Programmed Playback

The program function enables you to store your 
favorite fi les from any disc or USB device.

A program can contain 20 tracks.

1.  Insert a CD or USB and wait for it to be order.

2. Press

 PROGRAM/MEMO

 on the remote control 

in stop status.

3. Press 

Y

/

U

 on the unit or 

Cc

/

vV

 on the remote control in 

stop status.

4. Press 

PROGRAM/MEMO

 again to save and 

select a next track.

5. Press 

d

/

M

 to play the programmed music fi les.

6.  To clear your selection, press 

STOP 

(

Z

),


PROGRAM/MEMO

 and then 

STOP 

(

Z

).

The programs are also cleared when the disc 
or USB device is removed, the unit is powered 
off  or the function is switched to others.


,

Note

Displaying fi le information 
(ID3 TAG)

While playing an MP3 fi le containing fi le 
information, you can display the information by 
pressing

 INFO

.

Turn off the sound temporarily

Press 

@

MUTE

 to mute your unit.

You can mute your unit, for example, to answer 
the telephone, the “

q

” is displayed in the display 

window.

DEMO

In power off  state to demonstrate the function on 
display window

MCT436-A0U-APERLLK-ENG.indd   13

MCT436-A0U-APERLLK-ENG.indd   13

11. 07. 05   

 9:40

11. 07. 05   

 9:40

Summary of Contents for MCS436F

Page 1: ...OWNER S MANUAL Mini Hi Fi System P NO MFL67233868 Please read this manual carefully before operating your set and retain it for future reference MCT436 A0U APERLLK ENG indd 1 MCT436 A0U APERLLK ENG indd 1 11 07 05 9 40 11 07 05 9 40 ...

Page 2: ... employs a Laser System To ensure proper use of this product please read this owner s manual carefully and retain it for future reference Shall the unit require maintenance contact an authorized service center Use of controls adjustments or the performance of procedures other than those specified herein may result in hazardous radiation exposure To prevent direct exposure to laser beam do not try ...

Page 3: ...ery or the battery put it in the appropriate container at designated collection points Do not dispose of batteries or battery together with other waste It is recommended that you use local free reimbursement systems batteries and accumulators The battery shall not be exposed to excessive heat such as sunshine fire or the like CAUTION The apparatus shall not be exposed to water dripping or splashin...

Page 4: ...ng file information ID3 TAG 13 Turn off the sound temporarily 13 DEMO 14 AUTO DJ playback 14 Setting the Clock 14 Sleep Timer Setting 14 Dimmer 15 Using your player as an alarm clock 15 Radio Operations 15 Listening to the radio 15 Presetting the Radio Stations 16 Deleting all the saved stations 16 Improving poor FM reception 16 Sound adjustment 16 Setting the surround mode 17 Setting the USER EQ ...

Page 5: ...file compatibility with this unit is limited as follows y Sampling Frequency 32 48 kHz MP3 32 48 kHz WMA y Bit rate 32 320 kbps MP3 40 320 kbps WMA y Maximum files Under 999 y File extensions mp3 wma y CD ROM file format ISO9660 JOLIET y We recommend that you use Easy CD Creator which creates an ISO 9660 file system Compatible USB Devices y MP3 Player Flash type MP3 player y USB Flash Drive Device...

Page 6: ...oss back up all data y If you use a USB extension cable or USB hub the USB device is not recognized y Using NTFS file system is not supported Only FAT 16 32 file system is supported y This unit is not supported when the total number of files is 1 000 or more y External HDD Card readers Locked devices or hard type USB devices are not supported y USB port of the unit cannot be connected to PC The un...

Page 7: ...usts speaker volume MUTE Mutes the sound c SLEEP Sets the system to turn off automatically at a specified time Dimmer The display window will be darkening by half INFO Checks information about your music MP3 files often come with tags The tag gives the Title Artist Album or Time information REPEAT Listens to your tracks repeatedly or randomly TUN Selects the radio station Cc vV Skip Search Skips F...

Page 8: ...Getting Started 8 Getting Started 1 Front panel MCT436 A0U APERLLK ENG indd 8 MCT436 A0U APERLLK ENG indd 8 11 07 05 9 40 11 07 05 9 40 ...

Page 9: ... or confirms the setting k AUTO DJ Selects the AUTO DJ mode l OPEN CLOSE m SLEEP Sets the system to turn off automatically at a specified time Dimmer The display window will be darkening by half n CLOCK For setting the clock and checking the time o TIMER Uses your player as an alarm clock p DISC SKIP Chooses a desired CD q STOP r R Record Recording s USB port t Headphone jack A warning that excess...

Page 10: ...Getting Started 10 Getting Started 1 Rear panel a ANTENNA FM AM b AUX IN c Speaker terminal d Cooling fan MCT436 A0U APERLLK ENG indd 10 MCT436 A0U APERLLK ENG indd 10 11 07 05 9 40 11 07 05 9 40 ...

Page 11: ...uct Speaker duct A hall for plentiful bass sound on speaker cabinet enclosure y The speakers contain magnet parts so color irregularity may occur on the TV screen or PC monitor screen Please use the speakers far away from either TV screen or PC monitor Caution Antenna Connection Connect the supplied FM AM antenna for listening to the radio y To prevent noise pickup keep the AM Loop antenna away fr...

Page 12: ... only one output for audio mono connect it to the left white audio jack on the unit Note USB Connection Connect the USB Memory or MP3 player etc to the USB port on the front of the unit Removing the USB Device from the unit 1 Choose a different function mode or press STOP Z twice in a row 2 Remove the USB device from the unit Note MCT436 A0U APERLLK ENG indd 12 MCT436 A0U APERLLK ENG indd 12 11 07...

Page 13: ...R only MP3 WMA REPEAT CD REPEAT ALL RANDOM OFF Selecting a folder 1 Press PRESET FOLDER W S on the remote control repeatedly until a desired folder appears 2 Press d M to play it The first file of folder will play Other Operations Programmed Playback The program function enables you to store your favorite files from any disc or USB device A program can contain 20 tracks 1 Insert a CD or USB and wa...

Page 14: ...ates the AUTO DJ function y During recording AUTO DJ function is not available y If you change a disc while the AUTO DJ function is activated the function is deactivated Note Setting the Clock 1 Turn the unit on 2 Press CLOCK for at least 2 seconds 3 Choose time mode by pressing Y U AM 12 00 for an AM and PM display or 0 00 for a 24 hour display 4 Press SET CD M to confirm your selection 5 Select ...

Page 15: ... icon and setting information by pressing TIMER even when the unit is turned off Then this function will working in everyday Note Radio Operations Listening to the radio 1 Press TUNER until FM or AM appears in the display window The last received station is tuned in 2 Press and hold TUN for about 0 5 seconds until the frequency indication starts to change then release Scanning stops when the unit ...

Page 16: ...scription NATURAL You can enjoy comfortable and natural sound Local Specialization equalizer Regionally optimized sound effect REGUETON MERENGUE SAMBA SALSA CUMBIA AUTO EQ Sets the sound equalizer on the mode that is the most similar to the genre which is included in the MP3 ID3 tag of song files POP CLASSIC JAZZ ROCK This program lends an enthusiastic atmosphere to the sound giving you the feelin...

Page 17: ...l device Refer to the page 12 1 Connect the external device to the AUX IN connector of the unit 2 Turn the power on by pressing 1 Power 3 Select the AUX function by pressing AUX on the unit or FUNCTION on the remote control 4 Turn the external device and start it playing Recording to USB 1 Connect the USB device to the unit 2 Select a function by pressing CD AUX TUNER on the unit or FUNCTION on th...

Page 18: ...rded at that time will be stored AUDIO CD Only y Do not remove the USB device or turn off the unit during USB recording If not an incomplete file may be made and not deleted on PC y If USB recording does not work the message like NO USB ERROR FULL or NO REC is displayed on the display window y Multi card reader device or External HDD can not be used for USB recording y A file is recorded by about ...

Page 19: ...ot be tuned in properly y The antenna is positioned poorly Adjust its position y The signal strength of the radio station is too weak Tune to the station manually y No stations have been preset or preset stations have been cleared when tuning by scanning preset channels Preset some radio stations see page 15 for details The remote control does not work properly y The remote control is not pointed ...

Page 20: ...perating humidity 5 to 85 Tuner FM Tuning Range 87 5 to 108 0 MHz or 87 50 to 108 00 MHz AM Tuning Range 522 to 1 620 kHz or 520 to 1 710 kHz Amplifier Output Power Front 140 W x 2 Subwoofer 150 W CD player Frequency response audio 40 to 20000 Hz Signal to noise ratio audio More than 75 dB 1 kHz Dynamic range audio More than 80 dB USB USB Version USB 2 0 or USB 1 1 Bus Power Supply DC 5 V 500 mA M...

Page 21: ...344 x 261 mm Net Weight 1EA 3 kg Passive Subwoofer Type 1 Way 1 Speaker Impedance 3 Ω Rated Input Power 150 W Max Input Power 300 W Net Dimensions WxHxD 272 x 332 x 317 mm Net Weight 1EA 5 1 kg y Design and specifications are subject to change without notice MCT436 A0U APERLLK ENG indd 21 MCT436 A0U APERLLK ENG indd 21 11 07 05 9 40 11 07 05 9 40 ...

Page 22: ...o not use strong solvents such as alcohol benzine or thinner as these might damage the surface of the unit Maintaining the Unit The unit is a high tech precision device If the optical pick up lens and disc drive parts are dirty or worn the picture quality could be diminished For details please contact your nearest authorized service center Notes on Discs Handling Discs Never stick paper or tape on...

Page 23: ...MCT436 A0U APERLLK ENG indd 23 MCT436 A0U APERLLK ENG indd 23 11 07 05 9 40 11 07 05 9 40 ...

Page 24: ...MCT436 A0U APERLLK ENG indd 24 MCT436 A0U APERLLK ENG indd 24 11 07 05 9 40 11 07 05 9 40 ...

Reviews: