background image

- 2-46 -

MEMO

Summary of Contents for LX-M240 D

Page 1: ... BLOCK DIAGRAM 2 21 SCHEMATIC DIAGRAMS 2 23 WIREING DIAGRAM 2 31 PRINTED CIRCUIT DIAGRAMS 2 33 INTERNAL BLOCK DIAGRAM OF ICs 2 42 SECTION 3 EXPLODED VIEWS CABINET AND MAIN FRAME SECTION 3 1 TAPE DECK MECHANISM AUTOREVERSE DECK 3 3 TAPE DECK MECHANISM AUTOSTOP DECK OPTIONAL 3 5 CD MECHANISM 3 7 SECTION 4 SPEAKER PART SPEAKER PART 4 1 SECTION 5 REPLACEMENT PARTS LIST REPLACEMENT PARTS LIST 5 1 ...

Page 2: ... beams may damage the eyes Absolutely never permit laser beams to enter the eyes Also NEVER switch ON the power to the laser output part lens etc of the pick up if it is damaged 5 Cleaning the lens surface If there is dust on the lens surface the dust should be cleaned away by using an air bush such as used for camera lens The lens is held by a delicate spring When cleaning the lens surface theref...

Page 3: ... bag do not place the pick up on the bag This is because there is the possibility of damage by static electricity 4 To prevent AC leakage the metal part of the soldering iron should be grounded 5 Workers should be grounded by an armband 1MΩ 6 Care should be taken not to permit the laser pick up to come in contact with clothing in order to prevent static electricity changes in the clothing to escap...

Page 4: ...es sufficient to damage ESD devices 5 Do not use freon propelled chemicals These can generate electrical charges sufficient to damage ESD devices 6 Do not remove a replacement ESD device from its protective package until immediately before you are ready to install it Most replacement ESD devices are packaged with leads electrically shorted together by conductive foam aluminum foil or comparable co...

Page 5: ... SPECIFICATIONS 1 5 ...

Page 6: ... 1 6 MEMO ...

Page 7: ...made to modificate any circuit If any parts are replaced or if anyone tampers with the adjustment realignment may be necessary IMPORTANT 1 Check Power source voltage 2 Set the function switch to band being aligned 3 Turn volume control to minimum unless otherwise noted 4 Connect low side of signal source and output indicator to chassis ground unless otherwise specified 5 Keep the signal input as l...

Page 8: ...IRCUIT PN507 CHECK MICOM INTERFACE CIRCUIT PN507 CONNECTOR CHECK PN501 PN503 CHECK PICKUP MOVEMENT CHECK BA5810FP IC503 CHECK MN6627933CG IC501 CHECK AN22004 IC502 CONNECTOR CHECK PN508 CONNECTOR CHECK PN508 PN507 PN503 PN501 READING DISPLAY CHECK READING OK CHECK IF PLAY AUDIO OUTPUT CHECK OK YES NO NO NO NO NO NO NO NO NO NO NO YES YES YES ...

Page 9: ... NG CONNECTOR LOCKING CHECK PN508 PN507 CHECK POWER SUPPLY CIRCUIT PN508 PN507 PN 508 PIN 8 6 2V PIN 7 5V PN507 PIN 1 5V CHECK VOLTAGE CHANGE OF OPEN CLOSE AND BTLMUTE VOLTAGE 5V PN507 PIN 12 OPEN 13 CLOSE 14 BTLMUTE CHECK VOLTAGE CHANGE LO LO OF IC503 PN507 PIN OPEN 12 CLOSE 13 NO NO NO NO YES YES YES ...

Page 10: ...PIN7 5V CHECK MICOM INTERFACE CIRCUIT PN507 PN507 PIN 6 8 9 10 SIGNAL CHECK 6 STAT 8 MDATA 9 MCLK 10 MLD CHECK THE WAVE FORM 1 CHECK POWER SUPPLY PORT PN508 PN507 PN508 PIN 8 6 2V PIN 7 5V PN507 PIN 1 5V DEFECTIVE CONNECTOR OR MAIN POWER SUPPLAY DEFECTIVE IC505 DEFECTIVE MICOM OR CONNECTOR DEFECTIVE MICOM OR CONNECTOR DEFECTIVE IC501 NO NO NO NO NO YES YES YES YES YES ...

Page 11: ...HECK PN501 PIN 13 16 FA FA DEFECTIVE PICKUP OR IC503 OR IC501 OR IC502 DEFECTIVE PICKUP OR IC503 OR IC501 DEFECTIVE PICKUP OR IC502 DEFECTIVE PICKUP OR IC503 DEFECTIVE PICKUP OR IC503 OR IC501 OR IC502 CHECK PN503 PIN 10 LD CHECK PN503 PIN 5 6 SP SP CHECK PN501 PIN 14 15 TA TA DOES LASER LIGHT DOES SPINDLE ROTATE IS READING OK NO NO NO NO NO NO NO NO NO NO YES YES YES YES YES YES ...

Page 12: ...APPEAR AT IC503 PIN14 AND PN503 PIN3 WAVEFORM 2 SLED MOTOR WAVE DOES SLIN WAVEFORM APPEAR AT IC503 PIN 5 WAVEFORM 2 SLED DRIVE WAVE DEFECTIVE IC501 DEFECTIVE IC503 CHECK PN503 CONNECTOR LINE DEFECTIVE PN503 CONNECTOR DEFECTIVE PICKUP SLED MOTOR NO NO NO NO NO YES YES ...

Page 13: ...R AT IC503 PIN15 AND PN501 PIN16 WAVEFORM 3 FOCUS COIL DRIVE WAVE DOES FAIN WAVEFORM APPEAR AT IC503 PIN 26 WAVEFORM 3 FOCUS DRIVE WAVE DEFECTIVE IC501 DEFECTIVE IC503 CHECK PN501 CONNECTOR LINE DEFECTIVE PN501 CONNECTOR DEFECTIVE PICKUP FOCUS ACTUATOR NO NO NO NO NO YES ...

Page 14: ...LY VOLTAGE CHECK IS 3 3 V APPLIED TO PIN3 OF IC502 RF IC SUPPLY VOLTAGE CHECK IS 2 0 V PIN2 OF IC502 LASER CONTROL VOLTAGE CHECK DEFECTIVE IC505 DEFECTIVE IC502 CHECK PN501 CONNECTOR LINE DEFECTIVE Q501 OR D502 DEFECTIVE PN501 CONNECTOR DEFECTIVE PICKUP LASER PART NO NO NO NO NO NO YES YES ...

Page 15: ...E DEFECTIVE IC501 DEFECTIVE IC503 DEFECTIVE PN503 CONNECTOR DEFECTIVE PICKUP SPINDLE MOTOR NO NO NO NO NO YES YES DOES SPIN WAVEFORM APPEAR AT IC503 PIN 6 WAVEFORM 4 SPINDLE DRIVE WAVE DOES SP WAVEFORM APPEAR AT IC503 PIN12 AND PN503 PIN6 WAVEFORM 4 SPINDLE MOTOR DRIVE WAVE ...

Page 16: ...EFORM APPEAR AT IC503 PIN 23 WAVEFORM 5 TRACKING DRIVE WAVE DEFECTIVE IC501 DEFECTIVE IC503 CHECK PN503 CONNECTOR LINE DOES ARF SIGNAL APPEAR IC502 PORT 8 WAVEFORM 6 DOES FE TE SIGNAL APPEAR IC502 PORT FE 23 TE 21 WAVEFORM 6 DEFECTIVE IC501 DEFECTIVE PN503 CONNECTOR DEFECTIVE PICKUP OR IC502 DEFECTIVE PICKUP OR IC502 YES YES YES YES NO NO NO NO NO NO NO ...

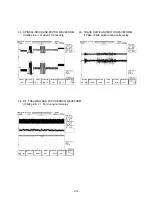
Page 17: ...FORM PN507 pin6 8 9 1 0 during normal play 2 SLED DRIVE AND MOTOR WAVEFORM IC503 pin5 1 4 when focus search 3 FOCUS DRIVE AND MOTOR WAVEFORM TP56 1 IC503 pin 1 5 When focus search failed or there is no disc on tray There is disc on tray and focus search success ...

Page 18: ...SPINDLE DRIVE AND MOTOR WAVEFORM IC503 pin6 1 2 when TOC reading 5 TRACK DRIVE AND MOTOR WAVEFORM TP560 IC503 pin23 during normal play 6 RF TRACKING AND FOCUS ERROR WAVEFORM IC502 pin8 2 1 23 during normal play ...

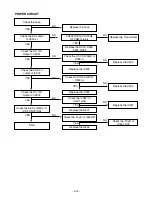
Page 19: ... 34V of C928 Check the DC 27V of ZD 902 Check the DC 27V of Q901 E Check the PATTERN Replace the D936 Replace the ZD902 Replace the Q901 YES YES YES YES NO NO NO NO P SENS PART Does 5V appear at ZD901 Check the pattern of IC301 pin Check the waveform of D937 Replace ZD901 Replace the D937 YES YES NO NO 26 16 ...

Page 20: ...ECK THE AC VOLTAGE OF CN901 pin5 6 Check the DC VOLTAGE of D939 Replace the Q501 Replace the D925 D926 D927 D928 Replace the IC902 Check DC VOLTAGE OF D930 Check the LOW of IC501 pin8 Check the High of Q605 B Replace the Q604 Replace the IC902 Replace the Transformer Replace the D939 Replace the D930 Replace the IC501 Check the High of IC501 pin4 YES YES YES YES YES YES YES YES YES YES YES NO NO N...

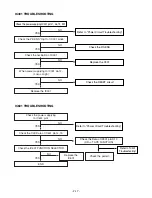
Page 21: ...C601 pin1 Check the High of Q702 B Check the High of IC701 pin5 Check the power of IC701 Check the connecting to SPEAKER YES YES YES NO NO NO NO MUTING CIRCUIT MUTE Dose High appear at Q701 Q751 B check the Low of Q701 Q751 C MUTE Check the High of PN601 pin12 Check the High of the IC301 pin2 Replace the Q703 Replace the TR Refer to IC 301 Troubleshooting YES YES YES NO NO NO ...

Page 22: ...n6 23 Refer to IC201 Troubleshooting AUX Chekc the signal input of IC601 pin5 24 Check the signal input of JK601 Check the signal input of IC601 pin3 26 Check the signal input of CN603 pin6 8 Check the signal input of IC601 pin4 25 Refer to TUNER PACK Troubleshooting CD TUNER ...

Page 23: ...cuit Refer to Power Circuit Troubleshooting Check the Data of IC301 pin9 10 CD TAPE FUNCTION Replace the IC601 Check the pattern Check the P SENS High of IC301 pin26 Check the oscillation of X301 When power supplying to IC301 pin12 Low High Replace the IC301 Check the power supplying to IC601 pin1 Check the CLK Data of IC601 pin14 15 Check the IC601 FUNCTION SELECTOR END YES YES YES YES YES YES YE...

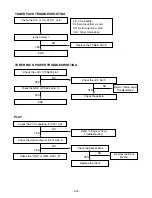
Page 24: ...OWER TROUBLESHOOTING Check the 9V of OPN602 pin2 Check the DC C670 Check the pattern Refer to Power circuit Troubleshooting Check the GND of PN602 pin4 10 END YES YES YES NO NO PLAY Check the VCC supplying to IC201 pin4 Refer to Power Circuit Troubleshooting Check the Deck Mecha Replace the Deck Mecha Replace the IC201 Check the signal output of IC201 pin3 6 Check the LOW of Q201 Q251 B YES YES YE...

Page 25: ...plying to C227 Check the oscillation of Q204 E Check the signal of R212 R262 Check the Pattern Check the Vcc power of IC203 Pin6 Check the oscillation of L201 pin 1 3 Replace the DECK Check the Low of Q202 Q252 B Replace the Q202 Q252 Check the Low of IC501 pin9 Refer to Power Circuit Troubleshooting Check the 0 6V of Q205 B Replace the L201 YES YES YES YES YES YES YES YES NO NO NO NO NO NO NO NO ...

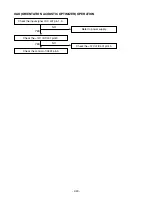
Page 26: ...O ORIENTATION ACOUSTIC OPTIMIZER OPERATION Check the input signal of IC 401 pin 1 3 Refer to power supply Check the 12V of IC401 pin13 Check the 12V of IC401 pin13 Check the control of IC401 pin9 YES YES NO NO ...

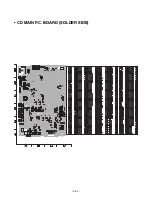
Page 27: ... 2 41 CD MAIN P C BOARD SOLDER SIDE ...

Page 28: ... 2 42 INTERNAL BLOCK DIAGRAM OF ICs KIA6225P S IC201 BIPOLAR LINEAR INTEGRATED CIRCUIT ...

Page 29: ... 2 43 Internal circuit configuration BA3126N IC202 2 channel head switch for radio cassette recoreders BA3308 IC203 Dual preamplifier with ALC ...

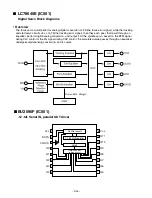
Page 30: ...equalizer perform digital analog conversion and output it At the spindle servo based on the EFM signal during CLV control or the FG signal during CAV control the calculated value passes through an equalizer undergoes digital analog conversion and is output BU2090F IC501 12 bit Serial IN parallel OUT driver Control circuit 12 bit shift register Latch VSS 2 1 3 4 5 6 7 8 DATA CLOCK Q0 Q1 Q2 Q3 Q4 16...

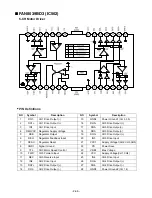
Page 31: ...tor Output 19 DO3 CH3 Drive Output 6 REO Regulator Feedback Input 20 IN3 CH3 Drive Input 7 RESX Regulator Reset 21 VCC1 Supply Voltage1 CH2 CH3 CH5 8 GND1 Signal Ground 22 PS Power Save 9 CTL CH5 Motor Speed Control 23 VREF Bias Voltage 10 FWD CH5 Forward Input 24 VCC Supply Voltage CH1 CH4 11 REV CH5 Reverse Input 25 IN4 CH4 Drive Input 12 IN2 CH2 Drive Input 26 DO4 CH4 Drive Output 13 DO2 CH2 Dr...

Page 32: ... 2 46 MEMO ...

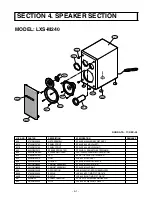
Page 33: ...5B20L 4 SAMMI WOOFER 6OHM 854 4766RM0075A FELT EVA 0 7T BLACK FOR TWEETER 855 5208RM0037A DUCT LXS 340 MOLD DUCT 856 4930RM0024B HOLDER SPK LXS M340 MOLD BLACK 857A 3091RMW088A CABINET ASSEMBLY SPK LXS M240 DE 1878 31 857B 3091RMW088B CABINET ASSEMBLY SPK LXS M240 RIGHT 858 3508RMP039B DECORATION LXS M240 MOLD SPRAY BK3SILVER 860A 4760RM0063A BAFFLE LXS 340 LEFT MDF12T DE 1878 860B 4760RM0064A BAF...

Page 34: ... 4 2 MEMO ...

Page 35: ...2 21 2 22 BLOCK DIAGRAM ...

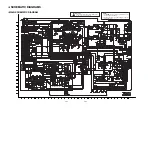
Page 36: ...24 NOTE 1 Shaded parts are critical for safety Replace only with specified part number 2 Voltages are DC measured with a digital voltmefer during Play mode NOTE Warning Parts that are shaded are critical With respect to risk of fire or electrical shock ...

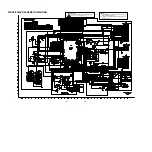
Page 37: ... 1 Shaded parts are critical for safety Replace only with specified part number 2 Voltages are DC measured with a digital voltmefer during Play mode NOTE Warning Parts that are shaded are critical With respect to risk of fire or electrical shock ...

Page 38: ... CDP SCHEMATIC DIAGRAM 2 27 2 28 ...

Page 39: ... EALA OAO SCHEMATIC DIAGRAM 2 29 2 30 ...

Page 40: ...2 31 2 32 WIRING DIAGRAM ...

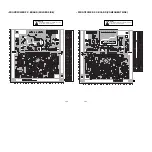
Page 41: ... PRINTED CIRCUIT DIAGRAMS MAIN TUNER P C BOARD SOLDER SIDE 2 33 2 34 ...

Page 42: ...2 35 2 36 MAIN TUNER P C BOARD COMPONENT SIDE ...

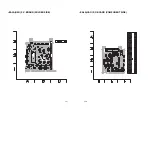
Page 43: ...2 37 2 38 EALA OAO P C BOARD SOLDER SIDE EALA OAO P C BOARD COMPONENT SIDE ...

Page 44: ...ONT POWER P C BOARD COMPONENT SIDE 2 39 2 40 NOTE Warning Parts that are shaded are critical With respect to risk of fire or electrical shock NOTE Warning Parts that are shaded are critical With respect to risk of fire or electrical shock ...

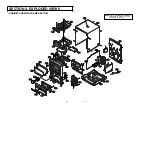
Page 45: ... 280 278 279 286 292 284 285 262 250 276 273 277 275 290 274 255 257 A26 351 352 A46 TUNER 301 288 310 A47 305 303 302 A41 A00 272 NOTE Refer to SECTION 5 REPLACEMENT PARTS LIST in order to look for the part number of each part SECTION 3 EXPLODED VIEWS ...

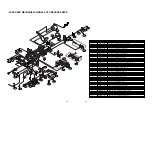
Page 46: ...22 6768R VP03A 50 093 4748 PIGEON SOLENOID CRM4205 023 6768R GP03A 50 093 4810 PIGEON GEAR CRM4205 025 6768R JP03B 50 093 31009 PIGEON PULLEY FLYWHEEL ASSY CRM4205 026 6768R SP01D 01 080 4609 PIGEON SPRING CWL44 027 6768R DP01A 50 259 3342 PIGEON LEVER CWL44 028 6768R RP01A 22 027 41054 PIGEON ROLLER CWL44 029 6768R MP01A 50 219 4033 PIGEON MOLD CWL44 031 6768R SP01L 01 080 4649 PIGEON SPRING CWL4...

Page 47: ...CWL44 018 6768R GP01J 50 222 4428 PIGEON GEAR CRL4428 019 6768R SP01P 01 081 4678 PIGEON SPRING CRL4428 020 6768R BP01C 02 083 4188 PIGEON BELT FELT CWL44 021 6768R LP01C 50 223 4429 PIGEON PULLEY FLYWHEEL CRL4428 022 6768R VP03A 50 093 4748 PIGEON SOLENOID CRM4205 023 6768R GP03A 50 093 4810 PIGEON GEAR CRM4205 025 6768R JP03B 50 093 31009 PIGEON PULLEY FLYWHEEL ASSY CRM4205 026 6768R SP01D 01 08...

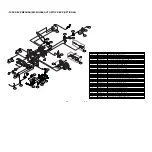
Page 48: ...47B PLATE CLAMP CDM 300 002 524 012AAAA COVER CLAMP MAGNET 030X018X5T 003 4860R 0016A CLAMP DISC CDM 300 004 4930R 0171A HOLDER CLAMP 011 3040R 0073A BASE P U CDM 300 012 5040R 0073A RUBBER DAMPER CDM 300 BK 013 4400R 0006A BELT LOADING 014 4470R 0055A GEAR PULLEY 015 6871RC2016A PWB PCB ASSEMBLY CD LOADING CDM 300 017 4470R 0056A GEAR LOADING 018 4974R 0023A GUIDE UP DOWN 020 3040R 0072A BASE MAI...

Reviews: