background image

21

OPERATION

ENGLISH

Knob Positions

After cleaning the oven knobs, make sure to replace each knob in the correct position. Failure to do so can result 

in improper operation of the burners.

Dual

Single

Single

Mode

Single

Triple

Summary of Contents for LSSE3027 Series

Page 1: ...ECTRIC RANGE Read this owner s manual thoroughly before operating the appliance and keep it handy for reference at all times www lg com MFL68881510_01 LSSE3027 LSSE3030 Copyright 2017 2018 LG Electronics Inc All Rights Reserved ...

Page 2: ...Time Timed Cook 26 Using the Cooktop 26 Cooking Areas 26 Hot Surface Indicator 26 Using the Cooktop Elements 27 The Recommended Surface Cooking Setting 28 Using the Proper Cookware 28 Choosing Cookware 28 Home Canning Tips 29 Using the Oven 29 Before Using the Oven 29 Oven Vent 29 Using Oven Racks 29 Bake 30 Convection Mode 31 Recommended Baking and Roasting Guide 32 Broil 33 Recommended Broiling ...

Page 3: ...OPERLY INSTALLED ANTI TIP DEVICE TO CHECK IF THE DEVICE IS INSTALLED PROPERLY REMOVE THE DRAWER BODY AND VERIFY THAT THE ANTI TIP DEVICE IS ENGAGED OR GRASP THE TOP REAR EDGE OF THE RANGE BACK GUARD AND CAREFULLY ATTEMPT TO TILT IT FORWARD Refer to the installation section for instructions It is possible for a child or adult to tip the range and be killed Verify that the anti tip device has been p...

Page 4: ...r service Do not operate the oven without the charcoal heater mesh Do not use plastic to cover food Use foil or oven safe lids only Do not allow anyone to climb stand or hang on the door storage drawer or cooktop They could damage the range and even tip it over causing severe personal injury Do not line the oven walls racks bottom or any other part of the oven with aluminum foil or any other mater...

Page 5: ...lammable liquids cleaners or aerosol sprays ELECTRICAL SAFETY CAUTION Be certain that all packing materials are removed from the appliance before operating Keep plastic clothes paper and other flammable materials away from parts of the appliance that may become hot Always disconnect power from the appliance before servicing Do not use aluminum foil or any other material to line the oven bottom Imp...

Page 6: ...hey have had sufficient time to cool This includes the cooktop and the area above the oven door Do not cook on a broken cooktop If the cooktop is broken cleaning solutions and spillovers may penetrate the broken cooktop and create a risk of electric shock Contact a qualified technician immediately Do not use the glass cooktop surface as a cutting board Do not place or store items that can melt or ...

Page 7: ... with the cooktop surface when cooking on the glass ceramic cooktop Match the size of the cooktop burner or element to the size of the cookware in use Using a large element for a small pan wastes heating energy and the exposed surface of the element is a burn or fire hazard Reduce energy use by cleaning light oven soils with the EasyClean feature instead of self clean Avoid opening the oven door m...

Page 8: ...oom Clean in the self clean cycle only parts listed in this manual Before self cleaning the oven remove the broiler pan all oven racks the meat probe and any utensils or food from the oven Important Instruction The oven displays an F error code and sounds three long beeps during the self cleaning process if it malfunctions in the self clean mode Switch off the electrical power to the main fuse or ...

Page 9: ...ring pad 1ea Optional Accessories Grid Broiler pan NOTE Contact LG Customer Service at 1 800 243 0000 if any accessories are missing For your safety and for extended product life only use authorized components The manufacturer is not responsible for product malfunction or accidents caused by the use of separately purchased unauthorized components or parts The images in this guide may be different ...

Page 10: ...t connection plate Black White Red Terminal block 240 V Product Specifications The appearance and specifications listed in this manual may vary due to constant product improvements Oven Range Models LSSE3027 LSSE3030 Description Electric Slide In Oven Range Electrical requirements 13 5 kW 120 240 VAC or 10 1 kW 120 208 VAC Exterior Dimensions 29 7 8 W x 37 7 8 H x 26 1 2 D D with door closed 75 7 ...

Page 11: ... should be followed exactly Failure to do so may result in fire electrical shock property damage personal injury or death Wear gloves during the installation procedure Failure to do so can result in bodily injury Parts not Provided 4 Wire cord or 3 Wire cord UL approved 40 or 50 AMP Strain relief For conduit Installations only Rear filler 1 Parts Provided Template 1 Anti tip bracket kit 1 Anchor s...

Page 12: ...en flames of operating burners install a ventilation hood over the range that projects forward at least five inches beyond the front of the cabinets Make sure wall covering countertop and cabinets around the range can withstand the heat up to 194 F generated by the range Discoloration delamination or melting may occur This range has been designed to comply with the maximum allowable wood cabinet t...

Page 13: ...5 2 cm 5 13 cm 6 15 2 cm 2 5 6 3 cm A 30 76 2 cm For U S A 30 76 2 cm 30 76 2 cm Minimum 15 38 1 cm 36 91 4 cm Minimum Dimensions 30 76 2 cm minimum clearance between the top of the cooking surface and the bottom of an unprotected wood or metal cabinet or 24 60 9 cm minimum when bottom of wood or metal cabinet is protected by not less than 1 4 6 4 cm flame retardant millboard covered with not less...

Page 14: ...nsert the rear leg into the anti tip bracket Use a level to check your adjustments Place the level diagonally on the oven rack and check each direction for level First check direction Then check direction If the level doesn t show level on the rack adjust the leveling legs with a wrench 1 2 Connecting Electricity Electrical Requirements This appliance must be installed and grounded on a branch cir...

Page 15: ...50R 3 Wire receptacle 10 50R Connecting the Power Cord The rear access cover must be removed Loosen the two screws with a screwdriver The terminal block will then be accessible Access cover Use the cord conduit connection plate to install the power cord or conduit Leave the connection plate as installed for power cord installations Remove the connection plate for conduit installations and use the ...

Page 16: ...ted 120 240 volts 50 amperes and marked for use with ranges with closed loop connectors or opened spade lugs with upturned ends shall be used The white middle neutral wire of the power cord or 4 wire conduit has to be connected to the middle post of the main terminal block The other two wires of the power cord or conduit have to be connected to the outside posts of the main terminal connection blo...

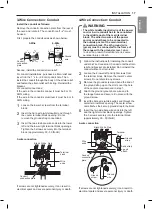
Page 17: ...on Conduit Warning The white middle neutral wire of the power cord or 4 wire conduit has to be connected to the middle post of the main terminal block The other two wires of the power cord or conduit have to be connected to the outside posts of the main terminal connection block The 4th ground wire green must be connected to the frame of the range with the ground screw Failure to do so can result ...

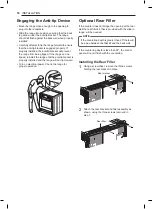
Page 18: ...ti tip bracket is properly installed and the range will not tip forward Turn on electrical power Check the range for proper operation Optional Rear Filler If the counter does not bridge the opening at the rear wall the rear filler kit that is provided with the slide in range will be needed NOTE If the countertop depth is greater than 25 there will be a gap between the filler kit and the back wall ...

Page 19: ...king all the surface heating elements check the locking system by pressing Probe for three seconds The oven door should lock and the cooktop should not operate while the Lockout function is turned on Pressing Probe for three seconds to disable Lockout 4 Now check the oven s operation Turn the oven mode knob to select the Bake mode 350 F appears in the display Press Start 5 The oven should finish p...

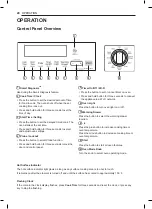
Page 20: ...ree seconds to set the time of day 3 Start Time Setting Press the button to set the delayed timed cook The oven starts at the set time Press and hold button for three seconds to select and adjust oven settings 4 Probe Lockout Press the button to select Probe function Press and hold button for three seconds to lock the door and control panel 5 Timer On Off Wi Fi Press the button to set or cancel ti...

Page 21: ...N ENGLISH Knob Positions After cleaning the oven knobs make sure to replace each knob in the correct position Failure to do so can result in improper operation of the burners Dual Single Single Mode Single Triple ...

Page 22: ...turned on if the Self Clean function is active Minimum Maximum Default Settings All of the features listed have a minimum and a maximum time or temperature setting that may be entered into the control An entry acceptance beep sounds each time a control key is pressed An entry error tone two short tones sounds if the entry of the temperature or time is below the minimum or above the maximum setting...

Page 23: ... app 5 To disconnect the appliance from the network delete it from the registered appliances in the app NOTE See the Smart Functions section in the owner s manual for more details Settings Set the oven mode knob to the Off position Press and hold Start Time for three seconds Then press the Start Time key repeatedly to toggle through and change oven settings The Setting key allows you to set the ho...

Page 24: ...ight 1 Set the oven mode knob to the Off position 2 Press and hold Start Time for three seconds Then press Start Time repeatedly until PrE appears in the display 3 Press plus or minus to turn the function on off 4 Press Start to accept the change Adjusting the Beeper Volume 1 Set the oven mode knob to the Off position 2 Press and hold Start Time for three seconds Then press Start Time repeatedly u...

Page 25: ... meats and most fruits and vegetables Foods that can easily spoil such as milk eggs fish meat or poultry should be chilled in the refrigerator Even when chilled they should not stand in the oven for more than 1 hour before cooking begins and should be removed promptly when cooking is completed Eating spoiled food can result in sickness from food poisoning Cook Time Timed Cook Set the oven to cook ...

Page 26: ...d off and until the surface has cooled to approximately 150 F CAUTION It is normal for the surface elements to cycle on and off during cooking even on higher settings This will happen more frequently if cooking on a lower temperature setting Using the Cooktop Elements CAUTION Only use cookware and dishes that are safe for oven and cooktop use Always use oven mitts when removing food from the cookt...

Page 27: ... the Warming Zone to keep food warm after it has already been cooked Attempting to cook uncooked or cold food on the Warming Zone could result in a food borne illness CAUTION FOOD POISON HAZARD Bacteria may grow in food at temperatures below 140 F Always start with hot food Do not use the warm setting to heat cold food Do not use the warm setting for more than 2 hours Turning on a Warming Zone Ele...

Page 28: ... are Aluminum Excellent heat conductor Some types of food will cause it to darken anodized aluminum cookware resists staining and pitting If aluminum pans slide across the ceramic cooktop they may leave metal marks which will resemble scratches Remove these marks immediately Copper Excellent heat conductor but discolors easily May leave metal marks on glass ceramic see Aluminum above Stainless ste...

Page 29: ...avity Removing Racks 1 Pull the rack straight out until it stops 2 Lift up the front of the rack and pull it out Replacing Racks 1 Place the end of the rack on the support 2 Tilt the front end up and push the rack in CAUTION Replace oven racks before turning the oven on to prevent burns Do not cover the racks with aluminum foil or any other material or place anything on the bottom of the oven Doin...

Page 30: ...he auto converted oven temperature 350 F and the fan icon 4 When cooking has finished or to cancel turn the oven mode knob to the Off position NOTE The oven fan runs while convection baking The fan stops when the door is open In some cases the fan may shut off during a convection bake cycle Tips for Convection Baking Use Convection Bake for faster and more even multiple rack cooking of pastries co...

Page 31: ...4 3 3 Cookies Sugar cookies Chocolate chips Brownies 4 4 4 Pizza Fresh Frozen 5 5 Pastry Crust From scratch Refrigerator 4 4 Breads Biscuit canned Biscuit from scratch Muffins 5 5 5 Desserts Fruit crisps and cobblers from scratch Pies from scratch 2 crust fruit 4 4 Custards Cheesecake crème brulée 2 Soufflés Sweet or savory 2 Casserole Frozen lasagna 5 Roasting rack guide Food Rack position Beef R...

Page 32: ...s or minus to select Hi or Lo 2 Press Start The oven begins to heat 3 Let the oven preheat for approximately five minutes before cooking the food if using broil 4 Turn the oven mode knob to the Off position to cancel at any time or when cooking is complete Smoking Due to the intense heat associated with broiling it is normal to experience smoke during the cooking process This smoke is a natural by...

Page 33: ...n 1 whole cut up 2 to 21 2 lbs split lengthwise 2 Breasts 5 5 8 10 8 10 4 6 5 7 Broil skin side down first Lobster Tails 2 4 10 to 12 oz each 5 9 12 Do not turn over Cut through back of shell Spread open Brush with melted butter before broiling and after half of broiling time Fish Fillets 1 4 to 1 2 thick 6 2 4 2 4 Handle and turn very carefully Brush with lemon butter before and during cooking if...

Page 34: ...n oil before cooking to improve browning Warm This function will maintain an oven temperature of 170 F The Warm function will keep cooked food warm for serving up to three hours after cooking has finished The Warm function may be used without any other cooking operations Setting the Warm Function 1 Turn the oven mode knob to select Warm 2 Press Start 3 Turn the oven mode knob to the Off position w...

Page 35: ... Setting the Meat Probe Function example for Roast 375 F with Probe temp 160 F 1 Insert the meat probe into the meat 2 Connect the meat probe to the jack 3 The meat probe icon flashes in the display if the meat probe is properly connected Method 1 Select cook mode Turn the oven mode knob to select Conv Roast 2 Set the oven temperature press plus or minus until 375 F appears in the display 3 Press ...

Page 36: ...function cannot be started when the oven door is open A beep alerts you to shut the door Sabbath Mode Sabbath mode is used on the Jewish Sabbath and Holidays While the oven is in Sabbath mode the temperature cannot be changed and the timer light and alarm functions are disabled If the oven light is on when the oven is put in Sabbath mode it will remain on Sabbath mode is only available when oven i...

Page 37: ...ow for Medium and for High 3 When the food is ready or to cancel press Warming Drawer Set Off NOTE The Warming Drawer shuts off automatically after three hours Do not heat cold food in the Warming Drawer Do not use pans or utensils with rough finishes in the Warming Drawer Doing so can leave scratches on the inner drawer surfaces Warming Drawer food power level recommendations Setting Type of Food...

Page 38: ...ater or any other liquids Spilled liquids may cause an electrical short or result in severe personal injury electric shock or death Never place plastics paper canned foods or other combustible material into the warming drawer These items pose a severe risk of fire damage and injury In the unlikely event that an item falls behind the warming drawer always turn the power off and wait for the warming...

Page 39: ...i repeater range extender to improve the Wi Fi signal strength The network connection may not work properly depending on the Internet service provider The Wi Fi connection may not connect or may be interrupted because of the home network environment If the appliance cannot be registered due to problems with the wireless signal transmission unplug the appliance and wait about a minute before trying...

Page 40: ...00 2 When instructed to do so by the call center agent hold the mouthpiece of your phone over the Smart Diagnosis logo on the machine Hold the phone no more than one inch from but not touching the machine NOTE Do not touch any other buttons or icons on the display screen 3 Press and hold the Start button for three seconds 4 Keep the phone in place until the tone transmission has finished This take...

Page 41: ...ice pursuant to Part 15 of the FCC Rules These limits are designed to provide reasonable protection against harmful interference in a residential installation This equipment generates uses and can radiate radio frequency energy and if not installed and used in accordance with the instructions may cause harmful interference to radio communications However there is no guarantee that interference wil...

Page 42: ...tomato sauce jellies fudge candy syrups chocolate spills or plastic or foil melts on the cooktop remove the molten material IMMEDIATELY with a metal razor scraper it will not damage the decorated cooking surface while the cooking surface is still hot to avoid the risk of damage to the glass ceramic surface For your safety please use an oven mitt or pot holder while scraping the hot cooking surface...

Page 43: ... feature takes advantage of LG s new enamel to help lift soils without harsh chemicals and it runs using ONLY WATER for just 10 minutes in low temperatures to help loosen LIGHT soils before hand cleaning While EasyClean is quick and effective for small and LIGHT soils the Self Clean feature can be used to remove HEAVY built up soils The intensity and high heat of the Self Clean cycle may result in...

Page 44: ...ain non scratch scrubbing sponges such as those made of melamine foam available at your local stores can also help improve cleaning The range should be level to ensure that the bottom surface of the oven cavity is entirely covered by water at the beginning of the EasyClean cycle For best results use distilled or filtered water Tap water may leave mineral deposits on the oven bottom Soil baked on t...

Page 45: ...g 9 Clean the oven cavity immediately after the EasyClean cycle by scrubbing with a wet non scratch scouring sponge or pad The scouring side will not scratch the finish Some water may spill into the bottom vents while cleaning but it will be captured in a pan under the oven cavity and will not hurt the burner NOTE Do not use any steel scouring pads abrasive pads or cleaners as these materials can ...

Page 46: ...ing the oven door after the Self Clean cycle Stand to the side of the oven when opening the door to allow hot air or steam to escape The oven may still be VERY HOT During the Self Clean cycle the cooktop elements and warming drawer cannot be used NOTE Remove oven racks and accessories before starting the Self Clean cycle If oven racks are left in the oven cavity during the Self Clean cycle they wi...

Page 47: ...e oven door open when the lock is displayed The oven door remains locked until the oven temperature has cooled Forcing the door open will damage the door After the Self Clean Cycle The oven door remains locked until the oven temperature has cooled You may notice some white ash in the oven Wipe it off with a damp cloth or a soap filled steel wool pad after the oven cools If the oven is not clean af...

Page 48: ...rim For general cleaning use a cloth with hot soapy water For more difficult soils and built up grease apply a liquid detergent directly onto the soil Leave it on for 30 to 60 minutes Rinse with a damp cloth and dry Do not use abrasive cleaners Stainless Steel Surfaces To avoid scratches do not use steel wool pads 1 Place a small amount of stainless steel appliance cleaner or polish on a damp clot...

Page 49: ...d spilled into the tracks could cause the racks to become stuck Clean with a mild abrasive cleaner 2 Rinse with clean water and dry NOTE If the racks are cleaned using the self clean cycle not recommended the color will turn slightly blue and the finish will become dull After the self clean cycle is complete and the oven has cooled rub the sides of the racks with wax paper or a cloth containing a ...

Page 50: ... pan and grid may be cleaned with a commercial oven cleaner or in the dishwasher Removing and Replacing the Lift Off Oven Doors and Drawer CAUTION Be careful when removing and lifting the door Do not lift the door by the handle The door is very heavy Removing the Door 1 Fully open the door 2 Unlock the hinge locks rotating them as far toward the open door frame as they will go Slot Lock Unlock Hin...

Page 51: ... cleaning can be done with the drawer in place however the drawer may be removed if further cleaning is needed Use warm water to thoroughly clean 1 Fully open the drawer 2 Locate the glide lever on each side of the drawer Push down on the left glide lever and pull up on the right glide lever Push down with finger Pull up with finger Lever Lever 3 Pull the drawer away from the range Replacing the D...

Page 52: ...e convection fan will stop until the door is closed Can I use aluminum foil to catch drippings in my oven cavity Never use aluminum foil to line the bottom or sides of the oven or the warming drawer The foil will melt and stick to the bottom surface of the oven and will not be removable Use a sheet pan placed on a lower oven rack to catch drippings instead If foil has already melted onto the botto...

Page 53: ...n section of your owner s manual Are there any tricks to getting some of the stubborn soils out Scraping the soils with a plastic scraper before and during hand cleaning is recommended Fully saturating soils with water is also recommended However certain types of soils are harder to clean than others For these stubborn soils the Self Clean cycle is recommended Consult the Self Clean section of you...

Page 54: ...ion Turn the Oven mode knob to the Off position to clear the display and stop beeping Reprogram oven If fault recurs record fault number Turn the Oven mode knob to the Off position and contact a Service agent CODE CAUSE F 3 Key short error F 9 Oven not heating Surface units will not maintain a rolling boil or cooking is not fast enough Improper cookware being used Use pans which are flat and match...

Page 55: ... Follow instructions under Setting Oven Controls Meat too close to the element Reposition the rack to provide proper clearance between the meat and the element Preheat broil element for searing Meat not properly prepared Remove excess fat from meat Cut remaining fatty edges to prevent curling Insert on broiler pan wrong side up and grease not draining Always place grid on the broiler pan with ribs...

Page 56: ... blade scraper to remove soil See Cleaning the Glass Ceramic Cooktop in the MAINTENANCE section Areas of discoloration on cooktop Mineral deposits from water and food Remove using a glass ceramic cooktop cleaning creme Use cookware with clean dry bottoms Oven will not Self Clean The oven temperature is too high to set a Self Clean operation Allow the range to cool and reset the controls Oven contr...

Page 57: ...ned in a Self Clean cycle Apply a small amount of vegetable oil to a paper towel and wipe the edges of the oven racks with the paper towel Moisture collects on oven window or steam comes from oven vent This is normal when cooking foods high in moisture Excessive moisture was used when cleaning the window A chime sounds when surface elements are turned on When any cooktop burner is activated a chim...

Page 58: ...ce trips to deliver pick up or install or repair the product instruction to the customer on operation of the product repair or replacement of fuses or correction of wiring or plumbing or correction of unauthorized repairs installation Failure of the product to perform during power failures and interruptions or inadequate electrical service Damage caused by leaky or broken water pipes frozen water ...

Page 59: ...rranty Mechanical breakage secondary crack primary crack Cooktop enamel chipping off Improper usage Do not hit the enamel cooktop Oven or racks are stained after using aluminum foil Aluminum foil has melted in the oven Never cover the oven bottom or cover an entire rack with materials such as aluminum foil If the foil has already melted onto the oven it will not affect the performance of the oven ...

Page 60: ...se excluded circumstances shall be borne by the consumer OBTAIN WARRANTY SERVICE AND ADDITIONAL INFORMATION If you do not have access to the internet and you need assistance using your product or you would like to schedule service you may contact LG Electronics at the number below For assistance or service call 1 800 243 0000 If you need further assistance you can write to LG with any questions or...

Page 61: ...LG Customer Information Center Register your product Online www lg com 1 800 243 0000 USA Printed in Korea ...

Reviews: