3-4
COMPONENT ACCESS
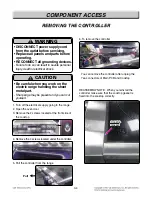
REMOVING THE CONTROLLER
REMOVING THE CONTROLLER
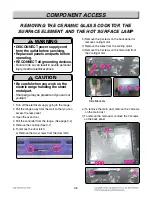
1. Turn off the electrical supply going to the range.
2. Open the oven door.
3. Remove the 2 screws located at the front side of
the cooktop.
4. Remove the 4 screws located under the controller.
5. Pull the controller from the range
Pull
6. To remove the controller
You can remove the controller after unplug the
7ea connectors of Main PCB and Cooktop
REASSEMBLY NOTE : When you reinstall the
controller make sure that the cooktop gasket is
fixed into the cooktop correctly.
Cooktop
Gasket
Cooktop
Gasket
Cooktop
Gasket
Cooktop
Gasket
Cooktop
Gasket
Cooktop
Gasket
Cooktop
Gasket
Cooktop
Gasket
Cooktop
Gasket
Cooktop
Gasket
Cooktop
Gasket
Cooktop
Gasket
Cooktop
Gasket
Cooktop
Gasket
WARNING
• DISCONNECT power supply cord
from the outlet before servicing.
• Replace all panels and parts before
operating.
• RECONNECT all grounding devices.
- Failure to do so can result in severe personal
injury, death or electrical shock.
!
CAUTION
• Be careful when you work on the
electric range handling the sheet
metal part.
- Sharp edge may be present and you can cut
yourself.
!
Summary of Contents for LSSE3026ST
Page 55: ...5 3 OVEN LIGHT Warming Drawer CR Cook top Element RR Cook top Element For Model LSE3092ST ...
Page 56: ...5 4 LR Cook top Element RF Cook top Element LF Cook top Element For Model LSE3092ST ...
Page 57: ...5 5 Broil Speed broil Boke Speed roost Warm Proof Easy clean ...
Page 58: ...6 1 COMPOSITION OF CONTROL 6 1 Wiring Diagram ...
Page 92: ... EV COOKTOP PARTS 3056 3215 3079 3006 3016 330M 330H 3205 3022 3204 330S 330S 3014 ...
Page 95: ......


