background image

LGE CDMA Fixed Wireless Telephone                                       
LSI-110/1100 


13


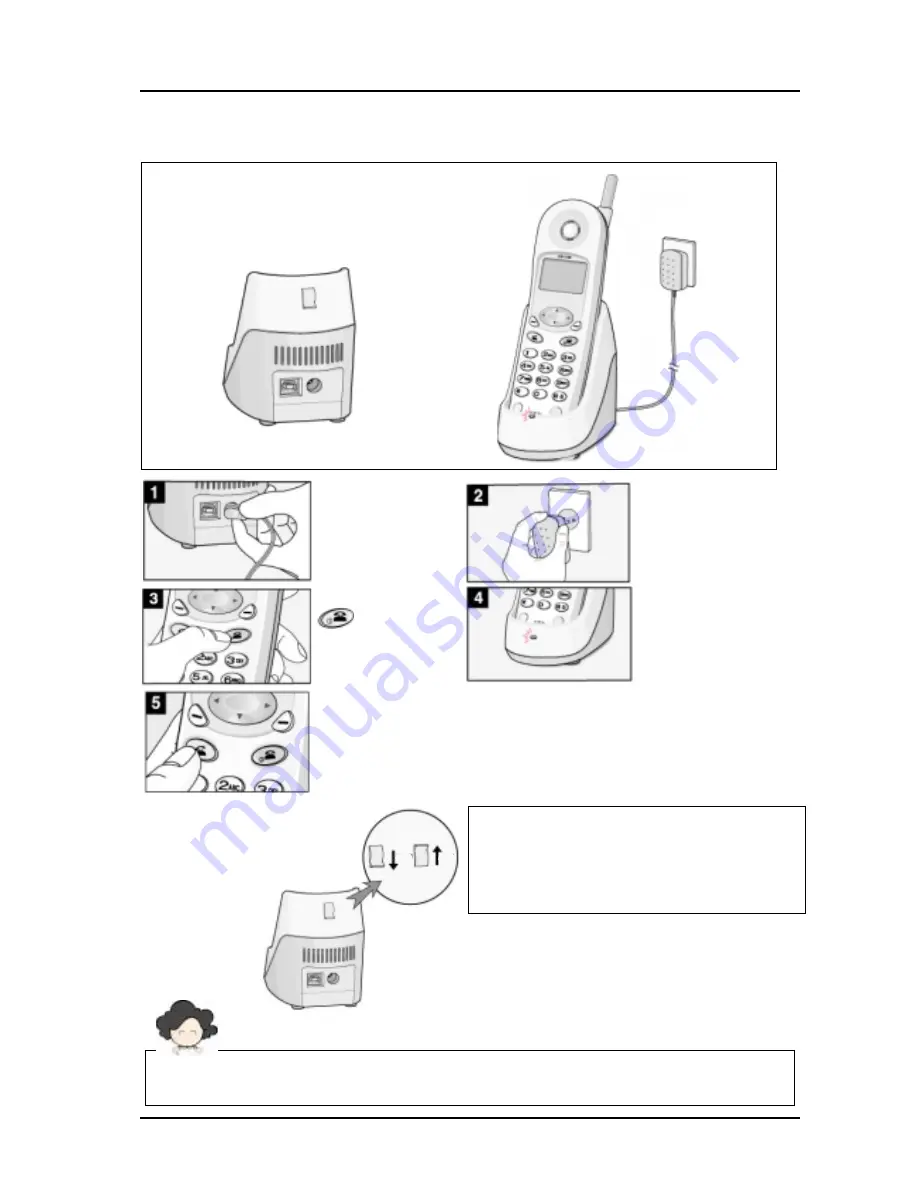
2.4 Installation   


The adapter type may be different by country adaptation. 
Be careful of power voltage.


Connect the AC 
power supply line in 
the charger


Connect adapter to 
outlet. 

Pick down the 
handset on the 
charger. 

Press and hold the       

          button 

to 

power on. 


After charging the 
terminal, make a call. 

Lock Switch :   


Lift up the lever to fix the handset on 
charger. 


Lift up the lever to make a data call with 
PC using USB port on charger. 

UNLOCK

LOCK

Summary of Contents for LSI-110

Page 1: ...CDMA Fixed Wireless Telephone User Guide Model LSI 110 ...

Page 2: ...LGE CDMA Fixed Wireless Telephone LSI 110 1100 2 REVISED HISTORY DATE ISSUE CONTENTS OF CHANGES REMARK 2002 05 13 ISSUE1 Initial Release ...

Page 3: ...LGE CDMA Fixed Wireless Telephone LSI 110 1100 3 Blank Page ...

Page 4: ...andards bodies The design of this phone complies with the FCC guidelines and these international standards Use only the supplied or an approved antenna Unauthorized antennas modifications or attachments could impair call quality damage the phone or result in violation of FCC regulations Do not use the phone with a damaged antenna If a damaged antenna comes into contact with the skin a minor burn m...

Page 5: ...g Last Outgoing Number 15 3 4 Signal Strength 16 3 5 Missed Call Message 16 4 List of Menu State 17 4 1 Volume Ring 18 4 1 1 Ring Volume 18 4 1 2 Key Volume 18 4 1 3 Ear Volume 18 4 1 3 Ring Select 19 4 2 Additional feature 19 4 2 1 Wake up Time 19 4 2 2 Minute Alert 19 4 2 3 Set Rx call mode 19 4 2 4 Backlight 20 4 2 5 Own number 20 4 3 Dial features 20 4 3 1 Hot Line 20 4 3 2 Hot Line Time 20 4 ...

Page 6: ... 7 1 Checking Deleting Received Message 29 7 1 1 Text Message 29 7 1 2 Voice Message 30 7 1 3 Erasing all Received Message 31 7 2 MSG Notification tone select 31 7 3 Message Sending 31 7 3 1 Sending a New Message 31 7 3 2 Sending the sent Message or message after editing the Sent Message 32 7 3 3 Erasing a Sent Message 33 8 Beside Functions 33 8 1 Redial 33 8 2 Finding Last Call History 33 8 3 Fla...

Page 7: ...s greatly enhanced voice clarity and can provide various advanced features The telephone provides 5 line LCD Display with status indicator A choice of 10 ring sounds A menu driven interface with prompts for easy operation Last Number Redial Speed Dialing with a 99 number memory Dial tone ROH Receiver Off Hook tone Adjustable Ring Volume Internal Battery AC DC Adapter Antenna Data Port for service ...

Page 8: ...care facilities when any regulations posted in the areas instruct you to do so Hospitals or health care facilities may be using equipment that could be sensitive to external RF energy If this equipment does cause harmful interference to radio or television reception which can be determined by turning the equipment off and on the user is encouraged to try to correct the interference by one or more ...

Page 9: ...nit fails for any reason do not attempt to disassemble contact the telephone service provider for assistance If any of the following conditions exist unplug the unit at the wall plug remove battery and call the service provider AC DC Adapter is damaged or frayed Liquid has been spilled into the unit The unit has been exposed to rain or water The unit has been dropped or damaged The unit does not w...

Page 10: ...n call state REDIAL Key Function as a redialing Navigation UP Key Function for entering a MSG menu in idle state Function for scrolling up menu in menu state Navigation Right Key Function for increasing volume up Book Soft 2 Key Activate a Book state END Key Terminate a call or a menu state Key Function as a keypad lock Clear Key Key to delete the last digit Navigation Left Navigation Right Naviga...

Page 11: ...gnal strength in the service area 2 No service The phone is not receiving system signal 3 In use Displayed when call is in progress or the phone is in off hook and dial tone heard No service In use 4 Text message Displayed when a text message is received 5 Voice message Displayed when a voice message is received 6 Alarm Displayed when wake up alarm time was setting 7 Caller ID Displayed when calle...

Page 12: ...ay result if the unit falls Do not place the unit on or within 1 meter of heaters or radiators This unit is designed for desktop usage Avoid direct exposure to the sun lights and damp area Read the SAFETY INFORMATION located at the first part of this document before you place the terminal STEP III Connect Components See the figures in Installation Steps Open the battery cover securely connect the ...

Page 13: ...n instruction step I to step III please check the LCD for normal operation If you may not see status of service please repeat the 2nd instruction of step III And conform Fixed Wireless Telephone to get the proper signal strength from service operator system The adapter type may be different by country adaptation ...

Page 14: ...r voltage Connect the AC power supply line in the charger Connect adapter to outlet Pick down the handset on the charger Press and hold the button to power on After charging the terminal make a call Lock Switch Lift up the lever to fix the handset on charger Lift up the lever to make a data call with PC using USB port on charger UNLOCK LOCK ...

Page 15: ...attery Replacement Step Battery Battery Cable Battery Cover Charging Slot Open the battery cover of the unit Connect battery cable Insert battery in the unit give care to polarity Replace the battery cover Press button to make phone be powered on for 1 sec ...

Page 16: ...l tone Press Redial button The last number that you called will be re dialed If re dialed number is a received number LSI 1100 Only 1 will be attached in front of re dial number 2 You can t connect a line even if you redial Correcting dialing mistakes 1 Press Clear button shortly to erase the most recent digit 2 Press and hold Clear button for at least one second If the phone is locked enter the L...

Page 17: ...sconnect the call press End key or pick down the handset on the charger 3 4 Signal Strength The quality of calls depends on the signal strength in your area The stronger the signal the better the call quality The signal strength icon indicates the current strength as a number of bars You can see the antenna and bars according to the strength of received signal in the upper left part 3 5 Missed Cal...

Page 18: ...for next Always modem 4 Backlight Always off 10 seconds 30 seconds 2 Additional 5 Own Number Display own number 1 Hot Line Off On 2 Hot Line Time 2 9 Sec 3 Auto time out 2 9 Sec 4 Speed Dialing Enable Disable 3 Dial features 5 Key tone length Normal Long 1 Set Lock mode On Off 2 Clear calls No Yes 3 Clear memory No Yes 4 Emergency call Local 3 ea 5 Restrict call 5 1 restrict set No restriction res...

Page 19: ...avigation Left Right Key or NEXT to adjust ring volume 3 Press OK to store the ring volume level By the Volume button 1 Press Navigation Left Right Key to adjust ring volume in on hook state 4 1 2 Key Volume The tone when you press a key can be adjusted 1 Press MENU 1 Volume Ring 2 Key Volume in on hook state 2 Press Navigation Left Right Key or NEXT to adjust key volume 3 Press OK to store the ke...

Page 20: ...ired ring type with Navigation Up Down Key or NEXT There are 10 different ring types Those are Standard Option 1 Option 2 Option 3 Option 4 Habanera Deutsch song La Primavera Oh susanna Beethoven 4 2 Additional feature 4 2 1 Wake up Time This function allows you to adjust Wake up Time 1 Press MENU 2 ADDITIONAL 1 Wake up Time In on hook State 2 Select Off Once or Always by NEXT and press OK 3 Press...

Page 21: ...ion Left Right Key or NEXT 3 Press OK to save and exit 4 2 4 Backlight 1 Press MENU 2 ADDITIONAL 4 Backlight in on hook State 1 Select Always off 10 seconds 30 seconds by Navigation Up Down Key or NEXT button 2 Press OK to save and exit 4 2 5 Own number 1 Press MENU 2 ADDITIONAL 5 Own Number in on hook Sate 2 Press OK to exit 4 3 Dial features 4 3 1 Hot Line 1 Press MENU 3 DIAL FEATURES 1 Hot Line...

Page 22: ...tomatically dialing a number You can select this time between 2 and 9 second 1 Press MENU 3 DIAL FEATURES 3 Auto Timeout In on hook State 2 Select Auto time out second between 2 and 9 by NEXT or Navigation Up Down key 3 Press OK to select 4 3 4 Speed Dial enable disable 1 Press MENU 3 DIAL FEATURES 4 Speed Dialing in on hook State 2 Select Enable or Disable by NEXT or Navigation Up Down key and pr...

Page 23: ...e settings are Normal and Long 3 Press MENU 3 DIAL FEATURES 5 KeyTone Length in on hook State 4 Select Normal or Long by NEXT or Navigation Up Down key and press OK to select 4 4 Security Features 4 4 1 Lock Mode Set This function prevents your phone from being used without permission Typical default value is 0000 Possible settings are ON OFF The OFF means that the phone is not locked ON sets the ...

Page 24: ...r Navigation Up Down key to choose the number from 1 to 3 4 Press EDIT 5 Enter the emergency phone number 6 Press OK to save the number 7 Press NEXT or Navigation Up Down key to edit others or Press End button to exit emergency call process 4 4 5 Restriction Call Service This function is a convenient feature which enables user to restrict using any phone number To forbid using any phone number use...

Page 25: ...in permit edit Menu 4 5 2 Result user can use the phone number started with 700 1234 4 4 5 1 Restrict set No restriction This is a general function which has no any restrictions Restriction This is a function that you can set permitted phone number and denied phone number Emergency only This is a function which enable you to call only emergency numbers 1 Press MENU and 4 SECURITY 2 Enter a lock co...

Page 26: ... in deny edit You can save 10 deny phone numbers 1 Do the above step 1 2 of 4 4 1 2 Press 5 Restrict Call and 3 Deny Memory 3 Press EDIT to edit deny number 4 Enter the deny phone number 5 Press OK to save and exit 4 4 6 New Lock Code You can change a new lock code 4digits 1 o the above step1 2 of 4 4 1 2 Press 6 New Code 3 Enter new lock code and press OK to save 4 Enter new lock code again to co...

Page 27: ...e Press TALK button 5 2 Ear Volume You may adjust ear volume while you are in a call The Navigation Left Right Key in the middle of the phone can be used to adjust ear volume 6 Searching Editing Dialing 6 1 Retrieving Phone Number by Name 1 Press BOOK and 2 FROM MEMORIES 2 Press 1 button to retrieve phone number by name Time 0 23 1234567 TALK MENU Time 0 23 1234567 TALK MENU NEXT OK EAR VOLUME NEX...

Page 28: ...y location Empty Location is displayed If you press FIND button without entering number you see the whole phone number list in the memory Location and you can find the number by scrolling the list 4 Pick up the handset and Send button to call to displayed number press EDIT to edit stored information or press DEL to delete displayed information Edit process Modify name by Clear button and keypad MA...

Page 29: ...ess You might press QUIT to go to Idle State at the above step 5 6 3 Retrieving Phone Number by NUMBER 1 Press BOOK and 2 FROM MEMEORIES 2 Press 3 button to retrieve a phone number by number 3 Enter the phone number that you want to find and press FIND button If there is no stored phone number in the memory location No number matches is displayed 4 Pick up the handset from the charger or press Sen...

Page 30: ...e all phonebook memory 4 Press MENU 4 Security Enter Lock Code 5 Press 3 Clear Memory 6 Select Yes using Navigation Up Down Key or NEXT button 7 Press OK to erase all phone memory 7 SMS Short Message Service Messaging Paging and Voice mail features are available when your phone is turned on Using Message button allows you to access messages for viewing on the LCD screen or to send a message Check ...

Page 31: ... voice mail message in your mail box Only the most recent voice mail notification will be stored in the WLL phone previous messages will be overwritten When a voice mail messages left for you the WLL phone will alert and display Voice Mail You must call your voice mail service to retrieve these messages 1 Press MESSAGE button and 1 Received MSG in idle state 2 Press 2 Voice MSG to check the voice ...

Page 32: ...ng NEXT or Navigation Up Down Key 3 Press OK to save and exit 7 3 Message Sending 7 3 1 Sending a New Message 1 Press Navigation Up button and 2 MSG SENDING 2 Press 1 New Message to send a new message 3 Enter the called number and press OK You can find the called number in the memory by FIND button 4 Enter the call back number and press OK Call Back Number 0123456789 OK Call Back Number 0123456789...

Page 33: ...age You can see the selected sent message Edit the message Press ABCD to change upper or lower case character 4 Press OK Button 5 Enter the called Number and press OK 6 Enter the call back Number and press OK 7 Select Yes No to store Message Press OK to send the MSG Store Message No Yes NEXT OK Store Message No Yes NEXT OK 01 Hello 02 Hi 03 It s Me DEL EDIT 01 Hello 02 Hi 03 It s Me DEL EDIT Messa...

Page 34: ...button to redial last outgoing number 8 2 Finding Last Call History Pick up the handset from the charger or press Send button and Redial button to redial last outgoing number MSG SENDING 2 Sent Message 3 Clear All 1 New Message NEXT OK MSG SENDING 2 Sent Message 3 Clear All 1 New Message NEXT OK 0123456789 Silvia 23456789 QUIT VIEW 0123456789 Silvia 23456789 QUIT VIEW LSI 1100 Only If re dialed nu...

Page 35: ...tate After the ROH tone The phone returns to the IDLE state as the picture and the phone is able to receive a call 9 Storing Phone Number 9 1 Storing Editing Phone Numbers 9 1 1 Storing Phone Numbers Frequently used phone numbers can be stored on the memory locations 01 99 2 digits and you can make a call by pressing memory location number in off hook state 1 Enter the area code and phone number i...

Page 36: ...number is stored in the displayed memory location 7 The phone will display an icon asking to keep your number as secret or not Select secret icon or in secret icon by Navigation Left Right Key Press Navigation Down Key to go to the next step 8 The phone will display an icon asking for the Phone number type to store your number Select Phone Type by Navigation Left Right Key Press Navigation Down Ke...

Page 37: ...aracter Press once a keypad to enter the first letter labeled in the keypad twice to enter the second letter and 3 times to enter the third letter EX To enter L Press dial button 5 labeled JKL 3 times to enter L After 2 seconds entering a character the cursor is moved to the next position automatically Press Navigation button to move the cursor Press Clear button to erase or correct entered charac...

Page 38: ... phone number in the memory location Empty Location is displayed If you do not remember the memory location to erase press FIND to search phone number by memory location 2 Erasing process Press DEL to delete Select Yes using Navigation Up Key Navigation Down Key or NEXT button Press OK to complete erasing process 9 2 Finding Stored Phone Numbers You can see all the list of stored phone numbers in ...

Page 39: ...ain Unit Item LSI 110 LSI 1100 Tx Frequency Digital 824 849 MHz Digital 1850 1910 MHz Rx Frequency Digital 869 894 MHz Digital 1930 1990 MHz Channel Bandwidth 1 25 MHz 1 25 MHz Tx Power Digital Max 0 2W Digital Max 0 2W Rx Sensitivity 104 25dBm 104 25dBm Size 45 X 161 X 35 7 L X W X H 45 X 161 X 35 7 L X W X H About 124 with battery About 129 with battery Weight g About 102 without battery About 1...

Page 40: ...1100 39 Input Voltage AC 100 240V 0 2A Input Frequency 50 60Hz Output Voltage DC12V 0 5A Battery Item Description Capacity 3 7V LI ion 750mAh Talk duration time 1 Hours Standby duration time 72 Hours Charging duration time Quick charge 3 Hours ...

Page 41: ...LSI 110 1100 40 Licensed by QUALCOMM Incorporated under one or more of the following Patents U S Patent No 4 901 307 U S Patent No 5 056 109 U S Patent No 5 099 204 U S Patent No 5 101 501 U S Patent No 5 103 459 U S Patent No 5 107 225 ...

Reviews: