background image

31

ENG

ENGLISH

WATCHING TV

Using additional options

Adjusting aspect ratio

Resize an image to view at its optimal size by 
pressing 

RATIO

 while you are watching TV.

 NOTE


y

You can also change the image size by 

accessing 

Aspect Ratio

 in the 

PICTURE


menus.


y

You can adjust the enlarge proportion using 

the Navigation buttons. 


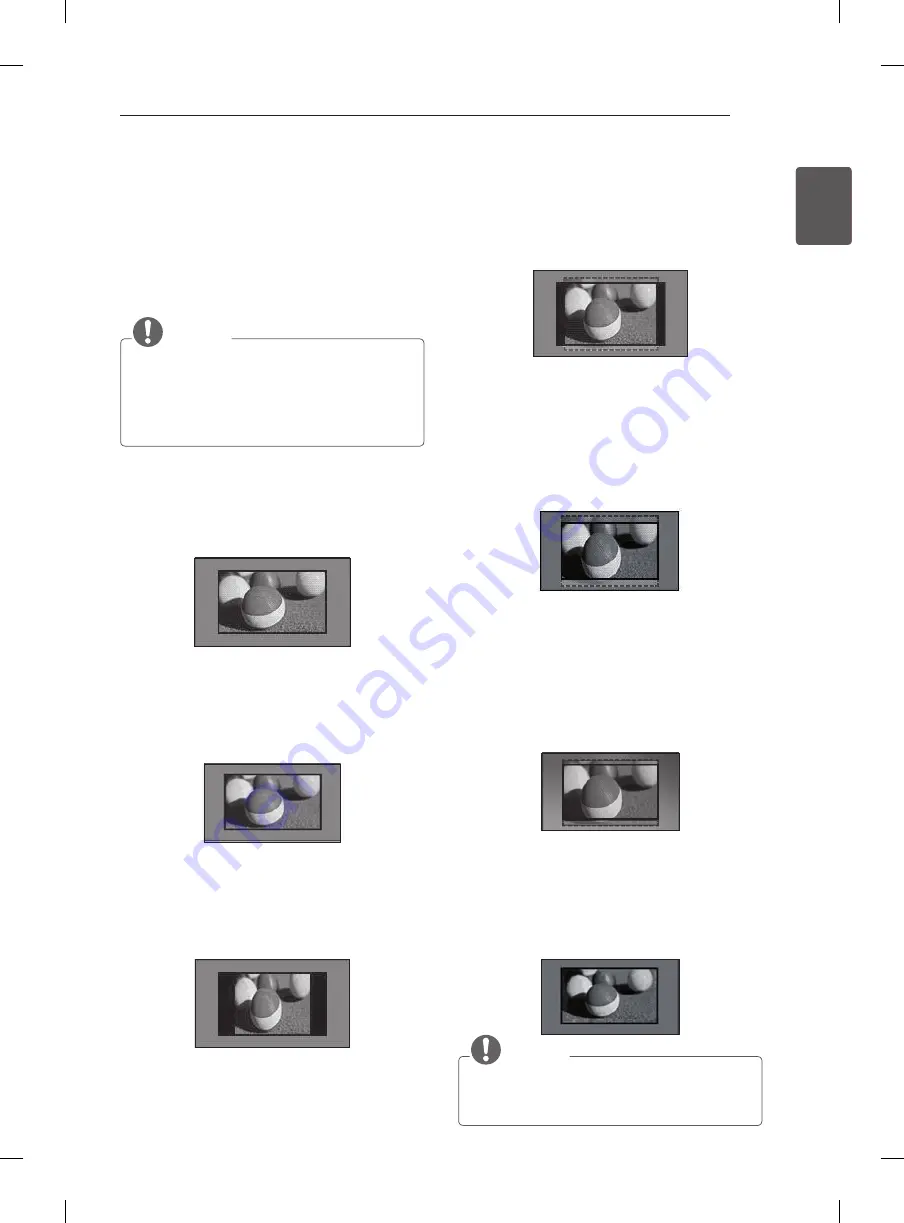
16:9

: Resizes images to fit the screen width.

(This function works in RF/AV/Component/
HDMI/USB Mode.)


Original

: When your TV receives a wide 

screen signal it will automatically change to the 
picture format  broadcasted. 
(This function works in RF/AV Mode.)


4:3

: Resizes images to the previous standard 

4:3.  
(This function works in RF/AV/Component/
HDMI Mode.)

14:9

 : You can view a picture format of 14:9 

or a general TV programme in the 14:9 mode. 
The 14:9 screen is viewed in the same way as 
in 4:3, but is moved to the up and down. 
(This function works in RF/AV Mode.)


Zoom 1 

: The following selection will allow you 

to view the picture without any alteration, while 
filling the entire screen. However, the top and 
bottom of the picture will be cropped.

      (This function works in RF/AV Mode.)

Zoom 2 

: Choose Zoom 2 when you wish the 

picture to be altered, both horizontally extended 
and vertically cropped. The picture adopting 
a compromise between alteration and screen 
coverage.

      (This function works in RF/AV Mode.)

Just Scan

: Displays video images in the origi-

nal size without 

removing

 parts

 of 

the edge of 

the image.

  (

This function works in Component/HDMI 

(720P/1080i/1080p) Mode.)

 NOTE


y

If you enlarge or reduce an image, the 

image may be distorted.

Summary of Contents for LS31 Series

Page 1: ...d First Mass Production 2 Especially Don t use or contain lead Pb and cadmium Cd in ink N O T E S 1 Trim Size Format 182 LG mm x 257 mm 2 Printing Colors Cover 1 COLOR BLACK Inside 1 COLOR BLACK 3 Stock Paper Cover Inside Uncoated paper 백상지 60 g m 4 Printing Method Off set 5 Bindery 6 Language 7 Number of pages 52 pages Suo Junwei Niu Yang 13 04 2012 13 04 2012 2 Uncoated paper 백상지 60 g m 2 1 Orig...

Page 2: ...Pagination sheet Pagination sheet P NO MFL67322320 Total pages 52 pages Front Cover EN P NO 2 Back Cover 50 Blank ...

Page 3: ...OWNER S MANUAL LCD TV LED LCD TV Please read this manual carefully before operating your set and retain it for future reference P NO MFL67322320 1204 REV00 Printed in China www lg com CS41 LS31 LS33 ...

Page 4: ...25 Composite connection 26 USB connection 26 Audio System connection 26 External Stereo Connection 27 REMOTE CONTROL 28 WATCHING TV 28 Turning the TV on for the first time 28 Watching TV 28 Managing programmes 28 Automatically setting up programme 29 Manually setting up programme 30 Editing your programme list 30 Selecting a programme on the programme list 30 Using favourite programmes 31 Using ad...

Page 5: ...PL MPL and other open source licenses that is contained in this product please visit http opensource lge com In addition to the source code all referred license terms warranty disclaimers and copyright notices are available for download LG Electronics will also provide open source code to you on CD ROM for a charge covering the cost of performing such distribution such as the cost of media shippin...

Page 6: ...wer plug with wet hands Additionally if the cord pin is wet or covered with dust dry the power plug completely or wipe dust off You may be electrocuted due to excess moisture y y Make sure to connect the power cable to the grounded current Except for devices which are not grounded You may be electrocuted or injured y y Fix the power cable completely If the power cable is not fixed completely a fir...

Page 7: ...connected to the input terminal on the wall Additionally do not touch the power cable right after plugging into the wall input terminal You may be electrocuted Depending on model y y Do not put or store inflammable substances near the product There is a danger of explosion or fire due careless handling of the inflammable substances y y Do not drop metallic objects such as coins hair pins chopstick...

Page 8: ...been impacted by shock The product has been damaged Foreign objects have entered the product The product produced smoke or a strange smell This may result in fire or electric shock y y If you don t intend to use the product for a long time unplug the power cable from the product Covering dust can cause a fire or insulation deterioration can cause electric leakage electric shock or fire y y Apparat...

Page 9: ...l the set to use the wall mounting bracket optional parts fix it carefully so as not to drop y y Only use the attachments accessories specified by the manufacturer y y When installing the antenna consult a qualified service man This may create a fire hazard or an electric shock hazard 5 7 times y y We recommend that you maintain a distance of at least 5 to 7 times the diagonal screen size when wat...

Page 10: ...hanical abuse such as being twisted kinked pinched closed in a door or walked upon Pay particular attention to plugs wall outlets and the point where the cord exits the appliance y y Do not press strongly upon the panel with a hand or sharp object such as nail pencil or pen or make a scratch on it y y Avoid touching the screen or holding your finger s against it for long periods of time Doing so m...

Page 11: ...different brightness and colour of the panel depending on your viewing position left right top down This phenomenon occurs due to the characteristic of the panel It is not related with the product performance and it is not malfunction y y Displaying a still image e g broadcasting channel logo on screen menu scene from a video game for a prolonged time may cause damage to the screen resulting in re...

Page 12: ...3 Connect an external device to the TV set ASSEMBLING AND PREPARING Unpacking Check your product box for the following items If there are any missing accessories contact the local dealer where you purchased your product The illustrations in this manual may differ from the actual product and item CAUTION y y Do not use any unapproved items to ensure the safety and product life span y y Any damages ...

Page 13: ...32 42LS31 See p Screw for assembly 2EA M4 x 14 Only 26LS33 See p 16 Screw for assembly 4EA M4 x 14 4EA P4 x 16 Only 32LS33 See p 16 Screw for fixing Only 26 32 42CS41 32 42LS31 32LS33 See p 19 Power Cord Adapter Only 19 22 26LS33 See p 24 or Isolator Depending on model See p 13 Ferrite core Depending on model See p 13 Cable holder Depending on model See p 21 Protection cover Only 26CS41 See p 22 P...

Page 14: ...ING Stand Body Stand Base Only 19 22 26LS33 See p 16 Stand Body Stand Base Only 32LS33 See p 16 Stand Body Stand Base Only 22CS41 See p 18 Stand Body Stand Base Only 26CS41 See p 17 Stand Body Stand Base Only 32 42LS31 32 42CS41 See p 17 ...

Page 15: ...tive earthing of the building installation through the mains connection or through other equipment with a connection to protective earthing and to a cable distribution system using coaxial cable may in some circumstances create a fire hazard Connection to a cable distribution system has therefore to be provided through a device providing electrical isolation below a certain frequency range galvani...

Page 16: ...he highlighted menu option or confirms an input SETTINGS Accesses the main menu or saves your input and exits the menus INPUT Changes the input source I Turns the power on or off 1 All of the buttons are touch sensitive and can be operated through simple touch with your finger INPUT OK SETTINGS Speakers Touch buttons1 Power indicator Remote control sensor Screen ...

Page 17: ...Before moving or lifting the TV disconnect the power cord and all cables y y When holding the TV the screen should face away from you to avoid damage y y Hold the top and bottom of the TV frame firmly Make sure not to hold the transparent part speaker or speaker grill area y y When transporting a large TV there should be at least 2 people y y When transporting the TV by hand hold the TV as shown i...

Page 18: ...3 Model 19 22LS33 26LS33 Standard screw P4 x 20 M4 x 14 Number of screws 2EA 2EA 1 3 2 Stand Body Stand Base 2 3 Screw Stand Head M4 x 14 w Stand Head x 14 M4 x 14 4EA Screw Stand Head M4 x 14 32LS33 1 Stand Body Stand Base P4 x 16 4EA Image shown may differ from your TV ...

Page 19: ...17 ENG ENGLISH ASSEMBLING AND PREPARING 26CS41 Stand Base 1 4EA M4 x 20 Stand Body 2 3 4EA M4 x 20 32 42CS41 32 42LS31 2 1 4EA M4 x 20 Stand Body Stand Base 3 4EA M4 x 20 ...

Page 20: ...the screws with too much force otherwise they may be worn out and get loosened NOTE y y Remove the stand before installing the TV on a wall mount by performing the stand attachment in reverse Mounting on a table 1 Lift and tilt the TV into its upright position on a table Leave a 10 cm minimum space from the wall for proper ventilation 10 cm 10 cm 10 cm 10 cm 2 Connect the power cord to a wall outl...

Page 21: ...ely y y Brackets bolts and ropes are not provided You can obtain additional accessories from your local dealer Adjusting the angle of the TV to suit view Only 32 42CS41 32 42LS31 Swivel 20 degrees to the left or right and adjust the angle of the TV to suit your view 20 20 CAUTION y y When adjusting the angle of the product watch out for your fingers Personal injury may occur if hands or fingers ar...

Page 22: ...cribed in the following table Separate purchase Wall Mounting Bracket Model 22CS41 19 22 26LS33 32LS31 26 32CS41 32LS33 VESA A x B 100 x 100 200 x 100 Standard screw M4 M4 Number of screws 4 4 Wall mount bracket LSW100B LSW100B Model 42LS31 42CS41 VESA A x B 200 x 200 Standard screw M4 Number of screws 4 Wall mount bracket LSW200BX 10 cm 10 cm 10 cm 10 cm Using the Kensington security system Depen...

Page 23: ...e not covered by the manufacturer s warranty NOTE y y Use the screws that are listed on the VESA standard screw specifications y y The wall mount kit includes an installation manual and necessary parts y y The wall mount bracket is not provided You can obtain additional accessories from your local dealer y y The length of screws may differ depending on the wall mount Make sure to use the proper le...

Page 24: ...dust and dirt Push the supplied protection cover into the opening at the bottom of the TV until it locks in place Protection cover Only 26 32 42CS41 32 42LS31 1 Gather and bind the cables with the Cable Management 2 Fix the cable management firmly to the TV Cable Management CAUTION y y Do not move the TV by holding the cable management as the cable management may break and injuries and damage to t...

Page 25: ...rt y y If you record a TV program on a DVD recorder or VCR make sure to connect the TV signal input cable to the TV through a DVD recorder or VCR For more information of recording refer to the manual provided with the connected device y y Refer to the external equipment s manual for operating instructions y y If you connect a gaming device to the TV use the cable supplied with the gaming device An...

Page 26: ...Speed HDMI Cables are tested to carry an HD signal up to 1080p and higher y y Supported HDMI Audio format PCM 32k 44 1k 48k DTS Not supported Adapter connection Only 19 22 26LS33 DC IN DC Adapter 1 Connect the antenna cable to the antenna input port on the TV 2 Connect the DC adapter plug to the power input jack on the TV 3 Connect the power cord to the DC adapter first then plug the power cord in...

Page 27: ...RED RED WHITE WHITE DVD Blu Ray HD Cable Box Not Provided NOTE y y If cables are installed incorrectly it could case the image to display in black and white or with distorted colour Composite connection Transmits analog video and audio signals from an external device to the TV Connect the external device and the TV with th e composite cable as shown VIDEO MONO AUDIO L R COMPONENT IN VIDEO Y L R PB...

Page 28: ...he built in speaker External Stereo Connection Use to connect to an external amplifier or surround sound system IN ANTENNAIN L AUDIO OUT R L R AUDIO IN External Stereo USB connection Connect a USB storage device such as a USB flash memory or a USB memory card reader to the TV USB IN Not Provided USB ...

Page 29: ... 9 number buttons Selects a programme Selects numbered items in a menu Accesses the saved programme list Returns to the previously viewed programme Accesses the main menus Clears all on screen displays and return to TV viewing Navigation buttons up down left right Scrolls through menus or options Selects menus or options and confirms your input PSM Recalls your preferred picture setting SSM Recall...

Page 30: ...ogrammes automatically 6 When you return to the previous menu press SETTINGS Turning the TV on for the first time When you turn the TV on for the first time the Initial setting screen appears Select a language and customize the basic settings 1 Connect the power cord to a power outlet 2 In Standby mode press POWER to turn the TV on The Initial setting screen appears if you turn the TV on for the f...

Page 31: ...s the OK to store it 6 When you return to the previous menu press SETTINGS Manually setting up programme Manual Tuning lets you manually tune and arrange the stations in whatever order you desire 1 Press SETTINGS and the Navigation buttons to scroll to SETUP 2 Press the Navigation buttons to scroll to Manual Tuning 3 Press the Navigation buttons to scroll to Storage 4 Press the Navigation buttons ...

Page 32: ... pro gramme 4 When you return to the previous menu press SETTINGS Selecting a programme on the programme list 1 Press LIST to access the programme list 2 Press the Navigation buttons to select to desired programme and press OK 3 When you return to the previous menu press LIST NOTE y y You may find some blue programmes They have been set up to be skipped by auto programming or in the programme edit...

Page 33: ...e 14 9 You can view a picture format of 14 9 or a general TV programme in the 14 9 mode The 14 9 screen is viewed in the same way as in 4 3 but is moved to the up and down This function works in RF AV Mode Zoom 1 The following selection will allow you to view the picture without any alteration while filling the entire screen However the top and bottom of the picture will be cropped This function w...

Page 34: ...the input sources and press OK y y Image shown may differ from your TV Input mv OK TV AV Component HDMI USB Input source Description TV Watch TV over the air and digital cable broadcast AV Watch video from a VCR or other external devices Component Select it when using the DVD or the Digital set top box depends on connector HDMI Watch video from a HTS or other high definition devices USB Select it ...

Page 35: ...e may be damaged y y Please do not connect the USB storage device which was artificially manoeuvred on the PC The device may cause the product to malfunction or fail to be played Never forget to use only a USB storage device which has normal music files image files y y Please use only a USB storage device which was formatted as a FAT16 or FAT32 file system y y Please connect a USB storage device w...

Page 36: ...e Change ꔵ ꘂ Mark ꕯ Exit 3 No Description 1 Moves to upper level folder 2 Current page Total pages 3 Contents under the current folder Button Description ꘂ Marks or Unmarks each file Supported file format Type Supported file format Photo JPEG Baseline 64 x 64 to 8192 x 8192 Progressive 64 x 64 to 1024 x 768 y y You can play JPEG files only y y Non supported files are displayed in the form of prede...

Page 37: ...by icon only y y Abnormal files are displayed in the form of bitmap Using photo options Use the following options while viewing photos 06 ꔆ 001 005 Option Close BGM Slideshow Options Number of selected photos Option Description Slideshow Starts or stops a slideshow with selected photos If there are no selected photos all photos saved in the current folder display during a slideshow To set a slides...

Page 38: ...c file BGM Start playing the selected music files and then move to the Photo List Mark All Mark all music files on the screen 6 Play music 7 Control playback by using the following buttons Music List Page 1 1 UP Folder Move Option Page Change ꔵ ꘂ Mark ꕯ Exit Title 002 mp3 003 mp3 004 mp3 001 mp3 3 12 3 12 3 12 3 12 UP Folder Duration ꕞ 0 00 4 06 Button Description r Stops playback s Plays a music ...

Page 39: ...on does not start but dis plays inappropriate information in playtime y y If you press OK button screen saver is stopped y y The PLAY s Pause t r w v buttons on the remote control are also avail able in this mode y y You can use the w button to select the next music and the v button to select the previous music file name Time elapsed UP Folder Title 002 mp3 003 mp3 004 mp3 001 mp3 3 12 3 12 3 12 3...

Page 40: ...e OPTION Customizes the general settings Customizing Settings SETUP Settings 1 Press SETTINGS and the Navigation buttons to scroll to Setup 2 Press the Navigation buttons to scroll to the setting or option you want and press OK 3 When you return to the previous menu press SETTINGS The available programme settings are described in the following Setting Description Auto Tuning Tunes and stores all a...

Page 41: ...ces the power consumption by adjusting the screen brightness Option Off The Energy Saving is off Minimum Medium Maximum Selects the brightness level Screen off The screen turns off in 3 seconds NOTE y y When you select Screen Off the screen will be turned off in 3 seconds and Screen Off will start y y If you adjust Energy Saving Minimum Medium Maximum Backlight feature will not work Picture Mode S...

Page 42: ... options Depending on model Setting Description Dynamic Contrast Adjusts the contrast to keep it at the best level according to the brightness of the screen The picture is improved by making bright parts brighter and dark parts darker Dynamic Colour Adjusts screen colours so that they look livelier richer and clearer This feature enhances hue saturation and luminance so that red blue and green whi...

Page 43: ...andard Select when you want standard quality sound Music Select when you listen to music Cinema Select when you watch movies Option Treble Controls the dominant sounds in the output When you turn up the treble it will increase the output to the higher frequency range Bass Controls the softer sounds in the output When you turn up the bass it will increase the output to the lower frequency range Res...

Page 44: ... the right loudspeaker L L Audio signal from audio L input is sent to left and right loudspeakers R R Audio signal from audio R input is sent to left and right loudspeakers This feature may not be applied based on country broadcasting circumstance Stereo Dual Reception When a programme is selected the sound information for the station appears with the programme number and station name 1 Press I II...

Page 45: ...ture Sleep Timer Sets the length of time until the TV to turns off When you turn the TV off and turn it on again the Sleep timer feature will be set to off y y Image shown may differ from your TV Time Clock Off Time On Time Sleep Timer mv s OK Settings OPTION Settings 1 Press SETTINGS and the Navigation buttons to scroll to Option 2 Press the Navigation buttons to scroll to the setting or option y...

Page 46: ... must complete the three digit number and then re enter the correct page number 2 The P button can be used to select the preceding or following page Fastext The teletext pages are colour coded along the bot tom of the screen and are selected by pressing the corresponding coloured button Page selection 1 Press the ꔻ button to select the index page 2 You can select the pages which are colour coded a...

Page 47: ...text page consists of 2 or more sub pages The number of sub pages and the sub page displayed is usually shown on the screen below the time When this menu is selected the stop symbol is displayed at the top left hand corner of the screen and the automatic page change is inactive ꔽ Reveal Select this menu to display concealed information such as solutions to riddles or puzzles ꔼ Update Displays the ...

Page 48: ...ult in scratches and image distortions y y Do not use any chemicals as this may damage the product y y Do not spray liquid onto the surface If water enters the TV it may result in fire electric shock or malfunction Power cord y y Remove the accumulated dust or dirt on the power cord regularly TROUBLESHOOTING Problem Solution Cannot control the TV with the remote control y y Check the remote contro...

Page 49: ...rection Afterimages ghosts appear when the product turns off y y Pixels may have been damaged from a fixed image displayed for a long time image burn Use a screen saver to prevent the pixel damage on the screen The power is on but the screen appears extremely dark y y Adjust the brightness and contrast in the PICTURE menu No Signal appears on the screen y y Check if the signal cable is connected b...

Page 50: ...39 0 539 0 x 400 0 x 165 0 663 0 x 483 0 x 197 0 Without stand mm 755 0 x 479 0 x 45 8 539 0 x 345 0 x 56 8 663 0 x 424 0 x 72 8 Weight With stand kg 9 1 4 2 7 4 Without stand kg 8 3 3 9 6 6 Power requirement AC 100 240 V 50 60 Hz AC 100 240 V 50 60 Hz AC 100 240 V 50 60 Hz MODELS 32CS41 42CS41 32LS31 32CS410 TB 32CS410Y TB 32CS411 TA 32CS411Y TA 42CS410 TB 42CS410Y TB 42CS411 TA 42CS411Y TA 32LS3...

Page 51: ...69 CATV 01 to 47 M VHF UHF 2 to 78 CATV 01 to 71 Vietnam Malaysia Television System PAL SECAM B G D K PAL I NTSC M Programme Coverage BG VHF UHF 1 to 69 CATV 01 to 47 I VHF UHF 1 to 69 CATV 01 to 47 DK VHF UHF 1 to 69 CATV 01 to 47 M VHF UHF 2 to 78 CATV 01 to 71 Iran Algeria Tunisia Digital model Television System PAL SECAM B G D K PAL I NTSC M Programme Coverage BG VHF UHF 1 to 69 CATV 01 to 47 ...

Page 52: ...0x720 37 5 44 96 45 50 59 94 60 1920x1080 33 72 33 75 28 125 26 97 27 33 716 33 75 56 25 67 43 67 5 59 94 60 50 23 97 24 29 976 30 00 50 59 94 60 Component port connecting information Component ports on the TV Y PB PR Video output ports on DVD player Y PB PR Y B Y R Y Y Cb Cr Y Pb Pr Signal Component 480i 576i O 480p 576p O 720p 1080i O 1080p O 50 Hz 60 Hz only ...

Page 53: ......

Page 54: ...and serial number of the TV Refer to the label on the back cover and quote this information to your dealer when requiring any service MODEL SERIAL Trade Mark of the DVB Digital Video Broadcasting Project 1991 to 1996 Only DTV ...

Reviews: