background image

Care and Maintenance

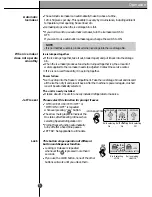
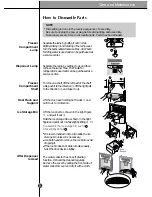
To remove the lamp cover, press the protrusion under the lamp cover to the front and
then pull the lamp cover out. 
Turn the bulb counterclockwise. Max. 40 W bulb for refrigerator is used and can be
purchased at a service center.

Lamp in

Refrigerator

Compartment

To remove the vegetable compartment
cover, pull out the vegetable compartment
a bit to the front

, lift the front part of the

vegetable compartment cover as shown by

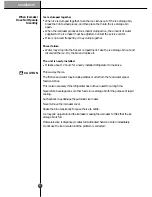
, and take it out.

Vegetable

Compartment

Cover

1

2

Be sure to remove parts from the refrigerator door when removing the vegetable
compartment, snack drawer, and refreshment center cover.

NOTE

Filter

Replacement

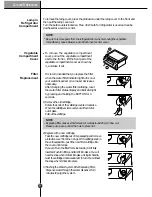
Replacing filter causes small amount of water(around 25cc) to flow out. 
Please put up a cup under the hole to prevent it.

NOTE

It is recommended that you replace the filter
when the water filter indicator light turns on or
your water dispenser or ice maker decreases
noticeably.
After changing the water filter cartridge, reset
the water filter status display and indicator light
by pressing and holding the BUTTON for 3
seconds.

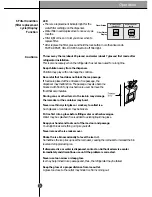
1) Remove the old cartridge.

Rotate the knob of the cartridge counter clockwise.
When the cartridge is removed, you will feel it click
out of place.
Pull out the cartridge.

3) Flushing the Water System After Replacing Filter.

Dispense water through the water dispenser for 3
minutes to purge the system.

2) Replace with a new cartridge.

Take the new cartridge out of its packaging and remove
protective cover from the o-rings. With cartridge knob in
the vertical position, push the new filter cartridge into
the cover until it stops.
If you can’t turn the filter from side to side, it isn’t fully
inserted. Push it in firmly and twist it into place. You will
hear the snap when it clicks into place. Using its handle,
twist the cartridge clockwise about 1/4 turn. You will hear
the snap when it clicks into place.

2

7

Summary of Contents for LRSC26923SW

Page 1: ...24 HOURS A DAY 7 DAYS A WEEK FOR LG CUSTOMER SERVICE Servicio LG Atenci n al Cliente 24 horas al d a 7 d as a la semana LRSC26925SW LRSC26923SW LRSC26925TT LRSC26923TT ...

Page 2: ...ker Shelf Wine Holder Applicable to some models only Egg Bin Applicable to some models only Humidity Control in the Vegetable Compartment Optichill Temperature Transition Corner Temperature Change at Optichill Optichill Location of Foods Storing Foods How to Dismantle Parts General Information Cleaning Troubleshooting Table of Contents Introduction Installation Operation Suggestion on Food Storage...

Page 3: ...ly and pull it straight out from the outlet Repair or replace inmediately all electric service cords that have become frayed or otherwise damaged Do not use a cord that shows cracks or abrasion damage along its length or at either the plug or connector end When moving your refrigerator away from the wall be careful not to roll over or damage it in any way Do not crush or damage the water line Do n...

Page 4: ... foods that have thawed if they still contain ice crystals or if they are still cold below 40 4 C Thawed ground meats poultry or fish that have any off odor or off color should not be frozen and should not be eaten Thawed ice cream should be discarded If the odor or color of any food is poor or questionable get rid of it The food may be dangerous to eat Even partial thawing and refreezing reduces ...

Page 5: ...h a properly grounded three prong wall outlet Do not under any circumstances cut or remove the third ground prong from the power cord NOTE Before performing any type of installation cleaning or removing a light bulb turn the control Thermostat Refrigerator Control or Freezer Control depending on the model to OFF and then disconnect the refrigerator from the electrical source When you are finished ...

Page 6: ... i c the Optichill is not included in all models NOTE Freezer Compartment Refrigerator Compartment Dairy Corner Water Filter Lamp Door Rack Lamp Automatic Icemaker Shelf steel or glass Door Rack Jet Freezing Drawer Door Rack Lower Cover Shelf Shelf Snack Drawer Wine holder Egg Box Lamp Vegetable Drawer Door Rack Optichill 6 6 ...

Page 7: ...performance 5 Allow the clearance of at least 2 inch from the ceiling and 1 inch from the side walls for better cooling efficiency ease of installation proper air circulation and electrical connections Method to remove protection film Some Model 1 Grasp the handles with both hands and hold them upward to remove 2 Entirely remove the protection film adhered to the external surface of the door 3 Ass...

Page 8: ...y lifting it upward This time the door should be lifted enough for the water feed tube to be completely pulled out 1 Loosen the hinge cover screws and remove the cover Remove connection wire if any except for the ground line 2 Remove keeper by rotating it clockwise and then remove the upper hinge by lifting it up 3 Remove the refrigerator compartment door by lifting it up If a tube end is deformed...

Page 9: ... icemaking and cool water feed Keep the total length of the water feed tube within 40 feet and be careful not to bend or kink the tube If the tube is longer than 40 feet the icemaker and water dispenser will not operate properly Install the water feed tube at a place free from heat Connect to potable water supply only Refer to instructions with water filter kit for installation Mount the doors in ...

Page 10: ...nly in areas where temperatures will remain above freezing It may take up to 24 hours for your icemaker to begin producing ice IMPORTANT Standard screwdriver 7 16 inch and 1 2 inch open end wrenches or two adjustable wrenches 1 4 inch nut driver 1 4 inch drill bit Hand drill or electric drill properly grounded Tools Required Your refrigerator dealer has a kit available with a 1 4 inch saddle type ...

Page 11: ...a drill drill a 1 4 inch hole in the cold water pipe you have selected 6 Fasten shut off valve to cold water pipe with pipe clamp Be sure outlet end is solidly in the 1 4 inch drilled hole in the water pipe and that the washer is under the pipe clamp Tighten packing nut Tighten the pipe clamp screws carefully and evenly so washer makes a watertight seal Do not overtighten or you may crush the copp...

Page 12: ...hat leak Plug In the Refrigerator Arrange the coil of copper tubing behind the refrigerator so it does not vibrate against the back of the refrigerator or against the wall Push the refrigerator back to the wall Start the lcemaker Set the icemaking stop switch to the ON position The icemaker will not begin to operate until it reaches its operating temperature of 15 F 9 C It will then begin operatio...

Page 13: ...a newly installed refrigerator to make ice When Icemaker Does Not Operate Smoothly Throw away the ice The first ice and water may include particles or odor from the feed water pipe or feed water box This is also necessary if the refrigerator has not been used for a long time Never store beverage cans or other foods in ice storage bin for the purpose of rapid cooling Such actions may damage the aut...

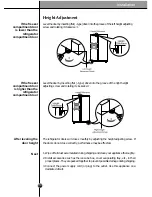
Page 14: ...erformance may be affected If the freezer compartment door is lower than the refrigerator compartment door If the freezer compartment door is higher than the refrigerator compartment door After leveling the door height Installation Next 1 Wipe off all dust accumulated during shipping and clean your appliance thoroughly 2 Install accessories such as the ice cube box cover evaporating tray etc in th...

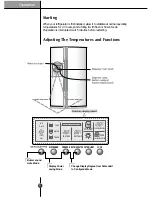
Page 15: ...esh or frozen foods If operation is interrupted wait 5 minutes before restarting DISPENSER FREEZER REFRIGERATOR FILTER LIGHT LOCK CUBE DIGITAL CONTROL WATER ROOMTEMPERATURE FILTER 3SECS LOCK DISPENSER BUTTON CRUSH ON JET FILTER RESET HOLD 3 SECS FRZTEMP REFTEMP Display Power saving Mode Change Display Degree from Fahrenheit to Centigrade Mode Buzzer sound mute Mode Operation PLUS ICE 155 ...

Page 16: ...sly to turn all leds ON and then OFF with the recognition sound of Ding after 5 seconds Once the mode activates the display is OFF Until door is opened or display button is pressed When 30 seconds has elapsed after closing door or pressing button the display turns OFF To deactivate this mode is same as the activation methods The mode inactivates when resetting the power 3 To change temperature dis...

Page 17: ...e indicated setting temperature is the target temperature not actual temperature within refrigerator Please adjust temperature as above after using refrigerator for minimum 2 3 days You can select water or ice Please select water Crushed ice or cubed ice by pressing button as you desire Please press the button gently by pushing in cup You will hear a clap when the ice door closes after ice is disp...

Page 18: ...n crushed ice will be automatically selected The unit is newly installed It takes about 12 hours for a newly installed refrigerator to make ice Automatic Icemaker When ice maker does not operate smoothly Please select this function for prompt freezer OFF ICE PLUS JET OFF or OFF ON OFF is repeated whenever pressing button The arrow mark graphic remains at the On status after flickering 4 times when...

Page 19: ...e is found in product during the use of refrigerator If your refrigerator fails do not turn off the power Instead contact a local Authorized service center or call our support line for assistance Turning off the appliance will make it more difficult for the service technician to determine the problem Crushed Ice Light the crushed ice lamp by pressing the selection button Crushed ice will be dispen...

Page 20: ...hing or injure yourself Never remove the ice maker cover Shake the ice bin occasionally to level the ice in it Sometimes the ice piles up near the icemaker causing the icemaker to misread the bin level and stop producing ice If discovered ice or water is dispensed contact an Authorized service center immediately and discontinue use until the problem is corrected Never use too narrow or deep glass ...

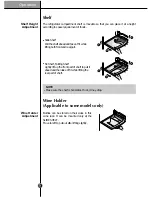
Page 21: ...off it while lifting both front and rear part Fix Shelf Folding Shelf Lightly lift up the front part of shelf to pull it ahead and then take off it while lifting the rear part of shelf Bottles can be stored on their sides in this wine rack It can be mounted only at the SLIDE SHELF Move to left to pull out after lifting slightly Shelf Height Adjustment Wine Holder Adjustment Make sure the shelf is ...

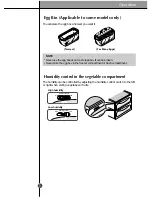
Page 22: ...controlled by adjusting the humidity control switch to the left or right when storing vegetabes or fruits High High Low Low High Low Humidity Control High Low Humidity Control Never use the egg box as an ice storage bin It can be broken Never store the egg box in the freezer compartment or fresh compartment NOTE High humidity Low humidity Normal For Many Eggs 22 ...

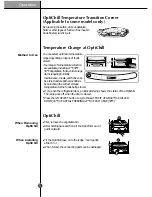
Page 23: ...nce meats and fishes can be stored under optimal conditions by selectiong the correct storage temperature for the foods being stored First remove the vegetable bin After holding back and front of the OptiChill and pull it outward If you open the refrigerator door an indicator lamp shows the status of the Optichill The lamp goes off when the door is closed Press the left SELECT button to cycle thro...

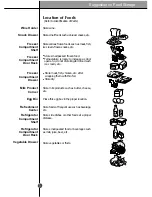
Page 24: ...er Compartment Shelf Freezer Compartment Door Rack Freezer Compartment Drawer Milk Product Corner Egg Bin Refreshment Center Refrigerator Compartment Shelf Refrigerator Compartment Door Rack Vegetable Drawer Store meat fish chicken etc after wrapping them with thin foil Store dry Store milk products such as butter cheese etc Place this egg box in the proper location Store foods of frequent use suc...

Page 25: ...mpartment they may break when frozen Do not refreeze food that has been thawed This causes loss of taste and nutrient When storing frozen food like ice cream for a long period place it on the freezer shelf not in the door rack Do not touch the cold foods or containers especially made of metallic with wet hands and place glass products in the freezer compartment That s why you may have chilblains a...

Page 26: ...lector cover and dry it with a cloth Hold the ice storage bin as shown in the right figure and pull it out while slightly lifting it Dismantling is done in the reverse sequence of assembly Be sure to unplug the power plug before dismantling and assembly Never apply severe force to dismantle parts Parts may be damaged NOTE Separate the lamp by pulling it out while slightly striking and rotating the...

Page 27: ...ilter indicator light turns on or your water dispenser or ice maker decreases noticeably After changing the water filter cartridge reset the water filter status display and indicator light by pressing and holding the BUTTON for 3 seconds 1 Remove the old cartridge Rotate the knob of the cartridge counter clockwise When the cartridge is removed you will feel it click out of place Pull out the cartr...

Page 28: ...erant to prevent sweating on the outer cabinet wall Regular cleaning is recommended Wash all compartments with a baking soda solution or a mild detergent and warm water Rinse and dry Please verify that the power cord is not damaged power plug is not overheated or power plug is well inserted into the power consent Always remove power cord from the wall outlet prior to cleaning in the vicinity of el...

Page 29: ...e controls This is normal for a fully automatic defrosting refrigerator The defrost cycle occurs periodically Make sure plug is tightly pushed into outlet Call local electric company This is normal Larger more efficient units run longer in these conditions It is normal for the refrigerator to work longer under these conditions It takes some hours for the refrigerator to cool down completely Warm f...

Page 30: ... temperature Freezer control is set too warm Refrigerator control is set too cold Refrigerator control is set too cold Solution This is normal The refrigerator goes on and off to keep the temperature constant Set the refrigerator control to a colder setting A refrigerator requires some hours to cool down completely Wait until the refrigerator or freezer has a chance to reach its selected temperatu...

Page 31: ...de the refrigerator to meet warm air from the outside Floor is uneven or weak Refrigerator rocks on the floor when it is moved slightly Refrigerator operates at higher pressures during the start of the ON cycle Items placed on the top of the refrigerator are vibrating Dishes are vibrating on the shelves in the refrigerator Solution This time close the door completely This is normal in humid weathe...

Page 32: ...and wrapping materials produce odors Food package is keeping door open Door was closed too hard causing other door to open slightly Solution Be sure both doors are closed Open household water line valve and allow sufficient time for ice to be made When ice is made dispenser should operate Turn the freezer control to a higher setting so that ice cubes will be made When the first supply of ice is ma...

Page 33: ...door is not closed Solution Be sure both doors are closed Draw and discard 7 glasses of water to freshen the supply Draw and discard an additional 7 glasses to completely rinse out tank Connect unit to cold water line which supplies water to kitchen faucet Open household water line valve Use the dispenser often so that cubes do not freeze together Only the ice cubes made by the ice maker should be...

Page 34: ...esult from misuse abuse operation outside environmental specifications or contrary to the requirements of precautions in the Operating Guide accident vermin fire flood improper installation acts of God unauthorized modification or alteration incorrect electrical current or voltage or commercial use or use for other than intended purpose Repairs when your LG refrigerator is used in other than norma...

Page 35: ...Notes ...
Page 36: ...http www lge com P No 3828JL8797A ...

Reviews: