background image

5

Before Use

INTRODUCTION

To ensure proper use of this product, please read this owner’s
manual carefully and retain for future reference.

Symbol Used in this Manual

The lightning flash symbol alerts you to the presence of
dangerous voltage within the product enclosure that may
constitute a risk of electric shock. 

Indicates hazards likely to cause harm to the unit itself or
other material damage.

NOTE

Indicates special notes and operating features.

TIP

Indicates tips and hints for making the task easier.

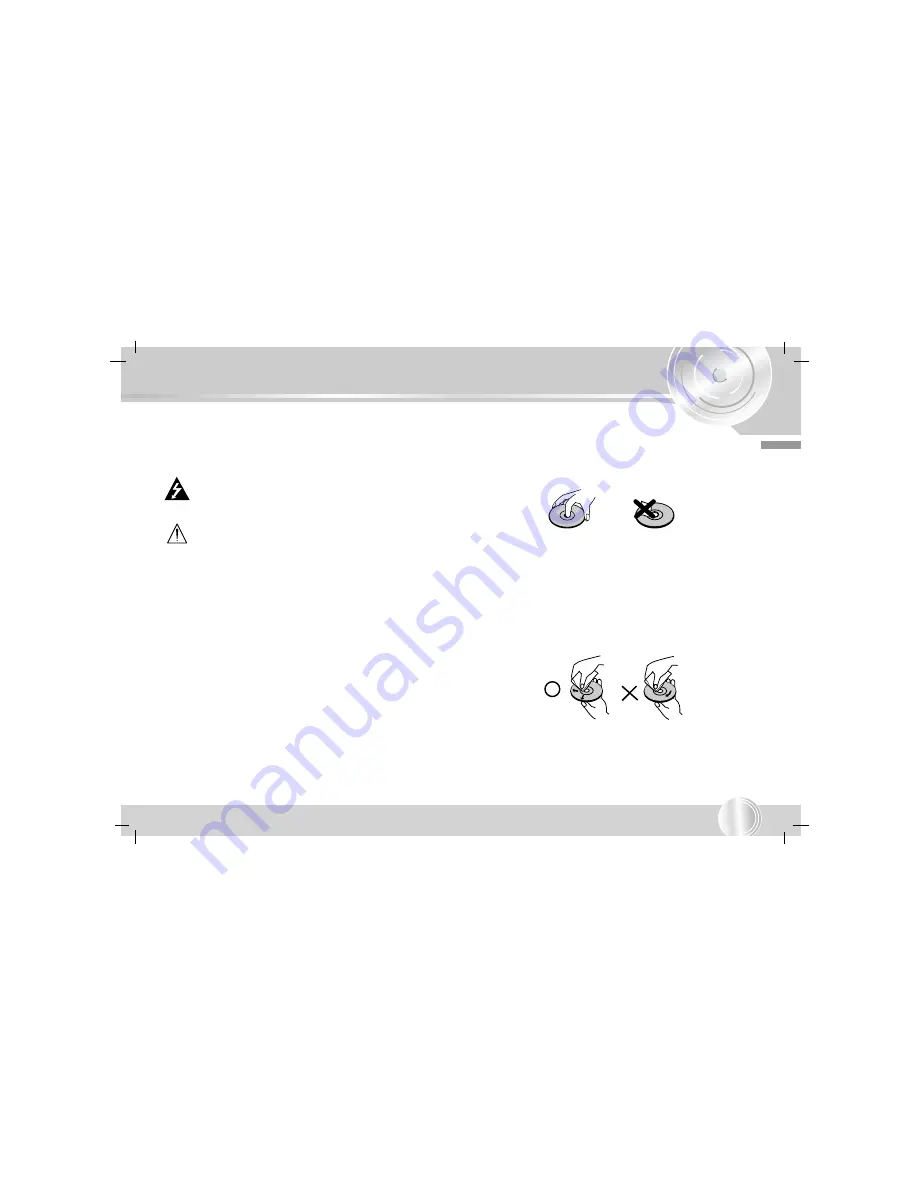
Notes on Discs

Handling Discs

Do not touch the playback side of the disc. Hold the disc by the
edges so that fingerprints do not get on the surface. Never stick
paper or tape on the disc.

Storing Discs

After playing, store the disc in its case. Do not expose the disc to
direct sunlight or sources of heat and never leave it in a parked
car exposed to direct sunlight.

Cleaning Discs

Fingerprints and dust on the disc can cause poor picture quality
and sound distortion. Before playing, clean the disc with a clean
cloth. Wipe the disc from the center out.

Do not use strong solvents such as alcohol, benzine, thinner, com-
mercially available cleaners, or anti-static spray intended for older
vinyl records.

Summary of Contents for LAC-M8400R

Page 1: ...e connecting operating or adjusting this product please read this instruction booklet carefully and completely Car CD Receiver OWNER S MANUAL MODEL LAC M8400R LAC M8410R LGEBN_LGEDG LAC M8400R M8410R_ENG 16G ...

Page 2: ...ary Equipment 15 OPERATION Basic Operation 16 18 Turning the unit on 16 Turning the unit off 16 Selecting a source 16 Adjusting the volume 16 Adjusting the angle of the front panel 16 Checking the clock 16 SOUND Adjustment 17 18 Using the EQ Equalizer 17 Adjusting the Balance and Fader of speaker 18 MUTE 18 Using the hands free LAC M8400R model 18 MENU Operation 19 26 Initial Settings 19 26 Genera...

Page 3: ...Disc and CD changer 29 31 Playing an Audio CD and MP3 WMA Disc 29 31 Playing a CD changer OPTIONAL 29 31 Playback Setup 29 Moving to another Disc 29 Pause 29 Moving to another Track 29 Moving to another Folder 29 Search 29 Repeat 30 Random 30 Intro scan 30 CD TEXT ID 3 TAG 30 Notes on MP3 WMA Recordings 31 About MP3 31 About WMA Window Media Audio 31 REFERENCE Troubleshooting 32 Specifications 33 ...

Page 4: ...tect this product from moisture Caution If the battery is disconnected or discharged the preset memory will be erased and must be reprogrammed CAUTION This unit employs a Laser System To ensure proper use of this product please read this owner s manual carefully and retain for future reference should the unit require mainte nance contact an authorized service location see service procedure Use of ...

Page 5: ...easier Notes on Discs Handling Discs Do not touch the playback side of the disc Hold the disc by the edges so that fingerprints do not get on the surface Never stick paper or tape on the disc Storing Discs After playing store the disc in its case Do not expose the disc to direct sunlight or sources of heat and never leave it in a parked car exposed to direct sunlight Cleaning Discs Fingerprints an...

Page 6: ...trol completely clean and install a new battery Using the remote control Point the remote control in the direction of the front panel to operate NOTES The remote control may not function properly in direct sunlight Do not store the remote control in high temperatures or sunlight Do not let the remote control fall onto the floor where it may become jammed under the brake or accelerator pedal Handli...

Page 7: ...pen the front panel 2 Grip the left side of the front panel and pull it gently outward Take care not to grip it tightly or to drop it 3 Put the front panel into the protective case provided for safe keeping Attaching the front panel Align the right side of the panel with the stopper and then push the left side or the panel into the unit until it clicks Protective case Front panel RELEASE 1 2 ...

Page 8: ...OR MICROPHONE MIC SOURCE SRC button EQUALIZER SELECTION EQ SEL button BALANCE BAL button FADER FAD button RETURN button BAND AS button REPEAT INTRO SCAN RPT SCN button TA PTY button TA button MENU RDS button RETURN button DISPLAY DISP button ENTER button PHONE button TILT button EARPHONE connector PHONE connector 17 16 15 14 13 12 11 10 9 8 7 6 5 4 3 2 1 8 9 10 11 12 13 14 7 ...

Page 9: ...own buttons RELEASE button REMOTE SENSOR SOURCE SRC button EQUALIZER SELECTION EQ SEL button BALANCE BAL button FADER FAD button RETURN button BAND button REPEAT RPT button PS AS button SHUFFLE INTRO SCAN SHF SCN button TA PTY button TA button MENU RDS button RETURN button DISPLAY DISP button ENTER button TILT button AUX connector 15 14 13 12 11 10 9 8 7 6 5 4 3 2 1 ...

Page 10: ...0 seconds of all track REPEAT RPT Plays tracks repeatedly SHF Plays tracks in random order SKIP SEARCH m M Backward or forward search playback Go to next track Returns to beginning of current track or go to previous track up down BAND Selects three FM and MW AM bands ENTER Confirms menu selection MENU SEL Enters the menu Enters the audio settings NUMBER VOLUME Adusts the volume level CLOCK CLK Clo...

Page 11: ...ll the unit in to the installation sleeve Removing existing receiver unit If there is already an installation sleeve for the receiver unit in the dashboard it must be removed When removing the unit from the installation sleeve If you need to remove the unit from the installation sleeve proceed as follows 1 Remove the rear supporter from the unit 2 Remove the front panel and trim ring from the unit...

Page 12: ...emoved from old unit 3 Slide the unit and frame into dash opening 4 Install dash panel or adapter plate 5 Install trim ring to the unit The notch on trim ring must be positioned at the bottom 6 Install faceplate by fitting right edge into position then pushing left edge closed 5 4 3 1 2 6 1 2 ...

Page 13: ...ER PINK 2 PHONE ORANGE 15A FILTER BOX BATTERY A D B 5 TO BATTERY YELLOW 1 2 3 4 5 6 7 8 1 2 3 4 5 6 7 8 WHITE FL WHITE BLACK STRIPE FL GRAY FR GRAY BLACK STRIPE FR GREEN RL GREEN BLACK STRIPE RL VIOLET RR VIOLET BLACK STRIPE RR C CD CHANGER Optional Connecting to Car Before connecting make sure that ignition switch is set to OFF and remove the terminal of the battery to avoid short circuits ...

Page 14: ...BLUE This lead is for connection to the power antenna 7 BLUE WHITE STRIPE This lead is for connection to the amplifier remote on Connect the CD changer Your car receiver works as control unit for a CD changer which you can buy if not yet done later The suitable cord shown on the scheme will be provided together with the CD changer Speaker Connections Connecting to Optional Equipment LAC M8410R mod...

Page 15: ...ont Left FR Front Right RL Rear Left RR Rear Right To AUDIO IN To AUDIO IN To AUDIO OUT To AUDIO OUT Connecting to Auxiliary Equipment Connect the AUDIO OUTPUT connector of this unit to the AUDIO INPUT connector of Auxiliary Equipment ...

Page 16: ...ff Whenever you turn on the unit it will operate at the memorized volume level When the front panel is opened it is closed automatically after about 10 20 seconds Adjusting the volume Use VOLUME to adjust the sound level Rotate VOLUME KNOB on the front panel to increase or decrease the volume Press VOLUME on the remote control to increase or decrease the volume Adjusting the angle of the front pan...

Page 17: ...or USER 2 EQ mode 1 Press EQ SEL for more than 1 second on the USER 1 or USER 2 EQ mode 2 Adjust the Bass by pressing v V on the front panel or on the remote control 3 After press B on the front panel adjust the Middle by pressing v V on the front panel or on the remote control 4 After press B on the front panel adjust the Treble by pressing v V on the front panel or on the remote control EQ POP R...

Page 18: ...E to cut the sound MUTE indicator will be shown in the display window 2 To cancel it press PWR MUTE POWER MUTE again Using the hands free LAC M8400R model 1 Connect the PHONE connector of on the front panel and to the earphone connector of mobile phone with the phone cable 2 If you call a phone press PHONE button PHONE TALK indicator will be shown in the display window 3 Press the numbers of mobil...

Page 19: ...as alternate setting s 3 Use the v V or to select the second desired option then press the B or M to move to the third level 4 Use the v V or to select the desired setting then press ENTER to confirm your selection Some items require additional steps 5 Press MENU SEL on the remote control to exit the menu System Menu Operation To display and exit the system menu Press MENU SEL on the remote contro...

Page 20: ...n 20 DISP DISPLAY BACKGROUND Selects the background you want in the display window CONTRAST Adjusts the shown letter shape brightly or darkly in the display window 1 3 steps BACKGROUND CONTRAST Car 3 SOUND MENU DISP ...

Page 21: ...ions may not choose to include some of these additional features If the data required for the selected mode is not being transmit ted the Display Window will show a NO Clock PTY None RT None message PI Program Identification contains additional information for regional program operation AF Alternative Frequencies for the actual program TP Traffic Program Identification TA Traffic Announcement Iden...

Page 22: ...S data is broadcast ed by stations in a network following procedures are operated in Modes 1 and 2 if a RDS station is tuned A flashing of the AF indicator in the LCD display shows the processor is still collecting the complete set of RDS data of this program Whenever the flashing stops all data are complete and the RDS functions can be used as far as they are supported by the program AF REG Netwo...

Page 23: ...annot help anymore another program of the driving area must be selected Especially in regional mode such reception borderland can be often reached Because of possible reduced reception quality the regional function shall be used only for driving short distances If the RDS station does not support AF data list or if the tuner cannot read AF data from reception no network tracking is possible Switch...

Page 24: ...A Seek mode the current station can be changed to the completely different station because the unit searches TP station when the field signal strength of the cur rent station is very weak or the current station has no TP sig nal The higher priority is TP rather than PI ALARM When this mode is selected any automatic retune mode is not activated Only double beep sound ALARM is out put So in this mod...

Page 25: ... procedure to reduce even this kind of unavoidable situation however there is a limit to be escaped from this serious case perfectly In that serious case 2 mode is selectable as follows SOUND When above different PI sound DIP is heard once in a while the DIP s sound will be heard for less than 1 second MUTE Under above same situation a mute sound will be heard for less than 1 second RETUNE The ini...

Page 26: ... PAGE Oldies Oldies Music Folk m Folk Music Affairs News Info Sports Educate Culture Drama Science Varied NEXT PAGE SPCH PTY MUSIC SPCH PTY MUSIC Rock m Pop m Easy m Light m Classics Jazz Other m Country Nation m NEXT PAGE NEXT PAGE Weather Weather Information Finance Financial Programme Children Children Programme Social Social Affairs Programme Religion Religious Broadcasts Phone In Phone In Pro...

Page 27: ...ator is displayed and disap peared for about 0 5 second it will be entered to the seek tuning mode When the selected frequency is being broadcast in stereo indicator will light Storing and recalling broadcast frequencies You can easily store up to six broadcast frequencies for later recall with the touch of a button 1 When you find a frequency that you want to store press the v v button on the fro...

Page 28: ...canned once NOTES The presetting is not performed if there is no station to be tuned in When the automatic presetting is performed the previous preset stations are automatically erased To stop the automatic presetting press BAND AS or PS AS button To scan the preset stations In case of LAC M8400R model press V V button on the front panel for about 1 second In case of LAC M8410R model press PS AS b...

Page 29: ...RC repeatedly 3 Insert a disc you want to play into the magazine Playback starts automatically Moving to another Disc Press v V or briefly during playback to go to the next disc or step back to the previous disc Pause 1 Press PLAY PAUSE B B X during playback 2 To return to playback press PLAY PAUSE B B X again Moving to another Track Press the b b B B on the front panel or m m M M on the remote co...

Page 30: ...MA CDC The SHF A disappears in the display window Intro scan 1 Press SCAN on the remote control The SCAN appears in the display window The first 10 seconds of all tracks on the disc are played in order 2 Press SCAN on the remote control again Audio CD The SCAN disappears in the display window The intro scan is cancelled MP3 WMA CDC The SCAN A appears in the display window It is played the first 10...

Page 31: ...ator which creates an ISO9660 file sys tem 5 A single session disc requires MP3 WMA files in the first track If there is no MP3 WMA file in the 1st track it cannot playback MP3 WMA files If you wish to playback MP3 WMA files format all the data in the disc or use a new one 6 Folder or File names should have a maximum 22 letters or less ID3 TAG Title Artist or Album names should have a maximum 30 l...

Page 32: ... sure to install the correct fuse with the same rate Turn the unit off and then on Load new battery Check using another disc Clean disc Check what type the disc is Connect the cables correctly Adjust the volume Secure this unit firmly Cause Leads and connector are incorrectly connected The fuse is blown Noise and other factors are causing the built in microprocessor to operate incorrectly Battery ...

Page 33: ...ithout Front Panel Net Weight approx 1 8 kg FM tuner Frequency Range 87 5 108 MHz S N Ratio 55 dB Distortion 1 0 Usable sensitivity 12 dB MW AM tuner Frequency Range 520 1720 kHz or 522 1620 kHz S N Ratio 45 dB Distortion 1 0 Usable sensitivity 32 dB CD Frequency Range 42 20000 Hz S N Ratio 55 dB Distortion 0 5 Design and specifications are subject to change without notice ...

Page 34: ...P NO 3834RR0016G ...

Reviews: