LG KT770 User Manual Download Page 7

17

01

02

03

04

05

06

07

08

Set up

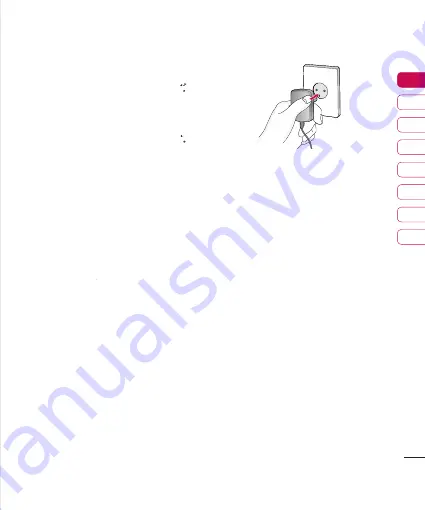
Charging the �attery

Before connecting the travel adapter to the 
phone you must first install the battery.

1

   With the arrow facing you as shown

 With the arrow facing you as shown 
in the diagram push the plug on the 
battery adapter into the socket on the 
left side of the phone until it clicks into 
place.

2

   Connect the other end of the travel

 Connect the other end of the travel 
adapter to the mains socket.

Note

  Only use the charger included in the box.

3

   The moving bars on the battery icon will

  The moving bars on the battery icon will 
stop after charging is complete.

4

   Ensure the battery is fully charged

 Ensure the battery is fully charged 
before using the phone for the first time.

Caution


  Do not force the connector as this may 

damage the phone and/or the travel 
adapter.


  If you use the battery pack charger when 

abroad, use an attachment plug adaptor 
for the proper configuration.


  Do not remove your battery or the SIM card 

while charging.

Warning


  Unplug the power cord and charger during 

lightning storms to avoid electric shock 
or fire.


  Make sure that no sharp-edged items such 

as animal teeth or nails, come into contact 
with the battery. This may cause a fire.

Summary of Contents for KT770

Page 1: ... installed and used in accordance with the instructions may cause harmful interference to radio communications However there is no guarantee that interference will not occur in a particular installation if this equipment does cause harmful interference or television reception which can be determined by turning the equipment off and on the user is encouraged to try to correct the interference by on...

Page 2: ...ny interference received including interference that may cause undesired operation Body worn Operation This device has been tested for typical body worn operations with the distance of 0 79inches 2 0cm from the user s body To comply with FCC RF exposure requirements a minimum separation distance of 0 79inches 2 0cm must be maintained from the user s body Additionally Belt clips holsters other body...

Page 3: ...ey down to clear all input Use this key to go back to a previous screen LCD screen Icons showing signal strength battery level and various other functions Soft key indications Parts of the phone Open view End Power key End or reject a call Closes the task window and goes back to standby mode Alpha numeric keys In standby mode Input numbers to dial Hold down to access Bookmarks application to acces...

Page 4: ...ger Cable connector Note Please ensure phone is powered on and in standby mode before connecting the USB cable Side keys Note To protect your hearing maximum volume level is 10 Micro SD memory card slot Left side view Right side view KT770 Features ...

Page 5: ...15 01 02 03 04 05 06 07 08 Set up Rear view External camera lens Battery terminals SIM card terminals SIM card socket Battery ...

Page 6: ...ntact area on the card is facing downwards To remove the SIM card press down lightly and pull it in the reverse direction Note The metal contact of the SIM card can easily be damaged by scratches Pay special attention to the SIM card while handling Follow the instructions supplied with the SIM card 2 Install the battery Slide the battery upwards until it snaps back into place 3 To remove the batte...

Page 7: ...ving bars on the battery icon will stop after charging is complete 4 Ensure the battery is fully charged before using the phone for the first time Caution Do not force the connector as this may damage the phone and or the travel adapter If you use the battery pack charger when abroad use an attachment plug adaptor for the proper configuration Do not remove your battery or the SIM card while chargi...

Page 8: ... in the memory card 2 Lift the plastic cover which protects the slot 3 Insert the memory card into the slot The gold contacts behind memory card must be facing down while inseting into the phone Don t push the memory card too much If it doesn t go into the slot easily you may be trying to insert it in the wrong way or there could be a foreign object in the slot 4 Once inserted push the memory card...

Page 9: ... memory card instruction manual Memory card formatting Before you start to use the memory card you have to format it After you insert the memory card select Organiser Memory then press This operation should only be done when you insert the memory card for the first time During formatting various folders will be created for different data types Turning the handset on off Turning your handset on Ens...

Page 10: ... 4 5 Camera 4 6 Radio 5 Organiser 5 1 Calculator 5 2 Clock 5 3 Converter 5 4 Notes 5 5 Calendar 5 6 File mgr 6 Profiles 6 1 General 6 2 Silent 6 3 Meeting 6 4 Outdoor 6 5 Pager 6 6 Offline 7 Settings 7 1 General 7 2 Phone 7 3 Connection 7 4 Applications 8 Tools 8 1 Call mailbox 8 2 Speed dial 8 3 Themes 8 4 Torch light 8 5 Licenses 8 6 GPS data 8 7 Landmarks 8 8 Device mgr 8 9 Help 8 0 About 9 Con...

Page 11: ...dia 3 Quickoffice 4 Music Store 5 Google Map 6 Try Buy 7 TRK 8 DRMUtilApp 9 DRMENcryptor 0 Vid services Clock Google RnD Tools 1 PerfHooks 2 MemMon 3 Goofy 4 TaskMgr 5 PerfMon 6 MemMon 7 LoadGen 8 ConnTest 9 STIF UI 0 Scr Grabber Launcher FileBrowser 13 Creator legacy ...

Page 12: ...nging type is set to Silent and Message alert tone IM alert tone and E mail alert tone are set to Off The device keypad is locked A clock alarm is active The second phone line is being used network service All calls to the device are diverted to another number lf you have two phone lines network service the indicator for the first line is and for the second GPS application is in use A compatible h...

Page 13: ...on is on hold A UMTS packet data connection is available A UMTS packet data connection is avtive A UMTS packet data connection is on hold A HSDPA packet data connection is available A HSDPA packet data connection is avtive A HSDPA packet data connection is on hold Bluetooth connectivity is on Data is being transmitted using Bluetooth connectivity A USB connection is active ...

Page 14: ... New call Select this to make a new call Activating call is automatically held Open active standby select this to open active standby screen Conference Select this to create a conference call to converse with multiple people at the same time Tip To add a participant to a conference call call the new participant press the left soft key Options and select Conference Add to conference Switch to video...

Page 15: ...use the speakerphone ensure you have the headset plugged in 3 To start the video function press the left soft key Options and select Call Video call You will be notified that you will need to close other applications to make the video call Note The video call may take some time to connect 4 Adjust the camera position if necessary 5 When you have a video call in progress you can access the followin...

Page 16: ...le you already have another video or voice call in progress Open active standby To open the standby mode image on the display Use secondary camera Select this to use the secondary camera Change image order To switch the location of the other party s and your own video or still image on the display Zoom in out You can zoom your video image in or out Switch to voice call Ends the video call and auto...

Page 17: ... the screen If the caller can be identified the caller s phone number or name if stored in your Contacts is displayed 1 Press to answer an incoming call Note To reject an incoming call press or the right soft key twice If Anykey answer is set to On Menu Settings Phone Call Anykey answer any key will answer a call except 2 End the call by pressing Note You can answer a call while using the Contacts...

Reviews: