background image

Appendix

53

Appendix

6


y

Graphics card with at least 32 MB video memory, 
minimum resolution of 800 x 600 pixels, and 16-
bit color settings


y

Windows® Internet Explorer® 6.0 or higher


y

DirectX® 9.0c revision 30 (August 2006) or higher


y

Network environment: 100 Mb Ethernet, WLAN

Start up your computer, and insert the supplied CD-
ROM disc into your computer’s CD-ROM drive. An 
installation wizard will walk you through the quick 
and uncomplicated installation process. To install 
Nero MediaHome 4 Essentials, proceed as follows:
1.  Close all Microsoft Windows programs and exit 

any anti-virus software that may be running.

2.  Insert the supplied CD-ROM disc into your 

computer’s CD-ROM drive.

3.  Click [Nero MediaHome 4 Essentials].
4.  Click [Run] to start installation.
5.  Click [Nero MediaHome 4 Essentials]. The 

installation is prepared and the installation 
wizard appears. 

6.  Click the [Next] button to display the serial 

number input screen. Click [Next] to go to the 
next step.

7.  If you accept all conditions, click [I accept 

the License Conditions] check box and click 
[Next]. Installation is not possible without this 
agreement.

8.  Click [Typical] and click [Next]. The installation 

process is started.

9.  If you want to take part in the anonymous 

collection of data, select the check box and click 
the [Next] button.

10. Click the [Exit] button to complete the 

installation.

Sharing files and folders 

On your computer, you must share the folder 
contained movie, music and/or photo content to 
play them on this player. 
This parts explains the procedure for selecting the 
shared folders on your computer.
1.  Double-click the “Nero MediaHome 4 Essentials” 

icon on the desktop.

2.  Click [Network] icon on the left and define your 

network name in the [Network name] field. The 
Network name you enter will be recognized by 
your player.

3.  Click [Shares] icon on the left.
4.  Click [Local Folders] tab on the [Shares] screen.
5.  Click [Add] icon to open the [Browse Folder] 

window.

6.  Select the folder containing the files you want 

to share. The selected folder is added to the list 
of shared folders.

7.  Click [Start Server] icon to start the server.


y

If the shared folders or files are not displayed 
on the player, click the folder on the [Local 
Folders] tab and click [Rescan Folder] at the 
[More] button.


y

Visit www.nero.com for more information 
and software tools.

,

,

Note

Summary of Contents for HX806PE

Page 1: ...ase read this manual carefully before operating your set and retain it for future reference HX806PE HX806PE SH86PE F S C SH95TZ W OWNER S MANUAL 3D 2D Blu ray DiscTM DVD HOME CINEMA SYSTEM P NO SAC35213802 ...

Page 2: ......

Page 3: ...ion has been adhered to CAUTION This product employs a Laser System To ensure proper use of this product please read this owner s manual carefully and retain it for future reference Shall the unit require maintenance contact an authorized service center Use of controls adjustments or the performance of procedures other than those specified herein may result in hazardous radiation exposure To preve...

Page 4: ...ases shall be placed on the apparatus Disposal of your old appliance 1 When this crossed out wheeled bin symbol is attached to a product it means the product is covered by the European Directive 2002 96 EC 2 All electrical and electronic products shall be disposed of separately from the municipal waste stream via designated collection facilities appointed by the government or the local authorities...

Page 5: ...ses only unless otherwise authorized by Rovi Reverse engineering or disassembly is prohibited y y Under the U S Copyright laws and Copyright laws of other countries unauthorized recording use display distribution or revision of television programs videotapes BD ROM discs DVDs CDs and other materials may subject you to civil and or criminal liability Important Notice for TV colour system The colour...

Page 6: ...g 26 Settings 26 Adjust the Setup Settings 26 DISPLAY Menu 28 LANGUAGE Menu 28 AUDIO Menu 29 LOCK Menu 29 NETWORK Menu 30 OTHERS Menu 31 Sound Effect 4 Operating 32 General Playback 32 Using HOME menu 32 Playing a Disc 32 Playing a file on a disc USB device 33 Playing Blu ray 3D disc 33 Enjoying BD LiveTM 34 Playing a file on a network server 35 Basic operations for video and audio content 35 Basi...

Page 7: ...twork 48 Picture 49 Sound 49 Customer Support 49 Open source software notice 6 Appendix 50 Controlling a TV with the Supplied Remote Control 50 Setting up the remote to control your TV 51 Network Software Update 51 Network update notification 51 Software Update 52 About Nero MediaHome 4 Essentials 52 Installing Nero MediaHome 4 Essentials 53 Sharing files and folders 54 Area Code List 55 Language ...

Page 8: ...VD RW 8 cm 12 cm disc r y y Discs such as movies that can be purchased or rented y y Video mode and finalized only y y Supports the dual layer disc also o Finalized AVCHD format y u i y y DVD R RW discs that contain Movie Music or Photo files y y ISO 9660 JOLIET UDF and UDF Bridge format DVD RW VR 8 cm 12 cm disc r VR mode and finalized only Audio CD 8 cm 12 cm disc t Audio CD CD R RW 8 cm 12 cm d...

Page 9: ...d recordings to meet certain technical standards in order to achieve optimal playback quality y y Pre recorded DVDs are automatically set to these standards There are many different types of recordable disc formats including CD R containing MP3 or WMA files and these require certain pre existing conditions to ensure compatible playback y y Customers should note that permission is required in order...

Page 10: ...6 xx Standard playback only XVID MPEG1 SS H 264 MPEG 4 AVC MPEG2 PS MPEG2 TS Dolby Digital DTS MP3 WMA AAC AC3 SubRip srt txt SAMI smi SubStation Alpha ssa txt MicroDVD sub txt SubViewer 1 0 sub SubViewer 2 0 sub txt TMPlayer txt DVD Subtitle System txt Music files File Location File Extension Sampling Frequency Bitrate Note Disc USB DLNA mp3 wma wav m4a DRM free within 16 48 kHz MP3 within 32 48 ...

Page 11: ... Main High at Level 4 1 For a file with higher level the warning message will appear on the screen y y This player does not support files that are recorded with GMC 1 or Qpel 2 1 GMC Global Motion Compensation 2 Qpel Quarter pixel Note y y This player supports UTF 8 files even it contains Unicode subtitle contents This player can not support the pure Unicode subtitle files y y Depending on the typ...

Page 12: ...t LG Remote You can control this player with your iPhone or Android phone via your home network This player and your phone must be connected to your wireless network device such as access point Visit Apple iTunes or Google Apps Marketplace for detailed information of LG Remote LG Remote function could be supported through updating the Network Software in the first half of 2011 We recommend update ...

Page 13: ...ys the DVD title menu or BD ROM s pop up menu if available Z STOP Stops playback z PLAY Starts playback M PAUSE STEP Pauses playback c v SCAN Searches backward or forward C V SKIP Goes to the next or previous chapter track file c SPEAKER LEVEL Sets the sound level of desired speaker SOUND EFFECT Selects a sound effect mode VOL Adjusts speaker volume OPTICAL Changes input mode to optical directly M...

Page 14: ...Y PAUSE I STOP Y U SKIP FUNC Function Changes the input source or function c PORT IN USB Port d Volume control Rear panel a Speakers connectors b Cooling Fan c Antenna Connector d OPTICAL IN e AUX R L IN VIDEO OUT f HDMI OUT Type A HDMI Connector Connect to TV with HDMI inputs g LAN port ...

Page 15: ... Refer to the images below Assembling the speaker Wall type Mounting the speakers to a wall 1 Open the cover of the speaker Connect the speaker cable 2 Draw the speaker cable through the inside at the speaker 3 Close the cover of the speaker 4 Drive 1 screw in the wall for the speaker and than hook the speaker over then ...

Page 16: ...rough the inside at the speaker 6 Attach the speaker to the pole then secure the connection with a supplied screw 7 Connect the speaker wire to the terminal on the speaker Make sure the wire marked black goes in to the terminal marked minus and the other wire goes in to the terminal marked plus 8 Close the cover to the speaker Be careful that the speaker does not fall down Otherwise it may result ...

Page 17: ...ioning the system The following illustration shows an example of positioning the system Note that the illustrations in these instructions differ from the actual unit for explanation purposes For the best possible surround sound all the speakers other than the subwoofer should be placed at the same distance from the listening position A D D E E F F A A A A A G G C C A B A A B D D E E F F A A A A A ...

Page 18: ...ng a HDMI cable Type A High Speed HDMITM Cable Connect the HDMI jack on the player to the HDMI jack on a HDMI compatible TV or monitor Rear of the unit TV Type A High Speed HDMI Cable Set the TV s source to HDMI refer to TV s Owner s manual Additional Information for HDMI y y When you connect a HDMI or DVI compatible device make sure of the following Try switching off the HDMI DVI device and this ...

Page 19: ...le length is generally limited to 4 5 m 15 ft Note What is SIMPLINK Some functions of this unit are controlled by the TV s remote control when this unit and LG TV s with SIMPLINK are connected through HDMI connection Controllable functions by LG TV s remote control Play Pause Scan Skip Stop Power Off etc Refer to the TV owner s manual for the details of SIMPLINK function LG TV s with SIMPLINK func...

Page 20: ...lution setting is set to Auto y y If you select a resolution that your TV does not accept the warning message will appear After resolution change if you cannot see the screen please wait 20 seconds and the resolution will automatically revert back to the previous resolution y y The 1080p video output frame rate may be automatically set to either 24 Hz or 50 Hz depending both on the capability and ...

Page 21: ... audio player from the speakers of the system Connect the headphones or line out jack of the portable audio player into the PORT IN of this unit And then select the PORTABLE option by pressing RADIO INPUT P and ENTER b You can also use FUNC button on the front panel to select the input mode MP3 player etc OPTICAL IN Connection You can enjoy the sound of your component with the digital optical conn...

Page 22: ...evice for further instructions Connect the player s LAN port to the corresponding port on your Modem or Router using a commercially available LAN or Ethernet cable y y When plugging or unplugging the LAN cable hold the plug portion of the cable When unplugging do not pull on the LAN cable but unplug while pressing down on the lock y y Do not connect a modular phone cable to the LAN port y y Since ...

Page 23: ...so test it on the Connection Status in the Setup menu Notes on Network Connection y y Many network connection problems during set up can often be fixed by re setting the router or modem After connecting the player to the home network quickly power off and or disconnect the power cable of the home network router or cable modem Then power on and or connect the power cable again y y Depending on the ...

Page 24: ...ne device this player may not be allowed to connect when a PC is already connected y y The use of a Router may not be allowed or its usage may be limited depending on the policies and restrictions of your ISP For details contact your ISP directly USB device connection This player can play movie music and photo files contained in the USB device Playback content in the USB device 1 Insert a USB devi...

Page 25: ...e y y Do not extract the USB device during operation play etc y y A USB device which requires additional program installation when you have connected it to a computer is not supported y y USB device USB device that supports USB1 1 and USB2 0 y y Movie music and photo files can be played For details of operations on each file refer to relevant pages y y Regular back up is recommended to prevent dat...

Page 26: ...ption according to your TV type 4 3 Letter Box Select when a standard 4 3 TV is connected Displays theatrical images with masking bars above and below the picture 4 3 Pan Scan Select when a standard 4 3 TV is connected Displays pictures cropped to fill your TV screen Both sides of the picture are cut off 16 9 Original Select when a 16 9 wide TV is connected The 4 3 picture is displayed with an ori...

Page 27: ...le with 1080p 24 Hz input y y When you select 24 Hz you may experience some picture disturbance when the video switches video and film material In this case select 50 Hz y y Even when 1080p Display Mode is set to 24 Hz if your TV is not compatible with 1080p 24 Hz the actual frame frequency of the video output will be 50 Hz to match the video source format Note HDMI Color Setting Select the type o...

Page 28: ...just the output level of each speaker Distance Adjust the distance between each speaker and the listening position Test Stop test tone The speakers will emit a test tone OK Confirms the setting Cancel Cancels the setting HD AV Sync Sometimes Digital TV encounters a delay between picture and sound If this happens you can compensate by setting a delay on the sound so that it effectively waits for th...

Page 29: ...back of rated DVD based on their content Not all discs are rated Rating 1 8 Rating one 1 has the most restrictions and rating eight 8 is the least restrictive Unlock If you select Unlock parental control is not active and the disc plays in full BD Rating Set an age limit of BD ROM play Use number buttons to input an age limit for BD ROM viewing 255 All BD ROM can be played 0 254 Prohibits play of ...

Page 30: ...ormation on how to complete your registration Register Displays the registration code of your player Deregister Deactivate your player and display the deactivation code All the downloaded videos from DivX VOD with this player s registration code can only be played back on this unit Note Auto Power Off The screen saver appears when you leave the player in Stop mode for about five minutes If you set...

Page 31: ...fer Up scaler When listening to MP3 files or other compressed music you can enhance the sound This mode is available only to 2 channel sources Loudness Improves bass and treble sound User EQ You can adjust the sound by raising or lowering the level of specific frequency Setting the User EQ 1 Use W S to select the desired frequency 2 Use A D to select the desired level Select Cancel option then pre...

Page 32: ... started automatically Note y y Playback functions described in this manual are not always available in every file and media Some functions can be restricted depending on many factors y y Depending on the BD ROM titles a USB device connection may be needed for the proper playback y y Unfinalized DVD VR format discs may not be played in this player y y Some DVD VR discs are made with CPRM data by D...

Page 33: ...ngly recommended to stop the playback and rest until you feel normal Caution Enjoying BD LiveTM e BD Video supporting BD Live BD ROM version 2 Profile 2 that has a network extension function allows you to enjoy more functions such as downloading new movie trailers by connecting this unit to the internet 1 Check the network connection and settings page 22 2 Insert a USB storage device to the USB po...

Page 34: ...ess ENTER b If you want to rescan available media server press the green G colored button 5 Select a file using W S A D and press ENTER b to play the file y y The file requirements are described on page 10 y y The thumbnail of the unplayable files can be displayed but those cannot be played on this player y y The subtitle file name and movie file name have to be the same and located at the same fo...

Page 35: ... or V to go to the previous or next content with same type Basic operations for photo content To play a slide show Press d PLAY to start slide show To stop a slide show Press Z STOP while slide show To pause a slide show Press M PAUSE while slide show Press d PLAY to re start the slide show To skip to the next previous photo While viewing a photo in full screen press A or D to go to the previous o...

Page 36: ...es kA B Selected portion will be repeated continually Audio CD only Track The current track or file will be played back repeatedly All All the tracks or files will be played back repeatedly l All All the tracks or files will be played back repeatedly in random order l The tracks or files will be played back in random order To return to normal playback press CLEAR y y If you press V once during Rep...

Page 37: ...y All marked points are cleared if the title is in complete stop Z mode the title is changed or if you unload the disc y y If the total length of the title is less than 10 seconds this function is not available Note Using the search menu eroy Using search menu you can easily to find the point where you want to start playback To search a point 1 During playback press SEARCH to display the search me...

Page 38: ... file information appears on the screen While movie playback you can display the file information by pressing TITLE POPUP The information displayed on the screen may not correct comparing actual content information Note Selecting a subtitle file y If the subtitle file name is different from the movie file name you need to select the subtitle file on the Movie menu before playing the movie 1 Use W ...

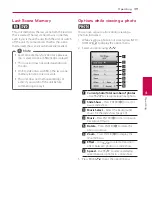
Page 39: ...t before commencing to play it Note Options while viewing a photo i You can use various options during viewing a photo in full screen 1 While viewing a photo in full screen press INFO DISPLAY m to display the option menu 2 Select an option using W S a Current photo Total number of photos Use A D to view previous next photo b Slide Show Press ENTER b to start or pause slide show c Music Select Sele...

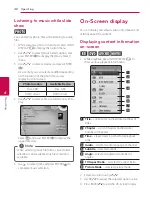
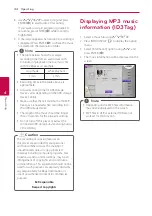
Page 40: ...cting music file from a server folder selection is not available Only file selection is available Note 5 Use D to select OK and press ENTER b to complete music selection On Screen display You can display and adjust various information and settings about the content Displaying content information on screen eroy 1 While playback press INFO DISPLAY m to show various playback information a Title curre...

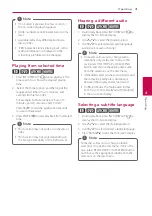
Page 41: ...LNA server Note Hearing a different audio eroy 1 During playback press INFO DISPLAY m to display the On Screen display 2 Use W S to select the Audio option 3 Use A D to select desired audio language audio track or audio channel y y Some discs allow you to change audio selections only via the disc menu In this case press TITLE POP UP or DISC MENU button and choose the appropriate audio from the sel...

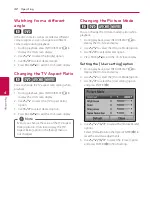
Page 42: ...reen display Even if you change the value of the TV Aspect Ratio option in On Screen display the TV Aspect Ratio option in the Setup menu is not changed Note Changing the Picture Mode eroy You can change the Picture mode option while playback 1 During playback press INFO DISPLAY m to display the On Screen display 2 Use W S to select the Picture Mode option 3 Use A D to select desired option 4 Pres...

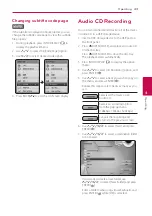
Page 43: ...Audio CD on the disc tray Press B OPEN CLOSE to close the disc tray The playback starts automatically 3 Press INFO DISPLAY m to display the option menu 4 Use W S to select CD Recording option and press ENTER b 5 Use W S to select a track you wish to copy on the menu and press ENTER b Repeat this step to select tracks as many as you can Selects all the tracks on an Audio CD Selects an encoding opti...

Page 44: ...for the proper recording y y Do not turn off this player or extract the connected USB storage device during Audio CD recording Note The recording or copying features on this player are provided for your personel and noncommercial use The making of unauthorized copies of copy protected material including computer programs files broadcasts and sound recordings may be an infringement of copyrights an...

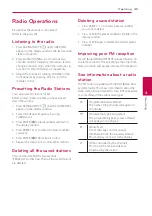
Page 45: ... stations Deleting all the saved stations Press and hold CLEAR for two seconds ERASE ALL will flash up Then all the saved stations are deleted Deleting a saved station 1 Press PRESET to Select a preset number you want to delete 2 Press CLEAR the preset number will blink in the display window 3 Press CLEAR again to delete the selectd preset number Improving poor FM reception Press B blue MONO STERE...

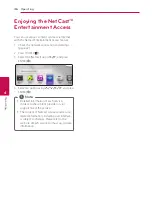
Page 46: ...Press HOME n 3 Select the NetCast using A D and press ENTER b 4 Select an option using W S A D and press ENTER b y y Detailed information of each service contact to the content provider or visit support link of the service y y The content of NetCast services and service related information including user interface is subject to changes Please refer to the web site of each service for most up to da...

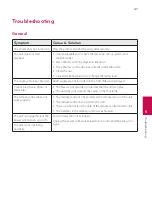
Page 47: ...t recorded on the DVD Video being played Cannot play movie photo or music files y y The files are not recorded in a format that the unit can play y y The unit does not support the codec of the movie file The remote control does not work properly y y The remote control is not pointed at the remote sensor of the unit y y The remote control is too far from the unit y y There is an obstacle in the pat...

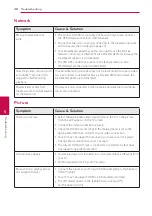
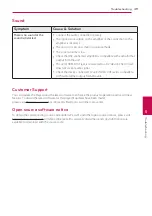
Page 48: ...ver are not displayed on the device list The player is not connected to the local area network that your media server are connected Picture Symptom Cause Solution There is no picture y y Select the appropriate video input mode on the TV so the picture from the unit appears on the TV screen y y Connect the video connection securely y y Check the HDMI Color Setting in the Setup menu is set to the ap...

Page 49: ...ck does not accept audio signal y y Check the device connected to unit s HDMI OUT jack is compatible with audio format output from the unit Customer Support You can update the Player using the latest software to enhance the products operation and or add new features To obtain the latest software for this player if updates have been made please visit http lgservice com or contact LG Electronics cus...

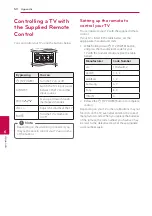
Page 50: ...te to control your TV You can operate your TV with the supplied remote control If your TV is listed in the table below set the appropriate manufacturer code 1 While holding down 1 TV POWER button and press the manufacturer code for your TV with the numerical buttons see the table below Manufacturer Code Number LG 1 Default 2 Zenith 1 3 4 GoldStar 1 2 Samsung 6 7 Sony 8 9 Hitachi 4 2 Release the 1 ...

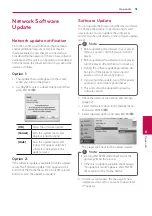
Page 51: ...e the player using the latest software to enhance the products operation and or add new features You can update the software by connecting the unit directly to the software update server y y Before updating the software in your player remove any disc and USB Device from the player y y Before updating the software in your player turn the player off and then turn it back on y y During the software u...

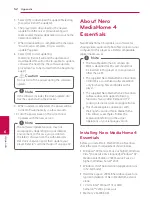
Page 52: ...ssentials Nero MediaHome 4 Essentials is a software for sharing video audio and photo files stored on your computer to this player as a DLNA compatiable digital media server y y The Nero MediaHome 4 Essentials CD ROM is designed for PCs and should not be inserted in this player or in any product other than a PC y y The supplied Nero MediaHome 4 Essentials CD ROM is a customized software edition on...

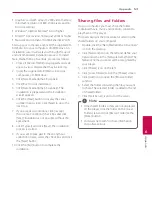
Page 53: ...ck Next Installation is not possible without this agreement 8 Click Typical and click Next The installation process is started 9 If you want to take part in the anonymous collection of data select the check box and click the Next button 10 Click the Exit button to complete the installation Sharing files and folders On your computer you must share the folder contained movie music and or photo conte...

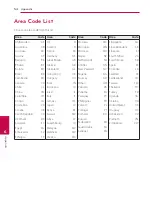
Page 54: ...GL Hong Kong HK Hungary HU India IN Indonesia ID Israel IL Italy IT Jamaica JM Japan JP Kenya KE Kuwait KW Libya LY Luxembourg LU Malaysia MY Maldives MV Mexico MX Monaco MC Mongolia MN Morocco MA Nepal NP Netherlands NL Antilles AN New Zealand NZ Nigeria NG Norway NO Oman OM Pakistan PK Panama PA Paraguay PY Philippines PH Poland PL Portugal PT Romania RO Russian Federation RU Saudi Arabia SA Sen...

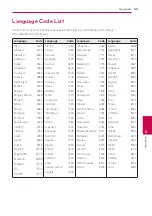
Page 55: ...an 7285 Icelandic 7383 Indonesian 7378 Interlingua 7365 Irish 7165 Italian 7384 Japanese 7465 Kannada 7578 Kashmiri 7583 Kazakh 7575 Kirghiz 7589 Korean 7579 Kurdish 7585 Laothian 7679 Latin 7665 Latvian Lettish 7686 Lingala 7678 Lithuanian 7684 Macedonian 7775 Malagasy 7771 Malay 7783 Malayalam 7776 Maori 7773 Marathi 7782 Moldavian 7779 Mongolian 7778 Nauru 7865 Nepali 7869 Norwegian 7879 Oriya ...

Page 56: ...cense under U S Patent s 5 451 942 5 956 674 5 974 380 5 978 762 6 226 616 6 487 535 7 392 195 7 272 567 7 333 929 7 212 872 other U S and worldwide patents issued pending DTS and the Symbol are registered trademarks DTS HD DTS HD Master Audio Essential and the DTS logos are trademarks of DTS Inc Product includes software DTS Inc All Rights Reserved DVD Logo is a trademark of DVD Format Logo Licen...

Page 57: ... will appear After resolution change if you cannot see the screen please wait 20 seconds and the resolution will automatically revert back to the previous resolution y y The 1080p video output frame rate may be automatically set to either 24 Hz or 60 Hz depending both on the capability and preference of the connected TV and based on the native video frame rate of the content on the BD ROM disc VID...

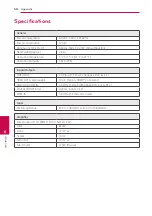
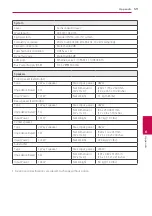
Page 58: ...ity 5 to 90 Inputs Outputs VIDEO OUT 1 0 V p p 75 Ω sync negative RCA jack x 1 HDMI OUT video audio 19 pin Type A HDMI Connector ANALOG AUDIO IN 2 0 Vrms 1 kHz 0 dB 600 Ω RCA jack L R x 1 DIGITAL IN OPTICAL Optical Connector x 1 PORT IN 0 5 Vrms 3 5 mm stereo jack Tuner FM Tuning Range 87 5 to 108 0 MHz or 87 50 to 108 00 MHz Amplifier Power output 3 Ω RMS THD 10 3 Ω 3 Ω Total 850 W Front 141 W x ...

Page 59: ...0 mm 10 2 x 45 3 x 10 2 inches Input Power 141 W Net Weight 3 1 kg 6 83 lbs Rear speaker Left Right Type 1 Way 1 speaker Max Input power 282 W Impedance Rated 3 Ω Net Dimensions W x H x D 96 x 250 x 85 mm 3 7 x 9 8 x 3 3 inches Input Power 141 W Net Weight 0 47 kg 1 03 lbs Center speaker Type 2 Way 2 speaker Max Input power 282 W Impedance Rated 3 Ω Net Dimensions W x H x D 320 x 112 x 95 mm 12 5 ...

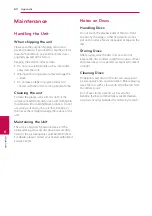
Page 60: ... the surface of the unit Maintaining the Unit The unit is a high tech precision device If the optical pick up lens and disc drive parts are dirty or worn the picture quality could be diminished For details please contact your nearest authorized Service Center Notes on Discs Handling Discs Do not touch the playback side of the disc Hold the disc by the edges so that fingerprints do not get on the s...

Page 61: ...ject to change at any time without prior notice including but not limited to the suspension removal or cessation of all or any part of the Content or Services Should you have any inquiry or problem related to the Content or Services you may refer to the Service Provider s website for the most up to date information LGE is neither responsible nor liable for customer service related to the Content a...

Page 62: ......

Reviews: