background image

6

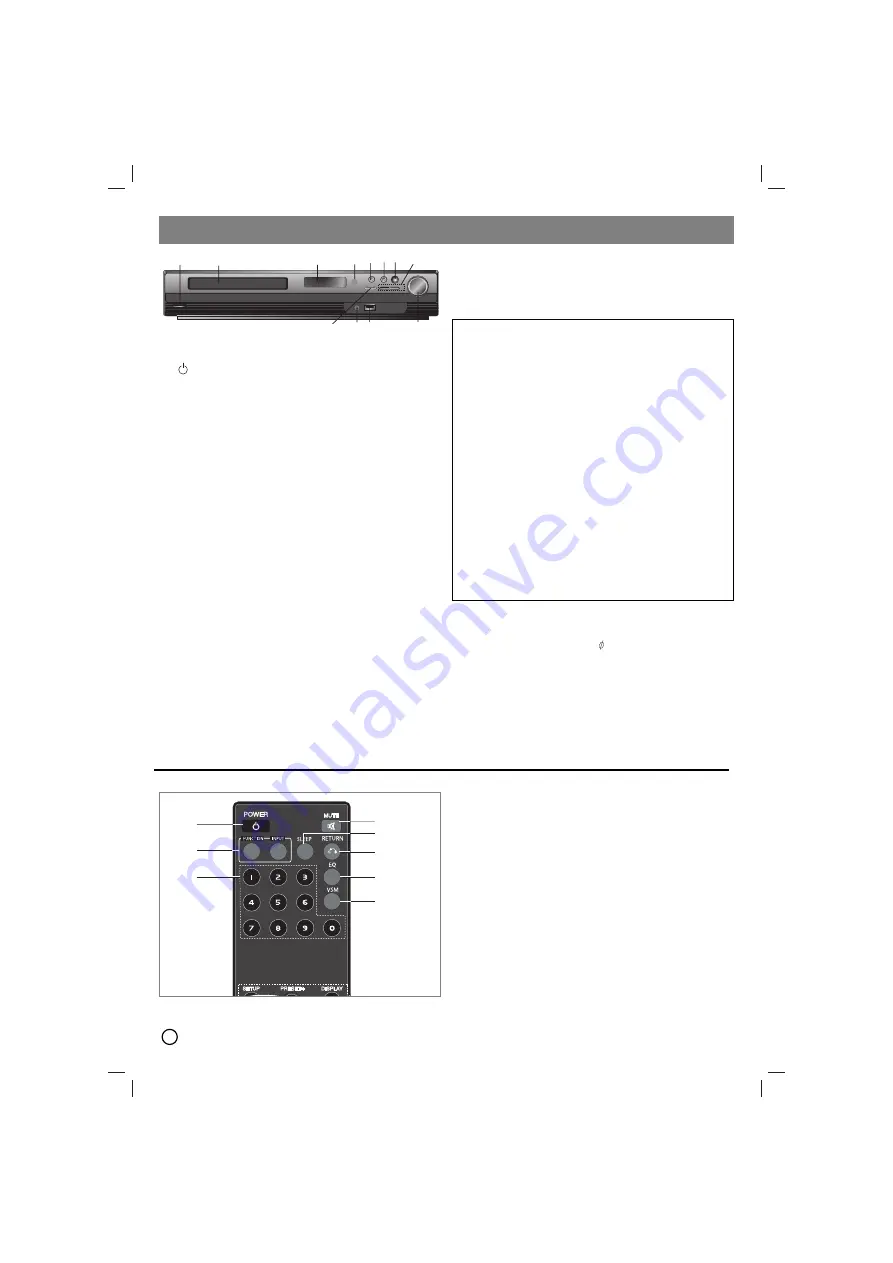
Operate using the Front Panel

1. 

(

/

[

)

POWER button

Lights red when the receiver is in Standby mode (off)

2. DISC Tray    
3. DISPLAY Window
4. Remote Sensor:

RemoteControl Operation Range

Distance:

About 23 ft (7 m) from the front of the Remote

Sensor

Angle:

About 30° in each direction in front of the Remote

Sensor

5. OPEN/CLOSE   

Opens and closes the disc tray.

6. 

• 

(

B

/

X

)

PLAY/PAUSE

• 

FUNC.(

-

)

Press and hold down this button

about 3 seconds, then press repeatedly to select other
function.

(

DVD/CD 

USB 

AUX

TV -AUDIO

PORTABLE

FM ) 

7.VSM   

Press 

VSM

to set the VIRTUAL sound.

• 

3D STEREO   

Realtime 3D positioned sound rendering

technology with stereo sources, optimized for stereo speakers.
Listeners may experience amazing virtual surround effects
with their own multimedia players.

• 

Multichannel sound   

The Multichannel sound changes the

sound in 5.1 ch into a virtual one in the 10.1 ch so that it
provides such a feeling that you listen to the sound
simultaneously from the right and left speakers and center
speaker.

8. TUNING(-/+)/SKIP/SCAN(

.

.

/

>

>

)

For manual tuning, press TUNING (-/+) repeatedly.
For automatic tuning, press and hold TUNING (-/+) for about
two seconds on the front panel.

9. VOLUME controller   

Adjusts speaker volume.

10. USB Port  

Connect the USB port of a USB Memory 

(or MP3 player, etc.) to the USB port on the front of the unit.

Removing the USB Device from the unit

1. Choose a different function mode or press STOP (

x

) twice in

a row.      

2. Remove the USB device from the unit.

11. PORT. IN 

Jack

Using PORTABLE device 

When you connect a portable music playing device to the PORT.
IN jack on this device by using a ( 3.5mm)mini stereo cable
(not supplied), you can here the sound being outputted from the
portable device through the speaker

12. STOP

Operation

1

2

3

4

5

6 7

8

9

10

10

11

11

12

12

Don’t extract the USB device while operating.

Music files (MP3/WMA), image files (JPEG) and Video files can
be played.

This unit cannot use a USB HUB.

Recommended Memory Cards.

Compact Flash Card (CFC), Micro Drive (MD), Smart Media Card
(SMC), Memory Stick (MS), Secure Digital Card (SD), Multimedia
Card (MMC), Memory Stick Pro (MS-Pro)
- Compatible with: FAT16, FAT32
- Only use the memory cards recommended.

Devices which require additional program installation when you
have connected the unit to a computer are not supported.

In case of a USB HDD, make sure to connect an auxiliary power
cord to the USB HDD for proper operation. Up to 2 primary
partitions of a drive are supported. If there is an extension
partition, up to four partitions are supported.

If the drive of USB device is two or more, a drive folder is
displayed on the screen. If you want to move to the initial menu
after you select a folder, press RETURN.

Digital cameras and mobile phones are not supported.

Only USB 1.0/ 1.1supported.(In case USB 2.0 is inserted  in to the
player,if operates at the  same speed as that of USB 1.1.)

Operate using the Remote Control

1. POWER   
2. MUTE  

Press MUTE to mute your unit. You can mute your

unit in order, for example, to answer the telephone.

3. 

• 

FUNCTION : (DVD/CD 

→ 

FM)

• 

INPUT : (USB 

→ 

AUX 

→ 

TV-- AUDIO 

→ 

PORTABLE )

4. SLEEP

You can set the DVD/CD Receiver to turn off automatically

at a specified time.

1.

Press SLEEP to set the desired sleep time. 

The sleep time

appears in the display window.

2.

Each time you press SLEEP the setting changes in the
following order.

(DIMMER ON)

SLEEP 180 

150 

120

90 

80 

70 

60

50 

40 

30 

20 

10 

→(

DIMMER  OFF)

Note:

You can check the remaining time before the DVD/CD Receiver

turns off.
Press SLEEP. The remaining time appears in the display window.

5. RETURN

Removes the setup menu.

6. 0-9 numerical buttons   

Selects a service, program number

directly or selects numbered options in a menu.

1

3

4

5

7

8

6

2

Summary of Contents for HT353SD

Page 1: ...ÙÔ ÂÁ ÂÈÚ ÈÔ Ú ÛË GREEK DVD CD EMPFÄNGER Leggere attentamente questo manuale prima di usare l unità ITALIAN RECEPTOR DVD CD Lea atentamente este manual antes de iniciar el uso de la unidad Lea detenidamente el contenido de esta tarjeta de Garantia SPANISH LEITOR DE DVD CD Leia cuidadosamente este manual antes de utilizar a unidade PORTUGUESE HT353SD HT353SD D0 SH33SD S W ...

Page 2: ...dically examine the cord of your appliance and if its appearance indicates damage or deterioration unplug it discontinue use of the appliance and have the cord replaced with an exact replacement part by an authorized servicer Protect the power cord from physical or mechanical abuse such as being twisted kinked pinched closed in a door or walked upon Pay particular attention to plugs wall outlets a...

Page 3: ...travel to reach your set listening point This allows the sound from each speaker to reach the listener at the same time Press b B to adjust the Distance of the selected speaker Test Press b B to test the signals of each speaker Adjust the volume to match the volume of test signals memorized in the system Front Left L Center Front Right R Rear Right R Rear Left L SubWoofer QUICK SETUP GUIDE Speaker...

Page 4: ...s may not be played on the unit For DVD R RW Discs only ones rewritten in video mode and finalized are supported on this player When there are a lot of data in a disc it may take longer to be read on this player than on other model Do not attach any seal or label to either side the labeled side or the recorded side of a disc Do not use irregularly shaped CDs e g heart shaped or octagonal It may re...

Page 5: ...ure appears on the screen Please read owner s manual for TV then set the resolution that your TV can accept Composit Video connection Connect the MONITOR jack from the DVD CD Receiver to the Video IN jack on the TV using the video cable supplied V Antenna Connection Connect the supplied FM antenna for listening to the radio Connect the FM Wire aerial to the FM aerial connector Notes Be sure to ful...

Page 6: ...2 3 4 5 6 7 8 9 10 10 11 11 12 12 Don t extract the USB device while operating Music files MP3 WMA image files JPEG and Video files can be played This unit cannot use a USB HUB Recommended Memory Cards Compact Flash Card CFC Micro Drive MD Smart Media Card SMC Memory Stick MS Secure Digital Card SD Multimedia Card MMC Memory Stick Pro MS Pro Compatible with FAT16 FAT32 Only use the memory cards re...

Page 7: ...9 REC z USB Direct Record This function enable you to record music to a connected USB storage device from AUDIO CD Before USB recordings read the notes on the page 14 1 Insert a USB device suffiicent free space to the USB port on the unit 2 Select DVD CD to record from by pressing FUNCTION button on the remote control AUDIO CD Press v V to select the track file you want 3 Press REC z on the remote...

Page 8: ...for connection to a TV or monitor that is compatible with a progressive scan signal set Progressive Scan to On Press ENTER If you not press ENTER within 10 seconds it will be OFF If you have no progressive scan TV in the state progressive scan on will not appear the screen so then press and hold STOP button on the remote control 5seconds it will be change OFF TV Output Select Select an option acco...

Page 9: ...TER press CLEAR 3 Select a rating from 1 to 8 using the v V buttons Rating 1 8 Rating one 1 has the most restrictions and rating eight 8 is the least restrictive Unlock If you select unlock parental control is not active and the disc plays in full 4 Press ENTER to confirm your rating selection then press SETUP to exit the menu Password You can enter or change password 1 Select Password on the LOCK...

Page 10: ...ed Viewing a JPEG file This unit can play discs with JPEG files Before playing JPEG recordings read the notes on JPEG Recordings page 14 1 Insert a disc and close the tray The PHOTO menu appears on the TV screen 2 Press v V to select a folder and then press ENTER A list of files in the folder appears If you are in a file list and want to return to the previous Folder list use the v V buttons on th...

Page 11: ...er memorizes the last scene from the last disc that is viewed The last scene remains in the memory even if you remove the disc from the receiver or switch off the receiver If you load a disc that has the scene memorized the scene is automatically recalled Note This receiver does not memorize the scene of a disc if you switch off the receiver before commencing to play the disc System Select You mus...

Page 12: ...8376 Somali 8379 Spanish 6983 Sudanese 8385 Swahili 8387 Swedish 8386 Tagalog 8476 Tajik 8471 Tamil 8465 Tatar 8484 Telugu 8469 Thai 8472 Tibetan 6679 Tigrinya 8473 Tonga 8479 Turkish 8482 Turkmen 8475 Twi 8487 Ukrainian 8575 Urdu 8582 Uzbek 8590 Vietnamese 8673 Volapük 8679 Welsh 6789 Wolof 8779 Xhosa 8872 Yiddish 7473 Yoruba 8979 Zulu 9085 Language Codes Use this list to input your desired langu...

Page 13: ...nted at the remote sensor of the DVD CD Receiver The remote control is too far from the DVD CD Receiver There is an obstacle in the path of the remote control and the DVD CD Receiver The batteries in the remote control are flat Nothing is displayed on the front panel display Correction Plug the power cord securely into the wall outlet Insert a disc Check that the DVD or audio CD indicator in the D...

Page 14: ...CM MP3 WMA Sampling frequency within 32 48 kHz MP3 within 24 48kHz WMA Bit rate within 32 320kbps MP3 40 192kbps WMA Max bitrate USB 4Mbps CD 4Mbps DVD 7Mbps For Discs formatted in Live file system you can not it on this player If the name of movie file is different from that of the subtitle file during playback of a DivX file subtitle may not be display If you play a DivX file differ from DivXspe...

Reviews: