background image

31

Playback

Program Playback with Audio
CD and MP3/WMA file

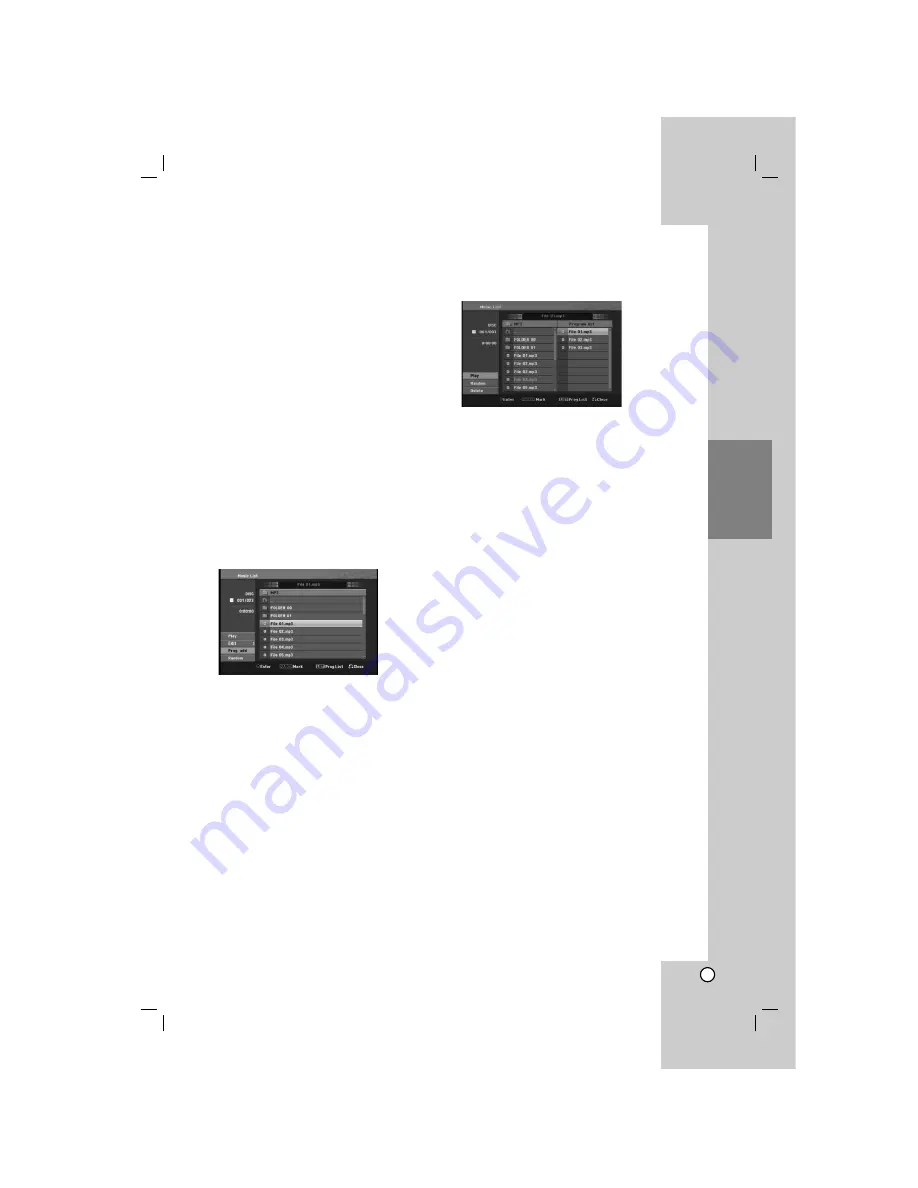
Program Playback enables you to make custom
playlists of Audio CD or MP3/WMA tracks. Programs
can contain up to 99 Audio CD tracks or 256
MP3/WMA files.
1. Use 

v

V

to select a track/file (or folder) on the

Audio CD or Music menu.

Selecting multiple files/tracks (folders)

1. Press MARKER.

A check mark appears on the file/track or
folder. Press MARKER again to cancel the
marked file/track or folder. 

2. Repeat step 1 to mark additional file/track

(folders).

2. Press ENTER.

The options appear on the left side of the menu.

3. Use 

v

V

to select the [Prog. add] option then

press ENTER.

4. Repeat steps 1-3 to mark additional tracks.

Note:

If you select a folder for Programmed Playback, all
tracks/files in the folder are added to the Program List. 

5. Use 

B

to move to the Program list.

The programmed track you selected last is
highlighted on the program list.

6. Use 

v

V

to select the track you want to start

playing.

7. Press PLAY (

B

) to start.

Playback stops after playing the last programmed
track in the program list.

8. To exit Program Playback and resume normal

playback, select a track on the List and press
PLAY (

B

). 

Tips:

You can access or remove the Program list screen
by pressing MENU/LIST.
You can not remove the Program list screen during
the programmed playback and the programmed 

Xx

x

.

Program List menu options

1. Press 

v

/

V

to select a track/file on the Program

List then press ENTER. 
The menu options appear.

2. Use 

v

V

to select an option then press ENTER

to confirm your selection.

[Play] Playback begins in the order in which you
programmed the tracks from the selected track.

[Random] Start or stop random playback.

[Delete] Deletes the track(s) from the Program
List menu.

Repeat Programmed Tracks 

Press REPEAT to select the desired Repeat mode.

[TRACK] Repeats the current track.
[ALL] Repeats all tracks on the Program List.
[OFF] Cancels Repeat mode (no display).

Erasing a Track from the Program List

1. Select the track you wish to erase from the

Program List. Use MARKER button to select
multiple tracks.

2. Press ENTER. The menu options appears
3. Select [Delete] option then press ENTER.

Summary of Contents for HR352SC

Page 1: ...his instruction booklet carefully and completely FOR THE GUARANTEE TERMS CONDITIONS PLEASE REFER TO BACK COVER OF THIS MANUAL HR352SC P02_NA4ULLK_ENG_1024 HDD DVD Recorder Receiver System OWNER S MANUAL MODEL HR352SC Main Unit HR352SC P02 Speakers SH32SC S SH32SC A USB ...

Page 2: ...ized servicer Protect the power cord from physical or mechanical abuse such as being twisted kinked pinched closed in a door or walked upon Pay particular attention to plugs wall outlets and the point where the cord exits the appliance To disconnect power from the mains pull out the mains cord plug When installing the product ensure that the plug is easily accessible SERIAL NUMBER You can find the...

Page 3: ...4 Playback 25 35 General Playback Features 25 28 Playing a DivX Movie File 29 Playing an Audio CD or MP3 WMA file 30 Program Playback with Audio CD and MP3 WMA file 31 Viewing a JPEG File 32 33 Editing a MP3 WMA JPEG DivX file 34 35 Recording 36 41 About DVD recording 36 About HDD recording 36 Timeshift 37 Basic Recording from a TV 38 Instant Timer Recording 38 Timer Recording 39 Checking Timer Re...

Page 4: ...ing operation and indicates that the function explained in this owner s manual is not available on that specific media Notes on Discs Handling Discs Do not touch the playback side of the disc Hold the disc by the edges so that fingerprints do not get on the surface Never stick paper or tape on the disc Storing Discs After playing store the disc in its case Do not expose the disc to direct sunlight...

Page 5: ...d contents are playable on DVD RW compatible players only after finalization Recordings can be edited the title chapter DVD R Digital Video Disc Recordable These Discs can be recorded only once After you finalize a DVD R you cannot record on it or edit it any more Playable on DVD R compatible players after finalization Any edited contents are not be compatible on DVD R compatible players Hide chap...

Page 6: ...This recorder requires discs and recordings to meet certain technical standards in order to achieve optimal playback quality Pre recorded DVDs are automatically set to these standards There are many different types of recordable disc formats including CD R containing MP3 or WMA files and these require certain pre existing conditions see above to ensure compatible playback Customers should note tha...

Page 7: ...and noticeable block noise mosaic in the picture However sometimes there will be no warning signs of HDD failure If the HDD fails no playback of recorded material will be possible In this case it will be necessary to replace the HDD unit Playing media files using the USB feature You can enjoy the media files such as pictures JPEG movies DivX and tunes MP3 WMA saved in an MP3 player or USB memory b...

Page 8: ...mode to HDD or DVD f ADJUST Scans up or down through memorized channels Selects menu options g B X PLAY PAUSE Starts playback Pause playback or recording temporarily press again to exit pause mode h x STOP Stops playback or recording i z REC Starts recording Press repeatedly to set the recording time j Remote Sensor Point the recorder remote control here k USB Connect to a USB port of multimedia U...

Page 9: ...ime REC MODE Selects the recording mode XP SP LP or EP RDS To view the various displays of the RDS options PTY To start a search for a specific PTY type OPEN CLOSE Opens and closes the disc tray AV Changes the input to use for recording Tuner AV1 AV2 or AV3 TV DVD To view channels selected by the recorder tuner or by the TV tuner PIP Selects PIP function on or off CLEAR Removes a mark on the Marke...

Page 10: ...ceiver Rear of TV L R AUDIO INPUT VIDEO INPUT SCART INPUT R Not supplied a IN FROM ANT Connect the aerial to this terminal b AV OUT VIDEO AUDIO OUT Left Right Connect to a TV with video audio inputs c AV IN 3 VIDEO IN AUDIO IN Left Right Connect the audio video output of an external source Audio system TV Monitor VCR Camcorder etc d EURO AV 2 DECODER Connect the audio video output of an external s...

Page 11: ... the phono in jack record deck of your audio system Component Video connection Connect the COMPONENT PROGRESSIVE SCAN VIDEO OUT jacks on the recorder to the corresponding input jacks on the TV using an Y Pb Pr cable C If your television is a high definition or digital ready television you may take advantage of the recorder s progressive scan output for the highest video resolution possible If your...

Page 12: ...set AV2 Connection option to Others see page 19 Tip You do not need to turn on the recorder to view the signals from the connected tuner on your TV Notes Pictures containing copy protection signals that prohibit any copying cannot be recorded If you pass the recorder signals via the VCR you may not receive a clear image on your TV screen Be sure to connect your VCR to the recorder and your TV in t...

Page 13: ...ng to the radio Connect the AM loop antenna to the AM antenna connector Connect the FM wire antenna to the FM antenna connector Notes To prevent noise pickup keep the AM loop antenna away from the HDD DVD Recorder Receiver System and other components Be sure to fully extend the FM wire antenna After connecting the FM wire antenna keep it as close to horizontal as possible L R VIDEO OUTPUT AUDIO OU...

Page 14: ...he cables are reversed the sound will be distorted and will lack base If you use front speakers with low maximum input rating adjust the volume carefully to avoid excessive output on the speakers About Ferrite Core Be sure to attach the ferrite core to the system cable This ferrite core can reduce noises How to attach the ferrite core 1 Press the stopper a of the ferrite core to open 2 Wind the sy...

Page 15: ...he center speaker and front speakers are ideally the same height But normally place it above or below the television Rear speakers Place left and right behind the listening area These speakers recreate sound motion and atmosphere required for surround sound playback For best results do not install the rear speakers too far behind the listening position and install them at or above the level of the...

Page 16: ...to 2 ch sound only Press SOUND button repeatedly 1 PCM BYPASS PROLOGIC MOVIE MUSIC MATRIX HALL 1 HALL 2 THEATER BYPASS 2 Dolby Digital BYPASS PROLOGIC MOVIE MUSIC MATRIX BYPASS Notes Initial sound mode is BYPASS When recording a TV broadcast or external source to the internal hard disk drive HDD or disc the sound recordings are encoded with Dolby Digital Controlling Your TV with the Supplied Remot...

Page 17: ...his menu system there are several ways to customize the settings provided Most menus consist of three levels to set up the options but some require greater depth for the variety of settings General Operation 1 Select SETUP and press ENTER 2 Use v V to select the desired option 3 While the desired item is selected press B to move to the second level 4 Use v V to select the second desired option 5 P...

Page 18: ...NICAM broadcast is not clear press ENTER so NICAM disappears 5 Press RETURN O repeatedly to exit Program List menu Program Edit You can perform a search to select and store TV channels manually When you select Program Edit in step 4 above the display for setting channels appears 1 Use b B to select the item and press v V to change the setting PR indicates the selected programme position Seek Searc...

Page 19: ...in the setup menu when the Video output format in the setup menu is set to RGB Caution Once the setting for Progressive Scan output is entered an image will only be visible on a Progressive Scan compatible TV or monitor If you set Progressive Scan to ON in error you must reset the recorder First remove the disc in the recorder Next press STOP x and hold it for five seconds before releasing it The ...

Page 20: ...5 1 Speaker Setup option then press B 2 Press ENTER and the 5 1 Speaker Setup menu appears 3 Use b B to select the desired speaker 4 Adjust options using v V b B buttons 5 Press ENTER to confirm your selection 6 Press v V repeatedly to return to the previous menu screen Speaker selection Select a speaker that you want to adjust Front Left Front L Center Front Right Front R Rear Right Rear R Rear L...

Page 21: ...he least restrictive No Limit If you select No Limit parental control is not active and the disc plays in full 4 Press ENTER to confirm your rating selection Note If you set a rating for the recorder all disc scenes with the same rating or lower are played Higher rated scenes are not played unless an alternate scene is available on the disc The alternative must have the same rating or a lower one ...

Page 22: ...s after the TV tuner mode is start If you want to use this function manually see Timeshift on page 37 ON Use Timeshift function automatically OFF Use Timeshift function manually Disc Settings Disc Format If you load a completely blank disc the recorder will initialize the disc DVD R The recorder initialize the disc to Video mode The recording mode will always be Video mode DVD RW DVD RW DVD R DL D...

Page 23: ... DVD R DL disc can take up to 30 minutes to finalize Tips If you load a DVD RW that has already been finalized you can Unfinalize it by choosing Unfinalize from the Finalize menu After doing this you can edit and re record onto the disc You cannot unfinalize a DVD R DVD R and DVD RW disc If Disc Protect option is set to ON the finalize is not available To finalize set Disc Protect option to OFF Di...

Page 24: ...PLAY to show various playback information The items displayed differ depending on the disc type or playing status 2 You can select an item by pressing v V and change or select the setting by pressing b B For details about each item see the pages in parentheses Title Current title or track number total number of titles or tracks Chapter Current chapter number total number of chapters Time Elapsed p...

Page 25: ...EP X to pause playback Press PAUSE STEP X repeatedly to play Frame by Frame SKIP During playback press SKIP or to go to the next chapter track or to return to the beginning of the current chapter track Press SKIP twice briefly to step back to the previous chapter track Tips To go directly to any chapter during DVD playback press DISPLAY and press v V to select the chapter icon Then input the chapt...

Page 26: ...creen Otherwise the disc menu may appears MENU LIST The disc menu appears on the screen SUBTITLE During playback press SUBTITLE then press b B repeatedly to select a desired subtitle language AUDIO Press AUDIO then press b B repeatedly to hear a different audio language or audio track Press AUDIO then press b B repeatedly during playback to hear a different audio channel STEREO LEFT or RIGHT With ...

Page 27: ...rts from the selected time Marker Search To enter a Marker You can start playback from up to nine memorized points To enter a marker press MARKER at the desired point on the disc during playback The Marker icon appears on the TV screen briefly Repeat to enter up to nine markers To Recall or Clear a Marked Scene 1 During disc playback press SEARCH The marker search menu appears on the screen 2 With...

Page 28: ... stored stations in sub picture during playback On and off Press PIP to switch on the sub picture press this button again to switch it off Input mode selection for sub picture Press AV to select the input mode for the sub picture Each time this button is pressed each input mode for the sub picture is displayed as shown below Tuner AV1 AV2 AV3 Program selection for sub picture Use v V to change the...

Page 29: ...k Movie List menu options 1 Press v V to select a folder file on the Movie List menu then press ENTER Movie List menu options appear The menu options displayed differ depending on the selected media 2 Press v V b B to select an option and press ENTER Play Start playback the selected title Open Opens the folder and a list of files in the folder appears Delete Deletes the file s or folder s from the...

Page 30: ...Press v V b B to select an option and press ENTER Play Start playback the selected title Random Start or stop random playback Open Opens the folder and a list of files in the folder appears Delete Deletes the file s or folder s from the HDD Rename Edits the file name page 34 Move Moves the file s to another folder or HDD page 35 Copy Copies the file s to another folder or HDD page 35 Prog add Adds...

Page 31: ...Press PLAY B to start Playback stops after playing the last programmed track in the program list 8 To exit Program Playback and resume normal playback select a track on the List and press PLAY B Tips You can access or remove the Program list screen by pressing MENU LIST You can not remove the Program list screen during the programmed playback and the programmed Xx x Program List menu options 1 Pre...

Page 32: ...s ENTER The menu options appear The menu options displayed differ depending on the selected media Selecting multiple files folders 1 Press MARKER A check mark appears on the file or folder Press MARKER again to cancel the marked file or folder 2 Repeat step 1 to mark additional file folders 2 Use v V to select an option then press ENTER to confirm your selection Open Opens the folder and a list of...

Page 33: ...st menu options on page 32 2 Press ENTER The Slide Show menu appears 3 Use b B v V to set the options Object option Selected Views slide show only selected files with MARKER button Use the MARKER button to select multiple files All Views slide show all files Speed option Sets the Slide Show speed to Slow Normal or Fast 4 Select the Start option then press ENTER to start the Slide Show 5 Press STOP...

Page 34: ... A check mark appears on the file or folder Press MARKER again to cancel the marked file or folder 2 Repeat step 1 to mark additional file folders 2 Press ENTER The menu options appear on the menu 3 Select Delete option then press ENTER Select OK option then press ENTER The selected file s is deleted Naming a file on the HDD You can name the files on the HDD independently 1 Select a file you wish ...

Page 35: ...you can create new album folder Select New Album option on the Copy menu then press ENTER NONAME folder is created 6 Select Copy option then press ENTER to begin copying Note If a folder s depth is more than 5 level the copy is not available Moving a file s You can move a file s folder s to HDD or folder After moving the file s folder s are deleted from the current location 1 Follow steps 1 3 as s...

Page 36: ... are not exact because the recorder uses variable bit rate video compression This means that the exact recording time will depend on the material being recorded When recording a TV broadcast if the reception is poor or the picture contains interference the recording times may be shorter If you record still pictures or audio only the recording time may be longer The displayed times for recording an...

Page 37: ...panel HOME or MENU LIST during the Timeshift the Timeshift will stop Clip Record You can edit during Timeshift to store the program on the HDD Hard Disk Drive 1 During Timeshift use pause step search and slow motion to find the starting point 2 Press REC at the starting point of the section you want to record Progress of the edit is indicated in red on the Progress Bar 3 Use pause step search and ...

Page 38: ...the output will operate with Mono Only when you record with Stereo or Main Sub mode you can play back with Stereo or Main Sub 6 Press REC z once Recording will start The REC indicator lights in the display window Recording continues until you press STOP x or the disc or HDD is full To record for a fixed length of time see Instant Timer Recording on right 7 Press STOP x to stop recording To Pause t...

Page 39: ...g at the current cursor position Press RETURN O to exit the Timer Record menu Press ENTER after filling in all the program information Press TIMER REC to display Timer Record List 3 Set a recording mode as necessary by pressing REC MODE repeatedly XP SP LP EP 4 Press ENTER the program will be memorized by the recorder To check the programming the Timer Record List will appear Check field s Rec OK ...

Page 40: ...dy 16 timer programs set If two or more timer programs overlap The earlier program takes priority When the earlier program finishes the later program starts If two programs are set to start at exactly the same time the program entered first takes priority If the disc is damaged the recording may not complete successfully In this case even though the Check field shows Rec OK it may not be Recording...

Page 41: ...u wish to rip Selecting multiple tracks 1 Press MARKER A check mark appears on the track Press MARKER again to cancel the marked track 2 Repeat step 1 to mark additional track 5 Press ENTER The menu options appear on the menu 6 Select Ripping option then press ENTER Ripping options appears 7 You can select a album folder to copy Select a album folder Also you can create new album folder Select New...

Page 42: ...bnails of the titles or chapter on the DVD or HDD You can change these thumbnails using the THUMBNAIL button see Changing Title Thumbnails on page 43 Press DISPLAY to display the information of selected title on the Title List menu After selecting a title or chapter on the Title List or Chapter List menu then press ENTER The menu options appears on the left side of the menu Use v V to select a opt...

Page 43: ...Throughout this manual you will often see the words Original and Playlist to refer to the actual content and the edited version Original content refers to what s actually recorded on the disc Playlist content refers to the edited version of the disc how the Original content is to be played Adding Chapter Markers You can create chapters within a title by inserting chapter marks at the desired point...

Page 44: ...ears on the left side of the menu 2 Use v V to select Playlist Add option then press ENTER 3 Select New Playlist then press ENTER The new title appears in the updated Playlist All chapters of the title are added to the Playlist Adding Additional Title Chapters to the Playlist You can add an Original title or chapter to add to a Playlist title even if it is already registered 1 Choose a title or ch...

Page 45: ... title s name is changed to Deleted Title If more than two titles are repeatedly deleted the titles are combined into one When you are deleting a title or chapter only the last one on DVD RW increases remaining recording time Deleting a Part You can delete a part which you do not want in the title 1 Use b B v V to choose a title you want to delete on the Title List menu then press ENTER The option...

Page 46: ...ER to confirm your selection OK Select to finish Cancel Cancels all entered characters Space Inserts a space at the cursor position Delete Deletes the previous character at the cursor position b B Moves cursor to left or right 4 Choose OK then press ENTER to fix the name and return to the previous menu screen 5 Press RETURN O repeatedly to exit the menu Notes For discs formatted on a different rec...

Page 47: ...ne option then press ENTER to fix the dividing point The title is divided into two new titles It take up to 4 minutes to divide Note You cannot select dividing point less than 3 seconds Combining Two Chapters Into One Use this function to combine two adjacent Playlist or Original chapters into one Note This function is not available if there is only one chapter within the title 1 On the Chapter Li...

Page 48: ...isplayed Hide a Chapter You can skip playing chapters without deleting from the disc 1 Use v V b B to choose a chapter you want to hide on the Chapter List menu then press ENTER Options appear on the left side of the screen 2 Select Edit Hide option Example Chapter List DVD RW 3 Press ENTER to confirm Tip If you select a hidden chapter on the Chapter List menu you can show it by choosing Show opti...

Page 49: ...ing equipment should be used only for lawful copying and you are advised to check carefully what is lawful copying in the area in which you are making a copy Copying of copyright material such as films or music is unlawful unless permitted by a legal exception or consented to by the rights owner This product incorporates copyright protection technology that is protected by method claims of certain...

Page 50: ... 4 To stop dubbing at any other time press STOP x Dubbing from DISC to HDD 1 On the Title List menu select a title you want to dub then press ENTER The menu options appears on the left side of the screen 2 Use v V to select Dubbing option then press ENTER Dubbing menu appears 3 Dubbing starts 4 To stop dubbing at any other time press STOP x Note Depending on the conditions of the recording equipme...

Page 51: ...at is capable of playing DVD RW or DVD R discs 1 Insert DVD R or DVD RW disc recorded already 2 Press TITLE in Play or stop mode Title List menu will appear as shown below Tip You can remove the Title List menu by pressing STOP x 3 To play back a title select the title you want then press ENTER or PLAY N Playing Your Recordings on Other DVD Players Finalizing a Disc Most regular DVD players can pl...

Page 52: ...6669 Cambodian 7577 Catalan 6765 Chinese 9072 Corsican 6779 Croatian 7282 Czech 6783 Danish 6865 Dutch 7876 English 6978 Esperanto 6979 Estonian 6984 Faroese 7079 Language Code Fiji 7074 Finnish 7073 French 7082 Frisian 7089 Galician 7176 Georgian 7565 German 6869 Greek 6976 Greenlandic 7576 Guarani 7178 Gujarati 7185 Hausa 7265 Hebrew 7387 Hindi 7273 Hungarian 7285 Icelandic 7383 Indonesian 7378 ...

Page 53: ...adio Preset radio stations in the unit s memory first see Presetting radio stations on the left 1 Press FM AM until AM or FM appears in the display window The last received station is tuned in 2 Press PR or repeatedly on the remote control to select the preset station you want Each time you press this button the Recorder Receiver tunes in one preset station at a time 3 Adjust the volume by rotatin...

Page 54: ...e and show it in the Display Window Note Some RDS stations may not choose to include some of these additional features If the data required for the selected mode is not being transmitted the Display Window will show a PTY NONE RT NONE CT NONE PS NONE message Programme Search PTY A major benefit of RDS is its ability to encode broadcasts with Programme Type PTY codes that indicate the type of mater...

Page 55: ...ose The antenna is positioned or connected poorly The system cable is connected incorrectly Solution Plug the power cord into the wall outlet securely Select the appropriate video input mode on the TV so the picture from the recorder appears on the TV screen Connect the video cable securely Turn on the TV Select the correct input mode on the audio receiver so you can listen to the sound from the r...

Page 56: ... sensor of the recorder The remote control is too far from the recorder There is an obstacle in the path of the remote control and the recorder The batteries in the remote control are exhausted Solution Finalize the disc page 23 No solution The other player must be RW compatible in order to play it No solution Use another disc You cannot record the source Select the channel on the recorder s built...

Page 57: ...DD 80GB Approx 18 hours XP mode 30 hours SP mode 61 hours LP mode 91 hours EP mode Video recording format Sampling frequency 27MHz Compression format MPEG2 Audio recording format Sampling frequency 48kHz Compression format Dolby Digital Playback Frequency response DVD PCM 48 kHz 8 Hz to 20 kHz CD 8 Hz to 20 kHz DVD PCM 96 kHz 8 Hz to 44 kHz Signal to noise ratio More than 100 dB AUDIO OUT connecto...

Page 58: ...posed of separately from the municipal waste stream via designated collection facilities appointed by the government or the local authorities 3 The correct disposal of your old appliance will help prevent potential negative consequences for the environment and human health 4 For more detailed information about disposal of your old appliance please contact your city office waste disposal service or...

Page 59: ...ed to the dealer from whom the equipment was originally purchased The dealer may before carrying out service under guarantee require a receipted account as evidence of the date of purchase D We respectfully point out that your dealer is not obligated to replace batteries if they become exhausted or worn in use E Aerial alignment and consumer control adjustments are not covered by this guarantee Th...

Reviews: