background image

3

PRODUCT FEATURES

PRODUCT FEATURES

* Depending on the model, some of the following functions may not be available.

DOOR ALARM

The Door Alarm function is designed to prevent refrigerator malfunctioning 
that could occur if a refrigerator door or freezer door remains open. If a 
refrigerator door or freezer door is left open for more than 60 seconds, a 
warning alarm sounds in 30 second intervals until it is closed. 

EXPRESS FREEZE

The freezer section is maintained at the coldest temperature for a 24-hour 
period before automatically resuming normal operation. The freezer display 
temperature will not change when Express Freeze is engaged. It will also 
enhance ice production whilst it is on.

AUTO CLOSING HINGE

The refrigerator doors close automatically with a slight push. (The door only 
closes automatically when it is open at an angle less than 30°.)

FILTERED WATER AND ICE DISPENSER

The water dispenser dispenses fresh, chilled water. 
The ice dispenser dispenses cubed and crushed ice. 

Summary of Contents for GF-5D712SL

Page 1: ...OWNER S MANUAL BOTTOM FREEZER REFRIGERATOR Please read this owner s manual thoroughly before operating and keep it handy for reference at all times GF 5D712SL www lg com ...

Page 2: ...mbling the In Door Ice Bin 23 Automatic Icemaker 23 Ice and Water Dispenser 26 Storing Food 26 Food Preservation Location 28 Food Storage Tips 28 Storing Frozen Food 29 Adjusting the Refrigerator Shelves 29 Detaching the Shelf 29 Refitting the Shelf 30 Using the Folding Shelf 30 When Closing the Door 31 Big Fresh Zone 31 Removal of the Big Fresh Zone drawer 31 Refitting the Big Fresh Zone drawer 3...

Page 3: ...als until it is closed EXPRESS FREEZE The freezer section is maintained at the coldest temperature for a 24 hour period before automatically resuming normal operation The freezer display temperature will not change when Express Freeze is engaged It will also enhance ice production whilst it is on AUTO CLOSING HINGE The refrigerator doors close automatically with a slight push The door only closes ...

Page 4: ...the rating prior to use It y is the user s responsibility to replace a standard 2 prong wall outlet with a standard 3 prong wall outlet Do not install the refrigerator where there may be a danger of it falling Installation on a non sturdy y timber floor may cause difficulty in door alignment and cause the cabinet to deform Use DO NOT allow children to climb stand or hang on the refrigerator doors ...

Page 5: ... element that releases the cubes Do not place fingers or hands on the automatic ice making mechanism while the refrigerator is plugged in When dispensing ice from the dispenser do not use crystal ceramics y Do not touch the cold surfaces in the freezer compartment with wet or damp hands when your y refrigerator is in operation Do not put glass containers glass bottles or beverage cans in the freez...

Page 6: ...s appliance contains a small amount of isobutane refrigerant R600a natural gas with high environmental compatibility but it is also combustible When transporting and installing the appliance care should be taken to ensure that no parts of the refrigerating circuit are damaged Refrigerant squirting out of the pipes could ignite or cause an eye injury If a leak is detected avoid any naked flames or ...

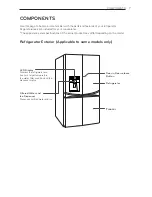
Page 7: ...rance and specifications of the actual product may differ depending on the model Refrigerator Exterior Applicable to some models only LED Display Displays the refrigerator and freezer s target temperature the water filter condition and the dispenser status Door in Door release Button Refrigerator Freezer Filtered Water and Ice Dispenser Dispenses purified water and ice ...

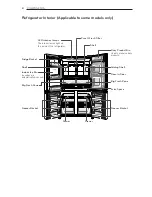
Page 8: ...ps light up the inside of the refrigerator Shelf Dairy Product Bin Used to preserve dairy products Fridge Basket Shelf Freezer Basket Big Fresh Zone Pure N Fresh Filter Door In Door Folding Shelf Big Fresh Zone Freezer Basket Extra Space Drawer Drawer Indoor Ice Bin Ice cubes are automatically produced ...

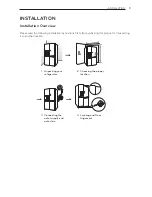
Page 9: ...e read the following installation instructions first after purchasing this product or transporting it to another location 1 Unpacking your refrigerator 3 Connecting the water supply and water line 2 Choosing the proper location 4 Leveling and Door Alignment ...

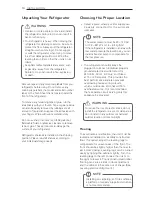
Page 10: ...maining tape or glue rub the area briskly with your thumb Tape or glue residue can also be easily removed by rubbing a small amount of liquid dish soap over the adhesive with your fingers Wipe with warm water and dry Do not use sharp instruments rubbing alcohol flammable fluids or abrasive cleaners to remove tape or glue These products can damage the surface of your refrigerator Refrigerator shelv...

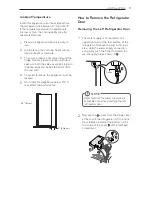
Page 11: ...4 To avoid vibrations the appliance must be leveled 5 Don t install the appliance below 5 C It may affect the performance 2 5 08 cm 24 61 cm Removing the Left Refrigerator Door How to Remove the Refrigerator Door 1 The water supply is connected to the upper right part of the rear surface of the refrigerator Remove the ring in the joint area Hold the water supply connection and gently push the Coll...

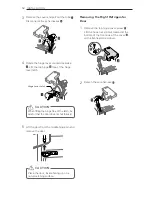
Page 12: ... of the latch be careful that the door does not fall forward Hinge Lever Latch 5 Lift the door from the middle hinge pin and remove the door CAUTION Place the door inside facing up on a non scratching surface Removing the Right Refrigerator Door 1 Remove the top hinge cover screw Lift the hook not visible located at the bottom of the front side of the cover with a flat head screwdriver 2 Detach th...

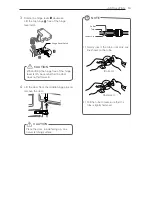
Page 13: ...ver clockwise Lift the top hinge free of the hinge lever latch 4 Lift the door from the middle hinge pin and remove the door CAUTION Place the door inside facing up on a non scratching surface NOTE 1 Gently insert the tube until only one line shows on the tube Correct Incorrect 2 Pull the tube to make sure that the tube is tightly fastened Collet Tube Insert Line ...

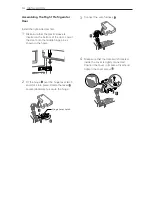
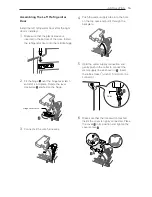
Page 14: ...shown in the figure 2 Fit the hinge over the hinge lever latch and slot it into place Rotate the lever counterclockwise to secure the hinge Assembling the Right Refrigerator Door Hinge Lever Latch 4 Make sure that the door switch located inside the cover is tightly connected Position the cover in its place Insert and tighten the cover screw 3 Connect the wire harness ...

Page 15: ...sten the hinge Assembling the Left Refrigerator Door 3 Connect all the wire harnesses Hinge Lever Latch 4 Push the water supply tube into the hole on the top case and pull it through the backplate 5 Hold the water supply connection and gently push in the collet to connect the water supply line as shown in Insert the tube at least 5 8 inch 15 mm into the connector 6 Make sure that the door switch l...

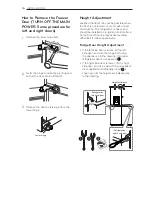
Page 16: ... the spanner as in the drawing for upper refrigerator doors use spanner 1 If the right side door is lower lift the right y side door and use a pair of long nose pliers not supplied to additionally insert 3 a snap ring until the heights are balanced as in the drawing 3 Remove the door by raising it from the lower hinge How to Remove the Freezer Door TURN OFF THE MAIN POWER Same procedure for left a...

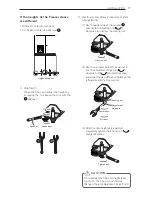
Page 17: ...o unscrew the locking nut 2 Use the narrower side of the spanner to turn the adjustment hinge pin clockwise or counterclockwise and adjust the gap difference between the refrigerator and the freezer door 3 After the door heights are adjusted completely tighten the locking nut counterclockwise CAUTION Do not adjust the hinge pin height level too much The hinge pin can fall out Range of height adjus...

Page 18: ...ge If a reverse osmosis water filtration system is connected to your cold water supply the water pressure to the reverse osmosis system needs to be a minimum of 40 to 60 psi 276 414 kPa or 2 8 4 2 kgf cm less than 2 0 3 0 sec to fill a cup of 7 oz or 198 cc capacity All installations must be in accordance with local plumbing code requirements CAUTION Do not install the icemaker tubing in areas whe...

Page 19: ...il or a bad odor could remain inside the refrigerator Wait for the refrigerator to cool Allow your refrigerator to run for at least three to four hours before putting food in it Check the flow of cold air in the freezer compartment to ensure proper cooling The refrigerator makes a loud noise after initial operation This is normal The loudness will decrease as the temperature lowers Before Plugging...

Page 20: ... Fridge set temperature in normal ambient conditions and loads is 3 C 4 C Freezer Temperature Freezer Temperature Indicates the set target temperature of the freezer compartment in Celsius C The recommended Freezer set temperature in normal ambient conditions and loads is 18 C 20 C Pure N Fresh Pure N Fresh When the Replace lamp is on replace the Pure N Fresh filter When the Replace lamp is turned...

Page 21: ...off If you want to activate the y Lock function to lock other buttons press and hold the Lock button for three seconds or more The Lock icon will display and the Lock function is now enabled To disable the y Lock function press and hold the Lock button for approximately three seconds CAUTION Display Mode For Store Use Only The Display Mode disables all cooling in the refrigerator and freezer secti...

Page 22: ...in damage or personal injury The icemaker will stop producing ice when y the in door ice bin is full If you need more ice empty the ice bin into the extra ice bin in the freezer compartment During use the ice can become uneven causing the icemaker to misread the amount of ice cubes and stop producing ice Shaking the ice bin to level the ice within it can reduce this problem Storing cans or other i...

Page 23: ...the in door ice bin y is full When full the in door ice bin holds approximately 6 to 8 glasses of ice Foreign substances or frost on the auto shutoff y feeler arm can interrupt ice production Make sure the feeler arm is clean at all times for proper operation Auto shutoff feeler arm Icemaker Turning the Automatic Icemaker On or Off To turn the automatic icemaker On Off press and hold the Ice On Of...

Page 24: ... be affected Keep the glass at a proper distance from y the ice outlet A glass held too close to the outlet may prevent ice from dispensing To avoid personal injury keep hands out of y the ice door and passage Never remove the dispenser cover y If ice or water dispenses unexpectedly turn y off the water supply and contact a qualified service center CAUTION When You Should Turn the Icemaker Off Whe...

Page 25: ...ntact a qualified service center Do not use the ice or water until the problem is corrected The dispenser will not operate when y either of the refrigerator doors are open If dispensing water or ice into a container y with a small opening place it as close to the dispenser as possible Some dripping may occur after y dispensing Hold your cup beneath the dispenser for a few seconds after dispensing ...

Page 26: ...es of food Store your food in the optimal space to enjoy the freshest taste Freezer Basket Preserve small packaged frozen food or frequently taken out foods Drawer 1 Preserve small packaged frozen food or frequently taken out foods Drawer 2 Preserve frozen food to keep longer Big Fresh Zone Preserve vegetables and fruits Fridge Basket Store beverages water etc ...

Page 27: ...ture It can also increase the refrigerator s electricity usage NOTE If you are leaving home for a short period of time like a short vacation the refrigerator should y be left on Refrigerated foods that are able to be frozen will stay preserved longer if stored in the freezer If you are leaving the refrigerator turned off for an extended period of time remove all food and y ice from the ice maker c...

Page 28: ...gs or plastic containers and store in crisper Fish Store fresh fish and shellfish in the freezer section if they are not being consumed the same day of purchase It is recommended to consume fresh fish and shellfish the same day purchased Leftovers Cover leftovers with plastic wrap aluminum foil or plastic containers with tight lids Storing Frozen Food Freezing Freezing Your freezer will not quick ...

Page 29: ... plastic containers y Containers without tight lids y Wax paper or wax coated freezer wrap y Thin semi permeable wrap y Adjusting the Refrigerator Shelves The shelves in your refrigerator are adjustable to meet your individual storage needs Your model may have either glass or wire shelves Adjusting the shelves to fit different heights of items will make finding the exact item you want easier Doing...

Page 30: ...ass shelves with y warm water while they are cold Shelves may break if exposed to sudden temperature changes or impact Glass shelves are heavy Use special y care when removing them CAUTION To reduce the risk of door scratches y and breaking the door centre mullion please make sure that the refrigerator door mullion is always folded in The door Alarm will sound every 30 y seconds the door remains o...

Page 31: ... drawer The Moisture balance keeper helps optimize humidity in the vegetable compartment 1 Pull the drawer back to the end of its travel 2 Lift the front of the draw up and remove it from its guide Refitting the Big Fresh Zone drawer 1 Insert the left and right roller of the drawer into the guides whilst the draw is slightly lifted at the front and push it in gently while lowering it at the same t...

Page 32: ...rs 2 Lift the vegetable box drawers with both hands and gently pull them toward you 3 Grab the back end with one hand to lift the vegetable box and then take it out while tilted How to refit vegetable box 1 Lift the vegetable box drawer assembly on to an angle and place it into the refrigerator compartment ready for fitting 2 Lift the vegetable box drawer horizontally and align to its original pos...

Page 33: ...If you close the refrigerator door with the dairy corner left open the refrigerator door may not close properly It could also result in damage to the lid NOTE The Cheese Butter and Condiment bins are not recommended for storing items that spoil easily such as milk and mayonnaise Door In Door Applicable to some models only The Door In Door compartment allows for easy access of commonly used beverag...

Page 34: ...ket and raise it up to take it out 3 Move floating basket to the top compartment from magic space cover to where the Daily Corner was removed Door In Door Shelf Disassembly Applicable to some models only 1 Raise magicspace cover up and take it out Hold both ends of the basket and lift up the front part of the basket Assemble in the same method as y disassembly ...

Page 35: ...m basket before y moving it up or down Not doing so could cause damage to the basket or food items CAUTION Always remove drawers with both y hands to avoid breakage or injury Always open the freezer doors all the y way before removing or refitting the drawers Freezer Drawer Use the compartment for packed frozen foods and frequently accessed foods Use the bottom compartment for frozen foods Dried f...

Page 36: ...evel 2 Continue to push in the drawer all the way while lowering the drawer to the correct level Freezer Fridge basket You can store small packaged frozen food Freezer basket small packaged refrigerated food or beverages Fridge basket such as milk water juice beer etc Do Not store ice cream or foods intended for long term storage in the Freezer Door Basket To remove the basket hold the basket with...

Page 37: ...ess steel exterior use a clean sponge or soft cloth with mild detergent in warm water Do not use abrasive or harsh cleaners Dry thoroughly with a soft cloth CAUTION Do not use a rough cloth or sponge y when cleaning the interior and exterior of the refrigerator Do not place your hand on the bottom y surface of the refrigerator when opening and closing WARNING Use non flammable cleaner Failure to d...

Page 38: ... flammable fluids These can scratch or damage the material Condenser Coil Cover Condenser Coil Cover Use a vacuum cleaner with an attachment to clean the condenser cover and vents located at the rear of the appliance Do not remove the panel covering the condenser coil area Always disconnect the main power before cleaning 2 Installing a New Pure N Fresh filter Place the new filter inside of the cov...

Page 39: ...ng the right end of the water filter out of the compartment and then grasp and rotate the filter counterclockwise to remove it from the filter head NOTE Replacing the water filter could cause a small amount of water to drain Place a cup under the filter head to catch any water NOTE This refrigerator does not require a filter bypass plug when the filter is not in place 2 Replace with a new water fi...

Page 40: ...rvice center Only use the Smart Diagnosis feature when instructed to do so by the LG call center agent The transmission sounds that you will hear are normal and sound similar to a fax machine Smart Diagnosis cannot be activated unless your refrigerator is connected to power If your refrigerator is unable to turn on then troubleshooting must be done without using Smart Diagnosis Using Smart Diagnos...

Page 41: ...efrigerators require more operating time but use less energy due to more efficient technology Refrigerator was recently plugged in or power restored The refrigerator will take up to 24 hours to cool completely Door opened often or a large amount of food hot food was added Adding food and opening the door warms the refrigerator requiring the compressor to run longer in order to cool the refrigerato...

Page 42: ...erator should not be operated in temperatures above 43 C A large amount of food or hot food was added to either compartment Adding food warms the compartment requiring the cooling system to run Allowing hot food to cool to room temperature before putting it in the refrigerator will reduce this effect Doors not closed correctly See the Doors will not close correctly or pop open section in Parts Fea...

Page 43: ... condensation and frost Food is freezing in the refrigerator compartment Food with high water content was placed near an air vent Rearrange items with high water content away from air vents Refrigerator temperature control is set incorrectly If the temperature is too cold adjust the control one increment at a time and wait for the temperature to stabilize Refer to the Setting the Controls section ...

Page 44: ...frigerator is not resting solidly on the floor Floor is weak or uneven or leveling legs need to be adjusted See the Door Alignment section Refrigerator with linear compressor was jarred while running Normal Operation Whooshing Evaporator fan motor is circulating air through the refrigerator and freezer compartments Normal Operation Air is being forced over the condenser by the condenser fan Normal...

Page 45: ...e dirty or sticky Clean the gaskets and the surfaces that they touch Rub a thin coat of appliance polish or kitchen wax on the gaskets after cleaning Door was recently closed When you open the door warmer air enters the refrigerator As the warm air cools it can create a vacuum If the door is hard to open wait one minute to allow the air pressure to equalize then see if it opens more easily Refrige...

Page 46: ...water dispenser output decreases When the ice cubes are smaller than normal Low house water supply pressure The water pressure must be between 20 and 120 psi on models without a water filter and between 40 and 120 psi on models with a water filter If the problem persists it may be necessary to contact a plumber or install a booster pump to compensate for the low pressure Reverse Osmosis filtration...

Page 47: ...um 18 degrees If the freezer temperature is warmer ice production will be affected Dispensing water slowly Water filter has become clogged and congested It is recommended that you replace the water filter Approximately every six months When the water filter indicator turns on When the water dispenser output decreases When the ice cubes are smaller than normal Reverse osmosis filtration system is u...

Page 48: ...off arm sensor is not obstructed Once the ice supply in the bin has been completely exhausted it my take up to 90 minutes before additional ice is available and approximately 24 hours to completely refill the bin Icemaker is not making ice Refrigerator was recently installed or icemaker recently connected It may take up to 24 hours for each compartment to reach the desired temperature and for the ...

Page 49: ...ense 2 5 gallons of water flush for approximately 5 minutes to remove trapped air and contaminants from the system Do not dispense the entire 2 5 gallon amount continuously Depress and release the dispenser pad for cycles of 30 seconds ON and 60 seconds OFF Tubing connecting refrigerator to house supply valve is kinked The tubing can kink when the refrigerator is moved during installation or clean...

Page 50: ...ation for the water storage tank to cool completely The water dispenser has been used recently and the storage tank was exhausted Depending on your specific model the water storage capacity will range from approximately 20 to 30 oz Dispenser has not been used for several hours If the dispenser has not been used for several hours the first glass dispensed may be warm Discard the first 10 oz Refrige...

Page 51: ......

Reviews: