background image

ENGLISH

A28

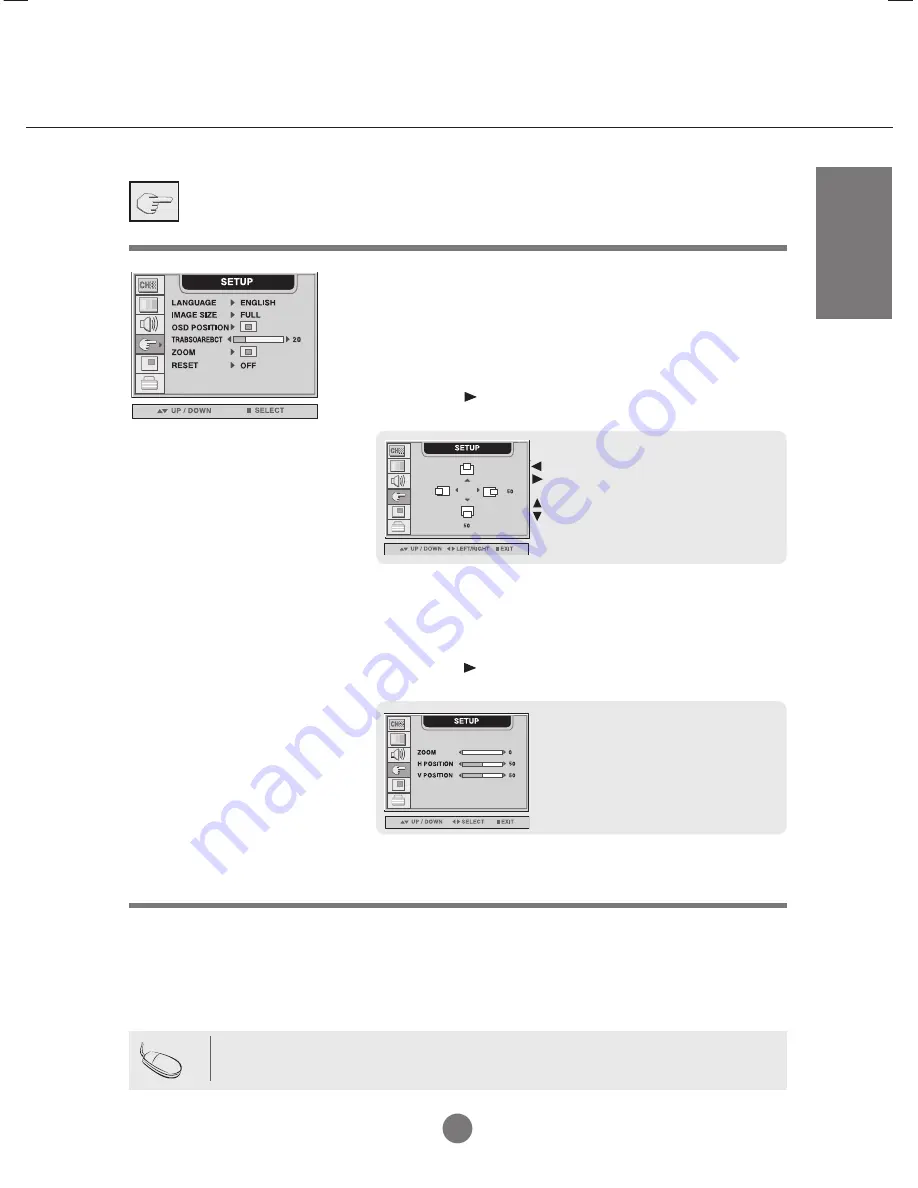
Selecting the options

To choose the language in which the control names are
displayed.

To select the image size of the screen.
(FULL/4:3/SPECTACLE/1:1)

To adjust position of the OSD window on the screen.
Press the      button to display the submenu for OSD
POSITION.

LANGUAGE

IMAGE
SIZE

OSD
POSITION

To adjust the transparency of the OSD menu screen.

Use this function to zoom in the screen. When you turn the monitor
off and on again, the default screen size will be restored.
Press the      button to display the submenu for OSD
POSITION.

TRANS
-PARENCY

ZOOM

Use this function to reset the monitor to the factory default.
However, language selection will not be initialized.

RESET

Left 
Right

Up 
Down 

Moving the OSD screen position horizontally.

Moving the OSD screen position vertically.

* If the zooming value is set to '0', vertical

and horizontal positioning cannot be
adjusted.

Note

The 

'ZOOM' 

menu will be disabled when the screen size is 4:3, spectacle or 1:1, or

PIP/POP/PBP is activated.

Summary of Contents for FLATRON L3000H

Page 1: ...ecautions before using the product Keep the User s Guide CD in an accessible place for furture reference See the label attached on the back cover and quote this information to your dealer when you require service L3000H User s Guide ...

Page 2: ...E and Position Adjusting the audio function Adjusting Options Adjusting PIP POP PBP Mode Functions When Watching Video DVD HDTV Adjusting Screen Image Adjusting the audio function Adjusting Options Adjusting PIP POP PBP Mode Functions To adjust the CAPTION VCHIP function Setting a password Closed Captions Adjusting Functions using your PC A16 A19 A20 A20 A20 A21 A22 A23 A26 A26 A27 A28 A29 A32 A34...

Page 3: ...ound unplug the power cord and contact the service center If you continue to use without taking proper measures electrical shock or fire can occur If you dropped the monitor or the case is broken turn off the monitor and unplug the power cord If you continue to use without taking proper measures electrical shock or fire can occur Contact the service center Do not drop metallic objects such as coin...

Page 4: ...cable from the monitor Covering dust can cause a fire or insulation deterioration can cause electric leakage electric shock or fire Fix the power cable completely If the power cable is not fixed completely a fire can break out Hold the plug when pulling out the power cable Do not bend the power cord with excessive force or put heavy objects on the power cord The power line can be damaged which may...

Page 5: ...e from the monitor Your vision may be impaired if you look at the monitor too closely Set the appropriate resolution and clock by referring to the User s Manual Your vision can be impaired Use authorized detergent only when cleaning the monitor Do not use benzene thinner or alcohol Monitor can be deformed Caution Do not shock the monitor when moving it You may be electrocuted or the monitor can be...

Page 6: ... ROM Cards Power Cord S Video Cable Audio Cable PC Monitor Please check the accessories in the product package The monitor and the accessories can be different from the figures shown here 15 pin D Sub Signal Cable DVI D Signal Cable Accessories RCA Cable ...

Page 7: ...eir focus on the screen center a non linear ratio increase at the outskirt area is not recognized which makes it possible to watch 4 3 screen with a wide screen However the spectacle function is useful in watching motion pictures but is not suitable for the PC environment in which you perform graphic or document work Sleep Function When watching AV DVD HDTV The monitor will be automatically turned...

Page 8: ...V DVD HDTV Automatically adjusts the image Press this button repetitively to set the intended screen See A26 CAPTION Button See A32 Menu Button Exit Button Auto Button PC Automatic adjustment function Operational for the analog signal only Check Button Sound Mode Select Select the sound mode MONO STEREO Video Operation Button Applicable for LG products only Volume Button Mute button Name and Funct...

Page 9: ...is button POP ON PBP FULL PBP 4 3 OFF If you press the button once the following Input Signal Window will appear Select the signal type you want using the button This button will be enabled only when you selected the AV signal The signal type will be changed with the following order Set the signal type you want POP ON PBP FULL PBP 4 3 Input Select Button AV Button VIDEO1 VIDEO2 DVD HDTV Name and F...

Page 10: ...t Signal 1 and Input Signal 2 using the SWAP button 1 Take out the battery cap 2 Insert the battery with correct polarity 3 Close the battery cap You can use a remote controller 7 meter distance and 30 degree left right within the receiving unit scope Dispose of used batteries in the recycle bin to prevent environmental pollution Inserting batteries into remote controller 3 Swap Button You can swa...

Page 11: ...Terminal DVI Digital Signal Connector D Sub Analog Signal Connector Connect the power cord Speaker Terminal Connect the speaker Theft prevention locking device Theft prevention locking device Name and Function of the Parts ...

Page 12: ...xternal device if you record the broadcasting When you set the input signal of the main screen as VIDEO1 CVBS you can transmit the signal that you re watching to the AV output terminal If you set other signals than VIDEO1 CVBS as the main screen the signal type you set in the PIP input signal would be displayed However it is supported when the PIP input signal is VIDEO1 CVBS Connecting the sound c...

Page 13: ...h the DSub signal input cable IBM compatible PC When connecting with the DSub signal input cable Macintosh PC PC Rear side of the monitor MAC Macintosh Adapter Optional Use the standard Macintosh adapter since an incompatible adaptor is available in the market Different signaling system Rear side of the monitor When connecting to a wall outlet Connecting to External Devices Connect the power cord ...

Page 14: ... the SOURCE button at the front side of the monitor How to connect to two computers Connect the signal cables DVI and D Sub to each computer Press the Input Select button in a remote controller to select the computer to use Directly connect to a grounded power outlet on the wall or a power bar with a ground wire Note Turn on power by pressing the power button on the monitor If the system is not po...

Page 15: ... connecting with a S Video cable Select VIDEO 2 S Video Select an input signal Press the Input Select button on the remote controller to select the input signal Or press the SOURCE button at the front side of the monitor Connect the video cable as shown in the below figure and then connect the power cord See page A11 When watching Video DVD Connecting to External Devices B A B A Side of the Monito...

Page 16: ...D Y Cb Cr Select an input signal Press the Input Select button on the remote controller to select the input signal Or press the SOURCE button at the front side of the monitor BRT W Connect the video audio cable as shown in the below figure and then connect the power cord See page A11 Connect the input terminal with a proper color match When watching DVD 480i ...

Page 17: ...e controller to select the input signal Or press the SOURCE button at the front side of the monitor BRT W Connect the video audio cable as shown in the below figure and then connect the power cord See page A11 Connect the input terminal with a proper color match The HDTV terminal also supports SDTV 480i 480p When watching HDTV 720p 1080i Connecting to External Devices Red White Red Blue Green R W ...

Page 18: ...he display is in DPM Energy Saving mode this indicator color changes to amber Power Button Power LED Adjust the volume Use this button to directly control brightness and contrast of the PC signal DSUB DVI Use this button to show hide the OSD On Screen Display menu screen MENU Button UsethebuttontoselectaniconoradjustthesettingintheOSDscreen OSD Select Adjust Button A16 Selecting and Adjusting the ...

Page 19: ...tment Activated when pressed together longer than 5 seconds DVI DIGITAL DVI digital signal DSUB ANALOG 15 pin D Sub analog signal VIDEO1 CVBS Composite video VIDEO2 S Video S Video DVD Y Cb Cr DVD HDTV Y Pb Pr HD television Select the input signal SOURCE Button OSD Lock Unlock Button Menu button The unit that receives the signal from the remote controller Use this button to turn on off the monitor...

Page 20: ...Adjusts PIP POP PBP mode function Icon Function Description Icon Function Description OSD Menu When Watching Video DVD HDTV Video Audio Setup PIP POP PBP Adjusts PIP POP PBP mode function Adjusts the screen status according to the circumstances Adjusts the audio function Adjusts the screen video Note OSD On Screen Display The OSD function enables you to adjust the screen status conveniently since ...

Page 21: ...g signal Then an optimal screen status will be selected that fits into the current mode If adjustment is not satisfactory you need to adjust screen position clock and phase in the OSD menu Pops up the menu screen Select a menu icon Select a menu icon Adjust the status Save adjustment Exit from the menu screen Press the MENU Button then the main menu of the OSD appears To access a control use the B...

Page 22: ...analog signal input only This button is for the automatic adjustment of the screen position clock and phase To minimize any vertical bars or stripes visible on the screen background The horizontal screen size will also change To adjust the focus of the display This item allows you to remove any horizontal noise and clear or sharpen the image of characters To move image left or right To move image ...

Page 23: ...y to the most appropriate level To use this feature select ON Used to select mute ON means sound off and mute OFF means sound on Set the SRS WOW menu on The SRS WOW function plays back the mono or stereo sound input with the dynamic surround effects It will provide rich and profound sound tone If you set the SRS WOW on bass treble will be automatically adjusted Use this function to balance sound f...

Page 24: ...you turn the monitor off and on again the default screen size will be restored Press the button to display the submenu for OSD POSITION TRANSPARENCY ZOOM Use this function to reset the monitor to the factory default However language selection will not be initialized RESET Left Right Up Down Moving the OSD screen position horizontally Moving the OSD screen position vertically If the zooming value i...

Page 25: ...reen Press the button to display the submenu for PIP IMAGE Use the buttons to adjust the item to the desired level The items of the sub menu may vary depending on the type of the source To turn the PIP sound on off To switch the main screen and sub screen in PIP mode PIP SOUND PIP SWAP PIP POSITION Adjust the PIP screen position PIP CONTRAST Adjust PIP screen contrast PIP BRIGHTNESS Adjust PIP scr...

Page 26: ...for POP IMAGE Use the buttons to adjust the item to the desired level POP SOURCE POP IMAGE To turn the POP sound on off To switch the main screen and sub screen in POP mode POP SOUND POP SWAP Note The POP IMAGE menu will be disabled if the POP screen input is a PC signal POP CONTRAST Adjust POP screen contrast POP BRIGHTNESS Adjust POP screen brightness POP SHARPNESS Adjust POP screen sharpness PO...

Page 27: ...PBP IMAGE Use the buttons to adjust the item to the desired level The items of the sub menu may vary depending on the type of the source PBP SOURCE PBP SIZE PBP IMAGE To turn the PBP sound on off To switch the main screen and sub screen in PBP mode PBP SOUND PBP SWAP Note The PBP IMAGE menu will be disabled if the PBP screen input is a PC signal PBP CONTRAST Adjust PBP screen contrast PBP BRIGHTNE...

Page 28: ... display status DYNAMIC Select this option to display with a sharp image MILD Select this option to display with a mild image To adjust the contrast of the screen To adjust the brightness of the screen To adjust the clearness of the screen To adjust the color to desired level To adjust the tint to desired level This function is available only in NTSC broadcasting mode PSM CONTRAST BRIGHTNESS SHARP...

Page 29: ...o the most appropriate level To use this feature select ON Set the SRS WOW menu on The SRS WOW function plays back the mono or stereo sound input with the dynamic surround effects It will provide rich and profound sound tone If you set the SRS WOW on bass treble will be automatically adjusted To select the audio mode MONO STEREO Used to select mute ON means sound off and mute OFF means sound on Us...

Page 30: ...creen When you turn the monitor off and on again the default screen size will be restored Press the button to display the submenu for OSD POSITION TRANS PARENCY ZOOM Use this function to reset the monitor to the factory default However language selection will not be initialized RESET Left Right Up Down Moving the OSD screen position horizontally Moving the OSD screen position vertically If the zoo...

Page 31: ...just the image of the PIP screen Press the button to display the submenu for PIP IMAGE Use the buttons to adjust the item to the desired level The items of the sub menu may vary depending on the type of the source PIP SOURCE PIP SIZE PIP IMAGE To turn the PIP sound on off To switch the main screen and sub screen in PIP mode PIP SOUND PIP SWAP PIP POSITION Adjust the PIP screen position PIP CONTRAS...

Page 32: ...ge of the POP screen Press the button to display the submenu for POP IMAGE Use the buttons to adjust the item to the desired level POP SOURCE POP IMAGE To turn the POP sound on off To switch the main screen and sub screen in POP mode POP SOUND POP SWAP POP CONTRAST Adjust POP screen contrast POP BRIGHTNESS Adjust POP screen brightness The sub menu can differ according to the type of the input sign...

Page 33: ...o display the submenu for PBP IMAGE Use the buttons to adjust the item to the desired level The items of the sub menu may vary depending on the type of the source PBP SOURCE PBP SIZE PBP IMAGE To turn the PBP sound on off To switch the main screen and sub screen in PBP mode PBP SOUND PBP SWAP PBP CONTRAST Adjust PBP screen contrast PBP BRIGHTNESS Adjust PBP screen brightness The sub menu can diffe...

Page 34: ...This feature can prevent unauthorized viewing In order to lock the OSD screen adjustment set the KEY LOCK tab to the on position In order to unlock it do the following 1 Push the menu button on the remote control and set KEY LOCK to the off position 2 Simultaenously push the menu button on the bottom of the monitor and the button for 5 seconds KEY LOCK This Function is used to block program viewin...

Page 35: ...es will be available PG 13 R NC 17 and X will be blocked MPAA GENERAL TV Rating TV G ABOVE General audience Individual categories do not apply TV PG ABOVE Parental guidance suggested TV 14 ABOVE 14 years and up TV MA Mature audience UNBLOCKED CHILDREN TV Rating TV Y ABOVE Youth Individual content categories do not apply TV Y7 Youth 7 years and up UNBLOCKED AGE BLOCK CONTENT Categories DIALOGUE sex...

Page 36: ...the password to any four digit number 1 Open the OSD Press the buttons to select the CAPTION VCHIP menu then press SET to open the menu Press the buttons to select the PARENTAL sub menu then press the button to open the sub menu 2 Use the number pad to enter your password when prompted If you have not set a passwod enter 7777 If you have forgotten your password enter 7777 3 Press the buttons to se...

Page 37: ...rom CC1 CC4 TEXT1 TEXT4 you can choose which signal you view CC1 is usually the signal with the captions while Another mode might show demonstration or programmimg information 3 Your TV might not receive caption signals normally in the following situations Poor reception conditions are encountered IGNITION Picture may flutter drift suffer from black spots or horizontal streaking Usually caused by ...

Page 38: ...2C terminal connection is not an accessory included in the product Please purchase the cable Raud Rate 115200bps Data Length 8bits Parity Bit NONE Stop Bit 1bit Flow Control NONE The RS 232C protocol is used for communication between the PC and monitor You can turn the monitor on off select an input source or adjust the OSD menu from your PC Communication Parameter Rear side of the monitor ...

Page 39: ...I DIGITAL DSUB ANALOG VIDEO1 CVBS VIDEO2 S Video DVD HDTV 01h 00h 00h 01h 02h 03h 04h 05h 00h 01h 02h 03h 04h 05h 01h 0Fh 10h 0Bh POWER MAIN INPUT SUB INPUT RED GREEN BLUE 00h 01h 02h 00h FFh 00h FFh 00h FFh USER CONTRAST BRIGHTNESS SHARPENESS COLOR 9300K 6500K USER 03h 04h 05h 06h 08h 09h 0Ah 00h 64h 00h 64h 00h 64h 00h 64h Commands Related with User Control ...

Page 40: ...0h 5 00h 6 Device ID 00h 63h 7 Check sum Parameter 2 8 Byte length Read Write selection 0 Length 08h 1 11h 2 Param ID 02h 3 00h 4 00h 5 00h 6 Write 01h 7 Check sum Parameter 3 8 Byte length Value 0 Length 08h 1 11h 2 Param ID 03h 3 4 5 6 7 Check sum High 2Byte Parameter 4 8 Byte length Value Function command 4 Byte length 0 1 2 3 Length 04h AAh Function Command Check sum ...

Page 41: ...s the power LED is turned on Power is on power LED is green but the screen appears extremely dark Does the power LED look yellow Does the OUT OF RANGE message appear Does the CHECK SIGNAL CABLE message appear No image is displayed The control locking function prevents unintentional OSD setting change due to careless usage To unlock the controls simultaneously press the Menu button and button for 5...

Page 42: ...ustment is not satisfactory use the Phase OSD menu See if the Zoom value is set to 0 If it is you cannot adjust the H V Position value If the screen size is not full when connected to the PC execute the PIP POP PBP to change to full screen mode You cannot adjust brightness and tint in the PIP POP PBP Screen menu for the sub screen among PIP POP PBP menus Therefore brightness can be different for t...

Page 43: ...ono colored Do black spots appear on the screen Screen color is abnormal See if the audio cable is connected properly Adjust the volume See if the sound is set properly See if the Sound is set to On in the PIP POP PBP menu Select the appropriate treble sound Select the appropriate bass sound Adjust the volume No sound No sound is available when the PIP POP PBP mode is engaged Sound is too dull Sou...

Page 44: ... Green Digital 15 pin D Sub type DVI D digital S Video Composite video HDTV DVD Rated Voltage AC 100 240V 50 60Hz 1 8A Power Consumption Normal operation 160W Power saving preparation state 5W Power saving state 5W Power switch on 5W Power cut off switch off 1W Size WxLxH 733 8mm x 538 0 mm x 99 0mm Weight excl package 14 2 kg Operational Condition Temperature 10 C 35 C Humidity 10 80 Storage Cond...

Page 45: ...SA VESA 85 75 60 75 60 60 Power LED Mode Monitor Normal Operation Pre power Saving State Power Saving State Power Switch Off Power Cut off Switch Off Green Amber Amber 100 100 100 Locking Device Use this locking cable optional to prevent theft VESA wall mounting Connected to another object stand type and wall mounted type This monitor accepts a VESA compliant mounting interface pad optional For fu...

Page 46: ...4 Shield T M D S Data 4 T M D S Data 4 DDC Clock DDC Data Analog Vertical Synchronization T M D S Data 1 T M D S Data 1 T M D S Data 1 3 Shield T M D S Data 3 T M D S Data 3 5V Power Grounding return for 5V horizontal sync and vertical sync Hot Plug Detect T M D S Data 0 T M D S Data 0 T M D S Data 0 5 Shield T M D S Data 5 T M D S Data 5 T M D S Clock Shield T M D S Clock T M D S Clock ...

Page 47: ...A45 Digitally yours ...

Reviews: