background image

A28

On Screen Display(OSD) Selection and Adjustment 

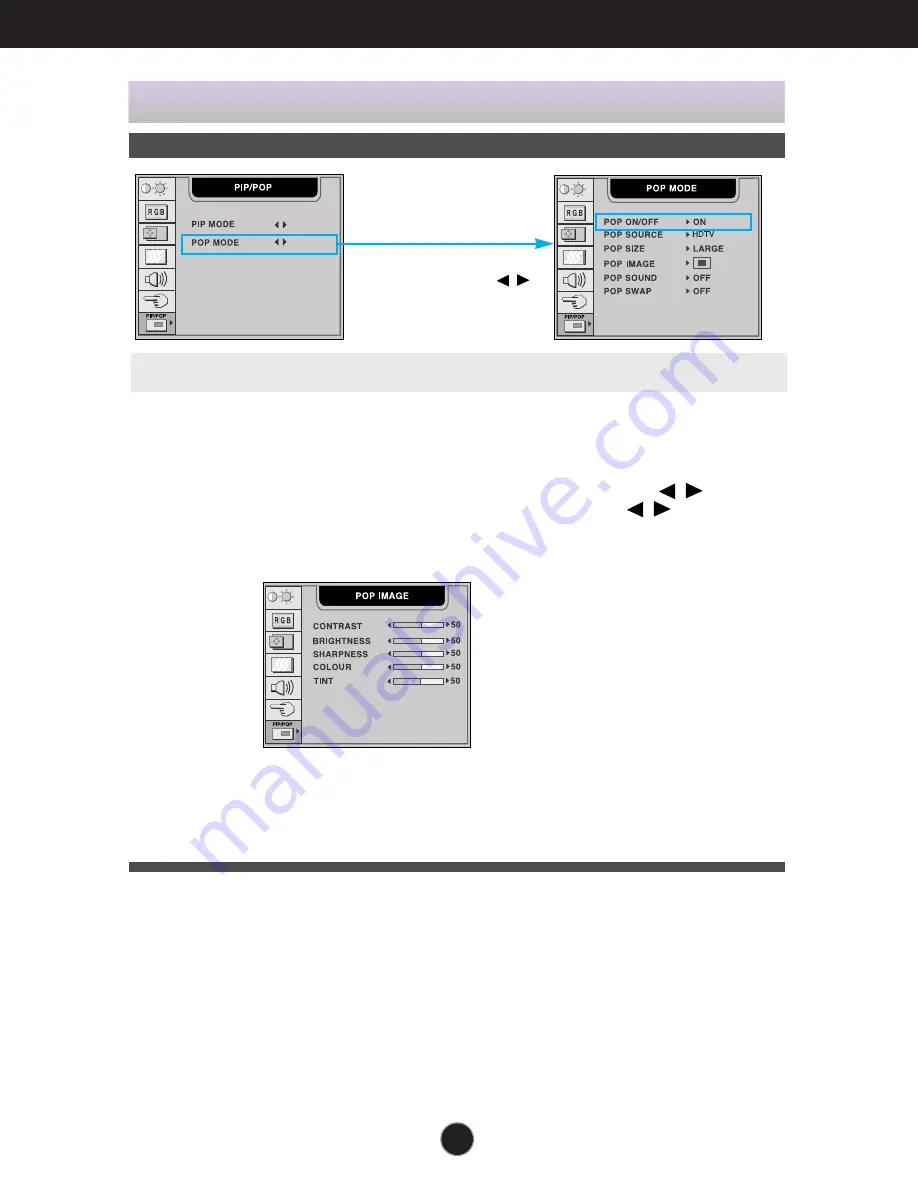
To adjust the POP(Picture out Picture) of the screen

OSD Adjust

Description

To select an input signal for POP.

To adjust the size of the POP screen: POP1/POP2/POP3/POP4

To adjust the image of the POP screen; Press the              button to
display the submenu for POP IMAGE. Use the              buttons to
adjust the item to the desired level. The items of the sub-menu may
vary depending on the type of the source.

To turn the POP sound on/off.

To switch the main-screen and sub-screen in POP mode.

POP SOURCE

POP SIZE

POP IMAGE

POP SOUND

POP SWAP

After selecting 

ON

in the 

POP ON/OFF

menu, the following menu items can be adjusted.

CONTRAST

To adjust the contrast of the screen.   

BRIGHTNESS 

To adjust the brightness of the screen. 

SHARPNESS 

To adjust the clearness of the screen.

COLOUR

To adjust the colour to desired level.

TINT

To adjust the tint to desired level.
This function is available only in
NTSC broadcasting mode.

To adjust the 

POP MODE 

submenu

function, Press the 

OK

-->

button on the remote control

Summary of Contents for FLATRON L2323T

Page 1: ...Precautions before using the product Keep the User s Guide CD in an accessible place for furture reference See the label attached on the back cover and quote this information to your dealer when you require service L2323T User s Guide ...

Page 2: ...loaded AC outlets and extension cords are dangerous So are frayed power cords and broken plugs They may result in a shock or fire hazard Call your service technician for replacement Do not Open the Display There are no user serviceable components inside There are Dangerous High Voltages inside even when the power is OFF Contact your dealer if the display is not operating properly To Avoid Personal...

Page 3: ... Active Matrix LCD with anything hard as this may scratch mar or damage the Active Matrix LCD permanently Do not press the LCD screen with your finger for a long time as this may cause some afterimages Some dot defects may appear as Red Green or Blue spots on the screen However this will have no impact or effect on the display performance If possible use the recommended resolution to obtain the be...

Page 4: ...are included with your monitor If any items are missing contact your dealer Media Station Remote control Batteries AAA x 2 CD Rom Cards 15 pinD SubSignalCable DVI D Signal Cable Power Cord SCART Cable Half SCART Cable RCA Cable S Video Cable Audio Cable PC Display P D cable Please see the Speaker User Manual included in the speaker box to reference the speaker accessory list ...

Page 5: ... input signal TV AV TV AV button I II Bilingual choice and sound mode selection Press this button to switch from Stereo to Mono sound in case of stereo transmission or from Nicam Stereo to Nicam Mono in case of digital transmission to switch from Nicam Dual I to Nicam Dual II or Nicam Dual I II in case of Nicam Dual transmission to choose between Dual I Dual II or Dual I II in case of bilingual tr...

Page 6: ...ly adjust your display image to the ideal settings for the current screen resolution size display mode It is available to the PC analog signal input only SWAP function To switch the main screen and sub screen in PIP POP mode Number buttons A5 Using the Remote Control AUTO TEXT SLEEP MODE UPDATE LIST TIME SIZE Q VIEW MIX HOLD INDEX APC REVEAL SWAP PR VOL VOL PR OK M X i Remote Control ...

Page 7: ...ected TV channel APC Auto Picture Control Use this button to select a screen color 9300K 6500K The default color is 9300K This function is not supported in PC mode 9300K Slightly bluish white 6500K Slightly reddish white Note TV channels displayed in blue have been setup to skipped in the PR EDIT menu 0 1 2 3 C 01 C 04 C 25 4 5 6 7 8 9 A6 Using the Remote Control AUTO TEXT SLEEP MODE UPDATE LIST T...

Page 8: ...P Picture in Picture The sub screen is changed in the order shown below SMALL LARGE OFF POP Picture out Picture The sub screen is changed in the order shown below POP1 POP2 POP3 POP4 OFF AUTO TEXT SLEEP MODE UPDATE LIST TIME SIZE Q VIEW MIX HOLD INDEX APC REVEAL SWAP M X i Remote Control PIP POP function SOURCE 2 SOURCE 1 AV AV DVI D DVI D HDTV HDTV TV TV D SUB D SUB S VIDEO S VIDEO 1024x768 256x1...

Page 9: ...appears briefly on your screen Press the botton again to reappear teletext SIZE Press the button repeatedly to display the upper part the lower part and then to return to the normal page size When the upper part is displayed you can scroll the text line by line using the buttons HOLD Press the button to stop the automatically rotating of the subpages Press the button again to continue the automati...

Page 10: ...hold or change the sub page press the RED GREEN or NUMBER buttons Press again to exit this function MIX Display the teletext pages superimposed on the TV picture To switch the TV picture off press this button again REVEAL Press the button to reveal conceal the hidden information such as solutions to riddles and puzzles Press this button again to remove the information from the display A9 Using the...

Page 11: ...ach direction of the front of the remote sensor Do not expose the sensor of remote control in the monitor to a strong light source such as direct sunlight or illumination If so may not be able to operate the monitor with the remote control I II TV AV Note Do not drop the remote control or handle it roughly Do not leave the remote control in extremely hot or humid conditions Do not expose the remot...

Page 12: ...reduce power consumption HDTV YPbPr Input ports 720p 1080i Connect the antenna cable not included Connect the power cord LINE OUT A terminal used to connect to the speaker including a built in amplifier Amp Make sure that the connecting terminal of the PC sound card is checked before connecting If the Audio Out of PC sound card has only Speaker Out reduce the PC volume If the Audio Out of the PC s...

Page 13: ...ay cable When attached tighten the thumbscrews to secure the connection 2 Connect the signal cable When connecting D SUB signal cable When connecting DVI D signal cable PC MediaStationRear MAC Macadapter notincluded ForAppleMacintoshuse aseparateplugadapterisneededto changethe15pinhighdensity 3row D subVGAconnector onthesuppliedcabletoa15pin2rowconnector P D cable MediaStationRear MediaStationRear...

Page 14: ...I D signal cable DVI D DIGITAL DVI D digital signal 3 Connect the power cord into a proper power outlet that is easily accessible and close to the display 5 Select an input signal Press the SOURCE button on the remote control to select an input 4 Turn the media station power on MediaStationRear MediaStationRear STEP A B ...

Page 15: ...A14 Connecting the Display AV1 AV2 Video Connecting the Speakers Connect the audio cable ...

Page 16: ...ting the VCR DVD 1 When connecting RCA cable Connect the each audio video output jack of the VCR DVD to the corresponding input port as shown on the Display or Media station A When connecting SCART cable When connecting S Video cable If you connect the S Video input port to external equipment you can have an improved definition image B C MediaStationRear VCR DVD MediaStationRear VCR DVD G AUDIO L ...

Page 17: ... 1 Connect both HDTV cable Y Pb Pr and audio cable Audio L R to the Display or Media station jack and the Set top box jack Audiocable notincluded MediaStationRear HDTV Set Top Optional HDTV YPbPr 2 Select an input signal Press the SOURCE button on the remote control to select an input STEP Red White ...

Page 18: ... SOURCE button on the remote control to select an input Connecting the HDTV DVD 576i only Take these connection steps if the HDTV DVD player has a RCA jack and the output is 576i only MediaStationRear HDTV DVD 576i STEP 1 Connect half of the SCART cable Red Blue Green Red White ...

Page 19: ...OURCE button on the remote control to select an input STEP AUTO AV switching If your VCR is connected to the euroconnector and the VCR is switched to playback the TV will automatically change to AV1 mode If you want to keep watching in TV mode press the PR Buttons or press the number buttons When you select a TV input signal from other sources the AV1 SCART signal will be displayed immediately if ...

Page 20: ... CVBS TV TV Source Selection The sub screen is changed in the order shown below SMALL LARGE OFF The positions of SOURCE 1 and SOURCE 2 can be transposed by selecting SWAP on the remote control PIP Picture in Picture function The sub screen is changed in the order shown below POP1 POP2 POP3 POP4 OFF The positions of SOURCE 1 and SOURCE 2 can be transposed by selecting SWAP on the remote control POP...

Page 21: ...se or adjust items in the On Screen Display MENU Button Use this button to enter or exit the On Screen Display Use this button to turn the display on or off This Indicator lights up blue when the display operates normally If the display is in DPM Energy Saving mode this indicator color changes to amber Power Button Power DPMS Indicator Use this button to enter a selection in the On Screen Display ...

Page 22: ...le adjustments and selections you can make using the OSD To make adjustments in the On Screen Display follow these steps Press the MENU Button then the main menu of the OSD appears To access a control use the or Buttons When the icon you want becomes highlighted press the OK Button Use the Buttons to adjust the item to the desired level Accept the changes by pressing the OK Button Exit the OSD by ...

Page 23: ...in menu Sub menu A D Reference PRESET 9300K 6500K R G B User Colour To adjust the position of the screen To customize the colour of the screen To customize the screen status for a user s operating environment To improve the clarity and stability of the screen Adjustable A Analog Input D Digital Input BRIGHTNESS CONTRAST V POSITION H POSITION AUTO CLOCK PHASE LANGUAGE IMAGE SIZE OSD POSITION TRANSP...

Page 24: ...ating environment To improve the clarity and stability of the screen LANGUAGE IMAGE SIZE OSD POSITION TRANSPARENCY To adjust the audio function PROGRAMME SYSTEM SELECT CHANNEL FINE TUNE NAME AUTO PR To select the TV channel settings and adjust the channel quality Using the VCR DVD TV HDTV Adjustable V VCR DVD T TV H HDTV MUTE VOLUME BASS TREBLE BBE EFFECT SOUND To adjust the PIP POP of the screen ...

Page 25: ... screen CONTRAST To adjust the contrast of the screen To adjust the brightness and contrast of the screen USER 9300K 6500K RED GREEN BLUE Set your own colour levels Select the screen colour 9300K Slightly bluish white 6500K Slightly reddish white To customize the colour of the screen OSD Adjust Description Vertical Position To move image up and down Horizontal Position To move image left and right...

Page 26: ...cus of the display This item allows you to remove any horizontal noise and clear or sharpen the image of characters AUTO CLOCK PHASE To improve the clarity and stability of the screen OSD Adjust Description To adjust the audio function OSD Adjust Description Used to select mute on means sound off and mute off means sound on To decrease or increase volume level To decrease or increase bass level To...

Page 27: ...oming point use the H V POSITION function in the sub menu However if the monitor turns off when zooming in and out the screen the monitor will be returned to original screen LANGUAGE IMAGESIZE OSD POSITION TRANSPARENCY ZOOM SPECTACLE This function provides different areas of the screen with a varied ratio so that the ratio at the central area is close to 4 3 and near the edges it exceeds 16 9 Sinc...

Page 28: ... IMAGE PIP SOUND PIP SWAP CONTRAST To adjust the contrast of the screen BRIGHTNESS To adjust the brightness of the screen SHARPNESS To adjust the clearness of the screen COLOUR To adjust the coloUr to desired level TINT To adjust the tint to desired level This function is available only in NTSC broadcasting mode To select an input signal for PIP To adjust the size of the PIP screen SMALL LARGE To ...

Page 29: ...ending on the type of the source To turn the POP sound on off To switch the main screen and sub screen in POP mode POP SOURCE POP SIZE POP IMAGE POP SOUND POP SWAP Afterselecting ONin thePOPON OFFmenu thefollowingmenuitemscanbeadjusted CONTRAST To adjust the contrast of the screen BRIGHTNESS To adjust the brightness of the screen SHARPNESS To adjust the clearness of the screen COLOUR To adjust the...

Page 30: ...possible to change the name stored in the memory or to assign a name to a TV channel which has not yet been entered A name with up 5 letters or numbers can be given to the programme numbers 0 to 99 Press the buttons to move cursor to be changed Press the buttons to select a character space number 0 9 and alphabet A Z Press the AUTO SELECT button or OK button on the remote control AUTOPR PROGRAMME ...

Page 31: ...appears EDIT AUTO PROGRAMME STORAGE FROM 2 START OFF EDIT SYSTEM BG PR PR PROGRAMME EDIT 0 1 2 3 C 01 C 04 C 25 4 5 6 7 8 9 DELETE COPY MOVE SKIP PR PR DELECT Press the buttons to select a TV channel to be deleted Press the red key on the remote control twice The selected TV channel number is deleted all the following channels are shifted up one position COPY Press the buttons to select a TV chann...

Page 32: ...is function is available only in NTSC broadcasting mode CONTRAST BRIGHTNESS SHARPNESS COLOUR TINT PR PR On Screen Display OSD Selection and Adjustment To adjust the audio function OSD Adjust Description Used to select mute on means sound off and mute off means sound on To decrease or increase volume level To decrease or increase bass level To decrease or increase treble level To adjust th clearnes...

Page 33: ... usually seen in the zooming process Input source can be controlled only in AV1 AV2 TV S VIDEO states PR PR To customize the screen status for a user s operating environment OSD Adjust Description LANGUAGE IMAGESIZE example Image Size 4 3 16 9 Screen ZOOM1 FULL ZOOM2 Input Source To choose the language in which the control names are displayed To select the image size of the screen FULL 4 3 SPECTAC...

Page 34: ... SIZE PIP POSITION PIP IMAGE PIP SOUND PIP SWAP CONTRAST To adjust the contrast of the screen BRIGHTNESS To adjust the brightness of the screen COLOUR To adjust the colour to desired level TINT To adjust the tint to desired level This function is available only in NTSC broadcasting mode To select an input signal for PIP To adjust the size of the PIP screen SMALL LARGE To adjust the position of PIP...

Page 35: ...of the sub menu may vary depending on the type of the source To turn the POP sound on off To switch the main screen and sub screen in POP mode POP SOURCE POP SIZE POP IMAGE POP SOUND POP SWAP Afterselecting ONin thePOPON OFFmenu thefollowingmenuitemscanbeadjusted CONTRAST To adjust the contrast of the screen BRIGHTNESS To adjust the brightness of the screen COLOUR To adjust the colour to desired l...

Page 36: ...on 1280x1024 60Hz Check if the HDTV resolution of your set top box is set at 480i 576i If so reconfigure it to 576p 720p 1080i This message appears when the signal cable between your PC and your display is not connected Check the signal cable and try again Press the SOURCE button on the remote control and select and input signal connected Is the power cord of the display connected Is the power ind...

Page 37: ...re changed If yes readjust the video card to the recommend resolution Press the AUTO button to automatically adjust your display image to the ideal setting If the results are unsatisfactory decrease the vertical bars or stripes using the CLOCK icon in the on screen display Press the AUTO button to automatically adjust your display image to the ideal setting If the results are unsatisfactory decrea...

Page 38: ...eshooting Display image is incorrect Is the H V position not adjustable from the ZOOM function Has the screen size of your PC changed automatically Is the sound not displayed on the TV channel indication window In the PC signal source is the brightness of the main screen different from that of the sub screen Check if the ZOOM value is set at 0 In case the ZOOM value is set at 0 the H V position wi...

Page 39: ...tly selected Check if the SOUND is ON in the PIP POP OSD menu Adjust the TREBLE to an appropriate level Adjust the BASS to an appropriate level Select the BBE EFFECT to an appropriate level Check the volume level No sound No sound in PIP POP mode Sound is too high pitched or too low piched Sound level is too low Audio function Do you see a CONTROLS LOCKED message on the screen Do you see CONTROLS ...

Page 40: ...igital Signal Input 15 pin D Sub Connector DVI D connector Digital Composite video S video HDTV TV Input Form RGB Analog 0 7Vp p 75ohm Digital S VIDEO CVBS Y Pb Pr Y Cb Cr Max 1280 x 1024 60Hz Recommend 1280 x 768 60Hz DDC 2B Display Input DC 24V 4 0A DC 5V 0 5A Media station Input AC 100 240V 50 60Hz 1 5A Output DC 24V 4 0A DC 5V 0 5A Normal 110W Stand by Suspend 5W DPMS Off 3W Power switch Off 3...

Page 41: ...10 to 80 non Condensing Storage Conditions Temperature 20 C to 60 C Humidity 5 to 95 non Condensing Specifications Dimensions Weight Environmental Conditions VESA wall mounting Connected to another object stand type and wall mounted type This monitor accepts a VESA compliant mounting interface pad optional For further information refer to the VESA Wall Mounting Instruction Guide Kensington Securit...

Page 42: ... 1024 x 768 1280 x 768 1280 x 1024 31 469 31 469 37 500 31 468 37 879 46 875 49 725 48 363 60 123 47 780 63 981 70 60 75 70 60 75 75 60 75 60 60 VGA VGA VESA VGA VESA VESA MAC VESA VESA VESA VESA HDTV mode Component Video Input YPbPr Display Modes Resolution Horizontal Freq kHz Vertical Freq Hz 1 2 3 720 x 483 1280 x 720 1280 x 720 31 50 45 00 44 96 59 94 60 00 59 94 Display Modes Resolution ...

Page 43: ...a3 T M D S Data3 5V Power Ground return for 5V H Sync and V Sync Pin Signal 16 17 18 19 20 21 22 23 24 Hot Plug Detect T M D S Data0 T M D S Data0 T M D S Data0 5 Shield T M D S Data5 T M D S Data5 T M D S Clock Shield T M D S Clock T M D S Clock T M D S Transition Minimized Differential Signaling DVI D Connector Indicator Normal Stand by Suspend DPMS Off Power switch off Power cut off switch off ...

Page 44: ...Digitally yours ...

Reviews: