background image

Installation

A7

USB specifications

Applies to 795FT

plus 

only(A6~A8 page).

Making use of USB (Universal Serial Bus) *

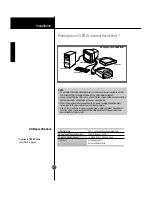
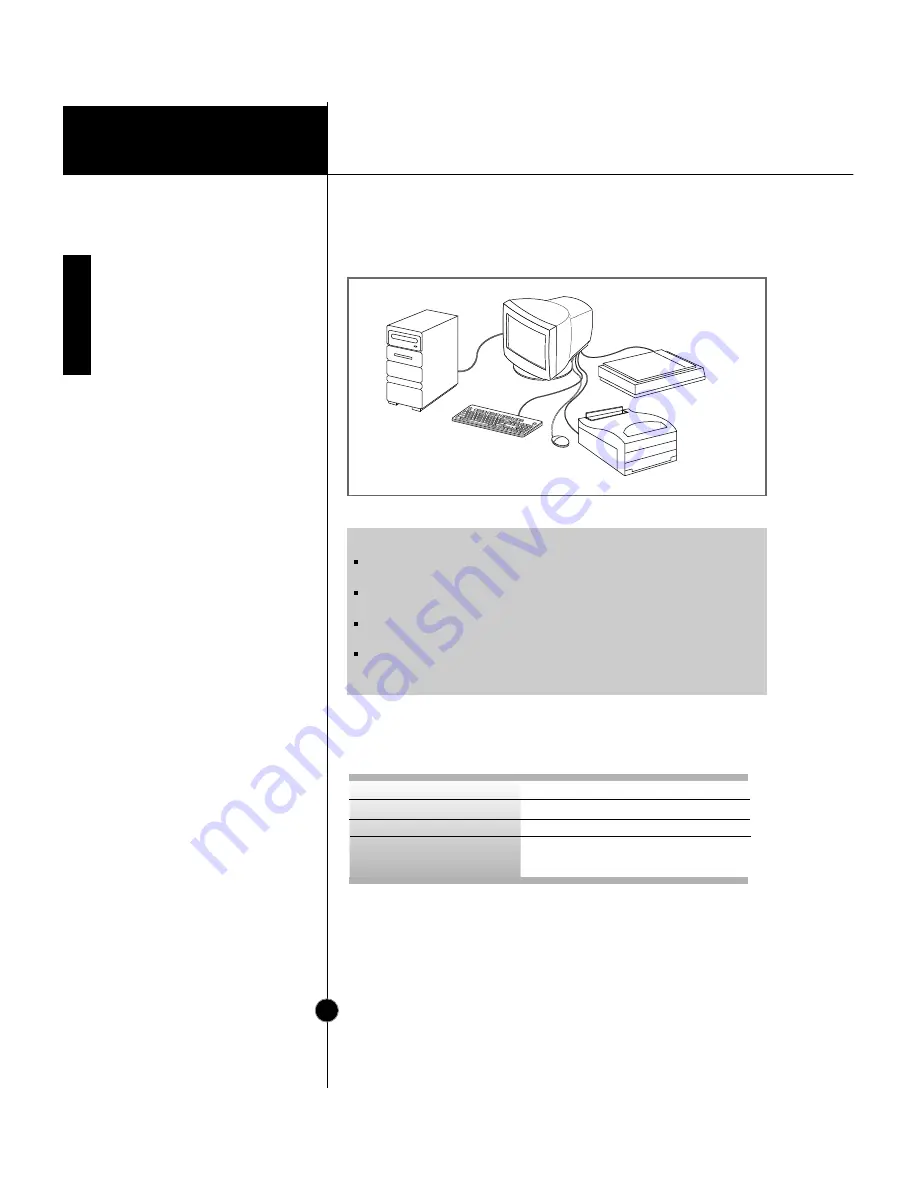
Example of connection

keyboard

printer

scanner

monitor

computer

mouse

USB standard

Downstream power supply

Communication speed

USB port

Rev. 1.0 complied self-powered hub

500mA for each (MAX)

12 Mbps (full), 1.5 Mbps (low)

1 Upstream port

4 Downstream ports

NOTE

To activate the USB hub function, the monitor must be connected to a USB
compliant PC(OS) or another hub with the USB cable(enclosed).
When connecting the USB cable, check that the shape of the connector at the
cable side matches the shape  at the connecting side.
When the monitor is not connected to AC power supply, the peripherals
connected to the downstream ports will not operate.
Even if the monitor is in a power saving mode, USB compliant devices will
function when they are connected the USB ports(both the upstream and
downstream) of the monitor.

Summary of Contents for Flatron 795FT

Page 1: ...795FT 795FT Monitor User s Guide Benutzerhandbuch Manuel d utilisation Guida Utente Guia del Usuario ...

Page 2: ...ight with all rights reserved No part of the document may be reproduced or transmitted by any means or in any form without prior consent in writing from LG Electronics Inc Trademark Acknowledgments IBM is a registered trademark and VGA is a trademark of International Business Machines Corporation ...

Page 3: ...trols Control Panel Function On Screen Display OSD Control Adjustment On Screen Display OSD Selection and Adjustment Energy Saving Design Low Radiation Compliance MPR II and DDC Display Data Channel Video Memory Modes Troubleshooting Service Specifications Communications Regulation Information Environmental Labelling of Personal Computers i A1 A9 A6 A4 A2 A10 A12 A11 A15 A17 A18 A19 A20 See back o...

Page 4: ... text and vivid color graphics with VGA SVGA XGA and VESA Ergonomic modes non interlaced and most Macintosh compatible color video cards when used with the appropriate adaptor The monitor s wide compatibility makes it possible to upgrade video cards or software without purchasing a new monitor Digitally controlled auto scanning is done with the micro processor for horizontal scan frequencies betwe...

Page 5: ...his manual or listed on the monitor If you are not sure what type of power supply you have in your home consult with your dealer Overloaded AC outlets and extension cords are dangerous So are frayed power cords and broken plugs They may result in a shock or fire hazard Call your service technician for replacement Do not Open the Monitor There are no user serviceable components inside There are Dan...

Page 6: ... with ventilation openings in the cabinet to allow the release of heat generated during operation If these openings are blocked built up heat can cause failures which may result in a fire hazard Therefore NEVER Block the bottom ventilation slots by placing the monitor on a bed sofa rug etc Place the monitor in a built in enclosure unless proper ventilation is provided Cover the openings with cloth...

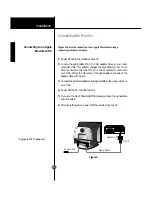
Page 7: ... both the monitor and PC 2 Connect the 15 pin VGA connector of the supplied signal cable to the output VGA video connector on the PC and the matching input connector on the rear of the monitor The connectors will mate only one way If you cannot attach the cable easily turn the connector upside down and try again When mated tighten the thumbscrews to secure the connection 3 Power ON the PC then the...

Page 8: ...s adapter changes the high density 3 row 15 pin VGA connector to the correct 15 pin 2 row connection to mate with your MAC Attach the other end of the signal cable to the side of the adapter block with 3 rows 3 Connect the attached adapter block signal cable to the video output on your MAC 4 Power ON the PC then the monitor 5 If you see the SELF DIAGNOSTICS message check the signal cable and conne...

Page 9: ...bility in setting up your system Plus you will have true Plug and Play capability 1 Connect the upstream port of the monitor to the downstream port of the USB compliant PC or another hub using the USB cable Computer must have a USB port 2 Connect the USB compliant peripherals to the downstream ports of the monitor USB Upstream connector USB Downstream connector USB upstream Port USB downstream Por...

Page 10: ... ports NOTE To activate the USB hub function the monitor must be connected to a USB compliant PC OS or another hub with the USB cable enclosed When connecting the USB cable check that the shape of the connector at the cable side matches the shape at the connecting side When the monitor is not connected to AC power supply the peripherals connected to the downstream ports will not operate Even if th...

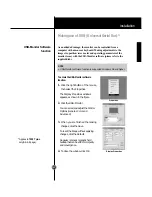
Page 11: ...s the USB Monitor software function 1 Click the right button of the mouse then select the Properties The Display Properties windows appears as shown in the figure 2 Click the USB Monitor You can select and adjust the Control Options General Color and Advanced 3 When you are finished the making changes click the Save To reset the image without applying changes click the Default Degauss removes magn...

Page 12: ...View Rear View Applies to 795FT plus only Location and Function of Controls ID Label USB upstream port USB downstream ports D Sub Signal Connector AC Power Socket Power Button Power Indicator OSD Button Buttons SET Button ...

Page 13: ...ton to enter a selection in the on screen display SET Button Use this button to turn the monitor on or off Power Button The power indicator light is shown in the power button This indicator lights up green when the monitor operates normally If the monitor is in DPM Energy Saving mode stand by suspend power off this indicator color changes to amber Power Indicator OSD SET Front Panel Controls ...

Page 14: ...lections you can make using the OSD To make adjustments in the On Screen Display follow these steps 1 1 1 1 Press the OSD Button then the main menu of the OSD appears 2 2 2 2 To acces a control use the or Buttons When the icon you want becomes highlighted press the SET Button 3 3 3 3 Use the Buttons to adjust the item to the desired level 4 4 4 4 Accept the changes by pressing the SET Button 5 5 5...

Page 15: ...N 66 45 Brightness Used to adjust the brightness of the screen Contrast Adjust the display to the contrast desired PRESET TEMP RED GREEN BLUE 6500K 9300K To appear the displays color temperature 6500K Slightly reddish white 9300K Slightly bluish white User easily color set without adjustment Red Green and Blue R G B To set your own color levels To set your own color levels To set your own color le...

Page 16: ...control adjusts for a skewing of the screen image Tilt To correct image rotation Pin S Adjust To correct the balance of both sides S bowling Pin W Adjust To correct the balance of both sides W bowling This item is used to select the monitor s input signal level The normal level used for most PC s is 0 7V When the screen suddenly gets brightened or blurry please select 1 0V and try again To select ...

Page 17: ...to the factory preset mode If the monitor is operating in a user mode this control has no effect RECALL This item allows you to reduce the moire Moire is caused by interference Horizontal Scan Line with the periodical dot screen It is normally OFF H 0 V 0 The moire adjustments may affect the focus of the screen The screen image may shake slightly while the moire reduction function is on MOIRE Use ...

Page 18: ...power consumption during periods of non use When the PC goes into the energy saving mode the monitor will go into a suspended operation state indicated by the Power LED light changing from a green color to an amber color After an extended period in the suspended mode the monitor will then enter a semi OFF mode to conserve more energy In the semi OFF mode or DPMS OFF mode as we call it in our speci...

Page 19: ... the Extremely Low Frequency ELF and Very Low Frequency VLF electromagnetic range DDC is a communication channel over which the monitor automatically informs the host system PC about its capabilities This monitor has two DDC function DDC1 and DDC2B DDC1 and DDC2B carry out uni directional communication between the PC and the monitor Under these situations the PC sends display data to the monitor b...

Page 20: ... the image settings you may have made the last time you used that mode You may however manually force a recall of each of the 12 preset modes by pressing the Recall button All preset modes are automatically recalled as the monitor senses the incoming signal The ability to recall the preset modes is dependent on the signal coming from your PC s video card or system If this signal does not match any...

Page 21: ...he signal cable is not fastened securely Check the computer power and graphics adapter configuration The image on the SCREEN is not centered or too small or not a rectangle shape Image adjustment not been done yet in the current operating mode Use the OSD SET and buttons to set the image to your liking The monitor doesn t enter the power saving off mode Amber Computer video signal is not VESA DPMS...

Page 22: ...ntinuous or frequent while the monitor is operating It is normal for some monitors to make occasional sounds when being turned on or off or when changing video modes Do not attempt to service the monitor yourself as opening or removing covers may expose you to dangerous voltage or other hazards Refer all servicing to qualified service personnel When replacement parts are required have the service ...

Page 23: ...c 1 2 3 Separate Sync Composite Sync Sync On Green H Sync H V Sync N C V Sync N C N C Pin Signal D Sub 1 2 3 4 5 6 7 8 Red Green Blue Ground Self Test Red Ground Green Ground Blue Ground Pin Signal D Sub 9 10 11 12 13 14 15 N C Ground Ground SDA H Sync V Sync SCL 11 6 1 5 15 10 N C No Connection NOTE No 5 Pin have to ground on the PC side ...

Page 24: ... TTL Positive Negative SOG Sync On Green Signal Input 15 pin D Sub Connector Input Form Separate RGB Analog 0 7Vp p 75 ohm Positive Resolution max 1600 x 1200 75Hz Width 41 50 cm 16 3 inches Height 43 90 cm 17 3 inches Depth 43 50 cm 17 1 inches AC 100 120 200 240V 50 60Hz 2 0 1 0A Net 21 0 kg 46 3 lbs Operating Condition Temperature 10 C to 35 C Humidity 10 to 90 non Condensing Storage Condition ...

Page 25: ... on a circuit different from that to which the receiver is connected Consult the dealer or an experienced radio TV technician for help Caution Changes or modifications not expressly approved by the party responsible for compliance could void the user s or your authority to operate the equipment Only peripherals digital input output devices terminals printers etc certified to comply with the Class ...

Page 26: ...ble to satisfactorily recycle the majority of electronics equipment most of these potentially damaging substances sooner or later enter nature There are also other characteristics of a computer such as energy consumption levels that are important from the viewpoints of both the work internal and natural external environments Since all methods of electricity generation have a negative effect on the...

Page 27: ...requirements include a demand that the computer and or display after a certain period of inactivity shall reduce its power consumption to a lower level in one or more stages The length of time to reactivate the computer shall be reasonable for the user Labelled products must meet strict environmental demands for example in respect of the reduction of electric and magnetic fields physical and visua...

Page 28: ...uterdisplays Cadmiumdamagesthenervoussystemandistoxicin highdoses TherelevantTCO 99requirementstatesthatbatteries thecolour generatinglayersofdisplayscreensandtheelectricalorelectronicscomponents mustnotcontainanycadmium Mercury Mercuryissometimesfoundinbatteries relaysandswitches Itdamagesthe nervoussystemandistoxicinhighdoses TherelevantTCO 99requirementstates thatbatteriesmaynotcontainanymercur...

Reviews: