background image

Before Calling Service Personnel

PAGE 26

REFERENCE

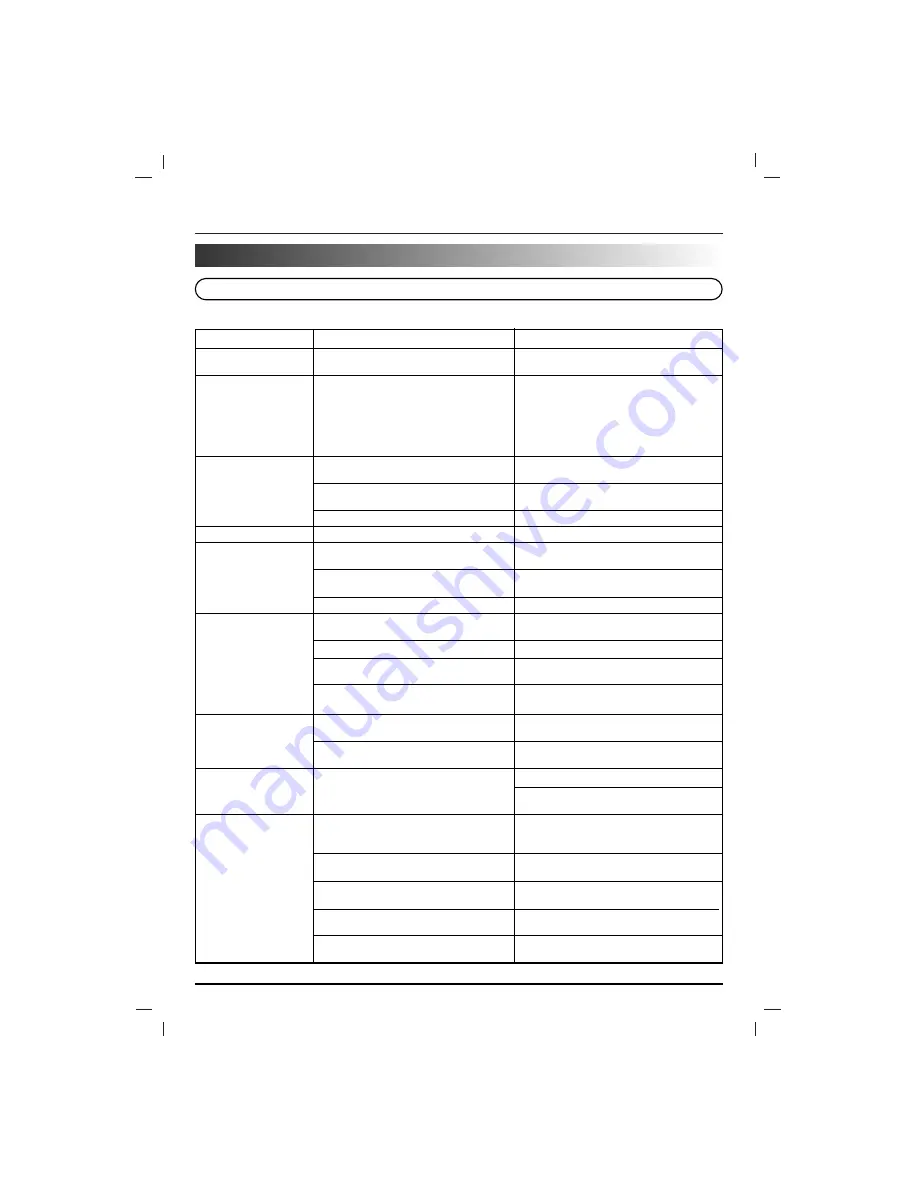
Check the following guide for the possible cause of a problem before contacting service.

Symptoms and Correction

Symptom

No power.

No picture.

There is no sound or
only a very low-level
sound is heard.

The playback picture is  poor.

The unit does not start
playback.

Severe hum or noise is
heard.

Recording cannot be
done.

Radio stations cannot
be tuned in.

The remote control
does not work properly.

Cause

• The power cord is disconnected.

• The TV is not set to receive VCD signal

output.

• The video cable is not connected

securely.

• The connected TV power is turned off.

• The audio cables are not connected

securely.

• The power of the equipment connected

with the audio cable is turned off.

• The audio connecting cord is damaged.

• The disc is dirty.

• The disc is placed upside down.

• The disc is not placed within the guide.

• The disc is dirty.

• The plugs and jacks are dirty.

• The disc is dirty.

• The speakers and components are 

connected poorly.

• The unit is located with TV nearly.

• The components are connected 

incorrectly.

• The source is selected incorrectly.

• The antennas are connected poorly.

• The signal strength of the stations is too

weak (when tuning in with automatic
tuning).

• The remote control is not pointed at the

remote sensor of the unit.

• The remote control is too far from the

unit.

• There is an obstacle in the path of the

remote control and the unit.

• The batteries in the remote control are

exhausted.

Correction

• Plug the power cord into the wall outlet

securely.

• Select the appropriate video input mode

on the TV so the picture from the unit
appears on the TV screen.

• Connect the video cable into the jacks

securely. 

• Turn on the TV. 

• Connect the audio cable into the jacks

securely.

• Turn on the equipment connected with

the audio cable.

• Replace it with new one.

• Clean the disc.

• Place the disc with the playback side

down.

• Place the disc on the disc tray correctly

inside the guide.

• Clean the disc.

• Wipe them with a cloth slightly moistened

with alcohol.

• Clean the disc.

• Connect the speakers and components

securely.

• Move your TV away from the audio

components.

• Connect the components correctly.

• Select the source with the 

FUNCTION 

SELECT 

button (CD, AUX or TUNER).

• Connect the antenna securely.

• Adjust the antennas and connect an

external antenna if necessary.

• Tune in the station manually.

• Point the remote control at the remote

sensor of the unit.

• Operate the remote control within about

23 ft (7 m).

• Remove the obstacle.

• Replace the batteries with new ones

Summary of Contents for FE-185VE

Page 1: ...rating your set Retain it for future reference Designs and specifications are subject to change without notice for improvement FFH 185MVA JA4AILA_ENG_MFL38637137 MICRO COMPO System OWNER S MANUAL MODEL FFH 185MVA FE 185VE CD R R CD R RW VIDEO CD ...

Page 2: ...paratus Warning Do not install this equipment in a confined space such a book case or similar unit This label is located on the interior This Compact Disc player is classified as a CLASS 1 LASER product The CLASS 1 LASER PRODUCT label is located on the exterior CAUTION Use of controls or adjustments or performance of pro cedures other than those specified herein may result in hazardous radiation e...

Page 3: ... radio 15 Cassette Deck Operation Tape Play 16 To Stop Play 16 To Play Fast Rewind or Fast Forward 16 Tape Counter Reset 16 Recording 17 Recording from Radio CD or Auxiliary Source 17 CD to Tape Synchronized Recording 17 CD VCD Operations Basic Playback 18 To Stop Play 18 To Pause Play 18 To Skipping the track 18 To Play Fast Rewind or Fast Forward 18 Advanced Operation RESUME 19 Time Search 19 Di...

Page 4: ... with a soft cloth Always keep the disc clean If you cannot wipe off the dust with a soft cloth wipe the disc lightly with a slightly moistened soft cloth and finish with a dry cloth Do not use any type of solvents such as thinner benzine commercially available cleaners or anti static spray for vinyl LPs They may damage the disc About This Owner s Manual This owner s manual explains the basic inst...

Page 5: ...3 5mm 6 RECORD RECORD PAUSE REC button PBC button 7 FUNCTION SELECT buttons TUNER BAND CD TAPE AUX 8 MIC VOLUME KNOB MIC VOL MIC JACK MIC 3 5mm 9 PUSH EJECT position 10 CD PAUSE CD COUNTER SET button CLOCK button TIMER button 11 TUNING buttons CD SKIP SEARCH buttons TAPE REWIND FAST FORWARD buttons 12 PRESET buttons BACKWARD PLAY button FORWARD PLAY button SELECT button 13 OPEN CLOSE button STOP C...

Page 6: ... POWER button 2 Function select buttons TUNER CD TAPE AUX 3 PRESET buttons 4 NUMERIC buttons 0 9 5 PLAY SELECT button PAUSE button CD STOP button PREV NEXT buttons REPEAT button PROGRAM button 6 KEY CONTROL buttons b KEY CON SCAN SEARCH REWIND FAST FORWARD buttons 7 MPX button ECHO button SCORE button 8 TAPE FUNCTION buttons TAPE REWIND FAST FORWARD buttons BACKWARD PLAY button FORWARD PLAY button...

Page 7: ...the operating range becomes reduced replace all batteries with new ones If battery leakage occurs wipe the battery liquid from the battery compartment then insert new batteries The batteries should last about one year with normal use This section shows you how to use the remote control Point the remote control at the remote sensor and press the buttons Distance About 23 ft 7 m from the front of th...

Page 8: ...NA VIDEO OUT R R L L 1 2 4 5 3 1 CD PLAY PAUSE indicator 2 PROGRAM indicator 3 TAPE PLAY DIRECTION indicator 4 PLAY MODE indicator 5 CD REPEAT indicator 6 TIMER indicator 7 SLEEP indicator 8 RECORD RECORD PAUSE indicator 9 FM STEREO indicator 10 MP3 indicator 11 VCD indicator REC STEREO kHz RPT 1 ALL REC PROG SLEEP MHz MP3 MP3 VCD VCD 7 8 9 1 3 6 2 5 4 10 11 P NO 3828R A040L ...

Page 9: ...ector Connect the FM wire antenna to the FM antenna coaxial connector To prevent noise pickup keep the AM loop antenna away from the unit and other components Be sure to fully extend the FM wire antenna After connecting the FM wire antenna keep it as horizontal as possible Notes FM wire antenna supplied AM loop antenna supplied A U X ANTENNA VIDEO OUT R R L L ...

Page 10: ...ssemble the front cover of supplied speaker Connecting to a TV Monitor Refer to the owner s manual of your TV as well When you connect the unit to your TV be sure to turn off the power and unplug both units from the wall outlet before making Notes VIDEO OUT jack connection Connect the VIDEO OUT jack on the back of the unit to a VIDEO IN jack of a TV or monitor AUX jacks connection Two phones jacks...

Page 11: ...omatically after 90 minutes Each time the button is pressed the time interval before it turns off is reduced by 10 minutes i e 80 70 etc Select the desired time to turn off To check the remaining time until the power is turned off While the sleep function is active press SLEEP briefly The time remaining until it turns off is dis played for about 5 seconds If you press SLEEP while the sleep time is...

Page 12: ... about 0 5 seconds in the display window and then disappears Set the hour to switch on by pressing PRESET button Press SET to confirm the hour to switch on Set the minute to switch on by pressing PRESET button Press SET to confirm the minute to switch on OFF TIME indicator appears for about 0 5 seconds in the display window and then disappears Set the hour to switch off by pressing PRESET button P...

Page 13: ...TE to mute your unit You can mute your unit in order for example to answer the telephone MUTE indicator flashes in the display window Press MDSS to reinforce treble bass and surround effect on the remote control The MDSS ON indicator lights up To cancel it press MDSS again The MDSS OFF indicator lights up Sound Quality Adjustment MUTE MDSS Multi Dynamic Sound System Connect an auxiliary device i e...

Page 14: ...ations are cleared For your reference If all stations have already been entered FULL mes sage will appear in the display window for a moment and then a preset number will flash To change the pre set number follow the steps 5 6 on the left side To recall presets Press and hold PRESET on the front panel or remote control until the desired preset number appears or press it repeatedly Notes Tuning in ...

Page 15: ...y on the previous page 1 2 3 Preset radio stations in the units memory first see Presetting radio stations on the previous page Use MODE RIF Radio Interference Filter function to switch the mono reception if stereo reception is distorted by noise When recording the AM broadcast beat noises occur If it does press MODE RIF once Notes For your reference If an FM program is noisy Press MODE RIF so tha...

Page 16: ...r press on the front panel or on the remote control during playback press PLAY or OPTIONAL in the point you want Press COUNTER during playback Playing time appears TP 0000 in display window 2 3 4 1 Tape Counter Reset PLAY MODE PLAY Pressing Once Twice Three times Display Function After the cassette plays front or reverse backward play side stops automatically After the cassette plays front and rev...

Page 17: ...e display window The synchronized recording is started auto matically after about 7 seconds If you wish to record from the desired track select the desired track with before commencing CD synchro recording The function change is not possible during recording This function is not available to MP3 file discs Recording from Radio CD or Auxiliary source 2 1 2 1 Wind up the tape to the point recording ...

Page 18: ...the button is pressed Press repeatedly during playback When a desired scene is displayed press PLAY TV screen The speed of advance reverse is relatively slow at first When the button is pressed again the speed becomes faster Each time the button is pressed the speed increases up to 4 steps in case of VIDEO CD or 1 steps in case of AUDIO CD The speed will be retained even after the button is releas...

Page 19: ...Press DISPLAY again during playing You can view the remained time per a track Press DISPLAY once more during playing You can view the total remained time on the disc This function is not available to MP3 file discs and PBC mode Display Function This function lets you use elapses time as a guide to find a certain point on a VIDEO CD Time Search function is especially useful when playing discs that ...

Page 20: ...the first picture of 9 tracks on the disc at one time on the TV screen Press NUMERIC button 2 During playing a VIDEO CD the TV screen shows still picture of the first scenes of tracks 1 to 9 To view still pictures of the tracks of the tracks numbered over 9 Press NEXT The TV screen shows still pictures of tracks 10 to 18 To go back to the previous screen press PREV Press NUMERIC buttons to select ...

Page 21: ... 5 4 3 2 Current track Current track 2 PBC Play Playback Control Play Preparation Insert VIDEO CD with PBC function Version 2 0 discs into the disc tray PBC appears in the display window After press PLAY to playing in stop mode The menu screen appears on the TV screen Select the menu number you want by press ing NUMERIC buttons on the remote control The selected item is now executed Or Select the ...

Page 22: ...m can contain up to 20 tracks NOTE The program play does not work in PBC ON status of the VIDEO CD with PBC function Version 2 0 Press PROG MEMO or PROGRAM on the remote control on the stop mode Press PREV NEXT to select the track you want In case of using NUMERIC 0 9 button press 0 and 3 Press PROG MEMO or PROGRAM on the remote control Repeat steps 1 4 Press PLAY 1 Prog Program Order am Order Tra...

Page 23: ... again to return to normal play back Press CD STOP to stop the playback Display Function is only restricted in single elapsed time on MP3 file discs POWER MUTE TUNER CD TAPE AUX b KEY CON MDSS EQ PATT SELECT PAUSE PBC STOP PREV RETURN REPEAT NEXT PROGRAM RESUME SCORE DIGEST NTSC PAL CD KARAOKE MPX ECHO TAPE SLEEP VOLUME T SEARCH DISPLAY PRESET 1 2 3 4 5 6 7 8 9 0 Notes Load an MP3 disc The ROOT di...

Page 24: ... play next press PREV NEXT again 2 1 3 4 5 6 7 Comes out the Score If the track playback is finished the score will appear on the screen And the unit will automatically pause after playing back of each track You can give an echo effect to the sound from the microphones Press ECHO repeatedly to adjust the strength of echo ECHO 1 ECHO 2 ECHO 3 or ECHO OFF is displayed in the display window To cancel...

Page 25: ...pictures as well as music Play interactive software using menu screens displayed on the TV screen in addition to the video playback function of Version 1 1 discs VIDEO CD with PBC functions Version 2 0 discs Discs should be kept clean at all times Stains scratches and dust on disc s surface cause bad quality video and audio Never touch disc s surface Depending on the conditions of the recording eq...

Page 26: ...h of the stations is too weak when tuning in with automatic tuning The remote control is not pointed at the remote sensor of the unit The remote control is too far from the unit There is an obstacle in the path of the remote control and the unit The batteries in the remote control are exhausted Correction Plug the power cord into the wall outlet securely Select the appropriate video input mode on ...

Page 27: ...ntermediate Frequency 450 kHz Signal to Noise Ratio 35 dB Frequency Response 100 2000 Hz Output Power 20W 20W T H D 0 4 Frequency Response 40 30000 Hz Signal to noise ratio 80 dB Tape Speed 4 75cm sec Wow Flutter 0 25 MTT 111 JIS WTD F F REW Time 120sec C 60 Frequency Response 250 8000Hz Signal to Noise Ratio 43dB Channel Separation 50dB P B 45dB R P Erase Ratio 55dB MTT 5511 MODEL FE 185VE Type B...

Page 28: ...P NO MFL38637137 ...

Reviews: