background image

26

Installing the Wall mount plate

Wall mount plate(Separate purchase)

This is stand-type or wall mount type and is
connectable with Wall mount plate.
Please refer to the installation guide for more
details, which is provided when Wall mount
plate is purchased.

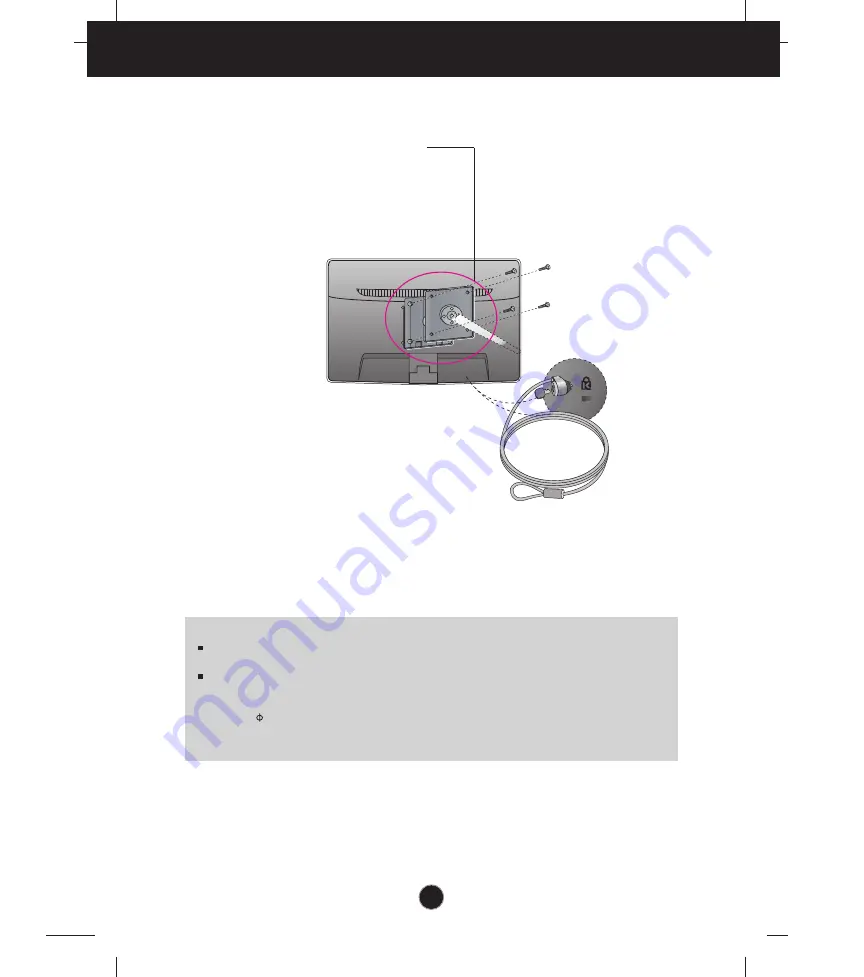
Kensington Security Slot

Connected to a locking cable that can
be purchased separately at most
computer stores.

<Screw Mounting Interface Dimension>

Hole spacing : 75 mm x 75 mm.

3

.

Install the Wall mount plate.

NOTE

VESA compatible only with respect to screw mounting interface dimensions and mounting screw     
specifications
Please use VESA standard as below.
* 784.8 mm and under (30.9 inch) 

- Wall Mount Pad Thickness :  2.6 mm
- Screw :   4.0 mm x Pitch 0.7 mm x Length 10 mm    

* 787.4 mm and above (31.0 inch) 

- Please use VESA standard wall mount pad and screws. 

Summary of Contents for EW224V

Page 1: ...www lg com OWNER S MANUAL LCD MONITOR LCD MONITOR MODEL EW224V EW234V Please read this manual carefully before operating your set and retain it for future reference ENGLISH ...

Page 2: ...ak out due to overheating Do not touch the power plug with wet hands Additionally if the cord pin is wet or covered with dust dry the power plug completely or wipe dust off before plugging in the cord You may be electrocuted due to excess moisture If you don t intend to use the product for a long time unplug the power cable from the product Covering dust can cause a fire or insulation deterioratio...

Page 3: ... electrical shock or fire can occur Contact the service center Do not drop an object on or apply impact to the product Do not throw any toys or objects at the product It can cause injury to humans problems to the product and damage the display Keep out of reach of children and do not place toys near the product Make sure the product ventilation hole is not blocked Install the product more than 10c...

Page 4: ...as nail pencil or pen or make a scratch on it Keep proper distance from the product and rest from time to time Your vision may be impaired if you look at the product too closely or fpr too long Set the appropriate resolution by referring to the User s Guide Your vision can be impaired Keep small accessories out of the reach of children Leaving a fixed image on the screen for a long time may cause ...

Page 5: ...mful interference to radio communications However there is no guarantee that interference will not occur in a particular installation If this equipment does cause harmful interference to radio or television reception which can be determined by turning the equipment off and on the user is encouraged to try to correct the interference by one or more of the following measures Reorient or relocate the...

Page 6: ...s Power Cord 15 pin D Sub Signal Cable Tosetitup thissignalcablemaybe attachedto thisproductbefore shippingout DVI D Signal Cable Thisfeatureisnotavailableinall countries NOTE This accessories may look different from those shown here User must use shielded signal interface cables D sub 15 pin cable DVI D cable with ferrite cores to maintain standard compliance for the product ...

Page 7: ...t until you hear it click 3 Assemble the Stand Base Front Rear into the Stand Body in the correct direction 4 Use a coin on the back of the stand base and turn the screw clockwise to tighten 5 Once assembled take the monitor up carefully and face the front side Important This illustration depicts the general model of connection Your monitor may differ from the items shown in the picture Do not car...

Page 8: ...soft cloth on aflat surface 3 Remove the Stand Body and Stand Base from product in correct direction as shown in the picture 2 Place the monitor face Down on the cushion or soft cloth 4 Use a coin on the back of the Stand Base and turn the screw anticlock wise to loosen ...

Page 9: ... of the panel in various ways for maximum comfort Tilt Range 5 to 15 ERGONOMIC It is recommended that in order to maintain an ergonomic and comfortable viewing position the forward tilt angle of the monitor should not exceed 5 degrees Do not touch or press the screen when adjusting the angle of the monitor When adjusting the angle of the screen do not put your finger s in between the head of the m...

Page 10: ...f the signal cable Connecting with the PC 1 2 Wall outlet type Mac adapter For Apple Macintosh use a separate plug adapter is needed to change the 15 pin high density 3 row D sub VGA connector on the supplied cable to a 15 pin 2 row connector When using a D Sub signal input cable connector for Macintosh Variesaccordingtomodel NOTE This is a simplified representation of the rear view This rear view...

Page 11: ...t control settings so that they cannot be inadvertently changed Press and hold the MENU button for several seconds The message OSD LOCKED should appear You can unlock the OSD controls at any time by pushing the MENU button for several seconds The message OSD UNLOCKED should appear Only for HDMI input For D SUB and DVI input ...

Page 12: ...isplay is running properly On Mode If the display is in Sleep Mode the power indicator is blinking blue Power Button Power Indicator SOURCE Hot key Exit the OSD On Screen Display EXIT Button SUPER ENERGY SAVING Button Use this button to enter SUPER ENERGY SAVING menu For more information refer to page 16 Only for HDMI input For D SUB and DVI input VOLUME Button To adjust the volume of headphone sp...

Page 13: ...he use of the controls The following section is an outline of the available adjustments and selections you can make using the OSD To make adjustments in the On Screen Display follow these steps Press the discretionary Button then the main menu of the OSD appears To access a control use the corresponding Buttons Use the Buttons to adjust the image to the desired level Use the Button to select other...

Page 14: ...order of icons may differ depending on the model 13 18 To adjust the image size Main menu Sub menu Supported input Description BRIGHTNESS ORIGINAL RATIO COLOR TEMP PRESET USER CONTRAST BLACK LEVEL LANGUAGE FACTORY RESET SUPER ENERGY SAVING Turn on the SUPER ENERGY SAVING function Turn off the SUPER ENERGY SAVING function Initialize the SUPER ENERGY SAVING and set to OFF mode ON OFF RESET VOLUME To...

Page 15: ... input image signal This function works only if input resolution is lower than monitor ratio 16 9 Exit Exit Move Select another sub menu PRESET Select the screen color WARM Set the screen to warm color temperature MEDIUM Set the screen to medium color temperature COOL Set the screen to cool color temperature RED Set your own red color levels GREEN Set your own green color levels BLUE Set your own ...

Page 16: ...ly Restore all factory default settings except LANGUAGE To adjust the contrast of the screen Exit Exit Move Select another sub menu You can set the offset level If you select HIGH the screen will be bright and if you select LOW the screen will be dark only for HDMI input Offset As the criteria for video signal it is the darkest screen the monitor can show Only HDMI input ...

Page 17: ...D system Listed below are the icons icon names and icon descriptions of the all items shown on the Menu Sub menus NOTE OSD On Screen Display menu languages on the monitor may differ from the manual Menu Name Icons Button Tip Press the SUPER ENERGY SAVING Button then the main menu of the OSD appears Exit Move Restart to select sub menu ...

Page 18: ...the SUPER SAVING color is green Turn off the SUPER ENERGY SAVING function Now the monitor is LED SAVING function When current setting value is OFF the SUPER SAVING color is gray Clear the TOTAL POWER REDUCTION and TOTAL CO2 REDUCTION values OK Select TOTAL POWER REDUCTION How much power is saved during using the monitor TOTAL CO2 REDUCTION Change the TOTAL POWER REDUCTION to CO2 ON OFF RESET ...

Page 19: ...s should be different from each panel and panel vendor LG accumulate those values using integrated function with 10 minutes broadcast video signal LED Saving means that how much power can be saved using WLED Panel instead of CCFL panel SUPER Saving means that how much power can be more saved using SUPER ENERGY SAVING function NOTE SAVING DATA W h ...

Page 20: ...y moving the mouse or pressing any key on the keyboard to bring up the screen Try to turn on the PC This message appears when the signal from the PC video card is out of horizontal or vertical frequency range of the display See the Specifications section of this manual and configure your display again This message appears when the signal cable between your PC and your display is not connected Chec...

Page 21: ...and adjust the display to the recommended resolution or adjust the display image to the ideal setting Set the color setting higher than 24 bits true color IMPORTANT Check Control Panel Display Settings and see if the frequency or the resolution were changed If yes readjust the video card to the recommend resolution If the recommended resolution optimal resolution is not selected letters may be blu...

Page 22: ... the recommend resolution Do you see an Unrecognized monitor Plug Play VESA DDC monitor found message Have you installed the display driver Be sure to install the display driver from the display driver CD or diskette that comes with your display Or you can also download the driver from our web site http www lg com Make sure to check if the video card supports Plug Play function The Audio function ...

Page 23: ... 1920 x 1080 60 Hz Resolution Plug Play On Mode 24 W Typ Sleep Mode 0 3 W Off Mode 0 3 W Power Consumption Operating Conditions Temperature 10 C to 35 C Humidity 10 to 80 non Condensing Storage Conditions Temperature 20 C to 60 C Humidity 5 to 90 non Condensing Environment al Conditions With Stand Width 50 9 cm 19 80 inch Height 38 8 cm 15 27 inch Depth 16 6 cm 6 54 inch Weight excl packing 2 9 kg...

Page 24: ... Height 40 7 cm 16 02 inch Depth 20 2 cm 7 95 inch Weight excl packing 3 4 kg 7 49 lb Dimensions Weight Tilt 5 to 15 Range AC 100 240 V 50 60 Hz 1 0 A Power Input Attached Detached O Stand Base Wall outlet type Power cord Without Stand Width 54 6 cm 21 49 inch Height 34 2 cm 13 46 inch Depth 5 7 cm 2 24 inch NOTE Information in this document is subject to change without notice Horizontal Freq 30 k...

Page 25: ...8 1152 x 864 1280 x 1024 1280 x 1024 1680 x 1050 1920 x 1080 31 468 31 469 37 500 37 879 46 875 48 363 60 123 67 500 63 981 79 976 65 290 67 500 70 60 75 60 75 60 75 75 60 75 60 60 Polarity H V Specifications Preset Modes Resolution DSUB DVI Timing Display Modes Resolution Horizontal Freq kHz Vertical Freq Hz 1 2 3 4 5 6 7 8 480P 576P 720P 720P 1080i 1080i 1080P 1080P 31 50 31 25 37 50 45 00 28 12...

Page 26: ... downward on a soft cloth 2 Remove the Stand Body and Stand Base from product in correct direction as shown in the picture Installing the Wall mount plate This monitor satisfies the specifications of the Wall mount plate or the interchange device ...

Page 27: ... a locking cable that can be purchased separately at most computer stores Screw Mounting Interface Dimension Hole spacing 75 mm x 75 mm 3 Install the Wall mount plate NOTE VESA compatible only with respect to screw mounting interface dimensions and mounting screw specifications Please use VESA standard as below 784 8 mm and under 30 9 inch Wall Mount Pad Thickness 2 6 mm Screw 4 0 mm x Pitch 0 7 m...

Page 28: ...rial number of the SET is located on the back or one side of the SET Record it below should you ever need service MODEL SERIAL As an ENERGY STAR Partner LGE U S A Inc has determined that this product meets the ENERGY STAR guidelines for energy efficiency ENERGY STAR is a set of power saving guidelines issued by the U S Environmental Protection Agency EPA ...

Reviews: