


SPECIFICATIONS
Product specifications shown above may be changed without prior notice due to upgrade of product
functions.
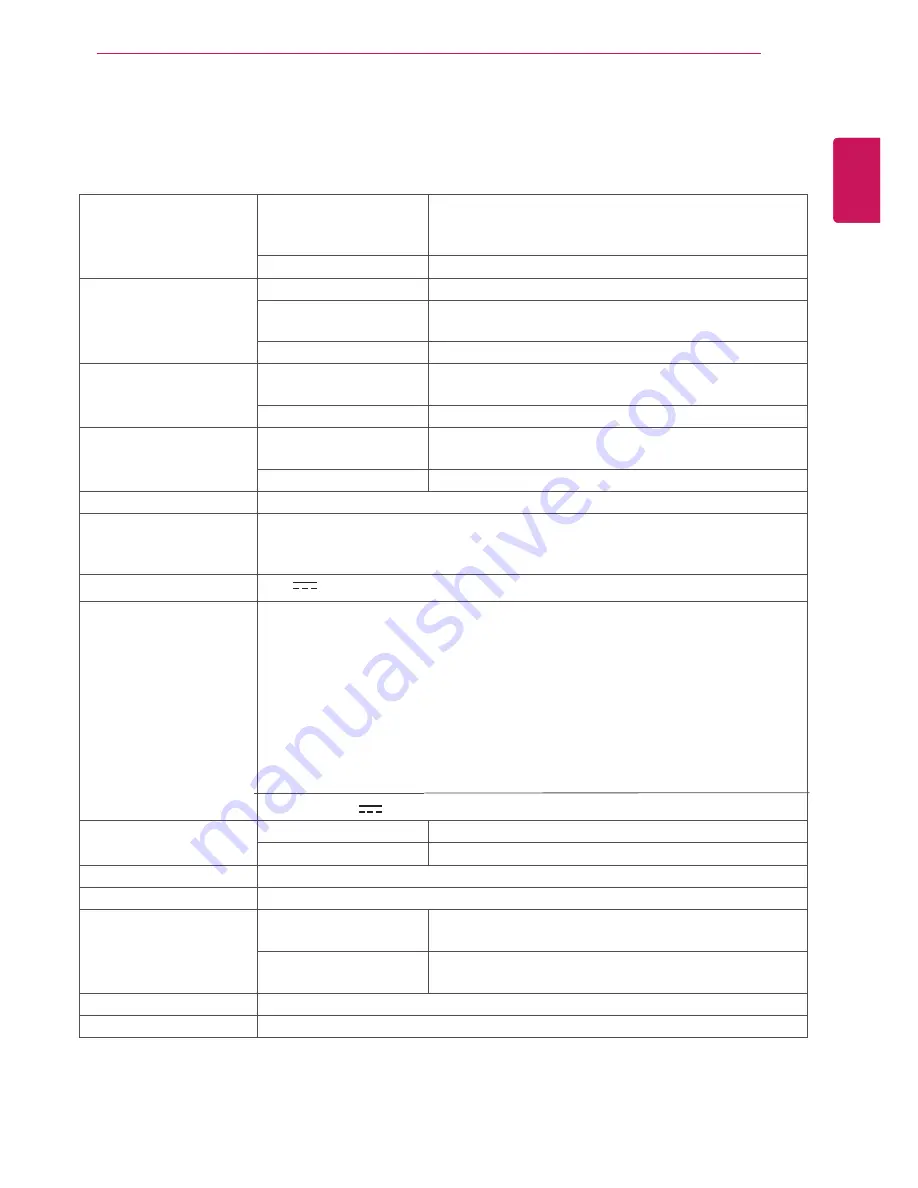
Display
Screen Type
60.9 cm (24 inch) Flat Panel Active matrix-TFT LCD
Anti-Glare coating
Visible diagonal size: 61.0 cm
Pixel Pitch
0.277 mm x 0.277 mm (Pixel Pitch)
Sync Input
Horizontal Frequency
30 kHz to 83 kHz (Automatic)
Vertical Frequency
56Hz to 75Hz (D-SUB, DVI-D)
56Hz to 61Hz (HDMI)
Input Form
Separate Sync. Digital
Video Input
Signal Input
15 pin D-SUB Connector /DVI-D Connector (Digital)
HDMI Connector
Input Form
RGB Analog (0.7 Vp-p/ 75 ohm), Digital
Resolution
Max
D-SUB(Analog) : 1920 x 1080 @ 60 Hz
DVI / HDMI (Digital) : 1920 x 1080 @ 60 Hz
Recommend
VESA 1920 x 1080 @ 60 Hz
Plug & Play
DDC 2B(Analog,Digital,HDMI)
Power Consumption
On Mode : 25 W(Typ.)
Sleep Mode ≤ 0.3 W
Of
f Mode ≤ 0.3 W
Power Input
Dimensions
(Width x Height x Depth)
With Stand
56.7 cm x 41.8 cm x 18.1 cm
Without Stand
56.7 cm x 34.3 cm x 5.7 cm
Weight
3.8 kg
Tilt Range
-5° to 20°
Environmental
conditions
Operating Temperature
Operating Humidity
10°C to 35 °C
10 % to 80 %
Storage Temperature
Storage Humidity
-20°C to 60 °C
5 % to 90 % non-Condensing
Stand Base
Attached ( ), Detached (O)
Power cord
Wall-outlet type
E2442V
19V
1.6A
AC-DC Adapter
Type ADS-40SG-19-3 19032G,manufactured by HONOR ELECTRONIC
or type ADS-40FSG-19 19032GPG-1,manufactured by HONOR ELECTRONIC
or type ADS-40FSG-19 19032GPBR-1,manufactured by HONOR ELECTRONIC
or type ADS-40FSG-19 19032GPI-1,manufactured by HONOR ELECTRONIC
or type ADS-40FSG-19 19032GPCU-1,manufactured by HONOR ELECTRONIC
or type LCAP21A,manufactured by LIEN CHANG ELECTRONIC ENTERPRISE
or type LCAP26A-A,manufactured by LIEN CHANG ELECTRONIC ENTERPRISE
or type LCAP26A-E,manufactured by LIEN CHANG ELECTRONIC ENTERPRISE
or type LCAP26A-I,manufactured by LIEN CHANG ELECTRONIC ENTERPRISE
or type LCAP26A-B,manufactured by LIEN CHANG ELECTRONIC ENTERPRISE
OUTPUT:
19V
1.7A
23
ENG
ENGLISH
SPECIFICATIONS


