background image

8

Connecting the Display

Before setting up the monitor, ensure that the power to the monitor,
the computer system, and other attached devices is turned off. 

Positioning your display

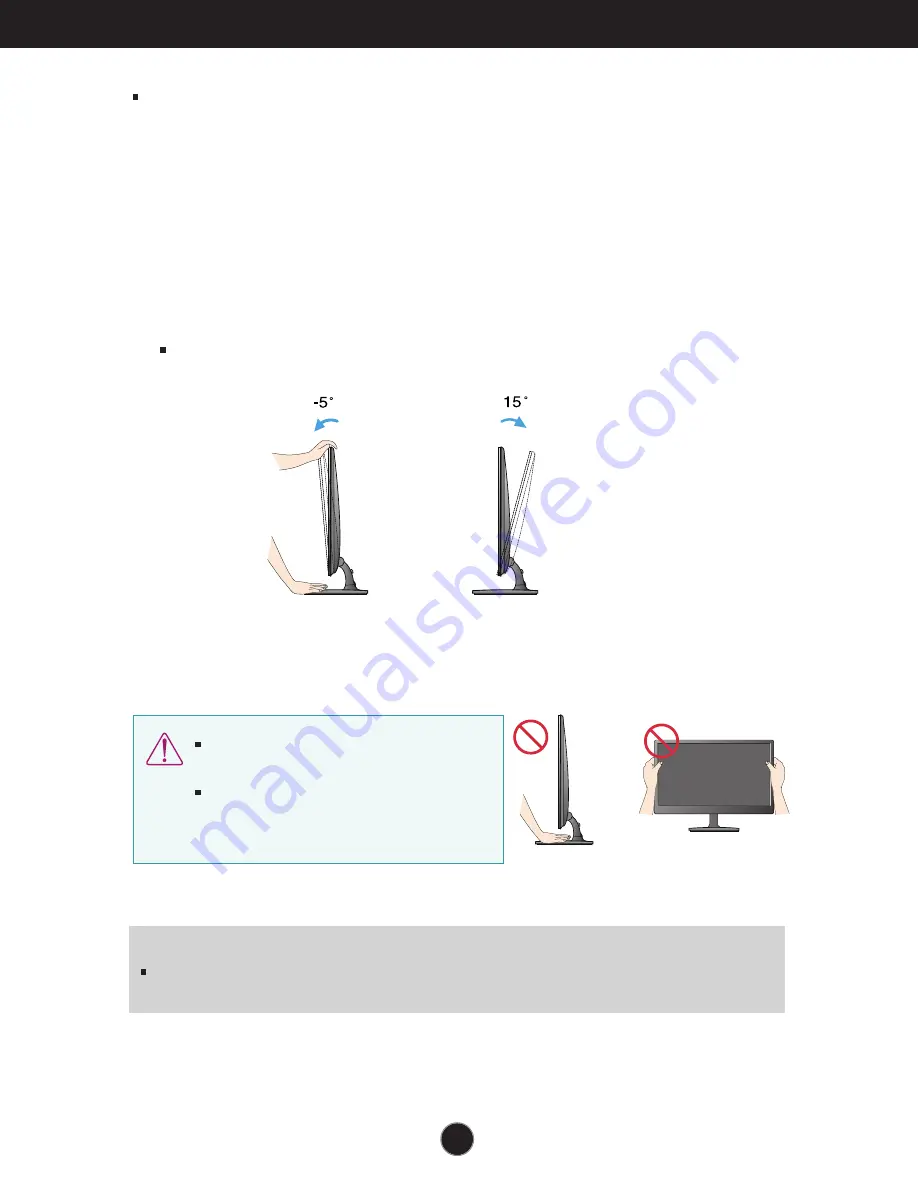
After installation, adjust the angle as shown below. 

* With stand base 

Adjust the position of the panel in various ways for maximum comfort.

Tilt Range : -5˚ to 15˚                            

ERGONOMIC

It is recommended that in order to maintain an ergonomic and comfortable viewing position,
the forward tilt angle of the monitor should not exceed 5 degrees.

Do not touch or press the screen when
adjusting the angle of the monitor. 

When adjusting the angle of the screen, do
not put your finger(s) in between the head of
the monitor and the stand body. You can
hurt your finger(s).

Summary of Contents for E2250VR

Page 1: ...tions before using the product Keep the User s Guide CD in an accessible place for future reference See the label attached on the product and give the information to your dealer when you ask for service E2250VR E2350VR E2750VR User s Guide ...

Page 2: ...d Call your service technician for replacement As long as this unit is connected to the AC wall outlet it is not disconnected from the AC power source even if the unit is turned off Do not Open the Display There are no user serviceable components inside There are Dangerous High Voltages inside even when the power is OFF Contact your dealer if the display is not operating properly To Avoid Personal...

Page 3: ...x LCD permanently Do not press the LCD screen with your finger for a long time as this may cause some afterimages Some dot defects may appear as Red Green or Blue spots on the screen However this will have no impact or effect on the display performance If possible use the recommended resolution to obtain the best image quality for your LCD display If used under any mode except the recommended reso...

Page 4: ...the product An electric shock may occur Do not use chemicals such as benzene paint thinners or alcohol Spray water onto a soft cloth 2 to 4 times and use it to clean the front frame wipe in one direction only Too much moisture may cause staining On Repacking Do not throw away the carton and packing materials They make an ideal container in which to transport the unit When shipping the unit to anot...

Page 5: ...ries NOTE This accessories may look different from those shown here User must use shielded signal interface cables D sub 15 pin cable DVI D cable with ferrite cores to maintain standard compliance for the product User s Guide Cards Power Cord AC DC adapter Dependingonthe country AC DC adapter Dependingonthe country 15 pin D Sub Signal Cable Tosetitup thissignalcablemay beattachedto thisproductbefo...

Page 6: ...the screw clockwise to tighten 3 Once assembled take the monitor up carefully and face the front side 4 When you desire to disintegrate the monitor from the stand base use a coin to turn the screw counterclockwise Important This illustration depicts the general model of connection Your monitor may differ from the items shown in the picture Do not carry the product upside down holding only the stan...

Page 7: ...nd body up please keep pressing the button If you don t press the button it will damage the product When limited tilt degree the button is not working pull stand body up or down a little Before setting up the monitor ensure that the power to the monitor the computer system and other attached devices is turned off 2 way stand 1 Place the monitor with its front facing downward on a soft cloth ...

Page 8: ...uct 5 Use a coin on the back of the stand base and turn the screw clockwise to tighten 6 Once assembled take the monitor up carefully and face the front side Important This illustration depicts the general model of connection Your monitor may differ from the items shown in the picture Do not carry the product upside down holding only the stand base The product may fall and get damaged or injure yo...

Page 9: ...osition of the panel in various ways for maximum comfort Tilt Range 5 to 15 ERGONOMIC It is recommended that in order to maintain an ergonomic and comfortable viewing position the forward tilt angle of the monitor should not exceed 5 degrees Do not touch or press the screen when adjusting the angle of the monitor When adjusting the angle of the screen do not put your finger s in between the head o...

Page 10: ... the monitor the computer system and other attached devices is turned off Positioning your display Without stand base Ergonomic It is recommended that in order to maintain an ergonomic and comfortable viewing position the backward tilt angle of the monitor should exceed 10 degrees ...

Page 11: ...t type Mac adapter For Apple Macintosh use a separate plug adapter is needed to change the 15 pin high density 3 row D sub VGA connector on the supplied cable to a 15 pin 2 row connector When using a D Sub signal input cable connector for Macintosh NOTE This is a simplified representation of the rear view This rear view represents a general model your display may differ from the view as shown Vari...

Page 12: ...vidual input signals AUTO Function When you encounter problems such as blurry screen blurred letters screen flicker or tilted screen while using the device or after changing screen resolution press the AUTO function button to improve resolution 3 Press the power button on the front panel to turn the power on When monitor power is turned on the Self Image Setting Function is executed automatically ...

Page 13: ... LOCKED UNLOCKED This function allows you to lock the current control settings so that they cannot be inadvertently changed Press and hold the MENU button for several seconds The message OSD LOCKED should appear You can unlock the OSD controls at any time by pushing the MENU button for several seconds The message OSD UNLOCKED should appear SUPER RESOLUTION Button For more information refer to page...

Page 14: ... display on or off From front view the power indicator stays blue if the display is running properly On Mode If the display is in Sleep Mode Energy Saving the power indicator is blinking blue Power Button Power Indicator When two input signals at least are connected you can select the input signal D SUB DVI HDMI you want When only one signal is connected it is automatically detected The default se...

Page 15: ...he use of the controls The following section is an outline of the available adjustments and selections you can make using the OSD To make adjustments in the On Screen Display follow these steps Press the discretionary Button then the main menu of the OSD appears To access a control use the corresponding Buttons Use the Buttons to adjust the image to the desired level Use the Button to select other...

Page 16: ...LOR TEMP PRESET USER sRGB RED 6500K GREEN 7500K BLUE 8500K 9300K GAMMA COLOR To customize the color of the screen BRIGHTNESS CONTRAST SHARPNESS BLACK LEVEL PICTURE To adjust the brightness contrast and sharpness of the screen DSUB DSUB DSUB Main menu Sub menu Supported input Description To improve the clarity and stability of the screen VOLUME To adjust the volume AUTO BRIGHT ORIGINAL RATIO F ENGI...

Page 17: ...AL LOW MEDIUM HIGH DEMO DSUB DVI D HDMI The image is inevitably damaged during the data processing to enlarge the image SUPER Resolution can maintain the resolution to show the clear video image even with the enlargement with the picture quality improvement technology that adjusts the blurred focus and rough outline due to the enlargement ...

Page 18: ... below are the icons icon names and icon descriptions of the all items shown on the Menu Sub menus NOTE OSD On Screen Display menu languages on the monitor may differ from the manual Menu Name Icons Button Tip Exit Adjust Decrease Increase Select another sub menu Restart to select sub menu Press the MENU Button then the main menu of the OSD appears ...

Page 19: ...PNESS BLACK LEVEL To adjust the brightness of the screen To adjust the contrast of the screen To adjust the clearness of the screen You can set the offset level If you select HIGH the screen will be bright and if you select LOW the screen will be dark only for HDMI input Offset As the criteria for video signal it is the darkest screen the monitor can show D SUB DVI D input HDMI input ...

Page 20: ...screen color RED Set your own red color levels GREEN Set your own green color levels BLUE Set your own blue color levels GAMMA Set your own gamma value 0 1 2 On the monitor high gamma values display whitish images and low gamma values display blackish images Select either PRESET or USER to adjust the screen color COLOR TEMP USER Exit Exit Decrease Increase Select another sub menu Restart to select...

Page 21: ...emoves noise that may occur at the edges of an image when HDMI is connected to an external device When ON is selected the image size is reduced to prevent noise When OFF is selected the original image size is maintained regardless of noise Only for HDMI input HORIZONTAL VERTICAL To move image left and right To move image up and down Exit Exit Decrease Increase Select another sub menu Restart to se...

Page 22: ...ory default settings except LANGUAGE FACTORY RESET POWER INDICATOR BUTTON INDICATOR Use this function to set the power indicator on the front side of the monitor to ON or OFF If you set OFF it will be turned off If you set ON at any time the power indicator will automatically be turned on Use this function to set the control key indicator on the front side of the monitor to ON or OFF If you set OF...

Page 23: ... the OSD system Listed below are the icons icon names and icon descriptions of the all items shown on the Menu Sub menus NOTE OSD On Screen Display menu languages on the monitor may differ from the manual Menu Name Icons Button Tip Exit Move Restart to select sub menu Press the SMART Button then the main menu of the OSD appears ...

Page 24: ...o to original This function works only if input resolution is lower than monitor ratio 16 9 If select on it automatically controls the brightness of display to best suit the surrounding working environment providing the optimal viewing condition and maximizeduser convenience If select OFF AUTO BRIGHT is off D SUB DVI D HDMI input D SUB DVI D HDMI input ON OFF WIDE ORIGINAL ...

Page 25: ...oduct in the most general using environment Exit Exit Move Select another sub menu Select this when you are watching a video or movie Select this when you want to use the original standard video In the General Standard mode the is turned off D SUB DVI D input HDMI input D SUB DVI D input HDMI input NORMAL STANDARD MOVIE ...

Page 26: ... input Select this when you are working on the document Word etc Select this when you are playing a game Select this when you watching general sports Exit Exit Move Select another sub menu Main menu Sub menu Description HDMI input HDMI input INTERNET GAME SPORTS ...

Page 27: ... select OFF CINEMA MODE is off Before using below functions please install Easy Set Packge programme Help user to browse web efficiently by dividing in half Help to arrange and move windows on screen Help user to control divided windows ratio If select OFF DUAL WEB is off Exit Exit Move Restart to select sub menu D SUB DVI D input D SUB DVI D input ON OFF ON OFF ...

Page 28: ...SD system Listed below are the icons icon names and icon descriptions of the all items shown on the Menu Sub menus NOTE OSD On Screen Display menu languages on the monitor may differ from the manual Menu Name Icons Button Tip Exit Move Restart to select sub menu Press the SUPER RESOLUTION Button then the main menu of the OSD appears ...

Page 29: ...ser wants a comfortable video screen at the medium level between low and high mode it helps to get the optimized screen It is effective for UCC and SD level videos When the user wants a sharp video screen with clear images it helps to get the optimized screen It is effective for high resolution video screens and games The screen is divided to two the left screen with original screen and the right ...

Page 30: ...y moving the mouse or pressing any key on the keyboard to bring up the screen Try to turn on the PC This message appears when the signal from the PC video card is out of horizontal or vertical frequency range of the display See the Specifications section of this manual and configure your display again This message appears when the signal cable between your PC and your display is not connected Chec...

Page 31: ...lay image to the ideal setting If the results are unsatisfactory decrease the horizontal bars using the PHASE icon in the on screen display Check Control Panel Display Settings and adjust the display to the recommended resolution or adjust the display image to the ideal setting Set the color setting higher than 24 bits true color IMPORTANT Check Control Panel Display Settings and see if the freque...

Page 32: ...rlace mode and if yes change it to the recommend resolution Picture OK No sound Check whether volume is 0 Check sound muted HDMI cable installed properly Head phone cable installed properly Check sound format Not supply to compressed sound format Do you see an Unrecognized monitor Plug Play VESA DDC monitor found message Have you installed the display driver Be sure to install the display driver f...

Page 33: ... inch Depth 19 80 cm 7 80 inch Weight excl packing 2 8 kg 6 17 lb Dimensions Weight Tilt 5 to 15 Range 12 V 3 0 A Power Input Attached Detached O Stand Base Wall outlet type Power cord DDC 2B Analog Digital HDMI Without Stand Width 52 58 cm 20 70 inch Height 33 48 cm 13 18 inch Depth 3 99 cm 1 57 inch NOTE Information in this document is subject to change without notice Type FSP036 DGAA1 manufactu...

Page 34: ...p Sleep Mode 1 W Off Mode 0 5 W Power Consumption Operating Conditions Temperature 10 C to 35 C Humidity 10 to 80 non Condensing Storage Conditions Temperature 20 C to 60 C Humidity 5 to 90 non Condensing Environment al Conditions With Stand Width 55 98 cm 22 04 inch Height 42 81 cm 16 85 inch Depth 19 80 cm 7 80 inch Weight excl packing 3 3 kg 7 28 lb Dimensions Weight Tilt 5 to 15 Range 12 V 3 0...

Page 35: ...ay On Mode 40 W Typ Sleep Mode 1 W Off Mode 0 5 W Power Consumption Operating Conditions Temperature 10 C to 35 C Humidity 10 to 80 non Condensing Storage Conditions Temperature 20 C to 60 C Humidity 5 to 90 non Condensing Environment al Conditions With Stand Width 65 20 cm 25 67 inch Height 49 59 cm 19 52 inch Depth 23 20 cm 9 13 inch Weight excl packing 5 2 kg 11 46 lb Dimensions Weight Tilt 5 t...

Page 36: ... Horizontal Freq kHz Vertical Freq Hz 1 2 3 4 5 6 7 8 480P 576P 720P 720P 1080i 1080i 1080P 1080P 31 50 31 25 37 50 45 00 28 12 33 75 56 25 67 50 60 50 50 60 50 60 50 60 HDMI Timing 1 2 3 4 5 6 7 8 9 10 11 12 720 x 400 640 x 480 640 x 480 800 x 600 800 x 600 1024 x 768 1024 x 768 1152 x 864 1280 x 1024 1280 x 1024 1680 x 1050 1920 x 1080 31 468 31 469 37 500 37 879 46 875 48 363 60 123 67 500 63 9...

Page 37: ...Digitally yours ...

Reviews: