background image

4

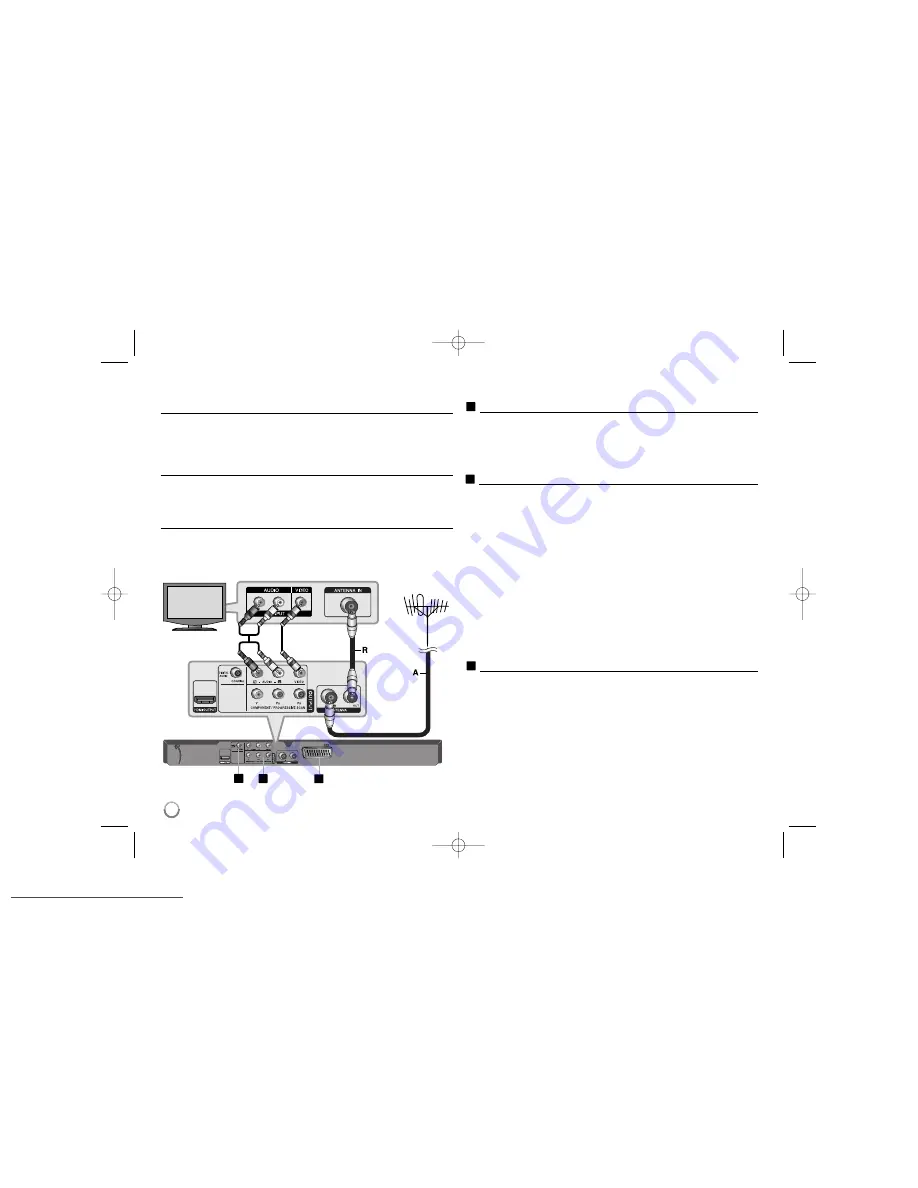
Hooking up the unit

Antenna connection

Connect the Terrestrial TV antenna 

(A)

to the ANTENNA IN jack on the unit.

If you want to use an indoor antenna, use one with a signal amplifier rated at
5V, 100mA and set [Antenna Feed 5V] to [ON] in the setup menu (See page
11).

Antenna connection to your TV

Connect one end of the RF cable 

(R)

to ANTENNA OUT jack on the unit and

other end to ANTENNA IN jack on your TV. Passes the signal from the ANTEN-
NA IN jack to your TV/monitor.

Audio and Video Connection

The unit Audio/Video jacks are color coded (yellow for video, red for right audio
and white for left audio). If your TV has only one input for audio (mono), 
connect it to the left (white) audio jack on the unit. 

Hooking up the unit - more you can do

SCART connection

Connect the TO TV jack on the unit and your TV using the SCART cable.
For SCART connections, resolution must be set to 576i(480i) by pressing
RESOLUTION button.

Caution : 

You must set the [TV Output Select] option to [RGB] on the setup

menu to use this connection. (See page 9)

Component Video Connections

Connect the COMPONENT / PROGRESSIVE SCAN OUTPUT jacks on the
unit to the corresponding input jacks on your TV using a YP

b

P

r

cable.

• You will still need to connect the left and right audio cables to the TV, or 

digital audio cable to your stereo.

Caution : 

You must set the [TV Output Select] option to [YPbPr] on the

setup menu to use this connection. (See page 9)

Resolution Setting

• You can change the resolution for component video output. Press 

RESOLUTION repeatedly to select the desired resolution - 576i(480i), 
576p(480p), 720p, 1080i, 1080p. 

• For 720p, 1080p and 1080i resolution on the component video output,

only non-copy protected discs can be played back. If the disc is copy 
protected,it will be displayed at the 576p(480p) resolution.

• Depending on your TV, some of the resolution settings may result in the 

picture disappearing or an abnormal picture appearing. In this case, press
RESOLUTION repeatedly until the picture re-appears.

Digital Audio Output Connection

Connect one of the unit’s DIGITAL AUDIO OUTPUT (COAXIAL) jack to the
corresponding jack on your amplifier.
• If the audio format of the digital output does not match the capabilities of 

your amplifier, the amplifier will produce a strong, distorted sound or no 
sound at all. 

• To see the audio format of the current disc in the on-screen display, press

AUDIO.

• This unit does not perform internal (2 channel) decoding of a DTS sound 

track. To enjoy DTS multi channel surround, you must connect this unit to 
a DTS compatible amplifier via one of this unit’s digital audio outputs.

Antenna

(Digital)

TV

Rear of this unit

A

B

C

B

C

A

DV499H-E.BDEULLK_ENG  1/23/09  4:45 PM  Page 4

Downloaded From Disc-Player.com LG Manuals

Summary of Contents for DVT499H

Page 1: ...artner LG has determined that this product or product models meet the ENERGY STAR guidelines for energy efficiency ENERGY STAR is a U S registered mark ENGLISH DV499H E BDEULLK_ENG 1 23 09 4 45 PM Page 1 Downloaded From Disc Player com LG Manuals ...
Page 2: ... shall be placed on the apparatus CAUTION concerning the Power Cord Most appliances recommend they be placed upon a dedicated circuit That is a single outlet circuit which powers only that appliance and has no additional outlets or branch circuits Check the specification page of this owner s manual to be certain Do not overload wall outlets Overloaded wall outlets loose or damaged wall outlets ext...

Page 3: ...PROGRESSIVE SCAN PICTURE PROBLEMS IT IS RECOMMENDED THAT THE USER SWITCH THE CONNECTION TO THE STANDARD DEFINITION OUTPUT IF THERE ARE QUESTIONS REGARDING OUR TV SET COMPATIBILITY WITH THIS MODEL 525p AND 625p UNIT PLEASE CONTACT OUR CUSTOMER SERVICE CENTER DVD VIDEO Discs such as movies that can be purchased or rented DVD R Video mode and finalized only DVD RW VR mode Video mode and finalized onl...

Page 4: ...or digital audio cable to your stereo Caution You must set the TV Output Select option to YPbPr on the setup menu to use this connection See page 9 Resolution Setting You can change the resolution for component video output Press RESOLUTION repeatedly to select the desired resolution 576i 480i 576p 480p 720p 1080i 1080p For 720p 1080p and 1080i resolution on the component video output only non cop...

Page 5: ...or instead of several cables and connectors and communication between the AV source and AV devices such as DTVs Notes on HDMI connection If your TV is not capable of handling 96 kHz sampling frequency set the Sampling Freq option to 48 kHz on the setup menu See page 9 If your TV is not equipped with Dolby Digital and MPEG decoder set the Dolby Digital and MPEG options to PCM on the setup menu See ...

Page 6: ...or antenna or to an existing outdoor antenna system If you live in a flat you should make sure that the digital terrestrial signals are distributed to your wall antenna outlet If you have your own antenna system you must make sure that it is equipped with antennas filter and or amplifier that can handle those fre quencies that the digital channels are transmitted on Cable TV Please observe that th...

Page 7: ...he menu Change the USB mode d INDEX ZOOM Moves to Index screen or page 100 in the teletext mode Enlarges video image in disc mode TEXT Switches between teletext mode and normal TV viewing MIX TITLE Displays the teletext pages superimposed on the TV picture Accesses the disc s title menu in disc mode if available EPG Displays the EPG menu Color buttons Use when tuned to a teletext program of a digi...

Page 8: ...l here g Display window Shows the current status of the unit Main unit a b c d e f g a b c d e f g h a AC Power Cord Connect to a power source b HDMI OUTPUT Type A Connect to TV with HDMI inputs Interface for digital audio and video c DIGITAL AUDIO OUTPUT COAXIAL Connect to a digital coaxial audio equipment d COMPONENT PROGRESSIVE SCAN OUTPUT Y PB PR Connect to a TV with Y Pb Pr inputs e VIDEO AUD...

Page 9: ...V is connected with the SCART jack YPbPr When your TV is connected with the COMPONENT PROGRES SIVE SCAN OUTPUT jacks on the unit Adjust the audio settings Dolby Digital DTS MPEG Selects the type of digital audio signal when using the DIGITAL AUDIO OUTPUT jack Bitstream Select this when you connect this unit s DIGITAL AUDIO OUTPUT jack to an amplifier with a built in Dolby Digital DTS or MPEG decod...

Page 10: ... and submit it during the registration process Important DivX VOD con tent is protected by a DivX DRM Digital Rights Management system that restricts playback to registered DivX Certified devices If you try to play DivX VOD content not authorized for your device the message Authorization Error will be displayed and your content will not play Learn more at www divx com vod REC Bit Rate You can choo...

Page 11: ...r antenna use one with a signal amplifier rated at DC 5V 100mA and set this option to ON ON Power is supplied to the connected antenna OFF The unit does not supply power to the connected antenna Adjust the time settings Set the channel that broadcasts a clock signal and the clock will be set auto matically If the clock that has automatically set is different with your local clock you can adjust ti...

Page 12: ...f you do not want to do not use this function Default Setting You can reset the unit to its original factory settings Press ENTER while Select option is selected Select Yes on the pop up message to return to the default setting Displaying the channel information In DVB T or DAB mode press DISPLAY to display the information displayed on screen If you press DISPLAY twice the signal strength and qual...

Page 13: ...hannel which broadcast teletext Press TEXT to access on the teletext Follow the indications on teletext and move onto the next or previous step by pressing color Red or Green or v V buttons Press TEXT or RETURN O to turn the teletext off and return to TV viewing Selecting teletext page Enter the desired page number as a three digit number with the numbered buttons If during selection you press a w...

Page 14: ...film begins to play You can navigate these menus using vV b B or number button to highlight an option Press ENTER to select Playing a DVD VR disc This unit will play DVD RW disc that is recorded using the Video Recording VR format When you insert a disc DVD VR disc the menu will appear on the screen Use vV to select a title then press PLAY N N To display DVD VR menu press DVD MENU or TITLE Some DV...

Page 15: ...speed Watching an enlarged video image During playback or pause mode press ZOOM repeatedly to select zoom mode You can move through the zoomed picture using vVb B buttons Press CLEAR to exit 100 p 200 p 300 p 400 p 100 Viewing the title menu Press TITLE to display the disc s title menu if available Viewing the DVD menu Press DVD MENU to display the disc menu if available Starting play from selecte...

Page 16: ...f a disc in the order you want by arranging the order of the musics on the disc To add a music s on the program list press PROGRAM to enter the program edit mode mark appears on the menu Select a desired music on the List then press ENTER to add the music to the program list Select a music from the program list then press ENTER to start programmed playback To clear a music from the program list se...

Page 17: ...te the photo in full screen counterclockwise or clockwise while viewing a photo in full screen Pause a slide show Press PAUSE STEP X to pause a slide show Press PLAY N N to continue the slide show Listening to music during slide show You can listen to music during slide show if the disc contain music and photo files together Use vV b B to highlight icon then press ENTER to start slide show Watchin...

Page 18: ...layer are not supported You can set the recording speed pressing AUDIO during USB direct recording X1 Track While normal speed recording you can listen to the music X4 Track While 4X speed recording you can not listen to the music Recording format MP3 file Encoding Bit rate 128 kbps 160 kbps 192 kbps 256 kbps 320 kbps Maximum Files Folder Less than 600 total number of files and folders USB Direct ...

Page 19: ...listed in the table below set the appropriate manufacturer code While holding down TV POWER button and press the manufacturer code for your TV with the numerical buttons see the table below Release the TV POWER button to complete setting Manufacturer Code Number LG GoldStar 1 Default 2 Zenith 1 3 4 Samsung 6 7 Sony 8 9 Hitachi 4 Depending on your TV some or all buttons may not function on the TV e...

Page 20: ...5 Scots Gaelic 7168 Serbian 8382 Serbo Croatian 8372 Shona 8378 Sindhi 8368 Singhalese 8373 Slovak 8375 Slovenian 8376 Spanish 6983 Sudanese 8385 Swahili 8387 Swedish 8386 Tagalog 8476 Language Code Tajik 8471 Tamil 8465 Telugu 8469 Thai 8472 Tonga 8479 Turkish 8482 Turkmen 8475 Twi 8487 Ukrainian 8575 Urdu 8582 Uzbek 8590 Vietnamese 8673 Volapük 8679 Welsh 6789 Wolof 8779 Xhosa 8872 Yiddish 7473 ...

Page 21: ...perate the remote control closer to the unit Designs and specifications are subject to change without prior notice Cause General Power requirements AC 200 240V 50 60Hz Power consumption 11 W Dimensions Approx 430 x 35 x 195 mm W x H x D without foot Net Weight Approx 1 7 kg Operating temperature 5 C to 35 C Operating humidity 5 to 90 Laser Semiconductor laser Television system DVB T Standard Compl...

Reviews: