


5
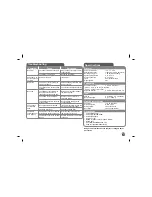
Main Unit
a
LCD screen
b
DC 12V IN:
Connect the AC adapter or automotive adapter.
c
AV OUT:
Connect to a TV with video and audio input.
d
i
(Earphones)
: Connect earphones here.
e
w
VOL (Volume):
Use to adjust the volume level of the built-in speaker and
earphones.
f
1/
I (Power)
: Press to turn the unit ON or OFF.
g
Battery charge and power indicator
The indicator turns red in charging and it will be turned into green when
the charging is complete. (Refer to page 8 for details.)
The indicator turns green when the unit is turned on.
h
Speakers
•
•
i
CD OPEN
.
:
Use the slide open key to open the disc lid.
j
Disc Lid
k
USB Port:
Connect a USB Flash Drive.
l
Playback control buttons
N
/
X
(Play/Pause): Press to start playback and pause playback
temporarily, press again to exit pause mode.
x
(Stop): Press to stop playback.
.
(Skip): Press to search backward* or return to the beginning of
current chapters/ tracks/
fi
les or go to the previous chapters/ tracks/
fi
les.
>
(Skip): Press to search forward* or go to next chapters/ tracks/
fi
les.
* Press and hold button for about two seconds.
m
Function buttons
SETUP: Press to access or exit the setup menu.
DISPLAY: Press to access On-Screen Display.
RETURN: Press to switch an operation mode between [DISC] and [USB].
COLOR/
: Press to display the Brightness or Colour menu for LCD
display.
TITLE: Press to access the title menu.
* To adjust the colour or brightness of the LCD display, press COLOR/
(BRIGHT) repeatedly on the main unit to display the Brightness or Colour
menu then use
b B
to adjust the value. Press
ENTER
to con
fi
rm the
adjustment.
n
Menu control buttons
ENTER: Press to con
fi
rm menu selection.
(left/right/up/down): Use to select an item in the menu.
o
Remote sensor:
Point the remote control here. To control the unit using the
remote control, do not fold the LCD panel down.
•
•
•
•
•
•
•
•
•
•
•
Summary of Contents for DP560
Page 20: ......