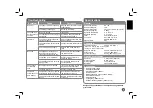
LG DP461A Manual Download Page 10

10

Playing a Disc

BUTTON

1

Open the disc lid:

OPEN (

Z

)

2

Insert a Disc: 

-

3

Close the disc lid: 

-

4

Start playback:

PLAY

5

Adjust the volume:

VOLUME 

6

To stop playback:

STOP

Playing a Disc - more you can do

Stops the playback

Press 

STOP (

x

)

 to stop playback, the unit records the stopped point depending 

on the disc. “ 

Xx 

” appears on the screen briefly. Press 

PLAY ( 

N

)

 to resume 

playback (from the scene point). If you press 

STOP (

x

again or unload the disc 

(“ 

” appears on the screen), the unit will clear the stopped point. 

(

Xx 

=Resume Stop, 

=Complete Stop)

 The resume point may be cleared 

when a button is pressed. (for example: POWER, OPEN, etc)

Playing a DVD that has a menu  

DVD


Most DVD now have menus which load first before the film begins to play. You 
can navigate these menus using 

vV b


or number button to highlight an 

option. Press 

ENTER

 to select.

Playing a DVD VR disc 

This unit will play DVD-RW disc that is recorded using the Video Recording 
(VR) format. When you insert a disc DVD VR disc, the menu will appear on the 
screen. Use 

vV 

to select a title then press 

PLAY ( 

N

)

.


To display DVD-VR 

menu, press 

MENU

 or 

TITLE

.

Some DVD-VR disc are made with CPRM data by DVD RECORDER. The unit 
does not support these kinds of discs.

Skip to the next/previous chapter/track/file  

ALL

Press 

SKIP (

>

)

 to move to the next chapter/track/file.

Press 

SKIP (

.

)

 to return to the beginning of the current chapter/track/file. 

Press 

SKIP (

.

)

 twice briefly to step back to the previous chapter/track/file.

Pause a playback  

ALL


Press 

PAUSE/STEP (

X

)

 to pause playback. Press 

PLAY ( 

N

)

 to continue 

playback.

Frame-by-Frame playback  

DVD


DivX


Press 

PAUSE/STEP (

X

)

 repeatedly to play Frame-by-Frame playback.

Playing repeatedly  

ALL

Press 

REPEAT

 repeatedly to select an item to be repeated. The current title, 

chapter or track will be played back repeatedly. To return to normal playback, 
press 

REPEAT

 repeatedly to select [Off]. 

Fast forward or fast reverse  

DVD


DivX


ACD


WMA


MP3

Press and hold 

SKIP (

.

 or 

>

)

 to play fast forward or fast reverse during 

playback. You can change the various playback speed by pressing and hold 

SKIP (

.

 or 

>

)

 repeatedly. Press 

PLAY ( 

N

)

 to continue play at normal 

speed.

Repeating a specific portion (A-B)  

DVD


DivX


ACD

Press 

A-B

 at the beginning of the portion you wish to repeat and again at the 

end of the portion. Your selected portion will be repeated continually. 

To return to normal playback, press 

A-B

 to select [Off].

Selecting a subtitle language  

DVD


DivX


During playback, press 

SUBTITLE (

)

 repeatedly to select a desired subtitle 

language.

Watching from a different angle  

DVD


If the angle indicator appears on the screen for a moment, you can select a dif-
ferent camera angle by pressing 

ANGLE (

)

 repeatedly.

Hearing a different audio  

DVD


DivX


During playback, press 

AUDIO (

)


repeatedly to switch between the available 

audio languages, channels or encoding methods. 

Slow down the playing speed  

DVD

 (

DivX

 : Forward only)

During playback, press 

SLOW (

t

 or 

T

)

 to slow down reverse or forward play-

back. You can change the various playback speed by pressing 

SLOW (

t

 or 

T

)


repeatedly. Press 

PLAY (


N

)

 to continue play at normal speed.

Summary of Contents for DP461A

Page 1: ...ENGLISH P NO MFL62512601 DP461A DP461D ...

Page 2: ...ted with product for your safety If you need to replace the battery take it to the nearest authorized LG Electronics service point or dealer for assistance CAUTION concerning the Power Cord Most appliances recommend they be placed upon a dedicated circuit That is a single outlet circuit which powers only that appliance and has no additional outlets or branch circuits Check the specification page o...

Page 3: ...ng stops if you turn on the unit The charging will take approximately 2 hours and 30 minutes Operating time on battery approximately 2 hour 20 minutes The operating time on battery may vary depending on the battery status operational status and environment conditions The battery indicator will turn red while charging Once the charging is com plete the indicator light changes to green When the rema...

Page 4: ...htness or Color menu for LCD display MODE Selects a operation mode between DISC TV and USB To adjust the color or brightness of the LCD display press COLOR BRIGHT repeatedly on the main unit to display the Brightness or Color menu then use b B to adjust the value Press ENTER to confirm the adjustment f Menu Control Buttons b B v V left right up down Selects an item in the menu ENTER Confirms menu ...

Page 5: ...ss the discʼs title menu REPEAT Repeats a chapter track title or all A B Repeats a section ZOOM Enlarges video image MARKER Marks any point during playback SEARCH Displays Marker Search menu RANDOM Plays tracks in random order Put the battery into the Remote Control Pinch the battery holder clip together then pull the tab to remove the battery holder Insert the battery with the facing in the same ...

Page 6: ...k and possible damage to your unit or vehicle always unplug the automotive adapter from the cigarette lighter socket before you remove the plug from your unit A 3 amp 250V fuse for protection is installed in the automotive adapter While the engine is being started disconnect the automotive adapter from the carʼs cigarette lighter socket Do not operate your unit when the car battery is discharged P...

Page 7: ...ed fold the LCD panel after revolving it To revolve the LCD panel to its original position open the LCD panel to a vertical position Revolve the LCD panel counter clockwise slowly 180 degrees When finished using the unit return the LCD panel to its original position Do not leave the LCD panel in the face up position or sudden shocks may damage it Selecting the operation mode You need to select a o...

Page 8: ...d 4 3 youʼll need to define how you would like widescreen programs and films to be displayed on your TV screen LetterBox This displays a widescreen picture with black bands at the top and bottom of the screen Panscan This fills the entire 4 3 screen cropping the picture as necessary Adjust the audio settings DRC Dynamic Range Control Make the sound clear when the volume is turned down Dolby Digita...

Page 9: ...ct an item v V 3 Adjust the Display menu settings b B ENTER 4 Exit the menu DISPLAY Displaying Disc Information more you can do You can select an item by pressing vV and change or select the setting by pressing b B Current title number total number of titles Current chapter number total number of chapters Elapsed playing time Selected audio language or channel Selected subtitle Selected angle tota...

Page 10: ...vious chapter track file Pause a playback ALL Press PAUSE STEP X to pause playback Press PLAY N to continue playback Frame by Frame playback DVD DivX Press PAUSE STEP X repeatedly to play Frame by Frame playback Playing repeatedly ALL Press REPEAT repeatedly to select an item to be repeated The current title chapter or track will be played back repeatedly To return to normal playback press REPEAT ...

Page 11: ...ti cally recalled Screen Saver The screen saver appears when you leave the unit in Stop mode for about five minutes If the Screen Saver is displayed for five minutes the unit automatically turns itself off Mixed disc or USB Flash Drive DivX MP3 WMA and JPEG When playing a disc or USB Flash Drive contained with DivX MP3 WMA and JPEG files together you can select which menu of files you would like t...

Page 12: ...a slide show Use vV b B to highlight icon then press ENTER to start slide show You can change slide show speed using b B when icon is highlighted Skip to the next previous photo Press SKIP or to view the previous next photo Rotate a photo Use vV to rotate the photo in full screen counter clockwise or clockwise while viewing a photo in full screen Pause a slide show Press PAUSE STEP X to pause a sl...

Page 13: ...TV and USB mode using MODE button Do not extract the USB device in operating We recommend that you back up your important files in the USB Flash Drive to protect against accidental loss If you use a USB extension cable or USB HUB the USB device might not be recognized Music files MP3 WMA photo files JPEG and DivX files can be played For details of operations on each files refer to relevant pages M...

Page 14: ...Connect the TV antenna to the TV AVT jack on the unit after selecting one between A and B as shown below A Connect an indoor antenna cable using supplied RF cable hub B Connect a supplied external antenna RF antenna cable hub External antenna Cable ...

Page 15: ...Searches for a channel automatically Searching stops when the unit tunes in a channel Notes on the TV receiving signal If the TV receiving signal is not poor it may appear following symptoms Screen Shaking Faded in double or triple Field gets bad gradually Color appears or disappears Screen is spotted Stripes appear Sound It noises It may not receive TV receiving signals as following Between Build...

Page 16: ... Scots Gaelic 7168 Serbian 8382 Serbo Croatian 8372 Shona 8378 Sindhi 8368 Singhalese 8373 Slovak 8375 Slovenian 8376 Spanish 6983 Sudanese 8385 Swahili 8387 Swedish 8386 Tagalog 8476 Language Code Tajik 8471 Tamil 8465 Telugu 8469 Thai 8472 Tonga 8479 Turkish 8482 Turkmen 8475 Twi 8487 Ukrainian 8575 Urdu 8582 Uzbek 8590 Vietnamese 8673 Volapük 8679 Welsh 6789 Wolof 8779 Xhosa 8872 Yiddish 7473 Y...

Page 17: ...ng level is set Change the rating level The remote control does not work properly The remote control is not pointed at the remote sensor on the unit Point the remote control at the remote sensor of the unit The remote control is too far from the unit Operate the remote control closer to the unit Specifications General Power requirements DC 12V Power consumption 12W External Dimensions 207 x 39 x 1...

Page 18: ...he operation of an airbag in a location that interferes with the driving instruments Depending on the type of headrest you may not be able to attach the bracket Headrest Mounting Bracket a Fixing Screw Fixes the unit on the bracket b Tilt Fixing Screw Fixes a tilt angle of the bracket c Horizontal Fixing Screw Fixes a horizontal angle of the bracket d Release knob Press both knobs to release the b...

Reviews: