background image

53

ENGLISH

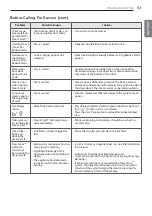
Before Calling For Service (cont.)

1SPCMFN

1PTTJCMF$BVTFT

4PMVUJPOT

There are no 
creases left on 
garment after
Steam Fresh™

t5IFGVODUJPOPGUIJTDZDMFJTUP

remove wrinkles from fabric.

t6TFBOJSPOUPNBLFDSFBTFT

Garments have
static after 
Reduce Static

t5IJTJTOPSNBM

t%FQFOETPOJOEJWJEVBMNPJTUVSFMFWFMJOTLJO

Garments are 
too damp or 
too dry after 
Reduce Static

t$PSSFDUESZJOHPQUJPOTOPU

selected.

t4FMFDUMPBEXFJHIUNBOVBMMZCFGPSFTUBSUJOH3FEVDF4UBUJD

option.

Water drips 
from door 
during Steam 
Cycle

t5IJTJTOPSNBM

t$POEFOTBUJPOXJMMOPSNBMMZGPSNPOUIFJOTJEFPGUIF

dryer door during steam operation. Some condensation 
may drip out the bottom of the door.

Steam is not 
visible during 
Steam Cycle

t5IJTJTOPSNBM

t4UFBNWBQPSJTEJGGJDVMUUPTFFXIFOUIFEPPSJTDMPTFE

However, condensation will normally form on the inside of 
the dryer door if the steam system is operating normally.

Cannot see 
steam vapor at 
the beginning 
of cycle

t5IJTJTOPSNBM

t4UFBNJTSFMFBTFEBUEJGGFSFOUTUBHFTPGUIFDZDMFGPSFBDI

option.

The display 
shows

t.PSF5JNFCVUUPOQSFTTFE

t5IJTEJTQMBZJOEJDBUFTUIBUUIFTUFBNPQUJPOIBTCFFOTFU

for a “ 

 ” item such as a comforter.  

Press the Less Time button to reduce the indicated load 
size.

Odors remain 
in clothing after 
Steam Fresh™

t4UFBN'SFTI™EJEOPUSFNPWF

odor completely.

t'BCSJDTDPOUBJOJOHTUSPOHPEPSTTIPVMECFXBTIFEJOB

normal cycle.

Clean Filter 
light is on 
during the
drying cycle

t-JOUGJMUFSJTBMNPTUDMPHHFEPS

full.

t1BVTFUIFESZJOHDZDMFBOEDMFBOUIFMJOUGJMUFS

Flow Sense

TM

indicator 
shows four 
bars during the 
drying cycle

t%VDUXPSLJTUPPMPOHPSIBTUPP

many turns/restrictions.

t4JHOJGJDBOUCMPDLBHFPGUIF

ductwork due to lint buildup or 
debris.

t5IFBQQMJBODFIBTEFUFDUFEB

restriction in the external dryer 
venting.

t*OTUBMMBTIPSUFSPSTUSBJHIUFSEVDUSVO4FFUIF*OTUBMMBUJPO

Instructions. 

t%VDUXPSLTIPVMECFDIFDLFEDMFBOFETPPO


Dryer can be used in this condition, but drying times may 
be longer.

t*GFYIBVTUSFTUSJDUJPOTBSFTFOTFECZUIF'MPX4FOTF

TM


system, the indicator will remain on for two hours after 
the end of the cycle. Opening the door or pressing the 
Power  button will turn off the display.

TROUBLESHOOTING

Summary of Contents for DLEX7700*E

Page 1: ...OWNER S MANUAL DRYER Please read this owner s manual thoroughly before operating and keep it handy for reference at all times MFL67731038 www lg com ENGLISH ESPAÑOL DLEX7700 E DLGX7701 E ...

Page 2: ... the Dryer 15 Reversing the Door 21 Installing the Side Vent Kit 22 Venting the Dryer 24 Connecting the Inlet Hose 25 Connecting Gas Dryers 27 Connecting Electric Dryers 32 Special Requirements for Manufactured or Mobile Homes 32 Final Installation Check 33 Installation Test Duct Check 35 HOW TO USE 35 Operating the Dryer 36 Sorting Loads 36 Loading the Dryer 36 Check the Lint Filter Before Every ...

Page 3: ...wed t P OPU JOTUBMM B DMPUIFT ESZFS XJUI GMFYJCMF QMBTUJD WFOUJOH NBUFSJBMT G GMFYJCMF NFUBM GPJM UZQF EVDU JT JOTUBMMFE JU NVTU CF PG B TQFDJGJD UZQF JEFOUJGJFE CZ UIF BQQMJBODF NBOVGBDUVSFS BT TVJUBCMF GPS VTF XJUI DMPUIFT ESZFST MFYJCMF WFOUJOH NBUFSJBMT BSF LOPXO UP DPMMBQTF CF FBTJMZ DSVTIFE BOE USBQ MJOU 5IFTF DPOEJUJPOT XJMM PCTUSVDU DMPUIFT ESZFS BJSGMPX BOE JODSFBTF UIF SJTL PG GJSF t P O...

Page 4: ...could ignite or explode t P OPU SFBDI JOUP UIF ESZFS JG UIF ESVN PS BOZ PUIFS part is moving t P OPU SFQBJS PS SFQMBDF BOZ QBSU PG UIF ESZFS or attempt any servicing unless specifically recommended in this owner s manual or in published user repair instructions that you understand and have the skills to carry out t P OPU UBNQFS XJUI DPOUSPMT t FGPSF UIF ESZFS JT SFNPWFE GSPN TFSWJDF PS EJTDBSEFE r...

Page 5: ...UFE BOE TJ FE QPXFS DJSDVJU UP BWPJE FMFDUSJDBM PWFSMPBE Improper power circuit can melt creating electric shock and or fire hazard t 3FNPWF BMM QBDLJOH JUFNT BOE EJTQPTF PG BMM TIJQQJOH NBUFSJBMT QSPQFSMZ Failure to do so can result in death explosion fire or burns t 1MBDF ESZFS BU MFBTU JODIFT BCPWF UIF GMPPS GPS B HBSBHF JOTUBMMBUJPO Failure to do so can result in death explosion fire or burns ...

Page 6: ...F PG QMBTUJD PS PUIFS DPNCVTUJCMF EVDUXPSL DBO DBVTF B GJSF Punctured ductwork can cause a fire if it collapses or becomes otherwise restricted in use or during installation t VDUXPSL JT OPU QSPWJEFE XJUI UIF ESZFS BOE ZPV TIPVME PCUBJO UIF OFDFTTBSZ EVDUXPSL MPDBMMZ 5IF FOE DBQ TIPVME IBWF IJOHFE EBNQFST UP QSFWFOU CBDLESBGU XIFO UIF ESZFS JT OPU JO VTF Failure to follow these instructions can re...

Page 7: ...FSMZ HSPVOEFE PVUMFU MFDUSJD TIPDL DBO SFTVMU JG UIF ESZFS JT OPU QSPQFSMZ HSPVOEFE BWF UIF XBMM PVUMFU BOE DJSDVJU DIFDLFE CZ B RVBMJGJFE FMFDUSJDJBO UP NBLF TVSF UIF PVUMFU JT QSPQFSMZ HSPVOEFE Failure to follow these instructions can create an electric shock hazard and or a fire hazard t 5IF ESZFS TIPVME BMXBZT CF QMVHHFE JOUP JUT PXO JOEJWJEVBM FMFDUSJDBM PVUMFU XIJDI IBT B WPMUBHF SBUJOH UIBU...

Page 8: ...s in the installed household ductwork that reduce exhaust airflow through the dryer If you see the alert Clean or repair the ducts to remove UIF SFTUSJDUJPOT FFQ ZPVS EVDUT DMFBO UP IFMQ JODSFBTF FGGJDJFODZ BOE SFEVDF MPOH ESZJOH UJNFT DBVTFE CZ CMPDLFE ducts Smart Diagnosis Should you experience any technical difficulty with your washing machine it has the capability of transmitting data by phone...

Page 9: ... PXOFS T NBOVBM NBZ CF EJGGFSFOU GSPN UIF BDUVBM DPNQPOFOUT BOE BDDFTTPSJFT XIJDI BSF subject to change by the manufacturer without prior notice for product improvement purposes INTRODUCING YOUR DRYER Two Way Reversible Door Release Hamper door The LG EasyLoad feature allows you to open the dryer door from the top hamper style when loading the dryer to help guide clothes into the drum and prevent ...

Page 10: ...ithout losing the current settings 05 If you do not press the Start Pause button to resume a cycle within four minutes the dryer turns off automatically PSF 5JNF FTT 5JNF VUUPOT ü To adjust the drying time use these buttons with Manual Dry Time Dry and Steam Fresh cycles as well as the Reduce Static and TurboSteam options Press the More Time button to increase the selected manual cycle time by a m...

Page 11: ...n of the display shows which stage of the drying cycle is currently underway Clean Filter Drying or Cooling IJME PDL OEJDBUPS ü When Child Lock is set the Child Lock indicator appears and all buttons are disabled except the Power button This prevents children from changing settings while the dryer is operating MFBO JMUFS 3FNJOEFS ü The display shows Clean Filter when the dryer is turned on as a re...

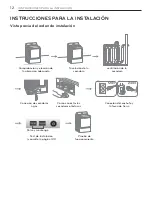
Page 12: ...cking and choosing the proper location Leveling the dryer Connecting electric dryers Venting the dryer Plugging in the power cord and grounding Connecting gas dryers Test run Installation test Refer to page 33 Press and hold 120V 240V INSTALLATION INSTRUCTIONS ...

Page 13: ...M ESZFS XFJHIU PG MCT LH 5IF DPNCJOFE XFJHIU PG B DPNQBOJPO appliance should also be considered t No other fuel burning appliance can be installed in the same closet as a dryer t EEJUJPOBM TQBDJOH TIPVME CF DPOTJEFSFE GPS FBTF PG installation and servicing t EEJUJPOBM DMFBSBODFT NJHIU CF SFRVJSFE GPS XBMM EPPS and floor moldings t EEJUJPOBM TQBDJOH TIPVME CF DPOTJEFSFE PO BMM TJEFT of the dryer to...

Page 14: ...rfectly level solid surface 1PTJUJPO UIF ESZFS JO UIF GJOBM MPDBUJPO 1MBDF B MFWFM across the top of the dryer t MM GPVS MFWFMJOH GFFU NVTU SFTU TPMJEMZ PO UIF GMPPS Gently push on the top corners of the dryer to make sure that the dryer does not rock from corner to corner If you are installing the dryer on the optional pedestal you must use the leveling feet on the pedestal to level the dryer The...

Page 15: ...he instructions here are for changing the door swing from a right to a left side hinge If the door has been reversed and it is necessary to change it back use care when following these instructions Some of the illustrations and the left right references will be reversed and you will need to read the instructions carefully WWARNING F TVSF UP TVQQPSU UIF XFJHIU PG UIF EPPS CFGPSF removing the hinge ...

Page 16: ...need for a service call to repair the dryer ON THE DOOR JGU PGG UIF EPPS DPWFS With the door laid inside facing up on a protected TVSGBDF SFNPWF UIF TDSFXT PO UIF JOTJEF PG UIF door Carefully lift off the door cover with the help of a small flat blade screwdriver inserted in the upper corner circled below WWARNING The edges of the door cover may be sharp Take care when handling or wear gloves to a...

Page 17: ...ons inner lock rods lower hinge filler lower hinge bracket side lock rod Hole plug top lock rod lower hinge assembly 3FWFSTF UIF DPNQPOFOUT JOTJEF UIF EPPS You will now be removing and reversing various components inside the door See below for a detailed diagram and identification of the inner structure and parts of the door The diagram shows the before view of the door with the default set up for...

Page 18: ...ock buttons side lock rod NOTE P OPU SFNPWF UIF UXP JOOFS MPDL SPET TFF QBHF located underneath the top lock rod They do NOT need to be reversed upper hinge assembly upper hinge pivot upper hinge assembly upper hinge pivot Spring JGU PVU UIF UXP UPQ JOUFSMPDL CVUUPOT Lift out the two grey interlock buttons from the top of the outer door and set them aside for later use JGU PVU UIF HSFZ JOUFSMPDL C...

Page 19: ...SFFT BOE JOTUBMM JU on the upper left side of the door 3FJOTUBMM UIF UPQ MPDL SPE 3PUBUF UIF UPQ MPDL SPE SFNPWFE JO TUFQ degrees end for end from its original position and reinstall it The spring should now be to the right of center with the spring on the side of the rod facing the top of the door a Insert the right end of the lock rod into the right hinge assembly Make sure the rod is aligned wi...

Page 20: ...PWFE JO TUFQ The ten similar screws go around the top and sides of the door cover Make sure to install the two different screws on the bottom edge in the locations marked below 19 PX QJDL VQ UIF VQQFS IJOHF QJWPU SFNPWFE FBSMJFS BOE SPUBUF JU EFHSFFT Press in the side interlock button on the left side and hold it down while you press the hinge pivot into the hinge assembly on the top right side If...

Page 21: ...de venting is not available on gas models Press the adapter duct onto the blower housing and secure to the base of the dryer as shown Rear Exhaust Duct Retaining Screw OPDLPVU SBDLFU Adapter Duct 1SFBTTFNCMF B JODI DN FMCPX UP UIF OFYU JODI DN EVDU TFDUJPO BOE TFDVSF BMM KPJOUT XJUI EVDU UBQF F TVSF UIBU UIF NBMF FOE PG UIF FMCPX faces AWAY from the dryer Insert the elbow duct assembly through the...

Page 22: ... PS UIJO GPJM EVDUJOH Failure to follow these instructions can result in fire or death t 5IF FYIBVTU EVDU NVTU CF JODIFT DN JO EJBNFUFS XJUI OP PCTUSVDUJPOT 5IF FYIBVTU EVDU TIPVME CF LFQU BT TIPSU BT QPTTJCMF BLF TVSF UP DMFBO BOZ PME EVDUT CFGPSF JOTUBMMJOH ZPVS OFX dryer Failure to follow these instructions can result in fire or death t 3JHJE TFNJ SJHJE PS GMFYJCMF NFUBM EVDUJOH JT SFDPNNFOEFE ...

Page 23: ... TIPSU BT QPTTJCMF t 6TF BT GFX FMCPX KPJOUT BT QPTTJCMF t 5IF NBMF FOE PG FBDI TFDUJPO PG FYIBVTU EVDU NVTU point away from the dryer t 6TF EVDU UBQF PO BMM EVDU KPJOUT t OTVMBUF EVDUXPSL UIBU SVOT UISPVHI VOIFBUFE BSFBT in order to reduce condensation and lint buildup on duct surfaces t ODPSSFDU PS JOBEFRVBUF FYIBVTU TZTUFNT BSF OPU covered by the dryer warranty Failures or poor performance caus...

Page 24: ...P UIF ESZFS JOMFU WBMWF UJHIUMZ CZ IBOE BOE UIFO UJHIUFO BOPUIFS UVSO XJUI pliers Make sure that there are no kinks in the hoses and that they are not crushed 5VSO PO UIF DPME XBUFS GBVDFU IFDL GPS MFBLT BU UIF DPOOFDUPS JG VTFE BOE JO BMM hoses NOTE t G BOZ MFBLT BSF GPVOE TIVU Pò UIF XBUFS GBVDFU remove the hose and check the condition of the rubber seals NOTE t FGPSF DPOOFDUJOH UIF XBUFS MJOF U...

Page 25: ... QSFTTVSF UFTUJOH PG UIF HBT TVQQMZ Failure to do so can result in fire explosion or death t 4VQQMZ MJOF SFRVJSFNFOUT PVS MBVOESZ SPPN NVTU IBWF B SJHJE HBT TVQQMZ MJOF UP ZPVS ESZFS O UIF 6OJUFE 4UBUFT BO JOEJWJEVBM NBOVBM TIVUPGG WBMWF 645 CF JOTUBMMFE XJUIJO BU MFBTU GU N PG UIF ESZFS JO BDDPSEBODF XJUI UIF BUJPOBM VFM BT PEF 4 PS BOBEJBO HBT JOTUBMMBUJPO DPEF 4 B149 1 A 1 cľ JODI 15 QJQF QMVH ...

Page 26: ...ilure to do so can result in fire explosion or death t BT ESZFST 645 FYIBVTU UP UIF PVUEPPST Failure to do so can result in fire explosion or death Connecting the gas supply BLF TVSF UIBU UIF HBT TVQQMZ UP UIF MBVOESZ SPPN JT turned OFF Confirm that the type of gas available in your laundry room is appropriate for the dryer The dryer is prepared for Natural Gas with a 8 inch NPT gas connection 3FN...

Page 27: ... DPEFT MMPX TVGGJDJFOU TMBDL JO XJSJOH TP ESZFS DBO CF NPWFE GSPN JUT OPSNBM MPDBUJPO XIFO OFDFTTBSZ Failure to do so can result in fire explosion or death t 5IF QPXFS DPSE QJHUBJM DPOOFDUJPO CFUXFFO XBMM SFDFQUBDMF BOE ESZFS UFSNJOBM CMPDL 4 05 TVQQMJFE XJUI ESZFS 5ZQF PG QJHUBJM BOE HBVHF PG XJSF NVTU DPOGPSN UP MPDBM DPEFT BOE XJUI JOTUSVDUJPOT PO UIF GPMMPXJOH QBHFT Failure to follow these ins...

Page 28: ...6 MJTUFE TUSBJO SFMJFG JT SFRVJSFE 3FNPWF UIF UFSNJOBM CMPDL BDDFTT DPWFS PO UIF VQQFS back of the dryer Install a UL listed strain relief into the power cord through hole then thread a UL listed 7 XJSF 8 NJOJNVN DPQQFS conductor power cord through the strain relief t 6TF B 7 6 MJTUFE QPXFS DPSE XJUI 8 NJOJNVN DPQQFS conductor and closed loop or forked terminals with upturned ends 5SBOTGFS UIF ESZ...

Page 29: ...UIF PUIFS UISFF XJSFT BOE TUSJQ JODI DN JOTVMBUJPO GSPN FBDI XJSF FOE UIF FOET PG UIF UISFF shorter wires into a hook shape 3FNPWF UIF UFSNJOBM CMPDL BDDFTT DPWFS PO UIF VQQFS back of the dryer Install a UL listed strain relief into the power cord through hole then thread the power DBCMF QSFQBSFE JO 4UFQ UISPVHI UIF TUSBJO SFMJFG Ground Wire DN DN Connecting Electric Dryers cont USA only t 6TF 6 M...

Page 30: ...BOVBSZ t 6 MJTUFE TUSBJO SFMJFG JT SFRVJSFE 3FNPWF UIF UFSNJOBM CMPDL BDDFTT DPWFS PO UIF upper back of the dryer Install a UL listed strain relief into the power cord through hole then thread a UL listed 7 XJSF 8 NJOJNVN DPQQFS conductor power cord through the strain relief t 6TF B 7 6 MJTUFE QPXFS DPSE XJUI 8 NJOJNVN DPQQFS conductor and closed loop or forked terminals with upturned ends UUBDI U...

Page 31: ... UIF PVUFS DPWFSJOH GSPN UIF XJSF 4USJQ JODI DN JOTVMBUJPO GSPN FBDI XJSF FOE UIF FOET PG UIF UISFF XJSFT JOUP B IPPL shape 3FNPWF UIF UFSNJOBM CMPDL BDDFTT DPWFS PO UIF VQQFS back of the dryer Install a UL listed strain relief into the power cord through hole then thread the power DBCMF QSFQBSFE JO 4UFQ UISPVHI UIF TUSBJO SFMJFG t 6TF 6 MJTUFE XJSF 8 NJOJNVN DPQQFS conductor cable t MMPX BU MFBTU...

Page 32: ...PG UIF EVDU GSPN BOZ DPNCVTUJCMF DPOTUSVDUJPO CF BU MFBTU JODIFT DN and when venting the dryer to the outdoors the dryer DBO CF JOTUBMMFE XJUI B DMFBSBODF PG JODI DN BU the sides and back of the dryer t 1MFBTF CF BXBSF UIBU WFOUJOH NBUFSJBMT BSF OPU TVQQMJFE with the dryer You should obtain the venting materials necessary for proper installation Final Installation Check Once you have completed the...

Page 33: ...ll display if the activation is successful 1SFTT 4UBSU 1BVTF CVUUPO The dryer will start the test which will last about two minutes The heat will be turned on and the temperatures in the drum will be measured IFDL UIF EJTQMBZ GPS SFTVMUT During the three minute test cycle monitor the Flow Sense display on the control panel If no bars are displayed when the cycle ends the exhaust system is adequate...

Page 34: ...s with multiple elbows or bends Excess or crushed transition duct Too many elbows or exhaust too long Check for blockages and lint buildup Make sure the ductwork is not crushed or restricted Crushed or damaged exhaust Lint buildup or blockage NOTE 8IFO UIF ESZFS JT öSTU JOTUBMMFE UIJT UFTU TIPVME CF performed to alert you to any existing problems with the exhaust duct in your home However since th...

Page 35: ...s can be done using the cycle modifier buttons as shown PO QBHF ZDMF PQUJPOT DBO CF BEEFE VTJOH UIF PQUJPO CVUUPOT BT TIPXO PO QBHF 4 OE PG ZDMF When the cycle is finished the chime will sound if it is set Remove your clothing from the dryer immediately to reduce wrinkling If Wrinkle Care is selected the dryer will tumble briefly every few minutes to help prevent wrinkles from setting in the cloth...

Page 36: ...pliance follow basic precautions including the following t IFDL BMM QPDLFUT UP NBLF TVSF UIBU UIFZ BSF FNQUZ UFNT TVDI BT DMJQT QFOT DPJOT BOE LFZT DBO EBNBHF CPUI ZPVS ESZFS BOE ZPVS DMPUIFT MBNNBCMF PCKFDUT TVDI BT MJHIUFST PS NBUDIFT DPVME JHOJUF DBVTJOH B GJSF Failure to do so can result in fire explosion or death t FWFS ESZ DMPUIFT UIBU IBWF CFFO FYQPTFE UP PJM HBTPMJOF PS PUIFS GMBNNBCMF TVC...

Page 37: ... door when loading It acts as a chute to help guide items into the drum and help prevent items from falling onto the floor It also comes in handy when unloading a few small items helping prevent the rest of the laundry from being pulled onto the floor To open the hamper door press the release in the middle of the handle recess on the top of the door and pull the door forward Make sure laundry is f...

Page 38: ...at Adjustable HOW TO USE Sensor dry cycles Sensor dry cycles utilize LG s unique dual sensor system to detect and compare the moisture level in clothes and in the air and adjust the drying time as needed to ensure superior results The dryer automatically sets the dryness level and temperature at the recommended setting for each cycle The estimated time remaining will be shown in the display Downlo...

Page 39: ... scroll through available settings Time Dry MMPXT ZPV UP NBOVBMMZ TFMFDU UIF ESZJOH UJNF GSPN UP NJOVUFT JO NJOVUF JODSFNFOUT 6TF UIJT GPS TNBMM MPBET PS UP remove wrinkles Use the More Time Less Time buttons to add PS SFEVDF UIF ESZJOH UJNF JO NJOVUF JODSFNFOUT Your dryer features several additional cycle options to customize cycles to meet your individual needs Certain option buttons also featur...

Page 40: ...om Program If you have a special combination of settings that you use frequently you can save these settings as a custom program To save a custom program 5VSO PO UIF ESZFS BOE UVSO UIF DZDMF TFMFDUPS LOPC UP select the desired cycle 6TF UIF DZDMF TFUUJOH CVUUPOT UP BEKVTU UIF TFUUJOHT for that cycle 1SFTT UIF DZDMF PQUJPO CVUUPO T GPS UIF PQUJPO ZPV would like to add A confirmation message will be...

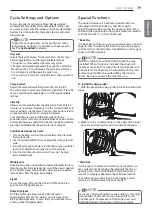
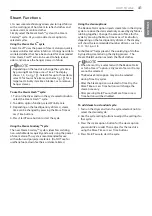
Page 41: ...nd odors in fabrics It brings new life to wrinkled clothes that have been stored for an extended time Steam Fresh can also be used to help reduce odors and remove the hanger creases in fabrics To use the Steam FreshTM cycle 5VSO PO UIF ESZFS BOE UVSO UIF DZDMF TFMFDUPS LOPC UP select the Steam Fresh cycle 5P BEE BO PQUJPO GVODUJPO TFMFDU 8SJOLMF BSF FQFOEJOH PO UIF MPBE RVBOUJUZ PG JUFNT TUFBN tim...

Page 42: ...F P OPU PWFSMPBE Steam Functions cont WWARNING t P OPU PQFO UIF ESZFS EPPS EVSJOH TUFBN DZDMFT Failure to follow this warning can cause serious injury or death t P OPU GJMM UIF TUFBN GFFEFS XJUI HBTPMJOF ESZ DMFBOJOH TPMWFOUT PS PUIFS GMBNNBCMF PS FYQMPTJWF TVCTUBODFT Failure to do so can result in death explosion fire or burns t P OPU UPVDI UIF TUFBN OP MF JO UIF ESVN EVSJOH PS BGUFS UIF TUFBN DZ...

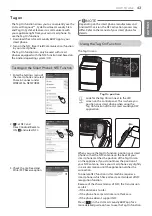
Page 43: ...s may differ Refer to the manual of your smart phone for details Using the Tag On Function The Tag On icon Tag On position Look for the Tag On icon next to the LED screen on the control panel This is where you position your smart phone when using the Tag On function of the LG Smart Laundry DW application When you use the Tag On function position your smart phone so that the NFC antenna on the back...

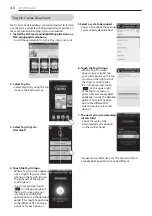
Page 44: ...POT It shows the diagnosis results on the cycles recently used Images are for reference only The actual LG Smart Laundry DW application may be different Using Tag On with Applications Touch the LG appliance s Tag On logo with your NFCequipped smart phone to use the LG Smart Laundry DW applications LG Smart Diagnosis Cycle Download Laundry Stats and Tag on Cycle Set Tag On Diagnosis OTUBMM 4NBSU BV...

Page 45: ...BSU JBHOPTJT 3FTVMU TDSFFO 4FMFDU ZPVS DPVOUSZ HSFF UP 5FSNT BOE POEJUJPOT PG UIF 6TF BOE 1SJWBDZ 1PMJDZ TFMFDUJOH DDFQU OUFS ZPVS QIPOF OVNCFS JO UIF GJFME 6TF UIJT QIPOF OVNCFS XIFO UBMLJOH UP UIF DVTUPNFS TFSWJDF SFQSFTFOUBUJWF UP BMMPX UIFN UP GJOE ZPVS 4NBSU JBHOPTJT EBUB 1SFTT UIF BMM CVUUPO UP JOJUJBUF UIF DBMM UP T 4VQQPSU FOUFS Images are for reference only The actual LG Smart Laundry DW ...

Page 46: ...DW application may be different Tag On Cycles Download Tag On Cycle Download allows you to download cycles for later use The cycle is available at the Downloaded cycle position on the control panel until another cycle is downloaded OTUBMM UIF 4NBSU BVOESZ 8 BQQMJDBUJPO PO B FRVJQQFE TNBSUQIPOF Install the application from the Play store and run it 4FMFDU 5BH 0O Select Tag On by using the top icons...

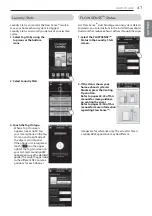
Page 47: ...mart Laundry DW application to see the detailed guide This might happen due to the different NFC antenna positions for each phone FLOW SENSETM Status LG s Flow SenseTM duct blockage sensing system detects and alerts you to restrictions in the installed household ductwork that reduce exhaust airflow through the dryer 4FMFDU UIF 08 4 4 5 4UBUVT JO UIF BVOESZ 4UBUT TDSFFO G UIF TUBUVT TIPXT ZPVS IPNF...

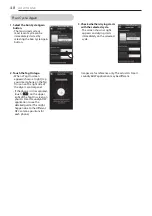
Page 48: ...of the dryer s control panel If the phone isn t recognized touch on the upper right of the Tag On screen on your LG Smart Laundry DW application to see the detailed guide This might happen due to the different NFC antenna positions for each phone IFDL XIFUIFS ESZJOH TUBSUT XJUI UIF TFMFDUFE DZDMF The screen shown at right appears and drying starts immediately on the selected cycle Images are for r...

Page 49: ...lication to see the detailed guide This might happen due to the different NFC antenna positions for each phone 4FMFDU B MBVOESZ DBUFHPSZ CBTFE PO UIF JTTVF ZPV XBOU UIF NBDIJOF UP GPDVT PO GUFS TFMFDUJOH UIF DBUFHPSZ B MJTU PG TQFDJGJD DZDMFT XJMM BQQFBS 4FMFDU UIF DZDMF CBTFE PO ZPVS needs 8IFO UIF 5BH 0O TDSFFO BQQFBST TIPXO BU SJHIU tap your smart phone to UIF 5BH 0O MPHP PO UIF SJHIU TJEF PG U...

Page 50: ... use steel wool or abrasive cleansers they can scratch or damage the surface Cleaning Around and Under the Dryer Vacuum lint and dust from around the dryer and underneath it regularly Vent ductwork should be checked for lint buildup and cleaned at least once per year If any noticeable reduction in airflow or drying performance occurs immediately check ductwork for obstructions and blockages Mainta...

Page 51: ...r DPEF U PS U t 5IFSNJTUPS JT NBMGVODUJPOJOH t 5VSO PGG UIF ESZFS BOE DBMM GPS TFSWJDF Lint on clothes t JOU GJMUFS OPU DMFBOFE QSPQFSMZ t BVOESZ OPU TPSUFE QSPQFSMZ t YDFTT TUBUJD JO DMPUIFT t SZFS JT PWFSMPBEFE t 5JTTVF QBQFS FUD MFGU JO QPDLFUT t BLF TVSF UIF MJOU GJMUFS JT DMFBOFE CFGPSF FWFSZ MPBE 8JUI some loads that produce high amounts of lint it may be necessary to clean the filter during...

Page 52: ...ty If the problem is a circuit overload have it corrected by a qualified electrician t JWJEF MBSHFS MPBET JOUP TNBMMFS MPBET GPS ESZJOH t G ZPV BSF ESZJOH B WFSZ TNBMM MPBE BEE B GFX FYUSB JUFNT to ensure proper tumbling action Clothes are wrinkled t MPUIFT ESJFE UPP MPOH overdried t MPUIFT MFGU JO ESZFS UPP MPOH after cycle ends t 0WFSESZJOH B MPBE PG MBVOESZ DBO MFBE UP XSJOLMFE DMPUIFT Try a sh...

Page 53: ...U EJGGFSFOU TUBHFT PG UIF DZDMF GPS FBDI option The display shows t PSF 5JNF CVUUPO QSFTTFE t 5IJT EJTQMBZ JOEJDBUFT UIBU UIF TUFBN PQUJPO IBT CFFO TFU for a item such as a comforter Press the Less Time button to reduce the indicated load size Odors remain in clothing after Steam Fresh t 4UFBN SFTI EJE OPU SFNPWF odor completely t BCSJDT DPOUBJOJOH TUSPOH PEPST TIPVME CF XBTIFE JO B normal cycle C...

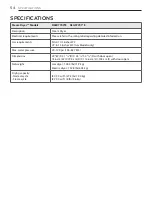
Page 54: ...ailed information Gas requirements JODIFT 8 1 o JODIFT 8 BT PEFMT POMZ Max water pressure o QTJ o L1B Dimensions w 8 9 w 9 w D with door open DN 8 9 DN 9 DN DN XJUI EPPS PQFO Net weight BT ESZFS MCT LH MFDUSJD ESZFS MCT LH Drying capacity Normal cycle Steam cycle DV GU MCT LH DV GU MCT LH SPECIFICATIONS SPECIFICATIONS ...

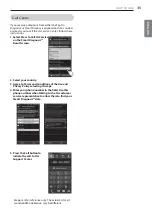
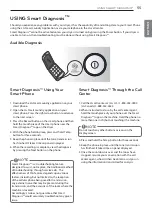
Page 55: ...ton on the phone Smart Diagnosis Through the Call Center BMM UIF DBMM DFOUFS BU 6 4 BOBEB 8IFO JOTUSVDUFE UP EP TP CZ UIF DBMM DFOUFS BHFOU hold the mouthpiece of your phone over the Smart Diagnosis logo on the machine Hold the phone no more than one inch but not touching the machine 1SFTT BOE IPME UIF 5FNQ CVUUPO GPS UISFF TFDPOET FFQ UIF QIPOF JO QMBDF VOUJM UIF UPOF USBOTNJTTJPO has finished It...

Page 56: ... UP UIF SFRVJSFNFOUT PG QSFDBVUJPOT JO UIF 0QFSBUJOH VJEF BDDJEFOU WFSNJO öSF øPPE JNQSPQFS JOTUBMMBUJPO BDUT PG PE VOBVUIPSJ FE NPEJöDBUJPO PS BMUFSBUJPO JODPSSFDU FMFDUSJDBM DVSSFOU PS WPMUBHF PS DPN mercial use or use for other than intended purpose The cost of repair or replacement under these excluded circumstances shall be borne by the consumer 6450 3 03 5 0 5 3 6 34 50 0 5 5 530 4 LG Custom...

Page 57: ...MANUAL DE PROPIETARIO SECADORA Lea este manual de usuario detenidamente antes de la utilizacion y guardelo a mano para futuras consultas www lg com ESPAÑOL DLEX7700 E DLGX7701 E ...

Page 58: ...irección de apertura de la puerta 21 Instalación del kit de ventilación lateral 22 Cónexión del conducto de ventilación de la secadora 24 Manguera de entrada 25 Conexión de secadoras a gas 27 Cómo conectar las secadoras eléctricas 32 Requisitos especiales para viviendas móviles o prefabricadas 32 Revisión de instalación final 33 Test de Instalación Verificación del Conducto 35 CÓMO USAR 35 Funcion...

Page 59: ...FT EF WFOUJMBDJØO QMÈTUJDPT GMFYJCMFT 4J TF JOTUBMB VO DPOEVDUP GMFYJCMF NFUÈMJDP EF UJQP MÈNJOB EF NFUBM ÏTUF EFCFSÈ DVNQMJS MBT FTQFDJGJDBDJPOFT EFUFSNJOBEBT QPS FM GBCSJDBOUF EFM FMFDUSPEPNÏTUJDP QBSB TV VTP DPO TFDBEPSBT 4F TBCF RVF MPT NBUFSJBMFT EF WFOUJMBDJØO GMFYJCMFT TF DPOUSBFO TF BHSJFUBO DPO SBQJEF Z BUSBQBO QFMVTBT TUBT DPOEJDJPOFT PCTUSVJSÈO FM GMVKP EF BJSF de la secadora y aumentar...

Page 60: ...mpieza en seco u otras substancias inflamables o explosivas ya que emanan vapores que podrían encenderse o explotar incluso después del lavado t P JOUSPEV DB MBT NBOPT FO MB TFDBEPSB DVBOEP FM tambor o las otras partes estén en movimiento t P SFQBSF P SFFNQMBDF OJOHVOB QBSUF EF MB TFDBEPSB ni intente reparar la misma a menos que esto se recomiende en forma específica en esta Guía de Uso y Cuidado ...

Page 61: ...T SFHVMBDJPOFT WJHFOUFT Siga los detalles en las instrucciones de instalación Si la secadora no se encuentra adecuadamente conectada a tierra se pueden producir descargas eléctricas t OUFT EF VTBS MB TFDBEPSB EFCF FTUBS DPSSFDUBNFOUF JOTUBMBEB DPNP TF EFTDSJCF FO FTUF NBOVBM Si la secadora no se encuentra adecuadamente conectada a tierra se pueden producir descargas eléctricas t OTUBMF Z BMNBDFOF ...

Page 62: ...s Los sistemas de ventilación agujereados pueden causar incendios si se colapsan o bloquean durante el uso o la instalación t P TF QSPWFF FM TJTUFNB EF WFOUJMBDJØO DPO MB TFDBEPSB FM NJTNP EFCFSÈ PCUFOFSTF MPDBMNFOUF B UBQB UFSNJOBM EFCFSÈ UFOFS SFHVMBEPSFT EF UJSP DPO CJTBHSBT QBSB QSFWFOJS FM SFUPSOP EF EFTDBSHB cuando no se usa la secadora Si no se siguen estas instrucciones se podrá producir i...

Page 63: ...la secadora no se encuentra adecuadamente conectada a tierra se pueden producir descargas FMÏDUSJDBT POUSBUF B VO FMFDUSJDJTUB DBMJGJDBEP QBSB RVF DPOUSPMF FM UPNBDPSSJFOUF Z FM DJSDVJUP FMÏDUSJDP QBSB BTFHVSBSTF RVF FM FODIVGF FTUÈ DPSSFDUBNFOUF conectado a tierra Si estas instrucciones no se cumplen se podrán producir descargas eléctricas y o riesgo de incendio t B TFDBEPSB TJFNQSF EFCF FTUBS FO...

Page 64: ...OR DE BLOQUEO DE CONDUCTO Flow Sense El sistema de detección de bloqueo de conductos Flow Sense detecta y alerta sobre la existencia de obstrucciones en el sistema de ventilación doméstico instalado que reducen el flujo de ventilación de la secadora Si aparece el mensaje de alerta Limpie o repare los conductos para eliminar las obstrucciones Mantenga sus conductos limpios para aumentar la eficienc...

Page 65: ...tro de pelusa Panel de acceso del bloque terminal Modelos eléctricos Ubicación de la toma de gas Modelos a gas Ubicación del cable eléctrico Modelos a gas Salida del conducto de escape Puerta reversible de doble vía Soltar Puerta tipo cesto La función LG EasyLoadTM le permite abrir la puerta de la secadora desde arriba tipo cesto y cargar la ropa en el tambor evitando que caiga al suelo Para la ca...

Page 66: ...ajustes actuales 05 Si no aprieta el botón Inicio Pausa Start Pause para detener un ciclo FO NJOVUPT MB TFDBEPSB TF BQBHBSÈ BVUPNÈUJDBNFOUF PUPOFT F ÈT 5JFNQP FOPT 5JFNQP ü PSF 5JNF FTT 5JNF Use estos botones con los ciclos de Secado Manual Manual Dry de SecadoTemporicado Time Dry y de Steam Fresh y con las opciones Reducir Estática Reduse Static yTurbo Steam para programar el tiempo de secado Apr...

Page 67: ...abo Limpie Filtro Clean Filter Secado Drying Friamiento Cooling OEJDBEPS F FSSBEVSB B 1SVFCB F J PT IJME PDL ü VBOEP TF IB GJKBEP FM TFHVSP JOGBOUJM BQBSFDFSÈ FM JOEJDBEPS EF TFHVSP JOGBOUJM y se desactivarán todos los botones excepto el botón de Enendido Apagado On Off Esto previene que los niños cambien los ajustes mientras la secadora se encuentra en funcionamiento 3FDPSEBUPSJP F JNQJF JMUSP MF...

Page 68: ...ubicación adecuada Nivelación de la secadora Cómo conectar las secadoras eléctricas ventilación de la secadora Conexión del enchufe y la toma de tierra Conexión de secadoras a gas Prueba de funcionamiento Test de Instalación consulte la página 33 Pulse y mantenga 120V 240V INSTRUCCIONES PARA LA INSTALACIÓN ...

Page 69: ...ndrá en cuenta el peso combinado de un posible electrodoméstico acoplado t No se puede instalar ningún aparato de combustión en el mismo compartimento que la secadora t 4F EFCF EFKBS VO FTQBDJP BEJDJPOBM QBSB GBDJMJUBS MBT tareas de instalación y mantenimiento t BT TFQBSBDJPOFT BEJDJPOBMFT QVFEFO TFS OFDFTBSJBT para las molduras del techo el suelo o la pared t HVBMNFOUF TF EFCFO DPOTJEFSBS MBT TFQ...

Page 70: ...nte nivelada y sólida PMPRVF MB TFDBEPSB FO TV VCJDBDJØO GJOBM PMPRVF VO nivel sobre la parte superior de la secadora t BT QBUBT OJWFMBEPSBT EFCFSÈO BQPZBSTF GJSNFNFOUF FO el piso Empuje suavemente las esquinas superiores de la secadora para asegurarse de que su secadora no se mece de esquina a esquina Si está instalando la secadora sobre el accesorio de pedestal opcional deberá usar las patas niv...

Page 71: ...aciones aquí contenidas sirven para cambiar la dirección de apertura de una bisagra de lado derecho a lado izquierdo Si se ha invertido la puerta y debe volver a cambiarla de dirección tenga cuidado y siga estas instrucciones Se invertirán algunas de las ilustraciones y referencias derecha izquierda y deberá leer las instrucciones detenidamente WADVERTENCIA Asegúrese de apoyar el peso de la puerta...

Page 72: ...técnico para repararla EN LA PUERTA FWBOUF Z TFQBSF MB UBQB EF MB QVFSUB CCon la parte interior de puerta colocada boca arriba TPCSF VOB TVQFSGJDJF QSPUFHJEB TVFMUF MPT UPSOJMMPT del interior de la puerta Separe cuidadosamente la tapa de la puerta con la ayuda de un destornillador pequeño de punta plana insertado en la esquina superior marcado abajo con un círculo WADVERTENCIA Los bordes de la tap...

Page 73: ... instrucciones la puerta deberá ser una imagen de espejo de la ilustración Estructura interior de la puerta antes de cambiar la apertura bisagras en lado derecho botones de enclavamiento placa de bisagra inferior barra de bloqueo lateral barra de bloqueo superior Varillas de bloqueo internas Soporte de bisagra inferior Tapón de agujero Ensamble de bisagra inferior Botones de enclavamiento conjunto...

Page 74: ...o lateral del soporte de la bisagra inferior elevando el extremo superior de la barra y deslizándolo hacia la parte superior de la puerta El resorte debe permanecer colocado en la barra de bloqueo Deje la barra de bloqueo a un lado 3FUJSF MB CBSSB EF CMPRVFP TVQFSJPS a Deslice la barra de bloqueo a la derecha para retirarla del ensamble de la bisagra del lado izquierdo b Mientras desliza la barra ...

Page 75: ...rior izquierdo de la puerta 13 3FJOTUBMF MB CBSSB EF CMPRVFP TVQFSJPS Gire la barra de bloqueo superior retirada en el paso HSBEPT EF FYUSFNP B FYUSFNP EFTEF TV QPTJDJØO original y vuelva a instalarla El muelle quedara ahora a la derecha del centro con el muelle en el lado de la barra orientada hacia la parte superior de la puerta a Inserte el extremo derecho de la barra en el ensamble de la bisag...

Page 76: ...no superponerse en el punto de DPOUBDUP POTVMUF MPT QBTPT Si está dañado o si la puerta no funciona tras el montaje póngase en contacto con el centro de asistencia telefónica al Asegúrese de que la parte superior de la barra de bloqueo lateral quede junto a la barra de bloqueo superior y que no se superponga una con otra para que ambas puedan interactuar correctamente Si no se alinean correctament...

Page 77: ...ilación lateral en los modelos a gas Apriete el conducto adaptador en la carcasa del ventilador y asegure la base de la secadora como se indica Parte trasera Conducto de escape Tornillo de seguridad Dispositivo de expulsión Abrazadera Conducto adaptador POFDUF VO DPEP EF QVMHBEBT DN B MB TJHVJFOUF TFDDJØO EF DPOEVDUP EF QVMHBEBT cm y asegure todas las conexiones con cinta adhesiva impermeable Aseg...

Page 78: ...EF FTDBQF EFCFSÈ NBOUFOFSTF MP NÈT DPSUP QPTJCMF TFHÞSFTF EF MJNQJBS DVBMRVJFS UJQP EF DPOEVDUP BOUJHVP BOUFT EF JOTUBMBS TV TFDBEPSB OVFWB Si no se siguen estas instrucciones se podrá producir incendio o muerte t 4F SFDPNJFOEBO DPOEVDUPT SÓHJEPT P TFNJSÓHJEPT QBSB VTBS FOUSF MB TFDBEPSB Z MB QBSFE O JOTUBMBDJPOFT QBSUJDVMBSFT DVBOEP FT JNQPTJCMF SFBMJ BS VOB DPOFYJØO TJHVJFOEP MBT SFDPNFOEBDJPOFT...

Page 79: ...T EF DPEP RVF sea posible t M FYUSFNP NBDIP EF DBEB TFDDJØO EFM DPOEVDUP EF escape deberá apuntar hacia afuera de la secadora t 6TF DJOUB BEIFTJWB JNQFSNFBCMF FO UPEBT MBT conexiones de conducto t ÓTMF FM TJTUFNB EF DPOEVDUP RVF TF UJFOEF B USBWÏT de áreas sin calefacción para reducir la condensación y acumulación de pelusa en las superficies del conducto t PT TJTUFNBT EF FTDBQF JODPSSFDUPT P JOBE...

Page 80: ...BHVB B MB válvula de entrada de la secadora firmemente a mano Z EFTQVÏT BQSJFUF EF PUSBT WVFMUBT DPO VO BMJDBUF Asegúrese que la mangueras no están retorcidas y que no están aplastadas CSB FM HSJGP EF BHVB GSÓB 5 Compruebe si hay fugas en el conector Y si se utiliza y todas las mangueras NOTA t 4J TF FODVFOUSB BMHVOB GVHB DJFSSF FM HSJGP EFM BHVB retire la manguera y compruebe el estado de la mang...

Page 81: ...r una explosión incendio o muerte t 3FRVJTJUPT EF MB MÓOFB EF TVNJOJTUSP 4V DVBSUP EF MBWBEP EFCF UFOFS VOB MÓOFB SÓHJEB EF TVNJOJTUSP EF HBT QBSB MB TFDBEPSB O MPT 66 TF EFCF JOTUBMBS VOB WÈMWVMB EF DPSUF NBOVBM JOEJWJEVBM B VOB EJTUBODJB EF QPS MP NFOPT QJFT N EF MB TFDBEPSB EF BDVFSEP DPO FM ØEJHP BDJPOBM EF BT PNCVTUJCMF 4 4F EFCF JOTUBMBS VO UBQØO EF UVCFSÓB EF QVMHBEBT 15 Si no se cumple con...

Page 82: ...odrá producir una explosión incendio o muerte t BT TFDBEPSBT EF HBT WFOUJMBS IBDJB FM FYUFSJPS Si no se cumple con esto se podrá producir una explosión incendio o muerte Conexión del suministro de gas TFHÞSFTF EF RVF FM TVNJOJTUSP EF HBT BM DVBSUP EF lavado se encuentre APAGADO Confirme que el tipo de gas disponible en su cuarto de lavado sea el adecuado para la secadora La secadora está lista par...

Page 83: ...F TVGJDJFOUF EPUBDJØO EF DBCMFBEP EF NBOFSB EF QPEFS NPWFS MB TFDBEPSB EF TV VCJDBDJØO OPSNBM DVBOEP TFB OFDFTBSJP Si no se cumple con esto se podrá producir una explosión incendio o muerte t 0 TF QSPWFF MB DPOFYJØO FO FTQJSBM EFM DBCMF FMÏDUSJDP FOUSF MB DBKB EF QBSFE Z FM CMPRVF UFSNJOBM EF MB TFDBEPSB DPO MB NJTNB M UJQP EF DPOFYJØO FO FTQJSBM Z FM DBMJCSF EFM BMBNCSF EFCFO TFHVJS MPT DØEJHPT M...

Page 84: ...B DVCJFSUB EF BDDFTP BM CMPRVF UFSNJOBM localizado en la parte superior trasera de la secadora Instale un protector de tensión listado por UL en el orificio de pase del cable eléctrico luego pase un cable eléctrico conductor de cobre Núm 8 EF QPS MP NFOPT IJMPT 7 MJTUBEP por UL por el protector de tensión t OTUBMF VO DBCMF FMÏDUSJDP EF 7 MJTUBEP QPS 6 DPO VO DPOEVDUPS EF DPCSF ÞN 8 como mínimo y t...

Page 85: ...les de MPT DBCMFT FO GPSNB EF HBODIP 2VJUF MB DVCJFSUB EF BDDFTP BM CMPRVF UFSNJOBM localizado en la parte superior trasera de la secadora Instale un protector de tensión listado por UL en el orificio de pase del cable eléctrico luego pase el cable FMÏDUSJDP GBCSJDBEP FO FM 1BTP QPS FM QSPUFDUPS EF tensión Alambre de conexión a tierra 5 DN DN Cómo conectar las secadoras eléctricas cont SÓLO EE UU ...

Page 86: ...6 2VJUF MB DVCJFSUB EF BDDFTP BM CMPRVF UFSNJOBM localizado en la parte superior trasera de la secadora Instale un protector de tensión listado por UL en el orificio de pase del cable eléctrico luego pase un cable eléctrico conductor de cobre Núm 8 EF QPS MP NFOPT IJMPT 7 MJTUBEP por UL por el protector de tensión t OTUBMF VO DBCMF FMÏDUSJDP EF 7 MJTUBEP QPS 6 DPO VO DPOEVDUPS EF DPCSF ÞN 8 DPNP N...

Page 87: ...TQFHVF QVMH DN EFM BJTMBNJFOUP EFDBEB BMBNCSF BHB MPT GJOBMFT EF MPT DBCMFT FO forma de gancho 2VJUF MB DVCJFSUB EF BDDFTP BM CMPRVF UFSNJOBM localizado en la parte superior trasera de la secadora Instale un protector de tensión listado por UL en el orificio de pase del cable eléctrico luego pase el cable FMÏDUSJDP GBCSJDBEP FO FM 1BTP QPS FM QSPUFDUPS EF tensión t OTUBMF VO DBCMF FMÏDUSJDP MJTUBE...

Page 88: ...le de DPOTUSVDDJØO TFB EF QPS MP NFOPT QVMHBEBT DN y que cuando se ventile la secadora al exterior se pueda instalar la secadora dejando un espacio libre de QVMHBEB DN B MPT MBEPT Z MB QBSUF USBTFSB EF MB secadora t 5FOHB FO DVFOUB RVF MPT NBUFSJBMFT EF WFOUJMBDJØO no se proveen con la secadora Debe obtener los materiales de ventilación necesarios para una instalación adecuada Revisión de instalac...

Page 89: ...después de unos momentos Test de Instalación Verificación del Conducto Una vez haya instalado la secadora haga este test para asegurarse de que las condiciones del sistema de evacuación son las adecuadas para el funcionamiento correcto de la secadora Este test tiene como objetivo mostrarle si existe algún problema importante en el sistema de evacuación de su vivienda t TUB TFDBEPSB DVFOUB DPO FM T...

Page 90: ...ples formaciones de torceduras o codos Conducto demasiado largo o muy torcido Tubería demasiado larga o con demasiados codos Controle los bloqueos y la acumulación de pelusa Asegúrese que la tubería no posea cortes ni restricciones Tubería estrangulada o bloqueada Acumulación de pelusa o bloqueo NOTA Cuando recién se instala la secadora debe realizarse esta prueba para alertarlo sobre cualquier cl...

Page 91: ... NPEJGJDBEPSFT EF DJDMP UBM Z DPNP TF NVFTUSB FO MB QÈHJOB BT PQDJPOFT EF ciclo pueden añadirse utilizando los botones de opción tal y como se muestra FO MB QÈHJOB 4 JO FM JDMP Al finalizar el ciclo si lo tiene ajustado oirá un aviso sonoro Retire inmediatamente sus prendas de la secadora para reducir las arrugas Si tiene TFMFDDJPOBEB MB GVODJØO VJEBEP F SSVHBT 8SJOLMF BSF MB TFDBEPSB volteará bre...

Page 92: ...éstico siga las precauciones básicas incluyendo lo siguiente t 3FWJTF UPEPT MPT CPMTJMMPT QBSB BTFHVSBSTF EF RVF FTUÏO WBDÓPT PT BSUÓDVMPT DPNP DMJQT GØTGPSPT QMVNBT NPOFEBT Z MMBWFT QVFEFO EB BS TV TFDBEPSB P TVT QSFOEBT PT PCKFUPT JOGMBNBCMFT UBMFT DPNP FODFOEFEPSFT P GØTGPSPT QPESÓBO FODFOEFSTF Z QSPWPDBS VO JODFOEJP Si no se cumple con esto se podrá producir una explosión incendio o muerte t V...

Page 93: ...adora Ésta actúa como un conducto para ayudarle a colocar la ropa en el tambor y evitar que las prendas caigan al suelo También resulta de utilidad para la descarga de algunas prendas pequeñas y evita que el resto de la colada caiga al suelo Para abrir la puerta de tipo cesto presione y suelte en el centro del hueco de la manivela ubicada en la parte superior de la puerta y tire de la puerta hacia...

Page 94: ...evar plástico o goma Apagado Sin Calor Regulable Ciclos de secado con sensor sensor dry Los ciclos de secado con sensor utilizan el sistema exclusivo de sensor doble de LG para detectar y comparar el nivel de humedad en las prendas y en el aire y programar el tiempo de secado del modo necesario para asegurar resultados superiores La secadora ajusta automáticamente el nivel de sequedad y temperatur...

Page 95: ...Esto permite el cuidado preciso de sus telas y prendas Apriete el boton Control DelTemperatura Temp Control varias veces para navegar por los ajustes disponibles SECADODETIEMPO TimeDry F QFSNJUF TFMFDDJPOBS FM UJFNQP EF TFDBEP NBOVBMNFOUF EF B NJOVUPT FO JODSFNFOUPT EF NJOVUPT 6TF FTUB PQDJPO FO DBSHBT pequenas o para eliminar arrugas Use los botones de MásTiempo MenosTiempo More Time Less Time pa...

Page 96: ...P 1BVTB 4UBSU 1BVTF QBSB JOJDJBS el ciclo Funciones especiales cont DE AHORRO DE ENERGÍA ENERGY SAVER Esta opción le permite reducir el consumo de energía en el ciclo Normal dependiendo del tamaño de la carga El tiempo de secado cambiará cuando se seleccione el ahorro de energía DRUM LIGHT ILUMINACIÓN DEL TAMBOR El tambor está equipado con una luz LED azul que se ilumina cuando la secador es encen...

Page 97: ...ue el tiempo del ciclo presionando el botón Más Tiempo More Time o Menos Tiempo Less Time La pantalla muestra la cantidad de prendas recomendadas QPS FKFNQMP Ø TurboSteam ayuda a prevenir el sobresecado de la ropa inyectando vapor durante el proceso de secado La función Steam Shield extiende la vida útil de las prendas Para agregar vapor a un ciclo estándar ODJFOEB MB TFDBEPSB Z HJSF MB QFSJMMB TF...

Page 98: ...DJDMPT EF WBQPS Si no se cumple con esto se podrá producir una explosión incendio quemaduras o muerte t P MMFOF FM BMJNFOUBEPS EF WBQPS DPO HBTPMJOB TPMWFOUFT QBSB MJNQJF B FO TFDP V PUSBT TVTUBODJBT JOGMBNBCMFT P FYQMPTJWBT Si no se cumple con esto se podrá producir una explosión incendio quemaduras o muerte t P UPRVF MB CPRVJMMB EF WBQPS EFM UBNCPS EVSBOUF P EFTQVÏT EFM DJDMP EF WBQPS Si no se c...

Page 99: ...UFMÏGPOP OP TPQPSUB Pulse en la aplicación LG Smart Laundry DW para acceder a una guía más detallada sobre el uso de la función Tag On Tag On B GVODJØO 5BH 0O MF QFSNJUF VUJMJ BS DØNPEBNFOUF las funciones LG Smart Diagnosis Descarga de ciclos Estadísticas de lavado y Ajuste de ciclo Tag On para comunicarse con su aparato desde su propio smartphone Para utilizar las funciones Tag On FTDBSHVF MB BQM...

Page 100: ...cos de los ciclos utilizados más recientemente Las imágenes solo sirven como referencia La aplicación LG Smart Laundry DW real puede ser diferente Utilizar Tag On con Aplicaciónes Toque el logotipo Tag On del dispositivo LG con su teléfono inteligente equipado con NFC para utilizar las aplicaciones LG Smart Laundry DW Diagnóstico inteligente LG descarga de ciclos estadísticas de lavado y set de ci...

Page 101: ...tados EFM EJBHOØTUJDP JOUFMJHFOUF 4FMFDDJPOF VO QBÓT Z QVMTF DFQUBS DFQUF MPT UÏSNJOPT Z DPOEJDJPOFT EF MB QPMÓUJDB EF VTP Z QSJWBDJEBE QVMTBOEP i DFQUP w OUSPEV DB FO FM DBNQP QBSB FMMP EJTQVFTUP TV OÞNFSP EF UFMÏGPOP 6UJMJDF FTUF OÞNFSP EF UFMÏGPOP DVBOEP IBCMF DPO FM SFQSFTFOUBOUF EFM TFSWJDJP BM DMJFOUF EF QBSB RVF FMMPT QVFEBO FODPOUSBS MPT EBUPT EFM EJBHOØTUJDP JOUFMJHFOUF 1VMTF FM CPUØO MBN...

Page 102: ...LG Smart Laundry DW real puede ser diferente Descarga del Ciclo Tag On El ciclo está disponible en la posición de ciclo Descargado Downloaded del panel de control hasta que se descarga otro ciclo OTUBMF MB BQMJDBDJØO 4NBSU BVOESZ 8 FO VO TNBSUQIPOF FRVJQBEP DPO OTUBMF MB BQMJDBDJØO EFTEF FM 1MBZ Z FKFDÞUFMB 4FMFDDJPOF 5BH 0O B GJDIB EF JOJDJP Z UPEPT MPT iconos de la parte inferior de la pantalla ...

Page 103: ...la lavadora 4J OP FT SFDPOPDJEP UPRVF en el ángulo superior derecho de la pantalla Tag On de la aplicación LG Smart Laundry DW para ver una guía detallada Esto puede ocurrir debido a las diferentes posiciones de la antena NFC para cada teléfono El estado de DETECCIÓN DE CAUDAL BSRVF QPS GBWPS FM FTUBEP EF 5 6 FO MB QBOUBMMB EF TUBEÓTUJDBT EF MBWBEP 4J FM FTUBEP NVFTUSB RVF el sistema de salida de ...

Page 104: ...ontrol de la secadora 4J OP FT SFDPOPDJEP UPRVF en el ángulo superior derecho de la pantalla Tag On de la aplicación LG Smart Laundry DW para ver una guía detallada Esto puede ocurrir debido a las diferentes posiciones de la antena NFC para cada teléfono PNQSVFCF TJ TF IB JOJDJBEP el secado con el ciclo seleccionado QBSFDF MB QBOUBMMB RVF TF muestra a continuación y el secado comienza inmediatamen...

Page 105: ...W para ver una guía detallada Esto puede ocurrir debido a las diferentes posiciones de la antena NFC para cada teléfono 4FMFDDJPOF VOB DBUFHPSÓB EF TFDBEP TFHÞO FM QSPCMFNB FO FM RVF EFTFB RVF TF DFOUSF MB NÈRVJOB 5SBT TFMFDDJPOBS VOB DBUFHPSÓB BQBSFDFSÈ VOB MJTUB EF DJDMPT FTQFDÓGJDPT 4FMFDDJPOF FM DJDMP TFHÞO sus necesidades VBOEP BQBSF DB VOB QBOUBMMB 5BH 0O WFS B MB EFSFDIB QPOHB FM TNBSUQIPOF...

Page 106: ...e limpiadores abrasivos ni de lana metálica pueden raspar o dañar la superficie Limpieza alrededor y debajo de la secadora Aspire la pelusa y polvo alrededor de la secadora y debajo de ella con regularidad Se debe revisar que el sistema de conductos de ventilación no tenga acumulación de pelusa y se debe limpiar una vez por año Si se percibe una reducción del flujo de aire o desempeño del secado n...

Page 107: ...de que las ropas queden completamente limpias de acuerdo con las instrucciones de su lavadora y detergente La pantalla muestra los FSSPSFT U P U t P FTUÈ GVODJPOBOEP FM DBMFGBDUPS t QBHVF MB TFDBEPSB Z MMBNF B NBOUFOJNJFOUP Pelusa en las prendas t P TF IB MJNQJBEP DPSSFDUBNFOUF FM filtro de pelusa t 1SFOEBT EF MBWBEP OP DMBTJGJDBEBT adecuadamente t YDFTP EF FTUÈUJDB FO MBT QSFOEBT t B TFDBEPSB FTU...

Page 108: ...BNCJF FM GVTJCMF P BVNFOUF MB capacidad del fusible Si el problema se debe a una sobrecarga de circuito pida a un electricista calificado que solucione el problema t JWJEB MBT DBSHBT HSBOEFT FO DBSHBT NÈT QFRVF BT QBSB SFBMJ BS el secado t 4J FTUÈ TFDBOEP VOB DBSHB NVZ QFRVF B B BEB BMHVOPT BSUÓDVMPT adicionales para asegurar una acción de giro apropiada Las prendas están arrugadas t BT QSFOEBT TF...

Page 109: ...FT EF comenzar la opcíon Reducción estática Reduce Static Gotea agua de la puerta durante el ciclo de vapor t TUP FT OPSNBM t PSNBMNFOUF TF GPSNB DPOEFOTBDJØO FO FM JOUFSJPS EF la puerta de la secadora durante el funcionamiento de vapor Puede gotear la condensación desde el fondo de la puerta No se ve vapor durante el ciclo de vapor t TUP FT OPSNBM t T EJGÓDJM WFS FM WBQPS DPO MB QVFSUB DFSSBEB Si...

Page 110: ...BTJ atascado o lleno t 1BVTF FM DJDMP EF TFDBEP Z MJNQJF FM GJMUSP EF QFMVTB La luz de Flow SenseTM esta encendida durante el ciclo de secado t B UVCFSÓB FT EFNBTJBEP larga o posee muchos giros restricciones t MPRVFP TJHOJGJDBUJWP EF MB tubería por acumulación de pelusa o escombros t M FMFDUSPEPNÏTUJDP IB detectado una obstrucción en la ventilación externa de la secadora t OTUBMF VO DPOEVDUP NÈT D...

Page 111: ...agnosis a través del Centro de atención telefónica MBNF BM FOUSP EF BUFODJØO UFMFGØOJDB EF MFDUSPOJDT BM UFMÏGPOP 66 BOBEÈ VBOEP TF MP JOEJRVF FM BHFOUF EFM FOUSP EF atención telefónica mantenga el micrófono de su teléfono sobre el logotipo Smart Diagnosis del equipo Sostenga el teléfono a no más de una QVMHBEB P DN QFSP TJO UPDBS FM FRVJQP Pulse y mantenga pulsado el botón de Control De La Temper...

Page 112: ...JEPT FO la Guía de funcionamiento accidente insectos incendio inundación instalación inadecuada casos de fuerza NBZPS NPEJöDBDJØO P BMUFSBDJØO OP BVUPSJ BEB DPSSJFOUF P WPMUBKF JODPSSFDUPT P VTP DPNFSDJBM P VTP EJGFSFOUF BM indicado El costo de reparación o reemplazo bajo estas circunstancias excluidas será responsabilidad del cliente Á 304 5304 03 5 1 3 0 5 5 3 530 4 103 033 0 G Customer Informat...

Page 113: ...57 ESPAÑOL ...

Page 114: ...58 ...

Page 115: ...59 ESPAÑOL ...

Page 116: ...1 800 243 0000 USA 1 888 542 2623 CANADA LG Customer Information Center Register your product Online www lg com ...

Reviews: