background image

30

Using the Product as an Audio System

Connecting via Bluetooth

You can play music files stored on a 

Bluetooth

 device, or run music apps to enjoy the music with this product.

Please check the following first.

• 

Bluetooth

 devices to be connected to the product should meet the following specifications.


- Version: 4.0 or higher


- Codec: SBC, AAC

• 

Steps to connect the device to the product may vary depending on the 

Bluetooth

 device type and 

model. For more information on how to connect the device, please refer to your external device’s user 
manual.

Select the [

Bluetooth

] from your smartphone's 

Settings

 menu. 

Settings menu items may vary depending on your smartphone manufacturer and model.
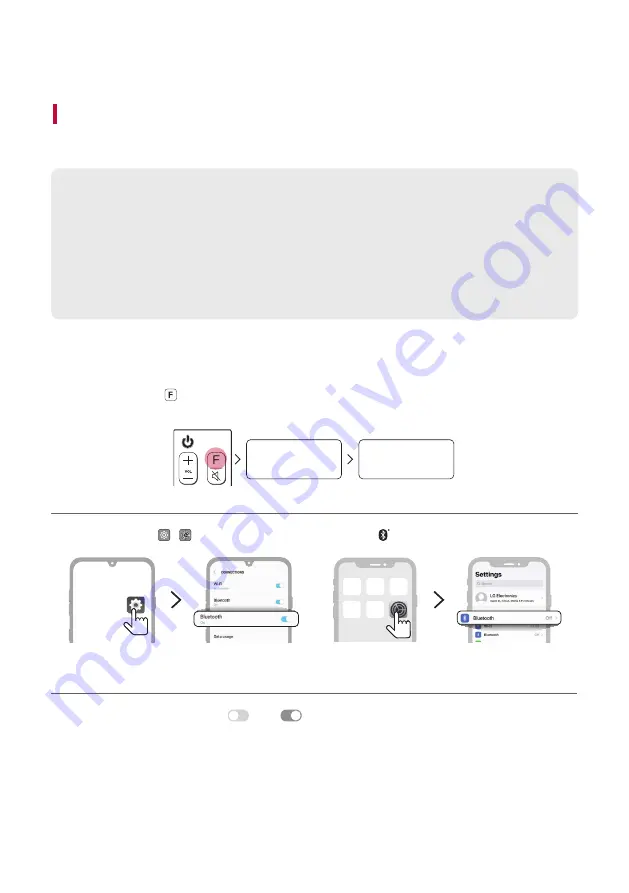
Turn on the product.

Press the 

Function

   button repeatedly and select “

BT

” from the status display. After a moment, “

READY

” 

appears on the status display.

BT

READY

Tap the 

Settings

 (  /  ) button on your smartphone and select   

Bluetooth

.

<Android Phone>

<iPhone>

Turn on the 

Bluetooth

 function. (


Off

 > 


On

)

Using the Product as an Audio System

Summary of Contents for DG1

Page 1: ...AL WIRELESS SOUND BAR Please read this manual carefully before operating your set and retain it for future reference Model DG1 DG1 SPN5 W 2104_Rev01 www lg com Copyright 2021 LG Electronics Inc All Rights Reserved ...

Page 2: ...cable HDMI OUT b D E C C c c c OPTICAL IN HDMI OUT TV eARC ARC HDMI IN a a HDMI IN ARC HDMI IN OPTICAL OUT B A A Sound bar B Remote Control Receiver Status Display C Rear Speakers Wireless Receiver Sold separately SPK8 S D Wireless Subwoofer Install it close to the sound bar E External Device Blu ray player game console etc ...

Page 3: ...until OPT HDMI ARC appears on the status display B On your TV s settings set the output speaker to HDMI ARC Optical or External Speaker C When the TV is properly connected to the product OPT ARC or E ARC will appear on the status display with a sound f Connecting the product to your smartphone via Bluetooth See Connecting via Bluetooth on page 30 A Tap the Settings button on your smartphone and se...

Page 4: ...he following order A Press the Power button on the sound bar to turn it off B Press the PAIRING Pairing button on the back of the disconnected wireless subwoofer or wireless receiver Check if each LED blinks green If you still see a red LED on the back of the wireless subwoofer press and hold the button on the back of the subwoofer again C Press the Power button on the sound bar to turn it on D Wh...

Page 5: ...ternal Device 27 Connecting with an HDMI Cable 29 Connecting with an Optical Cable Using the Product as an Audio System 30 Connecting via Bluetooth 34 Connecting with a Smartphone via LG Sound Bar app 36 Connecting to a USB Storage Device Mounting the Product to a Wall 40 Mounting the Product to a Wall Safety Precautions 47 Safety and Regulatory Before Reporting Product Malfunction 50 Troubleshoot...

Page 6: ...the wireless subwoofer b Plug the power cable connected to the wireless subwoofer into an outlet c Plug the power cable into the AC adapter d Connect the AC adapter cable to the DC IN AC adapter input terminal on the back of the product e Plug the power cable connected to the AC adapter into an outlet f When the connection is automatically established you will see the LED on the back of the wirele...

Page 7: ...ubwoofer You can check the connection status by looking at the LED on the back of the wireless subwoofer LED Colour Status Blinking green Connecting in progress Green Connected successfully Red Bad connection or the subwoofer is in standby Off Power cable not connected ...

Page 8: ...e back of the subwoofer again c Press the Power button on the sound bar to turn it on d When the connection is established you will see the LED light on the back of the wireless subwoofer light up in green Note Install the sound bar as close to the wireless subwoofer as possible The closer the distance between the sound bar and the wireless subwoofer the better the sound quality Please ensure ther...

Page 9: ...rear speakers left right to the wireless receiver Receiver Terminal Colour Speaker Position Blue L Left rear Grey R Right rear c Plug the wireless receiver power cable into an outlet d Press the Power button on the sound bar to turn it on e When the connection is automatically established you will see the LED on the front of the wireless receiver light up in green Note Please only use the speakers...

Page 10: ...ollowing order a Press the Power button on the sound bar to turn it off b Press the PAIRING button on the back of the wireless receiver Check if the LED on the front of the wireless receiver is blinking green c Press the Power button on the sound bar to turn it on d When the connection is established you will see the LED light on the front of the wireless receiver light up in green Note Keep the r...

Page 11: ...ational standards Attaching the ferrite core to the speaker cables Attach the ferrite core to the cables to reduce radio noise a Pull Part a to open the ferrite core b Wind the wireless receiver s speaker cables twice around the ferrite core c Close the ferrite core until you hear a click ...

Page 12: ...nels in the originally recorded content For example if you listen to music recorded in 2 0 channels with standard sound effects while the wireless rear speakers are connected you can hear the following difference When the surround sound is off When the surround sound is on Note Speaker positions are as follows A Front speakers B Centre speaker C Subwoofer D Rear speakers ...

Page 13: ...s scrolling on the status display press the Sound Tuning button once again The status display will change to ON SURROUND and the function turns on OFF SURROUND ON SURROUND c If you wish to turn off surround sound press and hold the Sound Tuning button for 3 seconds When you see ON SURROUND scrolling in the status display press the Sound Tuning button once again ON SURROUND OFF SURROUND ...

Page 14: ...annels 5 1 channels 7 1 channels or more BASS BLAST BASS BLAST Sound with reinforced bass 2 0 channels 5 1 channels 7 1 channels or more STANDARD You can enjoy optimised sound 2 0 channels 5 1 channels 7 1 channels or more MOVIE Cinematic 3D sound 2 0 channels 5 1 channels 7 1 channels or more MUSIC Dynamic sound similar to a concert hall 2 0 channels 5 1 channels 7 1 channels or more ...

Page 15: ...ess the button repeatedly to select the desired function or input mode Status Display Description OPT HDMI ARC Connects the product to a TV that supports an optical cable ARC E ARC or LG Sound Sync BT Connects the product via Bluetooth LG TV Connects the product to a TV that supports LG Sound Sync Wireless HDMI Connects the product to an HDMI input port USB Connects the product to a USB storage de...

Page 16: ...ug in an optical cable to connect the TV to the product c HDMI IN Plug in an HDMI cable to connect an external device to the product d HDMI OUT TV eARC ARC Plug in an HDMI cable to connect the TV to the product e USB port Plug in a USB storage device to play music with the product ...

Page 17: ...r on the back of the remote control B Insert the batteries with the and ends corresponding to the markings C Close the battery cover Risk of fire or explosion if the battery is replaced by an incorrect type a Power Turns the product on off b Volume Adjusts the sound volume c Skip Search If you play a previous song press button If you play a next song press button While playing a file on a USB stor...

Page 18: ...n this case even though you press Sound Effect this product does not respond And you can see only NOT SUPPORTED on the display window When this product detects DTS stream in MOVIE mode it plays stream using DTS Virtual X Technology TV remote It allows you to control the volume of this product by your TV remote control even by other company s product To turn on or off the TV Remote function press a...

Page 19: ...ptical LG TV or Bluetooth To turn on or off AUTO POWER function press and hold Information for about 3 seconds and press it again See Using Auto Power on page 21 j Repeat Press multiple times to select the play mode when listening to music on a USB storage device Status Display Description OFF Plays the files in order then ends playback ONE Plays the current file repeatedly FOLDER Only plays the f...

Page 20: ...de and you can see ON TV REMOTE ON TV REMOTE b If you wish to turn off this function press and hold the Sound Effect button for 3 seconds When ON TV REMOTE scrolls across the status display press the Sound Effect button once again ON TV REMOTE OFF TV REMOTE Note Press the Settings button on the TV remote control to check if the TV s audio output is set to External Speaker You cannot control the pr...

Page 21: ... the Auto Power function a Press and hold the Information button for 3 seconds The product enters the setting mode and you can see OFF AUTO POWER OFF AUTO POWER b While OFF AUTO POWER scrolls across the status display press the Information button once again ON AUTO POWER will appear when the function is activated OFF AUTO POWER ON AUTO POWER How to disconnect the wireless network connection or the...

Page 22: ...o to the product by connecting it to the TV with an optical cable You can add a variety of 3D effects to the original audio to fill the room with a deep rich sound Watching TV after connecting with an optical cable a If the digital cable terminal has a cover first remove the covers from both ends b Using an optical cable connect the OPTICAL IN terminal on the back of the product to the Optical Dig...

Page 23: ... an LG TV You can adjust the volume with the LG TV remote control if the TV is connected to the product with an optical cable You can only do so on a TV that supports the LG TV Sound Sync function Check your TV s user manual to see if your TV is supported Functions controllable with an LG TV remote control Volume mute on off Note When the TV is properly connected to the product LGOPT will appear o...

Page 24: ...he output speaker to LG Sound Sync Wireless c When the product is connected to the TV via LG Sound Sync Wireless you can see the status display change from PAIRED LG TV Connected Ready to use Note When using the product with an LG TV remote control the volume and mute status set on the TV will automatically be applied to the product You can still use the product s remote control even after connect...

Page 25: ...s the Settings button on the TV remote control to enter the Speaker menu and set the output speaker to HDMI ARC Settings and menu items may vary depending on the TV manufacturer d When the TV is properly connected to the product ARC will appear on the status display Note E ARC supports high quality audio such as DTS HD Master Audio DTS X Dolby TrueHD and Dolby Atmos If you wish to use Dolby Atmos ...

Page 26: ...able with a SIMPLINK compatible LG TV remote control Power on off volume control mute on off etc For more information on how to set up SIMPLINK consult your LG TV s user manual Note The SIMPLINK function may not work properly depending on the status of the product or other connected devices HDMI CEC features by TV manufacturer LG SIMPLINK Sony BRAVIA Sync Link Philips EasyLink Samsung Anynet etc ...

Page 27: ...to the product with an HDMI cable for a deep magnificent sound Connecting an external device via HDMI a Connect an external device such as a DVD or Blu ray player Following the picture below connect the HDMI OUT terminal of the device to the HDMI IN terminal on the back of the product b Using the HDMI cable connect the HDMI OUT TV eARC ARC terminal on the back of the product to the HDMI IN ARC ter...

Page 28: ...ports 3 1 channels When the wireless rear speakers are connected 5 1 channels are supported Please check the audio output settings in the Settings menu of your external device ex Blu ray player or TV The audio output should be set to No encoding Bitstream Auto or Pass through For more information on how to set the output please refer to your external device s user manual Use a certified cable with...

Page 29: ...se the optical cable to connect the OPTICAL IN terminal on the back of the product to the OPTICAL OUT terminal of your external device ex TV Blu ray player as shown in the picture OPTICAL OUT b Press the Function button repeatedly until OPT HDMI ARC appears on the status display OPT HDMI ARC c When the external device is properly connected to the product OPT will appear on the status display ...

Page 30: ... vary depending on the Bluetooth device type and model For more information on how to connect the device please refer to your external device s user manual Select the Bluetooth from your smartphone s Settings menu Settings menu items may vary depending on your smartphone manufacturer and model a Turn on the product b Press the Function button repeatedly and select BT from the status display After ...

Page 31: ... name Ready to use g If you cannot find the product LG DG1 XX tap the Refresh button at the top right of the screen on the Android smartphone or turn the Bluetooth off and turn it on again on iPhone Bluetooth LG DG1 XX Bluetooth devices LG Smart Phone On AVAILABLE DEVICES Android Phone iPhone h Run a Music app and listen to music on the smartphone Note XX is the last 2 digits of the MAC address of...

Page 32: ...support your Android or iOS operating system you will not be able to control the Bluetooth device with the remote control of the product Note Once the connection has been established between the product and the Bluetooth device you will only need to press the Function button of the product while the device s Bluetooth function is turned on Select BT to re establish the connection automatically If ...

Page 33: ...scrolls across the status display press the Play Pause button once again ON BT LOCK will appear when the function is activated OFF BT LOCK ON BT LOCK c If you wish to turn off the this function Press and hold Play Pause button for about 3 seconds in BT Bluetooth function When ON BT LOCK scrolls across the status display press the Play Pause button once again ON BT LOCK OFF BT LOCK Note Even if you...

Page 34: ...ns listed below Android OS Version 5 0 or higher Installing the app Install the LG Sound Bar app on your smartphone To install the LG Sound Bar app you can scan the QR code with a QR code scan app or download on Google Play Downloading with a QR code a Scan the QR code below with a QR code scan app b You will be directed to a page where you can download the LG Sound Bar app Tap the app to install ...

Page 35: ...o the Google play on your smartphone and search for the LG Sound Bar app to install it Android Phone Note Settings menu items may vary depending on the smartphone manufacturer and OS Google Android and Google Play are trademarks of Google LLC ...

Page 36: ...equires a separate device drive to be installed USB b Press the Function button repeatedly until USB appears on the status display USB c When the product is properly connected to a USB storage device the number of music files in the USB device will appear on the status display Press the Play Pause button on the remote control to enjoy the music Note USB devices with a large storage volume may take...

Page 37: ...2 kHz 48 kHz 56 kbps 128 kbps OGG 32 kHz 48 kHz 64 kbps 500 kbps File extension Sampling frequency FLAC 16 bit 24 bit 32 kHz 44 1 kHz 48 kHz 88 2 kHz 96 kHz 176 4 kHz 192 kHz WAV 16 bit 24 bit 32 kHz 44 1 kHz 48 kHz 88 2 kHz 96 kHz 176 4 kHz 192 kHz Number of playable files Up to 2 000 Maximum number of directories Up to 200 This product cannot play files protected by DRM Digital Rights Management...

Page 38: ...ommanded Installation of this product on other surfaces Wood Stud dry wall plywood bricks etc is not recommanded Improper installation may result in the product falling Install the product only on a vertical wall Do not install on a tilted wall that exceeds building standards or on the heavily titled wall or ceiling LG is not responsible for problems caused by improper installation of the product ...

Page 39: ...39 Components for mounting the product Sound bar Wall bracket Wall bracket installation guide Bracket screws Wall plugs Wall bracket extension Options for only 55 inch TVs top top ...

Page 40: ... wall bracket installation guide with the bottom of the TV and attach it to the wall Align the centre of the wall mounted TV with the part marked TV Center in the installation guide c With a pen mark screw holes on the installation guide where the wall brackets will be attached d Drill screw holes in the marked positions on the installation guide e Remove the wall bracket installation guide from t...

Page 41: ...p Note The wall bracket extension components are just optional For a 65 inch TV there is no need to use the extension g Insert the fixing hook on the back of the product and the hole in the wall mount so that it fits well h Fix the hooks of the unit on the brackets as shown below ...

Page 42: ...nchor locations with a drill bit of Ø 6 mm to a depth of 40 mm to 45 mm b Clean the drilled holes c Insert the enclosed anchors for fixing the wall mount into the holes Use a hammer when inserting anchors d Push the wall mount support closely toward the wall to match the hole locations ...

Page 43: ...eep it in a convenient place for future reference Ask a professional installer appointed by the store for installation of the product Installation by someone other than a professional installer is extremely dangerous and may result in personal injury Do not install the product in an unstable site that cannot withstand its weight If the installation site lacks sufficient rigidity the product may fa...

Page 44: ...in ways other than specified in the installation manual may result in an unstable installation and potential safety issues Do not wipe the product with a wet towel or use any heating equipment or humidifier under the place where the product is installed Liquid water or vapor may enter the product and excessive heat may cause fire electric shock or malfunction Do not install the product near a fire...

Page 45: ...45 Installing the stand Fix the hooks of the unit on the stands as shown below Note When installing the sound bar with a stand install it so that it does not cover the TV s remote sensor or screen ...

Page 46: ...46 Organising cables You can organise the cable with cable ties Note After all connections are completed you can arrange cables as needed ...

Page 47: ... Electrical swatter This product may malfunction due to electrical shock No naked flame sources such as lighted candles should be placed on the apparatus Do not block any ventilation openings Install in accordance with the manufacturer s instructions Slots and openings in the cabinet are provided for ventilation and to ensure reliable operation of the product and to protect it from over heating Th...

Page 48: ...e power cord from physical or mechanical abuse such as being twisted kinked pinched closed in a door or walked upon Pay particular attention to plugs wall outlets and the point where the cord exits the device For models using an adapter Only use the AC adapter supplied with this device Do not use a power supply from another device or another manufacturer Using any other power cable or power supply...

Page 49: ...le in the case of some lithium battery types disposal of a battery into fire or a hot oven or mechanically crushing or cutting of a battery that can result in an explosion leaving a battery in an extremely high temperature surrounding environment that can result in an explosion or the leakage of flammable liquid or gas and a battery subjected to extremely low air pressure that may result in an exp...

Page 50: ...e button to unmute Is the correct product function selected according to the external device connected Press the Function button to check if you selected the correct function The subwoofer does not produce sound Is the product properly connected to the wireless subwoofer If the LED on the back of the wireless subwoofer is blinking green or lit in red it means it is not connected If the connection ...

Page 51: ...mode is not On Turn OFF Night time mode The product fails to recognise a USB storage device The product may not support the file format of the USB storage device Format the USB storage device and reconnect it When formatting refer to the USB storage device formats supported by the product and select an appropriate file format See Connecting to a USB Storage Device on page 36 A Bluetooth device can...

Page 52: ...uct When the Bluetooth device is too far from the product Bluetooth may be disconnected or malfunctions may occur Install the Bluetooth device 1 m away from devices that use the same frequency as the product such as wireless routers medical equipment and microwave ovens Turning off the Demo Mode Issue Solution The remote control does not work Does the text on the status display remain unchanged ev...

Page 53: ...ply USB 5 V 0 500 mA Available Digital Input Audio Sampling Frequency 32 kHz 44 1 kHz 48 kHz 88 2 kHz 96 kHz 176 4 kHz 192 kHz Available Digital Input Audio format Dolby Atmos Dolby Audio DTS X DTS HD PCM Input Output OPTICAL IN 3 0 V p p optical audio connection terminal 1 HDMI IN 19 pin Type A HDMI connection terminal 1 HDMI OUT TV eARC ARC 19 pin Type A HDMI connection terminal 1 4K resolution ...

Page 54: ...less Receiver SPK8 S SPK8 S S78S1 S Sold Separately Wireless Receiver Power Requirement Refer to the main label on the wireless receiver Power Consumption Refer to the main label on the wireless receiver Rear power 70 W RMS x 2 3 Ω at 1 kHz THD 10 Dimensions W x H x D Approx 60 0 mm 220 0 mm 175 0 mm Rear Speakers Type 1 way 1 speaker Impedance 3 Ω Rated power 70 W RMS Max power 140 W RMS Dimensio...

Page 55: ... X logo are registered trademarks or trademarks of DTS Inc in the United States and other countries 2020 DTS Inc ALL RIGHTS RESERVED For DTS patents see http patents dts com Manufactured under license from DTS Licensing Limited DTS the Symbol DTS and the Symbol together Virtual X and the DTS Virtual X logo are registered trademarks or trademarks of DTS Inc in the United States and or other countri...

Page 56: ...duct This offer is valid to anyone in receipt of this information Handling the Product When shipping the Product Please save the original shipping carton and packing materials If you need to ship the product for maximum protection re pack the product as it was originally packed at the factory Keeping the exterior surfaces clean Do not use volatile liquids such as insecticide spray near the product...

Page 57: ......

Reviews: