background image

15

ENG

ENGLISH

CUSTOMIZING SETTINGS

COLOR 

1

  To display the OSD 

MENU

, press the 

MENU 

button 

at the bottom of the monitor.

2

  In the OSD menu, go to the "

NEXT MENU" 

menu.

3

  Press the 

 button to select 

COLOR

 menu.

4

  Press the 

▼ button

 to go to the 

COLOR

 settings. 

5


Press the ◄

 , 

 , or 

 button to change settings.

6

  Select

 EXIT 

to leave the


OSD


menu

.

To return to the upper menu or set other menu items, 
use the up arrow ( ) button.   

Each option is explained below.
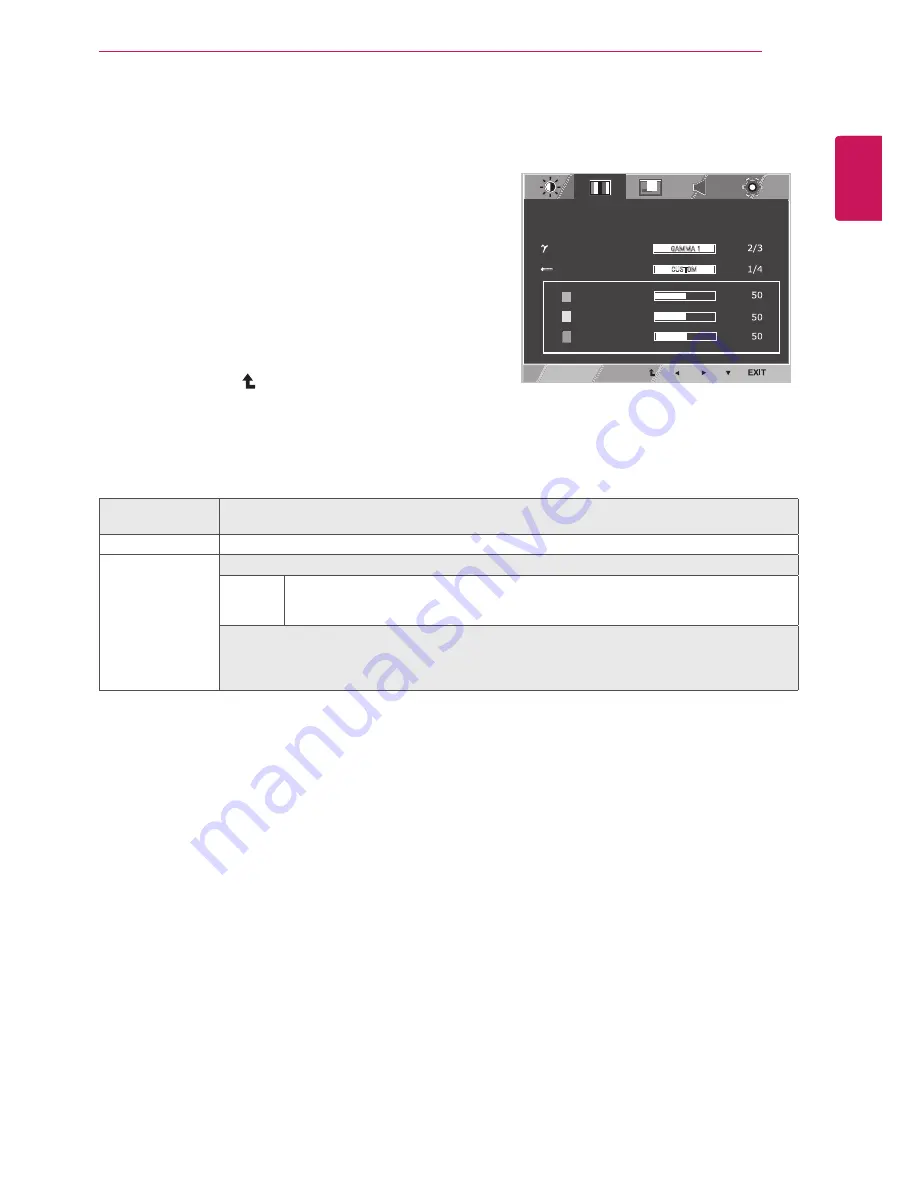
MENU > NEXT 

MENU > COLOR

Description

GAMMA

GAMMA Setting: higher gamma settings mean a brighter image is displayed or vice versa.

COLOR TEMP

CUSTOM
•RED

•GREEN

•BLUE


y

You can customize the picture color using Red, Green, and Blue colors.

Selects a factory default picture color.

WARM: 

Sets the screen color to a red tone.

MEDIUM: 

Sets the screen color between the red and blue tone. 

COOL: 

Sets the screen color to a blue tone.

MENU

BRIGHTNESS

WIDE/ORIGINAL

WIDE

RESET

CONTRAST

NO

NEXT MENU

+%11%

,36->328%0

:)68-'%0

'03'/

:3091)

4,%7)

'30368)14

6)(

+6))2

&09)

1)29"2)<81)29"'3036

1)29"2)<81)29"(-740%=

1)29"2)<81)29":3091)

1)29"2)<81)29"38,)67

+%11%

'97831

0%2+9%+)

43;)6-2(-'%836

;,-8)&%0%2')

)2+0-7,

32

23

7,%642)77

&0%'/0):)0

,-+,

3**

2361%0

1)29"2)<81)29"4-'896)

3:)67'%2

6)74327)8-1)

SUPER ENERGY SAVING IS 

ACTIVE
YOU SAVED 0.00 TREES
POWER REDUCTION:

ON

OFF

RESET

CO2 REDUCTION:

Summary of Contents for D2343P

Page 1: ...www lg com OWNER S MANUAL CINEMA 3D MONITOR DX2343 DX2743 D2343P D2743P Please read the safety information carefully before using the product List of Cinema 3D Monitor Models ENGLISH ...

Page 2: ... connection 10 DVI D connection 10 HDMI connection 12 CUSTOMIZING SETTINGS 13 CUSTOMIZING SETTINGS 13 MENU Settings 14 PICTURE 15 COLOR 16 DISPLAY 16 VOLUME 17 OTHERS 17 SETTINGS 18 FUNC Settings 18 3D SETTINGS 19 Dual Play 실행하기 20 PICUTRE MODE 21 SUPER RESOLUTION 22 SUPER ENERGY SAVING 23 TROUBLESHOOTING 25 TROUBLESHOOTING WHEN USING 3D MODE 26 SPECIFICATIONS 28 Preset Mode 28 HDMI video 3D timin...

Page 3: ... will not cover damage or injury caused by the use of counterfeit components y y Note that the components may look different from those shown here y y Without prior notice all information and specifications in this manual are subject to change to im prove the performance of the product CAUTION NOTE Power Cord Owner s Manual CD Cards D Sub Signal Cable DVI D Signal Cable This feature is not availab...

Page 4: ...4 ENG ENGLISH ASSEMBLING AND PREPARING Component and Button Description Power Indicator y y On Power is on y y Off Power is off Monitor Setting Buttons See p 12 Input Connectors See p 10 Power Button ...

Page 5: ... a soft cloth CAUTION Attach the stand body to the monitor Attach the stand base Tighten the screw to the right using a coin Attach the stand body to the monitor Fix the stand body to the monitor using two screws Attach the stand base Tighten the screw to the right using a coin 2 DX2343 D2343P DX2743 D2743P 1 Stand Body Stand Base Stand Body Stand Body Stand Base 2 3 1 2 3 4 ...

Page 6: ...mponents appearing in the illustra tions may look different from the actual prod uct y y Do not carry the monitor upside down as this may cause it to fall off its stand resulting in damage or injury CAUTION Detaching the stand base 1 Place the monitor face down To protect the screen from scratches cover the surface with a soft cloth Stand Body Stand Body Stand Base Stand Body Stand Body Stand Body...

Page 7: ... 10 cm away from the wall to ensure sufficient ventilation 2 Connect the power cord to the wall outlet 3 Turn on the monitor by pressing the power button on the bottom switch panel 10 cm 10 cm 10 cm 10 cm Unplug the power cord before moving or install ing the monitor There is risk of electric shock CAUTION Using the cable holder Cable Holder or ...

Page 8: ...y lock is optional You can obtain additional accessories from most electronics stores NOTE To avoid injury to the fingers when adjusting the screen do not hold the lower part of the monitor s frame as illustrated below Be careful not to touch or press the screen area when adjusting the angle of the monitor WARNING The angle of the screen can be adjusted forwards or backwards from 5 to 20 for a com...

Page 9: ...ngth 10 mm y y 787 4 mm 31 0 inch or longer Use the wall mount plate and screws conform ing to the VESA standard y y Unplug the power cord before moving or in stalling the monitor to avoid electric shocks y y Installing the monitor on the ceiling or on a slanted wall may result in the monitor falling off which could lead to injury y y Use an authorized LG wall mount and con tact a local dealer or ...

Page 10: ...cable as illustrated below y y There may be compatibility issues if an HDMI signal is used in the PC environment y y Apple Adapter An Apple adapter is required to use the monitor with an Apple computer The adapt er can be purchased at an Apple store NOTE DVI D connection Transmits the digital video signal from your PC to the Monitor set Connect the PC and the monitor with the DVI cable as shown in...

Page 11: ...ach signal to provide an optimal screen display only available for analog signals y y AUTO The Auto Image Adjustment option allows you to improve the picture quality if the screen is dimmed if the text appears blurred or too wide if the screen flickers or if the display area is not centered after adjusting the resolution Only available for analog signals y y Connect the input sig nal cable and tur...

Page 12: ...the screen will be unlocked The 2D 3D hot key is used to move to the 3D Settings menu Recognizes the input image automatically and displays 3D images without having the 3D mode on manually Activates menus to select and adjust various functions AUTO Adjusts the monitor setting for optimum viewing only available for analog signals Optimal Resolution 1920 x 1080 INPUT EXIT Allows you to select the in...

Page 13: ...t y y Digital DVI D Digital signal input y y HDMI HDMI Digital signal input Menu Analog Digital HDMI Description BRIGHTNESS O O O Adjusts the brightness and contrast of the screen CONTRAST O O O WIDE ORIGINAL O O O WIDE Displays the video in wide screen regardless of the video signal input ORIGINAL Displays a video according to the input video signal aspect ratio y y This function is available onl...

Page 14: ... HDMI y y Offset As a reference for a video signal this is the darkest color the monitor can display OVER SCAN Adjusts the displayed picture size in HDMI DTV timing only for HDMI If the monitor is con nected to an AV device it is recommended that you enable the OVER SCAN function RESPONSE TIME You can set a response time for displayed pictures based on the speed of the screen For a normal environm...

Page 15: ...ription GAMMA GAMMA Setting higher gamma settings mean a brighter image is displayed or vice versa COLOR TEMP CUSTOM RED GREEN BLUE y y You can customize the picture color using Red Green and Blue colors Selects a factory default picture color WARM Sets the screen color to a red tone MEDIUM Sets the screen color between the red and blue tone COOL Sets the screen color to a blue tone MENU BRIGHTNES...

Page 16: ...the key 6 Select EXIT to leave the OSD menu To return to the upper menu or set other menu items use the up arrow button Each option is explained below MENU NEXT MENU DIS PLAY Description HORIZONTAL Moves the picture to the left right VERTICAL Moves the picture up down CLOCK Minimizes the vertical lines in the background The horizontal size of a picture can also be adjust ed PHASE Adjusts the pictu...

Page 17: ...rrespond to that of the standard signal therefore providing optimal display Use this function when there are black and white colors on the screen 3091 1 29 2 8 1 29 3091 1 29 2 8 1 29 38 67 0 2 9 43 6 2 836 8 0 2 2 0 7 32 23 y y The white balance function is only available for analog input SETTINGS 1 To watch 3D press the button at the bottom of the monitor 2 To start 3D setting press the button t...

Page 18: ... processed for viewing in 3D 3D COLOR EF FECT The colors suitable for 3D picture are applied 3D 2D Converts 3D images into 2D images 3D L R CHANGE The L R picture is switched Select a screen with better 3D display quality R L The right output of the 3D image is displayed before the left L R The left output of the 3D image is displayed before the right 3036 8 48 0 6 2 32 92 7 88 2 7 92 4 896 13 92 ...

Page 19: ...y written on the Dual Play glasses NOTE y y What is Dual Play mode When playing a 1 1 battle game with a game console such as Playstation XBox and Wii users used to play the game with the screen divided top and bottom or side by side With Dual Play mode each player can enjoy the game with a full screen y y To play in Dual Play mode the Dual Play glasses type A and B are required y y The Dual Play ...

Page 20: ...screen can be optimized for more vivid visual effects STANDARD The screen can be optimized to display normal picture quality CINEMA The screen can be optimized to improve the visual effect of a video 3036 8 48 0 6 2 32 92 7 88 2 7 92 4 896 13 92 4 896 13 92 794 6 6 73098 32 92 794 6 2 6 7 2 13 498 32 0 77 7 2 2 328 28 8 7 6 3112 83 8 6 396 7 6 8 6 36 39 4 6 2 2 2 77 13 36 136 31 368 0 46 77 Ȝ 9883...

Page 21: ...ooth and natural images It is effective for slow moving pictures or still images MEDIUM The optimized picture quality is displayed when a user wants images between low and high modes for comfortable viewing It is effective for UCC or SD video HIGH Optimized picture quality is displayed when a user wants crystal clear images It is effective for high quality video or game Each option is explained be...

Page 22: ...e or button to change settings 3 Select EXIT to leave the OSD menu FUNC SUPER ENER GY SAVING Description ON The SUPER ENERGY SAVING function is used to save energy to the maximum extent while using the monitor When the SUPER ENERGY SAVING function is turned on you can save as much energy as Super Energy Saving efficiency allows OFF Disables the SUPER ENERGY SAVING function RESET Resets the values ...

Page 23: ...OCKED message is displayed Is the OSD LOCKED message displayed when the MENU button is pressed y y The OSD lock feature is enabled to prevent undesired modification of the OSD settings Press and hold the MENU button for a couple of seconds to unlock the OSD The OSD UNLOCKED message will be displayed The screen retains an image Does image sticking occur even when the monitor is turned off y y Displ...

Page 24: ...the manufacturer of the computer or video card for assistance NOTE The display color is abnormal Does the display color appear dis colored 16 color y y Set the color to 24 bit true color or higher In Windows go to Control Panel Display Settings Color Quality Does the display color appear un stable or in monochrome y y Check if the signal cable is connected properly Re connect the cable or re inser...

Page 25: ...ngle or 3D viewing distance the images may appear overlapped or may not be displayed properly in 3D DX2743 D2743P y y The optimal vertical viewing angle for this monitor is within 12 and the optimal horizontal angle is within 130 The optimal viewing distance for 3D is between 55 cm and 500 cm from the monitor When you view 3D images outside the optimal viewing angle or 3D viewing distance the imag...

Page 26: ...HDMI Power Rated Voltage 19 V ____ A Power Consumption 2D 3D On Mode 26 W Typ Power Saving Mode 0 5 W Off Mode 0 5 W On Mode 28 W Typ Power Saving Mode 0 5 W Off Mode 0 5 W AC DC Adaptor Manufactured by Lien Chang Electronic Enterprise Co Ltd LCAP26A E Type Output 19 V 1 7 A Dimension Weight Monitor Size Width x Height x Depth With stand 54 4 cm x 40 6 cm x 18 1 cm Without Stand 54 4 cm x 33 2 cm ...

Page 27: ...igital HDMI Power Rated Voltage 19 V ____ A Power Consumption 2D 3D On Mode 28 W Typ Power Saving Mode 0 5 W Off Mode 0 5 W On Mode 29 W Typ Power Saving Mode 0 5 W Off Mode 0 5 W AC DC Adaptor Manufactured by Lien Chang Electronic Enterprise Co Ltd LCAP26A E Type Output 19 V 1 7 A Dimension Weight Monitor Size Width x Height x Depth With stand 64 1 cm x 45 9 cm x 20 3 cm Without Stand 64 2 cm x 3...

Page 28: ...nded Mode HDMI video 3D timing Resolution Play Rate 3D Format 1920x1080p 59 94 Hz 50 Hz Top Bottom Side by Side half 1280x720p 59 94 Hz 50 Hz Frame Packing Top Bottom Side by Side half 1920x1080i 59 94 Hz 50 Hz Side by Side half 1920x1080p 24 Hz 30 Hz Frame Packing Top Bottom Side by Side half Preset Mode HDMI PC mode not supported y y To play 3D videos in HDMI 3D Frame Packing HDMI 3D Side by Sid...

Page 29: ...Frequency kHz Vertical Frequency Hz Remark 576P 31 25 50 720P 37 5 50 720P 45 60 1080i 28 12 50 1080i 33 75 60 1080P 56 25 50 1080P 67 5 60 Recommended Mode POWER INDICATOR Mode LED Color On Mode Red Power Saving Mode Blinking Red Off Mode Off HDMI timing ...

Page 30: ... dizziness If you feel sleepy tired or sick stop watching 3D video for a longer period of time If you watch 3D images too closely for a long period of time this may cause blurred vision If you watch 3D images for a long time you may feel dizzy or experience eye fatigue If you are pregnant a senior drunk have heart problems or easily feel motion sickness we rec ommend that you do not watch 3D image...

Page 31: ...lly in front of you Adjust your distance from the monitor to allow you to view images from the optimal distance L Adjust the position of the screen to minimize reflec tions DX2343 DX2743 CAUTION WHEN WATCHING 3D VIDEO y y Wear the 3D glasses provided with the monitor y y Watch in a proper position y y Watch in the optimal viewing distance L and optimal viewing angle D Viewing 3D images too closely...

Page 32: ...d that this product meets the ENERGY STAR guidelines for energy efficiency Make sure to read the Safety Precautions be fore using the product Keep the Owner s Manual CD in an accessible place for future reference The model and serial number of the SET is located on the back and one side of the SET Record it below should you ever need service MODEL SERIAL ...

Reviews: