E-7
Installing the Drive
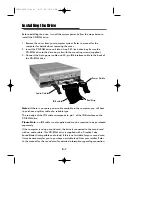
Before installing the drive, turn off the system power. Follow the steps below to
install the CD-ROM drive:
1. Remove the cover from your computer system. Refer to manual for the
computer for details about removing the cover.
2. Insert the CD-ROM drive unit into a free 5.25-inch drive bay. Secure the
CD-ROM drive to the drive bay rails with the mounting screws (supplied).
3. Connect the 4-pin power cable and 40-pin IDE interface cable to the back of
the CD-ROM drive.
Notes:
If there is no spare power cable available in the computer, you will have
to purchase a splitter cable of a suitable type.
The red edge of the IDE cable corresponds to pin 1 of the IDE interface on the
CD-ROM drive.
Please Note
: an IDE cable is not supplied and may be required to be purchased
separately.
If the computer is using a sound card, the drive is connected to the sound card
with an audio cable. This CD-ROM drive is supplied with a Creative Labs
SoundBlaster© compatible audio lead, if this is not suitable for your sound card,
it maybe necessary for you to purchase a suitable lead from your retailer. Refer
to the manual for the sound card for detailed information regarding connection.
DIGITAL
ANALOG
INTERFACE
POWER
D
R
C S M
S L A
G L
G
39
1
+5
+12
GND
40
2
AUDIO
AUDIO
Audio Cable
Red Strip
Power Cable
IDE cable
CRD-8480B/C-eng* 8/13/99 10:54 AM Page 7


