background image

Operating

16

Oper

ating

3

Selecting a folder

1. Press 

PRESET/FOLDER 

W

/

S

 on the remote 

control repeatedly until a desired folder appears.

2. Press 

d/M

 on the remote control or


T

 on the 

unit to play it. The first file of folder will be played. 


(During playback, if you selecting a folder you 
want, this step is not necessary.)


y

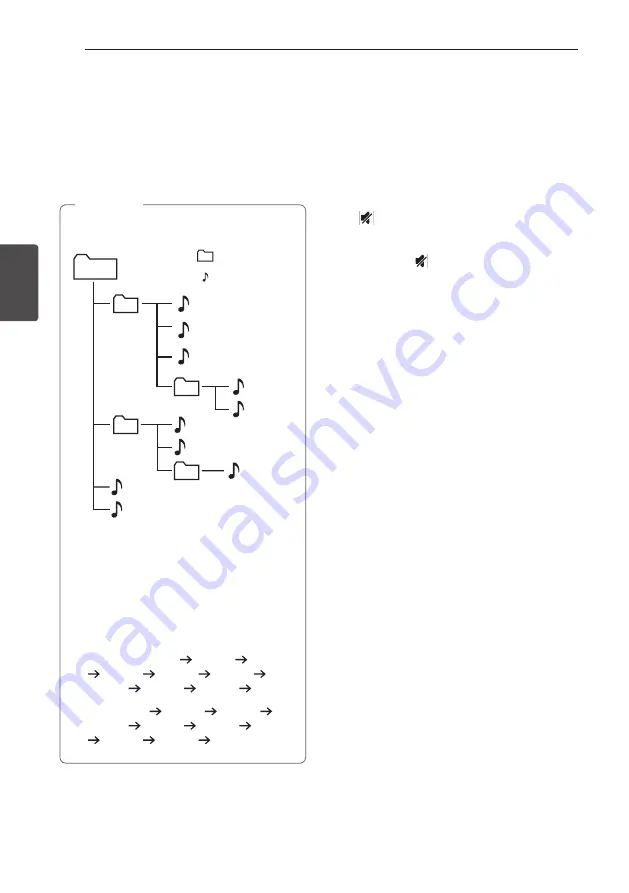
USB/CD Folders/Files are recognized as 
below

*ROOT

File_01

File

Directory

File_02

File_03

File_04

File_05

File_06

File_07

File_08

File_09

File_10


y

Files and folders will be presented in order 
recorded and may be presented differently 
according to the record circumstances.


y

*ROOT : the first screen you can see when a 
computer recognize the USB is “ROOT”


y

Folders will be presented as the following 
order; 

FAT(USB) : FILE_01 

 FILE_02   FILE_03 

 FILE_04   FILE_05   FILE_06   

FILE_07   FILE_08   FILE_09   FILE_10 

CD : FILE_01 

 FILE_02   FILE_03   

FILE_04   FILE_05   FILE_08   FILE_09 

 FILE_06   FILE_07   FILE_10


,

Note

Displaying file information  

(ID3 TAG)

While playing an MP3 file containing file information, 
you can display the information by pressing 

INFO

 on 

the remote control.

Turn off the sound temporarily

Press 

 on the remote control to mute your sound. 

You can mute your unit, for example, to answer the 
telephone, the “

q

” will blink in the display window. 

To cancel it, press   again or change the volume 

level.

Summary of Contents for CM1560DAB

Page 1: ...Fi Audio Please read this manual carefully before operating your set and retain it for future reference MODEL CM1560DAB CM1560DAB CMS1560F www lg com Copyright 2019 LG Electronics Inc All Rights Reserved 1908_Rev01 MFL71379809 ...

Page 2: ... built in installation such as a bookcase or rack unless proper ventilation is provided or the manufacturer s instruction has been adhered to CAUTION This product employs a Laser System To ensure proper use of this product please read this owner s manual carefully and retain it for future reference Shall the unit require maintenance contact an authorized service center Use of controls adjustments ...

Page 3: ...s CAUTION Do not use high voltage products around this product ex Electrical swatter This product may malfunction due to electrical shock CAUTION No naked flame sources such as lighted candles should be placed on the apparatus Symbols Refers to alternating current AC 0 Refers to direct current DC Refers to class II equipment 1 Refers to stand by Refers to ON power Refers to dangerous voltage ...

Page 4: ... 14 CD USB Operations 15 Other Operations 15 Programmed Playback 15 Deleting Programmed list 16 Selecting a folder 16 Displaying file information ID3 TAG 16 Turn off the sound temporarily 17 Sleep Timer Setting 17 Dimmer 17 DEMO 17 Auto power down 18 AUTO POWER On 18 Auto function change 19 Sound adjustment 20 Using a BLUETOOTH wireless technology 20 Listening to music stored on the BLUETOOTH devi...

Page 5: ...Table of Contents 5 1 2 3 4 5 4 Troubleshooting 24 Troubleshooting 5 Appendix 25 Main unit 26 Speakers 27 Maintenance 27 Handling the Unit 27 Notes on Discs 28 Trademarks and Licenses ...

Page 6: ...Getting Started 6 Getting Started 1 Unique Features BLUETOOTH Listens to music stored on your Bluetooth device ...

Page 7: ...t system for Windows Vista Compatible USB Devices y y MP3 Player Flash type MP3 player y y USB Flash Drive Devices that support USB2 0 or USB1 1 y y The USB function of this unit does not support all USB devices USB device requirement y y Devices which require additional program installation when you have connected it to a computer are not supported y y Do not extract the USB device while in opera...

Page 8: ... ON or OFF SLEEP Sets the system to turn off automatically at a specified time VOL Volume Adjusts speaker volume F Function Selects the function and input source Mute Mutes the sound PRESET FOLDER W S Searches for a folder of MP3 WMA files When a CD USB containing MP3 WMA files in several folders is being played press PRESET FOLDER W S to select the folder you want to play Chooses a preset number ...

Page 9: ...y or randomly INFO Sees information about your music An MP3 file often comes with ID3 tag The tag gives the Title Artist Album or Time information c TUNING Selects the radio stations Scans DAB stations by pressing and holding C V Skip Search Skips fast backward or forward Searches for a section within a track file d M Play Pause Starts or pauses playback Selects STEREO MONO RDS RDS Radio Data Syst...

Page 10: ...s to the previous next track file TUNING Selects the radio stations Scans DAB stations by pressing and holding T Play Pause Starts or pauses playback Selects Stereo Mono I Stop Stops playback b R Open Uses it when inserting or removing a CD c Display window d Volume Knob Adjusts volume of speaker e USB Plays the audio files by connecting the USB device f PORT Portable IN Connects to a Portable dev...

Page 11: ...Getting Started 11 Getting Started 1 Rear Panel R 6 Ω L 6 Ω b a c a DAB FM ANTENNA b SPEAKERS L R terminals c POWER IN ...

Page 12: ...d minus and the other end to the terminals marked plus y y Make sure children do not put their hands or any objects into the speaker duct Speaker duct A hole for plentiful bass sound on speaker cabinet enclosure y y Use the speaker supplied with this unit only Using any other speaker may cause malfunction y y The speakers contain magnet parts so color irregularity may occur on the TV screen or PC ...

Page 13: ...one or line out of portable device MP3 or PMP etc to the PORT IN connector Portable cable MP3 player etc Listening to music from your portable player or external device The unit can be used to play the music from many types of portable player or external device 1 Connect the portable player to the PORT IN connector of the unit 2 Turn the power on by pressing 1 on the remote control or 1 on the uni...

Page 14: ...k file In stop status Press C V on the remote control or Y U on the unit to go to the next previous track file During playback press V on the remote control or U on the unit to go to the next track file Playing less than 3 seconds press C on the remote control or Y on the unit to go to the previous track file Playing after 3 seconds press C on the remote control or Y on the unit to go to the begin...

Page 15: ... unit to play the programmed music tracks files 6 To clear your selection press Z on the remote control or I on the unit When making or modifying the programmed list REPEAT mode is off Note Deleting Programmed list Deleting function only works in the edit mode 1 Press PROGRAM MEMORY on the remote control in stop status 2 Select a song by pressing PROGRAM MEMORY or PRESET FOLDER W S on the remote c...

Page 16: ...fferently according to the record circumstances y y ROOT the first screen you can see when a computer recognize the USB is ROOT y y Folders will be presented as the following order FAT USB FILE_01 FILE_02 FILE_03 FILE_04 FILE_05 FILE_06 FILE_07 FILE_08 FILE_09 FILE_10 CD FILE_01 FILE_02 FILE_03 FILE_04 FILE_05 FILE_08 FILE_09 FILE_06 FILE_07 FILE_10 Note Displaying file information ID3 TAG While p...

Page 17: ...el it press DIMMER again DEMO In the power on state adjust the volume level of the main unit to minimum and then press and hold F on the unit for about 7 seconds To cancel the DEMO function press and hold the F on the unit for about 7 seconds Auto power down This unit will turn itself off to save electricity in the case were the main unit is not connected to an external device and is not used for ...

Page 18: ... turning off the unit y y If you have already paired with this unit automatically this unit can turn on by an input source when this unit is turned off y y If you turn off the unit by pressing the power button for more than 5 seconds Auto Power On function is disabled To activate it turn on the unit y y To use this function the main unit must be registered in paired devices list of Bluetooth devic...

Page 19: ...astic atmosphere to the sound giving you the feeling you are at an actual rock pop jazz or classic concert BASS Reinforces the treble bass and surround sound effect STANDARD You can enjoy optimized sound AUTO EQ Sets the sound equalizer on the mode that is the most similar to the genre which is included in the MP3 ID3 tag of song files y y On some speakers sound may not be heard or heard in low so...

Page 20: ...ur unit and BLUETOOTH device Before you start the pairing procedure make sure the Bluetooth feature is activated on your Bluetooth device Refer to your Bluetooth device s user guide Once a pairing operation is performed it does not need to be performed again 1 Turn on the unit 2 Operate the Bluetooth device and perform the pairing operation When searching for this unit with the Bluetooth device a ...

Page 21: ...luetooth device with this unit y y Depending on the type of the device you may not be able to use the Bluetooth function y y You can enjoy wireless system using phone MP3 Notebook etc y y The more distance between the unit and the Bluetooth device the lower the sound quality becomes y y Bluetooth connection will be disconnected when the unit is turned off or the Bluetooth device gets far from the ...

Page 22: ...the unit This will change the tuner from stereo to mono and usually improve the reception Presetting the Radio Stations You can preset 50 stations for FM DAB Before tuning make sure to turn down the volume 1 Press F on the remote control or on the unit until FM DAB appears in the display window 2 FM Select the desired frequency by pressing TUNING on the remote control or Y U on the unit DAB Select...

Page 23: ...ferred programmed type Press and hold TUNING on the remote control The tuner will search automatically When a station is found the search will stop Listening to the DAB You can change the display information of the currently broadcasting DAB channel Press DAB MODE on the remote control repeatedly the display changes in the following order SERVICE PTY NAME FREQ DLS ENSEMBLE The initials of the serv...

Page 24: ...ly The unit does not start playback y y An unplayable disc is inserted Insert a playable disc y y No disc is inserted Insert a disc y y The disc is dirty Clean the disc Refer to page 27 y y The disc is inserted upside down Place the disc with the label or printed side facing upwards Radio stations cannot be tuned in properly y y The antenna is positioned poorly Reorient the antenna position to goo...

Page 25: ...mm x 210 mm Operating temperature 5 C to 35 C Operating humidity 5 to 90 Inputs Portable in PORT IN 0 6 Vrms 3 5 mm stereo jack x 1 Tuner FM Tuning Range 87 5 to 108 0 MHz or 87 50 to 108 00 MHz DAB Tuning Range 174 92 to 239 20 MHz Amplifier RMS Output power Total 10 W Front 5 W x 2 6 Ω at 1 kHz 10 THD System Frequency response 80 to 20 000 Hz Signal to noise ratio 80 dB Dynamic range 75 dB Bus P...

Page 26: ...dix 5 Speakers Front Type 1 Way 1 Speaker Impedance 6 Ω Rated Input Power 5 W Max Input Power 10 W Dimensions W x H x D Approx 132 mm x 181 mm x 140 mm y y Design and specifications are subject to change without notice ...

Page 27: ...t cloth lightly moistened with a mild detergent solution Do not use strong solvents such as alcohol benzine or thinner as these might damage the surface of the unit Maintaining the Unit The unit is a high tech precision device If the optical pick up lens and disc drive parts are dirty or worn the picture quality could be diminished For details please contact your nearest authorized service center ...

Page 28: ... and Licenses The Bluetooth word mark and logos are registered trademarks owned by the Bluetooth SIG Inc and any use of such marks by LG Electronics is under license Other trademarks and trade names are those of their respective owners ...

Page 29: ......

Reviews: