background image

5

PrECAuCIONEs dE sEgurIdAd

Español

y

y

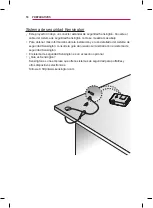
Para evitar daños en la lámpara, apague 

la unidad y déjela enchufada durante 3 

minutos hasta que el aparato se enfríe.

 PRECAUCIÓN

y

y

Sujete el enchufe firmemente cuando lo 

desconecte. 

-  Un hilo roto del cable podría producir 

un incendio.

y

y

Asegúrese de que el cable o el enchufe 

no están dañados, modificados, 

doblados, retorcidos, estirados en 

exceso ni calientes. No utilice el producto 

si la toma de alimentación está floja. 

-  Esto podría provocar incendios o 

descargas eléctricas.

y

y

Coloque el cable apartado de los 

dispositivos de calefacción. 

-  El revestimiento del cable podría 

derretirse y provocar incendios o 

descargas eléctricas.

y

y

Coloque el proyector en lugares donde 

no se pueda tropezar con él ni pisarse 

el cable o enchufe para evitar que se 

dañen. 

-  Podría producirse un incendio o una 

descarga eléctrica.

y

y

No encienda ni apague el proyector 

enchufándolo o desenchufándolo de la 

toma de pared.  

(No utilice el enchufe como interruptor). 

-  Podría producirse una descarga 

eléctrica o provocar una avería del 

producto.

y

y

No inserte un conductor en el otro lado 

de la toma de pared mientras el enchufe 

está insertado en la toma.  

Además, no toque el enchufe justo 

después de desconectarlo de la toma de 

pared. 

- Podría producirse una descarga 

eléctrica.

y

y

Utilice solo cables de alimentación 

proporcionados por LG Electronics. No 

utilice cables de otros fabricantes. 

- Esto podría provocar incendios o 

descargas eléctricas.

Durante el uso

 ADVERTENCIA

y

y

No coloque ningún recipiente con 

líquidos sobre el proyector como 

jarrones, macetas, tazas, cosméticos, 

medicinas, adornos, velas, etc. 

-  En caso de caída, pueden 

producirse incendios, descargas 

eléctricas o lesiones.

y

y

Si el proyector se golpea fuertemente 

o la carcasa se daña, apáguelo, 

desenchúfelo y póngase en contacto 

con un centro de servicio autorizado. 

-  En caso contrario, podría producirse 

un incendio o una descarga eléctrica.

y

y

No inserte piezas de metal como 

monedas, horquillas o restos 

metálicos, ni materiales inflamables, 

como papel o cerillas, en el proyector. 

-  Podría producirse un incendio o una 

descarga eléctrica.

y

y

Si en el proyector entra líquido 

o un objeto extraño, apáguelo, 

desenchúfelo y póngase en contacto 

con el centro de servicio de LG 

Electronics. 

- En caso contrario, podría producirse 

un incendio o una descarga eléctrica. 

y

y

Cuando cambie las baterías usadas 

del mando a distancia por otras 

nuevas, asegúrese de que los 

niños no las ingieren. Mantenga las 

baterías fuera del alcance de los 

niños. 

-  En caso de que un niño ingiera 

alguna batería, consulte con un 

médico inmediatamente.

y

y

No abra nunca las tapas del 

proyector. Existe un alto riesgo de 

descarga eléctrica.

y

y

Nunca mire directamente a la lente 

cuando el proyector está encendido. 

La luz fuerte podría dañarle los ojos.

y

y

Cuando la lámpara esté encendida o 

Summary of Contents for BG630

Page 1: ...m Cd in ink Printed in Russia Printed in China Printed in China Printed in Thailand Printed in Vietnam Printed in Poland Eng Ger Fre Ita Spa 5 148 mm x 210 mm A5 1 Color Black 1 Color Black Coated Snow white paper 150 g Uncoated wood free paper 80 g Perfect binding 200 3 Origin Notification Printed in Mexico Printed in Egypt Printed in India Printed in Indonesia 3 Stock Paper Cover Printed in Mexi...

Page 2: ...Front Back EN P No 2 39 Front Back FR 2 39 Front Back GE 2 39 Front Back IT 2 39 Front Back SP 2 39 Pagination sheet 1306 REV00 Revision number Total pages 200 pages Part number MFL67840301 ...

Page 3: ...Owner s Manual LCD PROJECTOR BG630 BG650 Please read the safety information carefully before using the product www lg com P NO MFL67840301 1306 REV00 ...

Page 4: ...hand WARNING CAUTION RISK OF ELECTRIC SHOCK DO NOT OPEN WARNING CAUTION RISK OF ELECTRIC SHOCK DO NOT OPEN The lightning flash with arrowhead symbol within an equilateral triangle is intended to alert the user to the presence of uninsulated dangerous voltage within the product s enclosure that may be of sufficient magni tude to constitute a risk of electric shock to persons WARNING CAUTION RISK OF...

Page 5: ...ise and cause fire y y Do not place the product close to sources of steam or oil such as a humidifier or kitchen counter This may cause fire or electric shock y y Do not place the product where it might be exposed to dust This may cause fire y y Do not use the product in a damp place such as a bathroom or a place exposed to the wind and rain where it is likely to get wet This may cause fire or ele...

Page 6: ...nants around power plug pins or wall outlets Failure to do so may cause fire y y To turn off the main power remove the power plug which should be positioned so it is easy to access for operation y y To prevent damage to lamp unit must remain plugged in for approximately 3 minutes after power down to allow for proper cooldown CAUTION y y When installing the projector on a table be careful not to pl...

Page 7: ...cial power cord pro vided by LG Electronics Do not use other power cords This may cause fire or an electric shock When in Use WARNING y y Do not place anything containing liquid on top of the projector such as a vase flower pot cup cosmetics or medicine or ornaments candles etc This may cause fire an electric shock or injury due to falling y y In the event that there is a big impact to the project...

Page 8: ... you watch the screen at a close distance for a long time your eye sight may become worse y y Do not look directly into the lens when the projector is in use The strong light may damage your eyes y y When the lamp is on or has just been turned off avoid touching the air vent or lamp because these will be very hot y y If there is a gas leak do not touch the wall outlet Open the window for ventilati...

Page 9: ...ene alcohol etc which can damage the product This can cause fire an electric shock or product damage deforma tion corrosion and damage Others WARNING y y Only a qualified technician can disas semble or modify the projector For inspection adjustment or repair con tact your seller or our service center Otherwise this may cause fire or an electric shock y y Do not charge the battery using any devices...

Page 10: ... with care Failure to do so may cause explosion or fire y y Make sure you use the same type of battery for replacement y y Incorrect battery replacement may cause fire CAUTION y y Do not mix new batteries with old bat teries This may cause fire or an electric shock caused by overheating and leakage y y Unplug the power cord if the projector is not used for a long period Accumulated dust may cause ...

Page 11: ...or more information on how to complete your registration DivX Certified to play DivX video up to HD 1080p including premium content DivX DivX Certified and associated logos are trademarks of Rovi Corporation or its subsidiaries and are used under license Covered by one or more of the following U S patents 7 295 673 7 460 668 7 515 710 7 519 274 The terms HDMI and HDMI High Definition Multimedia In...

Page 12: ...crobat Reader to view the owner s manual on your PC 1 Insert the supplied CD The web page appears automatically 2 Select language on the web page 3 Click Model name on the web page 4 View the owner s manual NOTE y y If the web page does not appear automatically access My computer and then click LG and index htm to view ...

Page 13: ...Outlet 34 Replacing the lamp 35 SPECIFICATIONS 36 SAFETY PRECAUTIONS 2 LICENSE 9 Additional information of the manual 10 PREPARATION 12 ACCESSORIES 12 Optional Accessories 13 PART NAMES 14 Main body 14 Connecting Part 15 Projector status indicator 16 Installation 17 Installation Precautions 17 Projection Distance per Screen Size 18 remote control 19 Watching with the Pro jector 21 Watching with th...

Page 14: ... When connecting a cable to the HDMI or USB port be sure to use the jack that fits into the USB HDMI port Use a standard sized jack TIMER SOUND MARK SETTINGS 3D L R 음량 내 미디어 외부입력 선택 키스톤 취침예약 영상모드 페이지 화면크기 화면가림 조용히 설정메뉴 화면정지 간편설정 확 인 자동조정 나가기 Remote Control AAA battery Owner s Manual eZ net program CD Computer Cable Power Cord Owner s Manual CD ...

Page 15: ...tail store where you purchased the product Without prior notice optional extras are subject to change in order to improve the per formance of the product and new optional accessories may be added Projection Screen HDMI Cable Replacement lamp Video Cable Audio Cable LAN cable RGB to Component Cable Component Cable RS 232C Cable DVI to HDMI Cable ...

Page 16: ...s while using the projector The lens may be damaged NOTE y y Air inlet Air filter It prevents dust or foreign objects from entering the product Clean the Air filter regularly If the filter is damaged replace it with a new one PART NAMES The projector is manufactured using high precision technology You may however see tiny black dots and or bright colored dots red blue or green that continuously ap...

Page 17: ...GB IN 1 RGB IN 2 RGB OUT RS 232C LAN USB AUDIO OUT VIDEO R AUDIO L PC1 DVI PC2 AUDIO IN HDMI DVI VIDEO AUDIO OUT USB AC IN Kensington Security System Connector HDMI IN RGB OUT RGB IN2 RGB IN1 RS 232C LAN R AUDIO L AUDIO IN PC1 DVI PC2 Speaker ...

Page 18: ...king The projector is turned off due to high temperature Red Orange switching A problem related to projector lamp or lamp occurs Turn on the projector again after waiting for suf ficient time If this indicator is blinking in red again contact the nearest LG Electronics Service Center Green Orange switch ing The projector is turned off because the internal fan is not working Please contact the near...

Page 19: ... 30 cm or more around the projector Do not place the product in a hot or humid environment Do not place the product in a hot cold or humid environment y y Do not place the product in a dusty place This may cause fire y y Never open any cover on the projec tor There is a high risk of electric shock y y The projector is manufactured using high precision technology You may however see tiny black dots...

Page 20: ...nch 4 3 aspect ratio Screen Size mm inch Screen Width Y mm inch Screen Height X mm inch Shortest Distance D mm inch Longest Distance D mm inch 762 30 610 24 457 17 9 873 34 3 1052 41 4 1016 40 813 32 610 24 1172 46 1 1411 55 5 1270 50 1016 40 762 30 1471 57 9 1771 69 7 1524 60 1219 47 9 914 35 9 1771 69 7 2130 83 85 1778 70 1422 55 9 1067 42 2070 81 4 2489 97 9 2032 80 1626 64 1219 47 9 2369 93 2 ...

Page 21: ...메뉴 화 자 Power Turns the projector on or off USB MY MEDIA Changes to the USB mode INPUT Changes the input source Playback control buttons Adjusts the play of My Media Key s Adjusts the Keystone settings SOUND Changes the SOUND mode SLEEP Sets the sleep timer PICTURE Changes the picture mode ENERGY SAVING Changes the ENERGY SAVING mode TIMER Changes the settings of the presentation timer VOL Adjusts ...

Page 22: ...tailed settings or gesture for each menu y y MARK button is used when a software update is required MARK button is not available for a user Note y y When using the remote control the optimal remote range is less than 6 m 236 2 inch left right and within a 30 arc of the IR receiver y y If cables are connected the remote range is less than 3 m 236 2 inch left right and within a 30 degree arc of the ...

Page 23: ...ize of the image rotate the inner zoom ring To move the screen image up ward downward adjust the height of foot at the bottom of the projec tor Front foot adjustment button y y While pressing the front foot ad justment button adjust the project upward downward until the screen image is correctly located y y When you release the front foot adjustment button the front foot is fixed at the current po...

Page 24: ...lamp from a reseller or an LG Elec tronics Service Center Using another manufacturer s lamp may damage the projector and lamp y y Only pull the lamp out when replac ing it y y Keep the lamp unit out of reach of children Keep the lamp away from heat sources such as radiators stoves etc There is a risk of fire or burning y y Do not expose the lamp to liquids or foreign materials The lamp may burst y...

Page 25: ... For Just Scan you may see image noise at the edges of the screen Set By Program Displays images in the same aspect ratio as the original image 4 3 Resizes the picture with a 4 3 ratio Zoom Enlarges an image to fit the screen width The top and bottom of the image may be truncated y y Press the or button to zoom in or out of the image y y Press the or button to move the image Cinema Zoom1 Enlarges ...

Page 26: ... adjustment Using the Input List Using the Input List 1 Press the INPUT button to access the input sources The connected input mode appears first Please note that the compo nent is always enabled INPUT List Component 1 Component 2 USB AV RGB PC1 RGB PC2 ꔂ Move ꔉ OK Input Label HDMI Exit 2 Select an input signal using the INPUT button The projector is switched only to the connected input mode You c...

Page 27: ... scroll through the following menus Blank Function Using Blank Function This function may be effective when you need to draw attention during a meeting or training 1 Press the BLANK button and the screen is covered by the background color You can change the background color by referring to Wireless LAN module 2 Press any button to clear the blank function To cover the screen temporarily press the ...

Page 28: ...nnot write or delete data in the USB device Connect a USB flash drive as shown below USB flash drive Removing a USB Device 1 Press the Q MENU button 2 Use the or button to move to USB Device and press the OK button 3 Remove the USB device NOTE y y After the USB device is disconnect ed it cannot be read Remove the USB device and connect it again ...

Page 29: ... may not be recognized y y Please connect a USB storage device with a cable provided by the USB manufacturer When you use a cable that is not provided by a USB manu facturer or an excessively long cable the device may not be recognized y y Some USB devices may not be sup ported or may not work properly y y If the length of a folder or file is too long the folder or file may not be recognized prope...

Page 30: ...to set up a desired item and press the OK button 4 Press the EXIT button when completed Menu Description PICTURE Adjusts the image quality for optimal viewing Audio Adjusts the sound quality and volume level TIME Sets time related settings OPTION Customizes the general settings INPUT Lets you select the desired input MY MEDIA Accesses photo music movie and document files ...

Page 31: ...ERNAL DEVICES You can connect various external devices to the projector HDMI 30 Page Component 1 Component 2 32 Page Input AV 32 Page RGB1 RGB2 31 Page Memory 26 Page Headphones 33 Page Computer Laptop Video DVD Digital Device USB Headphones Game Console ...

Page 32: ...GB IN 2 RGB OUT RS 232C LAN USB AUDIO OUT VIDEO R AUDIO L PC1 DVI PC2 AUDIO IN HDMI DVI 0 HDMI to DVI Connection Connect the HDMI DVI con nector of a projector to the DVI output connector using a HDMI to DVI cable For audio signal con nect using a voice cable Press the INPUT button on the remote control to select HDMI RGB IN 1 RGB IN 2 RGB OUT RS 232C LAN USB AUDIO OUT VIDEO R AUDIO L PC1 DVI PC2 ...

Page 33: ... RGB OUT RS 232C LAN USB AUDIO OUT VIDEO R AUDIO L PC1 DVI PC2 AUDIO IN HDMI DVI 8 2 287 5 287 3 RGB IN 1 RGB IN 2 RGB OUT RS 232C LAN USB AUDIO OUT VIDEO R AUDIO L PC1 DVI PC2 AUDIO IN HDMI DVI RGB to DVI Connection Connect the RGB IN 1 connec tor or RGB IN 2 connector of a projector to the DVI output con nector To output the audio connect the PC to the projector using an op tional audio cable RG...

Page 34: ... AUDIO IN HDMI DVI RGB IN 1 RGB IN 2 RGB OUT RS 232C LAN USB AUDIO OUT VIDEO R AUDIO L PC1 DVI PC2 AUDIO IN HDMI DVI 9 287 HIW 3 35 5LJKW 8 2 287 Connecting to the AV INPUT AV Connection Connect the output ports of an external device and the AV INPUT port of the projector Press the INPUT button to select AV 9 287 HIW 5LJKW 8 2 287 RGB IN 1 RGB IN 2 RGB OUT RS 232C LAN USB AUDIO OUT VIDEO R AUDIO L...

Page 35: ... Headphones You can listen to the audio through headphones RGB IN 1 RGB IN 2 RGB OUT RS 232C LAN USB AUDIO OUT VIDEO R AUDIO L PC1 DVI PC2 AUDIO IN HDMI DVI RGB IN 1 RGB IN 2 RGB OUT RS 232C LAN USB AUDIO OUT VIDEO R AUDIO L PC1 DVI PC2 AUDIO IN HDMI DVI ...

Page 36: ...Clean your projector to keep it in optimal condition Cleaning Cleaning the Lens If there is any dust or staining on the lens surface you must clean the lens Use an air spray or a cleaning cloth to clean the lens To remove dust or stains use an air spray or apply a small amount of cleaning agent onto a swab or soft cloth to lightly rub the lens Please be aware that liquid may flow into the lens if ...

Page 37: ...e out the fixed lamp from the hitch part 5 Hold the lamp and pull it out slowly to remove the lamp case 6 Insert the new lamp case gently into the correct position Check if it is cor rectly positioned 7 Tighten the screws you removed in step 3 Check if the lamp is securely fixed 8 Close the lamp cover and tighten the screw loosened in step 2 to fix the cover If you turn on the projector while the ...

Page 38: ...inch Depth 246 4 mm 9 7 inch Weight 3 6kg 7 9 Ibs Headphone earphone Impedance 16 Ω Output power 10mW Jack thickness 3 5mm 0 13 inch USB Device 5 V 0 5 A Max Power Sources AC 100 to 240 V 50 Hz 60 Hz Operation environ ment Temperature Operation 0 C 40 C Storage 20 C 60 C Relative humidity Operation 0 75 Storage 0 85 y y The images used and specifications stated in this owner s manual are subject t...

Page 39: ...uality in the PC mode Supported Monitor Display Resolution Horizontal Frequency kHz Vertical Frequency Hz 640 x 350 31 468 70 09 640 x 480 31 469 59 94 720 x 400 31 469 70 08 800 x 600 37 879 60 31 1024 x 768 48 363 60 00 1152 x 864 54 348 60 053 1280 x 800 49 7 59 81 1280 x 1024 63 981 60 02 1400 x 1050 65 3 60 1680 x 1050 65 3 59 95 HDMI DVI DTV WiDi mode supported Resolution Horizontal Frequenc...

Page 40: ...ght notices are available for download LG Electronics will also provide open source code to you on CD ROM for a charge covering the cost of performing such distribu tion such as the cost of media shipping and handling upon email request to opensource lge com This offer is valid for three 3 years from the date on which you purchased the product Component Port Connection Signal Component 60Hz 480i O...

Page 41: ... 5150 to 5250 MHz 5725 to 5850 MHz for Non EU Output Power Max 802 11a 11 dBm 802 11b 14 dBm 802 11g 10 5 dBm 802 11n 2 4GHz 11 dBm 802 11n 5GHz 12 5 dBm y y Because band channel used by the country could be different the user can not change or adjust the operat ing frequency and this product is set for the regional frequency table ...

Page 42: ...The model and serial number of the projector are located on the back or on the side of the projector Record them below should you ever need service MODEL SERIAL ...

Page 43: ...Manuel d utilisation PROJECTEUR LCD BG630 BG650 Veuillez lire attentivement les informations de sécurité avant d utiliser le produit www lg com ...

Page 44: ... d informations ainsi que des logiciels permettant de convertir vos fichiers au format DivX À PROPOS DE LA VIDÉO À LA DEMANDE DIVX ce périphérique DivX Certified doit être enregistré pour pouvoir lire des vidéos à la demande DivX Pour obtenir le code d enregistrement accédez à la section DivX VOD Vidéo à la demande DivX du menu de configura tion du périphérique Les instructions d enregistrement so...

Page 45: ... cette consigne peut provoquer un incendie y y Ne placez pas de produits inflammables près du projecteur Cela pourrait provoquer un incendie y y Ne laissez pas des enfants grimper sur le projecteur ou s y agripper Le projecteur risquerait de tomber et de causer des blessures ou un décès y y Ne placez pas le produit directement sur une moquette un tapis ou un endroit où la ventilation est limitée p...

Page 46: ...mur doit dépasser 30 cm Le non respect de cette consigne peut entraîner une augmentation excessive de la température interne du projecteur et provoquer un incendie ATTENTION y y Si vous installez le projecteur sur une table veillez à ne pas le positionner près du bord Le projecteur risquerait de tomber et de provoquer des blessures ou d être endommagé Veillez à utiliser le boîtier ou le support ad...

Page 47: ...é branchée pendant environ 3 minutes après la mise hors tension pour permettre à la lampe de refroidir vous risqueriez sinon de l endommager ATTENTION y y Maintenez fermement la fiche d alimentation lorsque vous la débranchez Un fil cassé dans le cordon peut provoquer un incendie y y Vérifiez que le cordon d alimentation et la fiche ne sont pas endommagés modifiés pliés tordus étirés écrasés ou br...

Page 48: ...incendie ou une électrocution y y et contactez un centre de réparation LG Electronics Le non respect de cette consigne peut provoquer un incendie ou une électrocution y y Veillez à ce qu un enfant n avale pas les batteries de la télécommande lors de leur remplacement Conservez les batteries hors de portée des enfants Si un enfant avale une batterie consultez immédiatement un médecin y y Veillez à ...

Page 49: ...l objectif ne soit soumis à un choc violent lors du déplacement de l objectif y y Évitez de toucher l objectif Vous risqueriez d endommager l objectif y y N utilisez pas d outils pointus tels qu un couteau ou un marteau sur le projecteur car cela endommagerait le boîtier y y Si aucune image n apparaît à l écran ou si aucun son n est audible arrêtez d utiliser le projecteur Mettez le projecteur hor...

Page 50: ...isez jamais un nettoyant un produit lustrant pour voitures ou industriel un abrasif ou de la cire du benzène de l alcool etc qui risqueraient d endommager le produit Le non respect de cette consigne peut entraîner un risque d incendie d électrocution ou d endommagement du produit déformation corrosion ou dommage Divers AVERTISSEMENT y y Seul un technicien qualifié peut démonter ou modifier le proj...

Page 51: ...quer une explosion ou un incendie y y Utilisez une batterie de remplacement du même type y y L utilisation d une batterie de remplacement non appropriée risque de provoquer un incendie ATTENTION y y N utilisez pas simultanément de nouvelles piles et des piles usagées Cela pourrait provoquer la surchauffe des piles et une fuite de liquide susceptibles d entraîner un incendie ou une électrocution y ...

Page 52: ...SIGNES DE SÉCURITÉ 3 Affichage du manuel d utilisation 9 PRÉPARATION 11 ACCESSOIRES 11 Accessoires en option 12 Pièces et composants 13 Retour 14 Indicateur d état du projecteur 15 Installation 16 Précautions d installation 16 Distance de projection par taille d écran 17 Système de sécurité Kensington 18 télécommande 19 Utilisation du pro jecteur 21 Utilisation du projecteur 21 Mise sous tension d...

Page 53: ... connectez un câble au port HDMI ou USB veillez à utiliser la prise adaptée à ceux ci Utilisez une prise de taille standard TIMER SOUND MARK SETTINGS 3D L R 음량 내 미디어 외부입력 선택 키스톤 취침예약 영상모드 페이지 화면크기 화면가림 조용히 설정메뉴 화면정지 간편설정 확 인 자동조정 나가기 Télécommande Batterie AAA Manuel d utilisation CD EZ Net Câble d ordinateur Cordon d alimentation CD Manuel d utilisation ...

Page 54: ...z le revendeur auprès duquel vous avez acheté ce produit Les suppléments en option peuvent être modifiés et de nouveaux accessoires peuvent être ajoutés sans préavis dans le but d améliorer les performances du produit Écran pour projecteur Câble HDMI Lampe de remplace ment Câble vidéo Câble audio Câble LAN Câble RGB vers Com posant Câble de composant Câble RS 232C Câble DVI HDMI ...

Page 55: ...e vous utilisez le projecteur Vous risqueriez d endommager l objectif REMARQUE y y Entrée d air filtre à air Empêche la poussière ou les objets étrangers de pénétrer dans le produit Nettoyez régulièrement le filtre à air Si le filtre est endommagé utilisez un nou veau filtre Pièces et composants Ce projecteur est fabriqué selon une technologie de haute précision Toutefois il est possible que de mi...

Page 56: ... RS 232C LAN USB AUDIO OUT VIDEO R AUDIO L PC1 DVI PC2 AUDIO IN HDMI DVI VIDEO AUDIO OUT USB AC IN Connecteur pour système de sécurité Kensington HDMI IN RGB OUT RGB IN2 RGB IN1 RS 232C LAN R AUDIO L AUDIO IN PC1 DVI PC2 Haut parleurs Retour ...

Page 57: ...projecteur a été mis hors tension car la tempéra ture était trop élevée Rouge orange en alternance Un problème lié à la lampe du projecteur ou à la lampe est survenu Attendez un peu et remettez le projecteur sous tension Si le voyant clignote toujours en rouge contactez le centre de service LG Electronics le plus proche Vert orange en alternance Le projecteur a été mis hors tension le ventilateur ...

Page 58: ...u pro jecteur N utilisez pas le produit dans un environnement chaud ou humide Ne le placez pas dans un en vironnement chaud froid ou humide y y Ne placez pas le produit dans un endroit poussiéreux Cela pourrait provoquer un incendie y y Veillez à ne jamais ouvrir les couvercles du projecteur Le risque d électrocution que cela comporte est élevé y y Ce projecteur est fabriqué selon une technologie ...

Page 59: ...prise murale Taux de projection vers le haut 90 Hauteur de l écran X X 2 X 2 Largeur de l écran Y Y 2 Y 2 Image Distance de projection D Distance de projection D Image 95 mm Format de l image 4 3 Taille de l écran mm Largeur de l écran Y mm Hauteur de l écran X mm Distance la plus courte D mm Distance la plus longue D mm 762 610 457 873 1052 1016 813 610 1172 1411 1270 1016 762 1471 1771 1524 1219...

Page 60: ... informations sur l installation et l utilisation du connecteur Kensington Security System reportez vous au guide de l utilisateur qui lui est associé y y Le connecteur Kensington Security System est un accessoire en option y y Qu est ce que Kensington Kensington est une société fournissant des systèmes de sécurité pour ordinateurs portables et autres appareils électroniques Site internet http www...

Page 61: ...DIA Permet de passer en mode USB INPUT Permet de changer la source d entrée Playback control buttons Permet d ajuster la lecture de Mes Médias Key s Permet de configurer les paramètres Keystone SOUND Permet de modifier le mode SON SLEEP Sélectionne la minuterie sommeil PICTURE Modifie les préréglages d image ENERGY SAVING Permet de configurer le mode ÉCONOMIE D ÉNERGIE TIMER Permet de configurer l...

Page 62: ...es supplémentaires pour chaque menu Note y y Lorsque vous utilisez la télécommande la plage de distance optimale est inférieure à 6 mètres gauche droite et se situe dans un arc de 30 degrés du récepteur IR y y Si des câbles sont connectés la plage de distance est de moins de 3 mètres gauche droite et dans un arc de 30 degrés du récepteur IR y y Pour un fonctionnement optimal ne bloquez pas le réce...

Page 63: ...ectif du projecteur y y Pour régler la taille de l image tournez l anneau de zoom intérieur Pour déplacer l image vers le haut le bas ajustez la taille du pied en bas du projecteur Bouton de réglage du pied avant y y Tout en maintenant le bouton de réglage du pied avant enfoncé réglez la hauteur du projecteur jusqu à ce que l image soit bien positionnée y y Lorsque vous relâchez le bouton de régla...

Page 64: ...re de service LG Electronics L utilisation d une lampe d un autre fabricant risque d endommager le projecteur et la lampe y y Ne tirez sur la lampe que lorsque vous devez la remplacer y y Ne laissez pas la lampe à portée des enfants N exposez pas la lampe à des sources de chaleur telles qu un radiateur une cuisinière etc pour éviter tout risque d incendie y y N exposez pas la lampe à des liquides ...

Page 65: ...e l écran affichent une image bruitée Format original permet d afficher les images dans le même format que l image originale Format original 4 3 permet de redimensionner l image au format 4 3 Zoom permet d agrandir une image pour l adapter à la largeur de l écran Le haut et le bas de l image peuvent être tronqués y y Appuyez sur la touche ou pour effectuer un zoom avant ou arrière sur l image y y ...

Page 66: ...H 100 0 V 100 0 2 Appuyez sur la touche OK une fois le réglage terminé Utilisation de la liste des sources Utilisation de la liste des sources 1 Appuyez sur INPUT pour accéder aux sources d entrée Le mode de source connecté s affiche en premier Remarque le composant est toujours activé SOURCE Composant 1 Composant 2 USB AV RGB PC1 RGB PC2 ꔂ Déplacer ꔉ OK Labels des sources HDMI Sortie 2 Sélectionn...

Page 67: ... image Utilisation de la fonction Absence d image Cette fonction peut être utile lorsque vous voulez attirer l attention de votre public lors d une réunion ou d une formation 1 Appuyez sur la touche BLANK l écran est recouvert par la couleur d arrière plan Pour modifier la couleur d arrière plan reportez vous à la couleur de fond de l image BlankAbscence d image 2 Appuyez sur n importe quelle touc...

Page 68: ...re pilote peut ne pas être détecté y y La vitesse de reconnaissance d un périphérique de stockage USB varie en fonction du périphérique y y Si un périphérique USB normal ne fonctionne pas déconnectez le puis reconnectez le Veuillez ne pas éteindre le projecteur ni débrancher le périphérique USB pendant le fonctionnement de ce dernier Il se peut que le périphérique USB ou les fichiers stockés soien...

Page 69: ... comporter jusqu à 100 caractères anglais y y Les données d un périphérique USB pouvant être endommagées il est recommandé de sauvegarder tous les fichiers importants Les utilisateurs sont responsables de la gestion de leurs données Aucune responsabilité n incombe au fabricant en la matière y y Il est recommandé d utiliser une clé USB de 32 Go ou moins et un disque dur USB de 1 To ou moins Un péri...

Page 70: ... l élément souhaité et appuyez sur OK 4Appuyez sur la touche EXIT lorsque vous avez terminé Menu Description IMAGE Règle la qualité de l image pour un visionnage optimal AUDIO Règle la qualité du son et le niveau sonore HEURE Définit les paramètres liés au temps OPTION Permet de personnaliser les paramètres généraux SOURCE Sélectionne la source d entrée souhaitée MES MÉDIAS Permet d accéder aux fi...

Page 71: ...TERNES Vous pouvez connecter plusieurs périphériques externes au projecteur HDMI 30 Page Composant 1 Composant 2 32 Page ENTRÉE AV 32 Page RGB1 RGB2 31 Page Mémoire 26 Page Casque 33 Page Ordinateur Ordina teur portable Vidéo DVD Périphérique numérique USB Casque Console de jeux ...

Page 72: ...VI PC2 AUDIO IN HDMI DVI RGB IN 1 RGB IN 2 RGB OUT RS 232C LAN USB AUDIO OUT VIDEO R AUDIO L PC1 DVI PC2 AUDIO IN HDMI DVI 0 Connexion HDMI DVI Branchez le connecteur HDMI DVI du projecteur au connecteur de sortie DVI via un câble HDMI ou DVI Pour le signal audio utili sez un câble vocal Appuyez sur la touche INPUT de la télécommande pour sélection ner HDMI RGB IN 1 RGB IN 2 RGB OUT RS 232C LAN US...

Page 73: ...UDIO IN HDMI DVI RGB IN 1 RGB IN 2 RGB OUT RS 232C LAN USB AUDIO OUT VIDEO R AUDIO L PC1 DVI PC2 AUDIO IN HDMI DVI 8 2 287 5 287 3 RGB IN 1 RGB IN 2 RGB OUT RS 232C LAN USB AUDIO OUT VIDEO R AUDIO L PC1 DVI PC2 AUDIO IN HDMI DVI Connexion RGB DVI Branchez le connecteur RGB IN 1 ou RGB IN 2 du projecteur au connecteur de sortie DVI Pour émettre un signal audio rac cordez le PC au projecteur à l aid...

Page 74: ...DIO L PC1 DVI PC2 AUDIO IN HDMI DVI RGB IN 1 RGB IN 2 RGB OUT RS 232C LAN USB AUDIO OUT VIDEO R AUDIO L PC1 DVI PC2 AUDIO IN HDMI DVI 9 287 HIW 3 35 5LJKW 8 2 287 Connexion au port AV Connexion au port AV Connectez les ports de sortie du périphérique externe au port AV INPUT du projecteur Appuyez sur la touche INPUT pour sélectionner AV 9 287 HIW 5LJKW 8 2 287 RGB IN 1 RGB IN 2 RGB OUT RS 232C LAN...

Page 75: ...ent d un casque Vous pouvez utiliser un casque pour écouter le son RGB IN 1 RGB IN 2 RGB OUT RS 232C LAN USB AUDIO OUT VIDEO R AUDIO L PC1 DVI PC2 AUDIO IN HDMI DVI RGB IN 1 RGB IN 2 RGB OUT RS 232C LAN USB AUDIO OUT VIDEO R AUDIO L PC1 DVI PC2 AUDIO IN HDMI DVI ...

Page 76: ...iltre dans l objectif Nettoyage du boîtier du projecteur Pour nettoyer le boîtier du projec teur débranchez d abord le câble d alimentation Pour nettoyer la poussière ou les taches sur l objectif utilisez uniquement un chiffon non pe lucheux doux et sec N utilisez pas d alcool de ben zène de solvant ni d autres déter gents chimiques car ils risquerai ent d endommager le boîtier Nettoyage des évent...

Page 77: ...Utilisez une lampe de remplacement du même type Si le couvercle de la lampe n est pas correctement installé le projecteur ne s allume pas Si c est le cas vérifiez que la lampe est correctement installée avant de contacter le centre de service LG Electronics Remplacement de la lampe 1 Retournez le projecteur débranchez le câble d alimentation et placez le projecteur sur une table ou une surface pla...

Page 78: ...ds kg 3 6 Casque oreillette Impédance 16 Ω Puissance en sortie 10 mW Épaisseur de la prise 3 5 mm Appareil USB 5 V 0 5 A max Power Sourc es Sources d alimentation CA 100 à 240 V 50 Hz 60 Hz Environnement de fonctionnement couleur Fonction nement 0 C à 40 C Stockage 20 C à 60 C Humidité relative Fonction nement 0 75 Stockage 0 85 y y Les images et spécifications contenues dans ce manuel sont sujett...

Page 79: ...andée pour obtenir une qualité d image optimale en mode ordinateur Moniteurs pris en charge Résolution Fréquence horizontale kHz Fréquence verticale Hz 640 x 350 31 468 70 09 640 x 480 31 469 59 94 720 x 400 31 469 70 08 800 x 600 37 879 60 31 1024 x 768 48 363 60 00 1152 x 864 54 348 60 053 1280 x 800 49 7 59 81 1280 x 1024 63 981 60 02 1400 x 1050 65 3 60 1680 x 1050 65 3 59 95 Mode HDMI DVI DTV...

Page 80: ...rce de ce produit rendez vous sur http opensource lge com En plus du code source tous les termes de la licence ainsi que les exclusions de responsabilité et les droits d auteur sont disponibles au téléchargement LG Electronics propose de vous fournir le code open source sur CD ROM en échange des coûts couvrant cet envoi notamment le coût du support des frais de port et de prise en charge une fois ...

Page 81: ... MHz De 5 725 à 5 850 MHz En dehors de l UE Puissance en sortie maxi mum 802 11a 11 dBm 802 11b 14 dBm 802 11g 10 5 dBm 802 11n 2 4 GHz 11 dBm 802 11n 5 GHz 12 5 dBm y y Comme le canal de bande utilisé varie d un pays à l autre l utilisateur ne peut pas modifier ou régler la fréquence de fonctionnement Ce produit est réglé conformément au tableau de fréquences régionales ...

Page 82: ...Le modèle et le numéro de série du pro jecteur figurent à l arrière ou sur le côté du projecteur Inscrivez les ci dessous pour référence ultérieure MODÈLE NUMÉRO DE SÉRIE ...

Page 83: ...Benutzerhandbuch LCD PROJEKTOR BG630 BG650 Bevor Sie das Produkt zum ersten Mal verwenden lesen Sie diese Sicherheitsinformationen aufmerksam durch www lg com ...

Page 84: ...ols zum Konvertieren von Dateien in das DivX Format finden Sie unter divx com Über DIVX VIDEO ON DEMAND Dieses DivX Certified Gerät muss registriert werden damit Sie gekaufte DivX Video on Demand Inhalte VOD wiedergeben können Um einen Registrierungscode zu erhalten rufen Sie im Einstellungsmenü des Geräts den Bereich DivX VOD auf Weitere Informationen darüber wie Sie Ihre Registrierung abschließe...

Page 85: ...ahr y y Platzieren Sie niemals entflammbare Materialien z B entflammbares Spray in der Nähe des Projektors Es besteht Brandgefahr y y Achten Sie darauf dass sich Kinder nicht an den Projektor hängen oder dar an klettern Der Projektor kann herunterfallen was zu gefährlichen Verletzungen oder zum Tod führen kann y y Stellen Sie das Produkt nicht auf Teppi chen Vorlegern oder an anderen Orten auf an ...

Page 86: ...or aus tren nen Sie ihn vom Netzanschluss und entfernen Sie alle Anschlüsse bevor Sie den Projektor an einen anderen Ort transportieren Bei einem beschädigten Netzkabel besteht Brand und Stromschlagge fahr y y Stellen Sie das Produkt nicht auf eine instabile vibrierende oder schräge Oberfläche auf Das Produkt könnte herunterfallen oder umkippen und Verletzungen verursachen y y Achten Sie darauf da...

Page 87: ...rbunden ist Berühren Sie den Netzstecker nicht unmittelbar nach dessen Herausziehen aus der Steckdose Es besteht Stromschlaggefahr y y Verwenden Sie nur das offizielle Strom kabel welches von LG Electronics Inc bereitgestellt wird Andere Stromkabel dürfen nicht verwendet werden Andernfalls besteht Brand oder Stromschlaggefahr Während des Betriebs ACHTUNG y y Stellen Sie keine mit Flüssigkeiten gef...

Page 88: ...her unterfallen und Verletzungen oder einen Geräteschaden verursachen y y Halten Sie die Abluftöffnungen frei ACHTUNG y y Wenn der Projektor verwendet wird berühren Sie niemals das Objektiv das es sehr heiß ist Es besteht Verbrennungsgefahr VORSICHT y y Stellen Sie keinen schweren Gegen stand auf das Gerät Er könnte herunterfallen und Verlet zungen hervorrufen y y Achten Sie darauf dass das Objekt...

Page 89: ...n Sie weder Sprühflaschen noch nasse Tücher Verwenden Sie für die Reinigung der Plastikteile wie dem Projektorgehäuse keine Reinigungsflüssigkeiten oder für Autos oder in der Industrie verwendete Reinigungsmittel aggressive Mittel oder Wachs Benzol Alkohol usw solche Mittel können das Gerät beschädigen Es besteht Brand und Stromschlag gefahr oder die Gefahr dass das Gerät beschädigt wird Verformun...

Page 90: ...gen oder Fehlfunktionen des Pro dukts führen y y Vergewissern Sie sich dass die Bat terie korrekt eingelegt ist Andernfalls besteht Explosions und Brandgefahr y y Die Batterie enthält Lithium Ionen Sie muss daher mit Sorgfalt behan delt werden Andernfalls besteht Explosions oder Brandgefahr y y Benutzen Sie denselben Akkutyp wenn Sie ihn austauschen y y Falscher Austausch von Batterien kann zu Brä...

Page 91: ...buch auf dem PC anzuzeigen 1 Legen Sie die mitgelieferte CD ein Die Webseite wird automatisch angezeigt 2 Wählen Sie auf der Webseite die Sprache aus 3 Klicken Sie auf der Webseite auf den Modellnamen 4 Zeigen Sie das Benutzerhandbuch an HINWEIS y y Wird die Webseite nicht automa tisch angezeigt gehen Sie zu Mein Computer und klicken Sie dann auf LG und index htm um das Benut zerhandbuch anzuzeige...

Page 92: ...inigen der Be und Entlüftung 34 Auswechseln der Lampe 35 TECHNISCHE DATEN 36 LIZENZ 2 SICHERHEITSVORKEHRUN GEN 3 Zusätzliche Informationen im Handbuch 9 VORBEREITUNG 11 ZUBEHÖR 11 Optionales Zubehör 12 TEILEBEZEICHUNGEN 13 Haupttext 13 Verbindungsteil 14 Statusanzeige des Projektors 15 Installation 16 Hinweise zum Aufstellen des Projektors 16 Projektionsabstand nach Anzeigeformat 17 Kensington Sic...

Page 93: ...Sie beim Anschluss eines Kabels am HDMI oder USB Anschluss den Stecker der in den USB HDMI Anschluss passt Verwenden Sie einen Stecker in Standardgröße TIMER SOUND MARK SETTINGS 3D L R 음량 내 미디어 외부입력 선택 키스톤 취침예약 영상모드 페이지 화면크기 화면가림 조용히 설정메뉴 화면정지 간편설정 확 인 자동조정 나가기 Fernbedienung AAA Batterie Benutzerhandbuch EZ NET Programm CD Computerkabel Netzkabel CD mit Benutzerhandbuch ...

Page 94: ... dem Einzelhändler bei dem Sie das Produkt gekauft haben erwerben Optionale Zubehörteile zur Produktverbesserung können ohne vorherige Ankündigung geändert und neue Zubehörteile hinzugefügt werden Projektionsleinwand HDMI Kabel Ersatzlampe Videokabel Audiokabel LAN Kabel RGB Component Kabel Component Kabel RS 232C Kabel DVI HDMI Kabel ...

Page 95: ...orbetriebs niemals das Objektiv Das Objektiv könnte beschädigt werden HINWEIS y y Belüftung Luftfilter Sorgt dafür dass keine Fremdkörper in das Gerät gelangen Reinigen Sie den Luftfilter regelmäßig Sollte der Filter beschädigt sein ersetzen Sie ihn durch einen neuen TEILEBEZEICHUNGEN Der Projektor wurde mit hochpräziser Technologie gefertigt Dennoch erscheinen auf der Projektionsfläche möglicherw...

Page 96: ...1 RGB IN 2 RGB OUT RS 232C LAN USB AUDIO OUT VIDEO R AUDIO L PC1 DVI PC2 AUDIO IN HDMI DVI VIDEO AUDIO OUT USB AC IN Kensington Security System Connector HDMI IN RGB OUT RGB IN2 RGB IN1 RS 232C LAN R AUDIO L AUDIO IN PC1 DVI PC2 Lautsprecher ...

Page 97: ... Der Projektor wurde aufgrund hoher Temperaturen ausgeschal tet Rot und orange abwechselnd Es besteht ein Problem mit der Projektorlampe oder der Lampe Schalten Sie den Projektor nach einer angemessenen Warte zeit wieder ein Falls die Anzeige erneut rot blinkt wenden Sie sich an den LG Electronics Kundendienst Grün und orange abwechselnd Der Projektor wird ausgeschaltet weil die interne Lüftung ni...

Page 98: ...stückchen oder Ähnliches in den Belüftungs einlass gelangen Halten Sie nach allen Seiten des Geräts mindestens 30 cm Abstand Stellen Sie den Projektor nicht in einer heißen oder feuchten Umgebung auf Stellen Sie den Projektor nicht in einer heißen kalten oder feuchten Umgebung auf y y Stellen Sie das Produkt nicht an einem staubigen Ort auf Es besteht Brandgefahr y y Öffnen Sie niemals die Abdecku...

Page 99: ... Projektors und der verbundenen Geräte an einer Netzsteckdose an Verhältnis der nach oben gerichteten Projektion 90 Anzeigehöhe X X 2 X 2 Anzeigebreite Y Y 2 Y 2 DISPLAY Projektionsabstand D Projektionsabstand D DISPLAY 95 mm Anzeigeformat 4 3 Anzeigeformat mm Anzeigebreite Y mm Anzeigehöhe X mm Geringster Abstand D mm Größter Abstand D mm 762 610 457 873 1052 1016 813 610 1172 1411 1270 1016 762 ...

Page 100: ...erheitskabel wie unten abge bildet an y y Weitere Informationen zur Installation und Bedienung finden Sie im Benutzerhand buch zum Kensington Sicherheitssystem y y Das Kensington Sicherheitssystem ist optionales Zubehör y y Was ist Kensington Kensington ist ein Unternehmen das Sicherheitssysteme für Notebooks und andere elektronische Geräte anbietet Website http www kensington com ...

Page 101: ...Stromquellen Schaltet den Projektor ein oder aus USB MY MEDIA Wechselt zum USB Modus INPUT Ändert die Eingangsquelle Steuerungstasten für Wiedergabe Regelt die Wiedergabe von Meine Medien Key s Passt die Trapezfunktion an SOUND Ändert den Ton Modus SLEEP Stellt den Sleep Timer ein PICTURE Ändert den Bildmodus ENERGY SAVING Ändert den Energiesparmodus TIMER Ändert die Einstellungen des Präsentation...

Page 102: ...aste MARKIEREN wird verwendet wenn eine Software Aktualisierung notwendig ist Die Taste MARKIEREN ist nicht für Benutzer verfügbar HINWEIS y y Der optimale Abstand für die Verwendung der Fernbedienung beträgt max 6 m links rechts außerdem sollte der Winkel zum IR Empfän ger 30 nicht überschreiten y y Beim Anschluss von Kabeln beträgt der Abstand für die Verwendung der Fernbedienung max 3 m links r...

Page 103: ...zustellen Stellen Sie die Höhe des Fußes an der Unterseite des Projektors ein um das Bild nach oben bzw unten zu bewegen Anpassungstaste für den vorderen Projektorfuß y y Halten Sie die Anpassungstaste für den vorderen Projektorfuß gedrückt und bewegen Sie den Projektor nach oben bzw unten bis das Bild korrekt positioniert ist y y Wenn Sie die Anpassungstaste loslassen bleibt der vordere Projek to...

Page 104: ...hädigungen der Lampe und des Projektors führen y y Entnehmen Sie die Lampe nur um sie auszuwechseln y y Bewahren Sie die Lampe außerhalb der Reichweite von Kindern auf Die Lampe darf nicht in die Nähe von Wärmequel len Heizgerät Herd usw kommen Es besteht Brand und Verbrennungsge fahr y y Lassen Sie die Lampe niemals in Berührung mit Flüssigkeiten oder sonstigen Fremdmaterialien kommen Es besteht ...

Page 105: ...ten der Anzeige auftre ten Auto Zeigt Bilder im Bildformat des Originalbildes an Auto 4 3 Stellt das Bild im 4 3 Verhältnis ein Zoom Passt das Bild durch Vergrößerung an die Bildschirm breite an Der obere und der untere Bildbereich werden möglicherweise abgeschnitten y y Drücken Sie zum Vergrößern oder Verkleinern die Tasten oder y y Drücken Sie zum Bewegen des Bildes die Tasten oder Kino Zoom 1 V...

Page 106: ...e OK Verwenden der Eingangsliste Verwenden der Eingangsliste 1 Drücken Sie die Taste INPUT um auf die Liste der Signalquellen zuzugreifen Die angeschlossene Signalquelle wird zuerst angezeigt Beachten Sie dass die Component Quelle immer aktiviert ist Eingangsliste Komponente1 Komponente2 USB AV RGB1 RGB2 ꔂ Bew ꔉ OK Eingangsbezeichnung HDMI Ausgang 2 Wählen Sie über die Taste INPUT eine Signalquell...

Page 107: ...wenden der Funktion BLANK Leeres Bild Diese Funktion ist von Bedeutung wenn Sie während eines Meetings oder in einer Schulung die Aufmerksamkeit auf etwas anderes lenken wollen 1 Drücken Sie die Taste BLANK und auf der Projektionsfläche wird ein schwarzer Hintergrund angezeigt Sie können die Farbe des Hintergrunds ändern Lesen Sie dazu den Abschnitt WLAN Modul 2 Drücken Sie eine beliebige Taste um...

Page 108: ...Schließen Sie wie unten dargestellt einen USB Speicherstick an USB Speicher stick Wenn Sie das USB Gerät trennen möchten gehen Sie wie folgt vor 1 Drücken Sie die Taste Q MENU 2 Navigieren Sie mit der Taste oder zum USB Gerät und drücken Sie die Taste OK 3 Entfernen Sie das USB Gerät HINWEIS y y Nachdem das USB Gerät getrennt wurde kann nicht mehr von ihm gelesen werden Entfernen Sie das USB Gerät...

Page 109: ... nicht erkannt y y Verbinden Sie ein USB Speichergerät mit dem vom Hersteller des USB Speichers gelieferten Kabel Wenn Sie ein Kabel verwenden das nicht mit dem USB Speicher geliefert wurde oder das sehr lang ist wird das Gerät möglicherweise nicht erkannt y y Einige USB Geräte werden möglicher weise nicht unterstützt oder funktionie ren nicht korrekt y y Wenn der Name eines Ordners oder einer Dat...

Page 110: ...wünschte Funktion einzustellen und drücken Sie die Taste OK 4 Drücken Sie die Taste EXIT wenn Sie fertig sind Menü Beschreibung BILD Stellt die optimale Bildqualität ein AUDIO Stellt die Tonqualität und die Lautstärke ein ZEIT Legt die Zeiteinstellungen fest OPTION Passt die allgemeinen Einstellungen an SIGNALQUELLE Legt die gewünschte Signalquelle fest MEINE MEDIEN Für Zugriff auf alle Foto Musik...

Page 111: ...TE Sie können verschiedene externe Geräte mit dem Projektor verbinden HDMI 30 Seite Component 1 Component 2 32 Seite Input AV 32 Seite RGB1 RGB2 31 Seite Speicher 26 Seite Kopfhörer 33 Seite Computer Notebook Video DVD Digitales Gerät USB Kopfhörer Spielekonsole ...

Page 112: ...MI DVI RGB IN 1 RGB IN 2 RGB OUT RS 232C LAN USB AUDIO OUT VIDEO R AUDIO L PC1 DVI PC2 AUDIO IN HDMI DVI 0 HDMI zu DVI Verbindung Verbinden Sie den HDMI DVI Anschluss eines Projektors mit dem DVI Ausgangsanschluss Verwenden Sie dazu ein HDMI zu DVI Kabel Verwenden Sie zur Übertragung eines Audiosignals ein Audiokabel Drücken Sie die Taste INPUT auf der Fernbedienung um HDMI auszuwäh len RGB IN 1 R...

Page 113: ... 1 RGB IN 2 RGB OUT RS 232C LAN USB AUDIO OUT VIDEO R AUDIO L PC1 DVI PC2 AUDIO IN HDMI DVI 8 2 287 5 287 3 RGB IN 1 RGB IN 2 RGB OUT RS 232C LAN USB AUDIO OUT VIDEO R AUDIO L PC1 DVI PC2 AUDIO IN HDMI DVI RGB zu DVI Verbindung Verbinden Sie den RGB IN 1 An schluss oder RGB IN 2 Anschluss eines Projektors mit dem DVI Aus gangsanschluss Verbinden Sie für die Audioausgabe den PC über ein Audiokabel ...

Page 114: ... R AUDIO L PC1 DVI PC2 AUDIO IN HDMI DVI RGB IN 1 RGB IN 2 RGB OUT RS 232C LAN USB AUDIO OUT VIDEO R AUDIO L PC1 DVI PC2 AUDIO IN HDMI DVI 9 287 HIW 3 35 5LJKW 8 2 287 Anschluss an AV INPUT Anschluss an AV INPUT Verbinden Sie die Ausgänge eines externen Geräts mit dem Eingang AV INPUT des Projektors Drücken Sie die Taste INPUT um AV auszuwählen 9 287 HIW 5LJKW 8 2 287 RGB IN 1 RGB IN 2 RGB OUT RS ...

Page 115: ... Kopfhörern Sie können sich den Ton über Kopfhörer anhören RGB IN 1 RGB IN 2 RGB OUT RS 232C LAN USB AUDIO OUT VIDEO R AUDIO L PC1 DVI PC2 AUDIO IN HDMI DVI RGB IN 1 RGB IN 2 RGB OUT RS 232C LAN USB AUDIO OUT VIDEO R AUDIO L PC1 DVI PC2 AUDIO IN HDMI DVI ...

Page 116: ...ung des Projektorge häuses Ziehen Sie vor dem Reinigen des Pro jektorgehäuses den Netzstecker Um Staub oder Flecken vom Objektiv zu entfernen verwenden Sie aus schließlich ein trockenes fusselfreies nicht scheuerndes Tuch Verwenden Sie für die Reinigung keinen Alkohol kein Benzin keinen Verdünner oder andere Chemikalien die Oberflächen beschädigen können Reinigen der Be und Ent lüftung In der Be u...

Page 117: ...y y Benutzen Sie für den Lampenaus tausch den selben Lampentyp Wenn Lampenabdeckung nicht ord nungsgemäß geschlossen ist lässt sich der Projektor nicht einschalten Prüfen Sie in diesem Fall ob die Lampe ordnungsgemäß eingesetzt ist und wenden Sie sich an den LG Electronics Kundendienst Auswechseln der Lampe 1 Schalten Sie den Projektor aus ziehen Sie das Stromkabel von der Steckdose ab und platzie...

Page 118: ...56 Tiefe mm 246 4 Gewicht kg 3 6 Kopfhörer Ohrhörer Impedanz 16 Ω Ausgangsleistung 10 mW Steckerstärke 3 5 mm USB Gerät 5 V 0 5 A max Stromquellen AC 100 240 V 50 Hz 60 Hz Betriebsumgebung Temperatur Betrieb 0 C 40 C Lagerung 20 C 60 C Relative Feuchte Betrieb 0 75 Lagerung 0 85 y y Die verwendeten Bilder und angegebenen technischen Daten in diesem Benutzer handbuch können geändert werden um die L...

Page 119: ...alität im PC Modus empfohlen Unterstützte Bildschirmauflösungen Auflösung Hori zontale Frequenz kHz Vertikale Frequenz Hz 640 x 350 31 468 70 09 640 x 480 31 469 59 94 720 x 400 31 469 70 08 800 x 600 37 879 60 31 1024 x 768 48 363 60 00 1152 x 864 54 348 60 053 1280 x 800 49 7 59 81 1280 x 1024 63 981 60 02 1400 x 1050 65 3 60 1680 x 1050 65 3 59 95 Modus HDMI DVI DTV WiDi Unterstützte Auflösung ...

Page 120: ...kt enthalten sind können Sie unter http opensource lge com herunterladen Neben dem Quellcode stehen dort eb enfalls alle Lizenzbedingungen auf die verwiesen wird Garantieausschlüsse sowie Urheberrechtshinweise zum Download bereit LG Electronics stellt Ihnen gegen eine Gebühr für Distribution Medien Versand und Verwaltung auch den Quellcode auf CD ROM bereit Wenden Sie sich per E Mail an LG Electro...

Page 121: ...0 MHz für Nicht EU Länder Ausgangs leistung Max 802 11a 11 dBm 802 11b 14 dBm 802 11g 10 5 dBm 802 11n 2 4 GHz 11 dBm 802 11n 5 GHz 12 5 dBm y y Da der Frequenzkanal je nach Land variieren kann kann die Betriebsfrequenz nicht durch die Benutzer geändert oder angepasst werden Dieses Gerät ist entsprechend der regionalen Frequenztabelle eingestellt ...

Page 122: ...Die Modell und die Seriennummer des Projektors befinden sich auf der Rückseite oder auf einer Seite des Geräts Bitte no tieren Sie diese Nummern im Falle eines Garantieanspruchs MODELL SERIENNUMMER ...

Page 123: ...Manuale dell utente PROIETTORE LCD BG630 BG650 Leggere attentamente le informazioni sulla sicurezza prima di utilizzare il prodotto www lg com ...

Page 124: ...e in video DivX visitare divx com INFORMAZIONI SU DIVX VIDEO ON DEMAND questo dispositivo DivX Certified deve essere registrato per poter riprodurre i film acquistati in formato DivX Video on Demand VOD Per ottenere il codice di registra zione individuare la sezione DivX VOD nel menu di configurazione del dispositivo Visitare il sito vod divx com per ulteriori informazioni su come completare la pr...

Page 125: ...i appendersi o arrampicarsi sul proiettore Il proiettore potrebbe cadere e causare lesioni personali o morte y y Non posizionare il prodotto direttamente su un tappeto tappetino o luogo in cui la ventilazione è limitata ad esempio uno scaffale o un pensile Ciò potrebbe causare l innalzamento della temperatura interna del prodotto e conseguenti incendi y y Non posizionare il prodotto vicino a sorge...

Page 126: ... y Non posizionare il prodotto su una superficie instabile o soggetta a vibrazioni come un scaffale non fissato o una superficie inclinata Il proiettore potrebbe cadere o capovolgersi e provocare lesioni y y Fare attenzione a non capovolgere o far cadere il prodotto durante il collegamento di dispositivi esterni Ciò potrebbe causare lesioni alle persone o danni al prodotto Alimentazione AVVISO y y...

Page 127: ...izzare soltanto il cavo di alimentazione ufficiale fornito da LG Electronics Non utilizzare altri cavi di alimentazione Ciò potrebbe provocare incendi o scosse elettriche Durante l uso AVVISO y y Non posizionare sul proiettore oggetti contenenti liquidi quali vasi tazze cosmetici medicinali decorazioni o candele Ciò potrebbe provocare incendi o scosse elettriche nonché lesioni personali in caso di...

Page 128: ...potreb be cadere e arrecare danni alle persone o danneggiarsi y y Non ostruire o inserire oggetti nelle ventole di areazione AVVISO y y Non toccare la lente mentre il proiettore è in uso Il calore emanato potrebbe causare ustioni ATTENZIONE y y Non posizionare oggetti pesanti sul prodotto Potrebbe cadere e causare lesioni alle persone y y Fare attenzione a non urtare la lente durante il trasporto ...

Page 129: ...antanti per automobili o industriali prodotti abrasivi o cera benzene alcool o altre sostanze che possano danneggiare il prodotto Ciò può causare incendi scosse elettriche o danneggiare il prodotto deformazione corrosione e danni Varie AVVISO y y Solo un tecnico qualificato può disassemblare o modificare il proiettore Per controlli regolazioni o riparazioni contattare il rivenditore o il centro se...

Page 130: ...ene ioni di litio Maneggiare con cura In caso contrario potrebbero verificarsi esplosioni o incendi y y Accertarsi di utilizzare sempre lo stesso tipo di batteria per le sostituzioni y y Una sostituzione non corretta potrebbe determinare incendi ATTENZIONE y y Non utilizzare batterie nuove insieme alle batterie usate Ciò potrebbe causare incendi o scosse elettriche causate da surriscaldamenti o fu...

Page 131: ...r ver el manual de usuario en el PC 1 Inserte el CD suministrado La página web aparece automáticamente 2 Selezionare la lingua nella pagina Web 3 Fare clic sul nome del modello nella pagina Web 4 Visualice el manual de usuario NOTA y y Si la página web no aparece automáticamente acceda a Mi PC haga clic en LG y a continuación en index htm para ver el manual de usuario ...

Page 132: ...UREZZA 3 Visualización del manual de usuario 9 PREPARAZIONE 11 ACCESSORI 11 Accessori opzionali 12 PARTI E COMPONENTI 13 corpo principale 13 Collegamento Parte 14 Indicatore di stato del proiettore 15 Installazione 16 Precauzioni per l installazione 16 Distanza di proiezione per dimensioni dello schermo 17 Sistema di sicurezza Kensington 18 telecomando 19 Visione con il proiettore 21 Visione con i...

Page 133: ...egamento di un cavo alla porta HDMI o USB accertarsi di utilizzare il jack appropriato Utilizzare un jack di dimensioni standard TIMER SOUND MARK SETTINGS 3D L R 음량 내 미디어 외부입력 선택 키스톤 취침예약 영상모드 페이지 화면크기 화면가림 조용히 설정메뉴 화면정지 간편설정 확 인 자동조정 나가기 Telecomando Batteria AAA Manuale dell utente CD del programma eZ Net Cavo del computer Cavo di alimentazione CD del manuale dell utente ...

Page 134: ...ivenditore presso il quale è stato acquistato il prodotto Gli accessori opzionali possono subire modifiche senza preavviso e possono essere aggiunti nuovi accessori per migliorare le prestazioni del prodotto Schermo di proiezione Cavo HDMI Lampada sostitutiva Cavo video Cavo audio Cavo LAN Cavo da RGB a Component Cavo Component Cavo RS 232C Cavo da DVI a HDMI ...

Page 135: ...l utilizzo del proiettore Potrebbe danneggiarsi NOTA y y Fessura di entrata dell aria filtro dell aria Impedisce l ingresso di polvere e oggetti estranei nel prodotto Pulire regolarmente il filtro dell aria Se danneggiato sostituire il filtro PARTI E COMPONENTI Questo proiettore è stato fabbricato utilizzando una tecnologia di alta precisione È comunque possibile che vengano continuamente visualiz...

Page 136: ...1 RGB IN 2 RGB OUT RS 232C LAN USB AUDIO OUT VIDEO R AUDIO L PC1 DVI PC2 AUDIO IN HDMI DVI VIDEO AUDIO OUT USB AC IN Sicurezza Kens ington Connector System HDMI IN RGB OUT RGB IN2 RGB IN1 RS 232C LAN R AUDIO L AUDIO IN PC1 DVI PC2 altoparlante ...

Page 137: ... proiettore viene acceso Arancione lampeggiante Il proiettore viene spento a causa della temperatura elevata Rosso arancione alternati Problema relativo alla lampada del proiettore Riaccendere il proiettore dopo aver atteso per una quan tità di tempo sufficiente Se l indicatore lampeggia di nuovo in rosso contattare il centro servizi LG Electronics di zona Verde arancione alternati Il proiettore v...

Page 138: ...n torno al proiettore almeno 30 cm y y Non posizionare il prodotto in ambienti caldi o umidi Non posizionare il prodotto in ambienti caldi freddi o umidi y y Non posizionare il prodotto in ambienti polverosi Ciò potrebbe causare incendi y y Non aprire il coperchio del proiettore onde evitare rischi di scosse elettriche y y Questo proiettore è stato fabbricato utilizzando una tecnologia di alta pre...

Page 139: ...lla presa a parete Rapporto della proiezione verso l alto 90 Altezza schermo X X 2 X 2 Larghezza schermo Y Y 2 Y 2 DISPLAY Distanza di proiezione D Distanza di proiezione D DISPLAY 95 mm y y La distanza minima massima rappresenta lo stato regolato ruotando la ghiera dello zoom mediante l apposita funzione y y La distanza di proiezione per ogni formato costituisce esclusivamente un riferimento con ...

Page 140: ...r ulteriori informazioni in merito all installazione e all impiego del sistema di sicurezza Kensington consultare la guida dell utente fornita in dotazione con il sistema di sicurezza Kensington y y Il sistema di sicurezza Kensington è un accessorio opzionale y y Che cos è Kensington Kensington è una società che fornisce sistemi di sicurezza per laptop e altri dispositivi elettronici Sito Web http...

Page 141: ...nte in ingresso Pulsanti di controllo della riproduzione Consentono di regolare la riproduzione di SUPPORTI Key s Consente di regolare le impostazioni Keystone SOUND Consente di passare alla modalità AUDIO SLEEP Consente di impostare il timer di spegnimento PICTURE Consente di modificare la modalità dell immagine ENERGY SAVING Consente di passare alla modalità Risparmio energetico TIMER Consente d...

Page 142: ...chiudere la finestra delle impostazioni Pulsanti colorati Consentono di configurare ulteriori impostazioni per ogni menu y y Il tasto MARK viene utilizzato quando è necessario un aggiornamento software il tasto MARK non è disponibile per un utente NOTA y y Quando si utilizza il telecomando la portata ottimale è inferiore a 6 m sinistra destra ed entro un arco di 30 del ricevitore IR y y Se i cavi ...

Page 143: ...magine verso l alto o verso il basso regolare l altezza del piedistallo alla base del proiettore Pulsante di regolazione del piedistallo anteriore y y Premendo il pulsante di regolazione del piedistallo anteriore regolare il proiettore verso l alto o verso il basso finché l immagine dello schermo non raggiungerà la posizione corretta y y Rilasciando il pulsante di regolazione del piedistallo anter...

Page 144: ...ervizi LG Electronics L uso di lampade di altre case produttrici può danneggiare il proiettore e la lampada y y Estrarre la lampada solo quando deve essere sostituita y y Tenere la lampada fuori dalla portata dei bambini Tenere la lampada lontano da sorgenti di calore quali termosifoni stufe e altro La mancata osservanza di questa precauzione potrebbe provocare incendi o ustioni y y Evitare che la...

Page 145: ...i sull immagine ai bordi dello schermo Originale consente di visualizzare le immagini nello stesso rapporto d aspetto dell immagine originale Originale 4 3 consente di ridimensionare l immagine con un rapporto 4 3 Zoom consente di ingrandire un immagine per adattarla alla larghezza dello schermo La parte superiore e inferiore dell immagine potrebbe risultare troncata y y Premere il pulsante o per ...

Page 146: ...V 100 0 2 Premere il pulsante OK al termine dell operazione di regolazione Utilizzo di Elenco Input Utilizzo di Elenco Input 1 Premere il pulsante INPUT per accedere alle sorgenti in ingresso Viene visualizzata prima la modalità in ingresso connessa La modalità Component è sempre attivata Elenco Input Component1 Component2 USB AV RGB1 RGB2 ꔂ Spo ꔉ OK Rinomina ingressi HDMI Uscita 2 Selezionare un ...

Page 147: ...sante o per scorrere i menu indicati di seguito Funzione di schermo vuoto Utilizzo della funzione di schermo vuoto Questa funzione può risultare utile se è necessario attirare l attenzione durante una riunione o un corso di formazione 1 Premendo il pulsante BLANK lo schermo verrà coperto dal colore di sfondo Per modificare il colore di sfondo fare riferimento alla sezione Specifica del modulo LAN ...

Page 148: ...vere o eliminare dati nella periferica USB Collegare una flash drive USB come indicato di seguito flash drive USB Rimozione di una periferica USB 1 Premere il pulsante Q MENU 2 Utilizzare il pulsante o per accedere a Periferica USB e premere il pulsante OK 3 Rimuovere la periferica USB NOTA y y Dopo aver scollegato la periferica USB non sarà possibile leggerla Rimuovere la periferica USB e ricolle...

Page 149: ... periferica di archiviazione USB con un cavo fornito dalla casa produttrice della periferica Se si utilizza un cavo non fornito dalla casa produttrice o un cavo eccessivamente lungo è possibile che la periferica non venga rilevata y y È possibile che alcune periferiche USB non vengano supportate o che non funzionino correttamente y y Se la lunghezza del nome di una cartella o di un file è eccessiv...

Page 150: ...ere il pulsante OK 4Al termine premere il pulsante EXIT Menu Descrizione IMMAGINE Consente di regolare la qualità dell immagine per una visualizzazione ottimale Audio Consente di regolare la qualità dell audio e il livello del volume TEMPO Consente di configurare impostazioni relative all ora OPZIONE Consente di personalizzare le impostazioni generali INGRESSO Consente di selezionare l ingresso de...

Page 151: ...VI ESTERNI È possibile collegare vari dispositivi esterni al proiettore HDMI 30 Pagina Component 1 Component 2 32 Pagina Ingresso AV 32 Pagina RGB1 RGB2 31 Pagina Memoria 26 Pagina Cuffie 33 Pagina Computer portatile Video DVD Dispositivo digitale USB Cuffie Console di gioco ...

Page 152: ...UDIO IN HDMI DVI RGB IN 1 RGB IN 2 RGB OUT RS 232C LAN USB AUDIO OUT VIDEO R AUDIO L PC1 DVI PC2 AUDIO IN HDMI DVI 0 Collegamento da HDMI a DVI Collegare il connettore HDMI DVI di un proiettore al connettore di uscita DVI mediante un cavo da HDMI a DVI Per il segnale audio utilizzare un cavo voce Premere il pulsante INPUT sul teleco mando per selezionare HDMI RGB IN 1 RGB IN 2 RGB OUT RS 232C LAN ...

Page 153: ... HDMI DVI RGB IN 1 RGB IN 2 RGB OUT RS 232C LAN USB AUDIO OUT VIDEO R AUDIO L PC1 DVI PC2 AUDIO IN HDMI DVI 8 2 287 5 287 3 RGB IN 1 RGB IN 2 RGB OUT RS 232C LAN USB AUDIO OUT VIDEO R AUDIO L PC1 DVI PC2 AUDIO IN HDMI DVI Collegamento da RGB a DVI Collegare il connettore RGB IN 1 o RGB IN 2 di un proiettore al con nettore di uscita DVI Per l uscita audio collegare il PC al proiettore mediante un c...

Page 154: ...DVI PC2 AUDIO IN HDMI DVI RGB IN 1 RGB IN 2 RGB OUT RS 232C LAN USB AUDIO OUT VIDEO R AUDIO L PC1 DVI PC2 AUDIO IN HDMI DVI 9 287 HIW 3 35 5LJKW 8 2 287 Collegamento all INGRESSO AV Collegamento AV Collegare le porte di uscita di un dis positivo esterno e la porta di ingresso AV del proiettore Premere il pulsante INPUT per selezionare AV 9 287 HIW 5LJKW 8 2 287 RGB IN 1 RGB IN 2 RGB OUT RS 232C LA...

Page 155: ...fie È possibile ascoltare l audio tramite una cuffia RGB IN 1 RGB IN 2 RGB OUT RS 232C LAN USB AUDIO OUT VIDEO R AUDIO L PC1 DVI PC2 AUDIO IN HDMI DVI RGB IN 1 RGB IN 2 RGB OUT RS 232C LAN USB AUDIO OUT VIDEO R AUDIO L PC1 DVI PC2 AUDIO IN HDMI DVI Accessori opzionali ...

Page 156: ...tore scollegare prima il cavo di alimentazione Per rimuovere polvere e macchie utilizzare solo un panno asciutto non abrasivo e privo di lanugine per pulire la lente Non utilizzare alcool benzene sol venti o altri detergenti chimici poiché potrebbero danneggiare la struttura esterna Pulizia della fessura di entrata e uscita dell aria Nella fessura di entrata e uscita dell aria possono accumularsi ...

Page 157: ...pre lo stesso tipo di lampade per le sostituzioni Se il coperchio non viene chiuso correttamente il proiettore non si accenderà In questo caso verificare che la lampada sia fissata correttamente e contattare il centro servizi LG Electronics Sostituzione della lampada 1 Spegnere il proiettore scollegare il cavo di alimentazione dalla presa e posizionare il dispositivo su un tavolo o una superficie ...

Page 158: ...à mm 246 4 Peso kg 3 6 Cuffie auricolari Impedenza 16 Ω Potenza in uscita 10 mW Spessore del jack 3 5 mm Periferica USB 5 V 0 5 A max Alimentazione CA da 100 a 240 V 50 Hz 60 Hz Ambiente operativo Temperatura Funzionamento 0 C 40 C Memoria 20 C 60 C Umidità relativa Funzionamento 0 75 Memoria 0 85 y y Le immagini utilizzate e le specifiche indicate in questo manuale dell utente sono soggette a mod...

Page 159: ...io come Nessun segnale o Formato non valido y y Il prodotto supporta il tipo DDC1 2B come funzione Plug Play rilevamento automatico del monitor del PC y y Tipi di segnale supportati per la sincronizzazione con il PC sincronizzazione di tipo separata y y In modalità PC è consigliabile utilizzare la risoluzione 1024 x 768 per ottenere la qualità delle immagini migliore Modalità HDMI DVI DTV WiDi sup...

Page 160: ...a all indirizzo http open source lge com In aggiunta al codice sorgente sono dis ponibili per il download tutti le condizioni di licenza le esclusioni di responsabilità e le relative note di copyright LG Electronics fornisce inoltre il codice open source su CD ROM a fronte del pagamento di una cifra a copertura dei costi che tale distribuzione comporta come il costo del supporto di spedizione e ge...

Page 161: ... 5 725 a 5 850 MHz per paesi non UE Potenza in uscita max 802 11a 11 dBm 802 11b 14 dBm 802 11g 10 5 dBm 802 11n 2 4 GHz 11 dBm 802 11n 5 GHz 12 5 dBm y y Poiché il canale della banda utilizzato dal paese potrebbe essere diverso l utente non può modificare o regolare la frequenza operativa il prodotto viene impostato in base alla tabella di frequenza regionale ...

Page 162: ...l numero di serie del proiettore sono situati sul retro o sulla parte laterale del proiettore Annotarli qui di seguito af finché siano disponibili qualora fosse nec essario contattare l assistenza MODELLO N DI SERIE ...

Page 163: ...Manual de usuario PROYECTOR LCD BG630 BG650 Lea la información de seguridad atentamente antes de utilizar el producto www lg com ...

Page 164: ...vídeo DivX Visite divx com para obtener más información y herramientas de software para convertir sus archivos a vídeo DivX ACERCA DE DIVX VIDEO ON DEMAND este dispositivo DivX Certified deberá registrarse para poder reproducir películas DivX Video on Demand VOD compradas Para obtener el código de registro localice la sección DivX VOD en el menú de configuración del dispositivo Visite vod divx com...

Page 165: ...a del proyector Podría producirse un incendio y y No deje a los niños acercarse ni subirse al proyector El proyector podría caerse y causar lesiones e incluso la muerte y y No coloque el proyector directamente sobre alfombras ni moquetas ni en lugares donde la ventilación esté limitada como armarios o estanterías Podría elevar la temperatura interna del proyector y producirse un incendio y y No co...

Page 166: ...ies inestables ni que tiemblen como estanterías expuestas a vibraciones o superficies inclinadas Podría caerse y causar lesiones y y Al conectar dispositivos externos al proyector tenga cuidado para que el proyector no vuelque El proyector podría dañarse u ocasionar lesiones personales Alimentación ADVERTENCIA y y Debe estar conectado el cable de conexión a tierra Asegúrese de conectar el cable de...

Page 167: ...es de alimentación proporcionados por LG Electronics No utilice cables de otros fabricantes Esto podría provocar incendios o descargas eléctricas Durante el uso ADVERTENCIA y y No coloque ningún recipiente con líquidos sobre el proyector como jarrones macetas tazas cosméticos medicinas adornos velas etc En caso de caída pueden producirse incendios descargas eléctricas o lesiones y y Si el proyecto...

Page 168: ...siones físicas o daños en el producto y y No introduzca ningún objeto ni cubra los orificios de salida de aire ADVERTENCIA y y Nunca toque la lente del proyector cuando lo esté usando ya que estará muy caliente Podría sufrir quemaduras PRECAUCIÓN y y No coloque objetos pesados encima del proyector Podrían caerse y causar lesiones físicas y y Proteja la lente de los impactos fuertes durante el tran...

Page 169: ...ndustriales ni para coches sustancias abrasivas ni cera benceno alcohol etc Podría producirse un incendio una descarga eléctrica o daños en el producto deformación corrosión y daños Varios ADVERTENCIA y y Solo un técnico cualificado podrá desmontar o modificar el proyector Para cualquier tarea de inspección ajuste o reparación póngase en contacto con el vendedor o el centro de servicio En caso con...

Page 170: ... lo que se debe manipular con cuidado De no hacerse así podría causar una explosión o un incendio y y Asegúrese de usar el mismo tipo de batería para su sustitución y y La sustitución incorrecta de las baterías puede provocar un incendio PRECAUCIÓN y y No mezcle las pilas nuevas con las antiguas Podría producirse un incendio o una descarga eléctrica a consecuencia de un sobrecalentamiento o una fu...

Page 171: ...ver el manual de usuario en el PC 1 Inserte el CD suministrado La página web aparece automáticamente 2 Seleccione el idioma en la página web 3 Haga clic sobre el nombre del modelo en la página web 4 Visualice el manual de usuario NOTA y y Si la página web no aparece automáticamente acceda a Mi PC haga clic en LG y a continuación en index htm para ver el manual de usuario ...

Page 172: ...de la lámpara 35 ESPECIFICACIONES 36 LICENCIA 2 Precauciones de seguri dad 3 Visualización del manual de usuario 9 PREPARATIVOS 11 ACCESORIOS 11 Accesorios opcionales 12 DENOMINACIÓN DE LAS PIEZAS 13 cuerpo 13 Parte de conexión 14 Indicador de estado del proyector 15 Instalación 16 Precauciones al realizar la instalación 16 Distancia de proyección por tamaño de pantalla 17 Sistema de seguridad Ken...

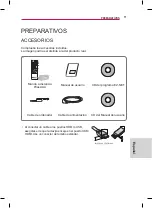
Page 173: ...a los puertos HDMI o USB asegúrese de que la clavija encaje en el puerto USB HDMI Use un conector de tamaño estándar TIMER SOUND MARK SETTINGS 3D L R 음량 내 미디어 외부입력 선택 키스톤 취침예약 영상모드 페이지 화면크기 화면가림 조용히 설정메뉴 화면정지 간편설정 확 인 자동조정 나가기 Mando a distancia Pilas AAA Manual de usuario CD del programa EZ NET Cable de ordenador Cable de alimentación CD del Manual del usuario ...

Page 174: ...n el establecimiento donde haya adquirido el producto Los accesorios opcionales están sujetos a cambios sin previo aviso para la mejora del rendimiento del producto además podrían añadirse nuevos accesorios Pantalla para el proyector Cable HDMI Lámpara de sustitución Cable de vídeo Cable de audio Cable LAN Cable de RGB a componentes Cable de componentes Cable RS 232C Cable DVI a HDMI ...

Page 175: ...ector cuando esté en funcionamiento ya que podría dañarse NOTA y y Entrada de aire filtro de aire Evita que el producto se atasque con polvo u otros objetos extraños Limpie el filtro del aire con frecuencia Si el filtro está dañado sustitúyalo por otro nuevo DENOMINACIÓN DE LAS PIEZAS El proyector se ha fabricado con tecnología de última generación Sin embargo en la pantalla podrían aparecer peque...

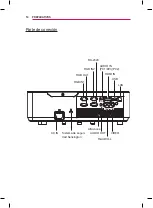
Page 176: ... IN 1 RGB IN 2 RGB OUT RS 232C LAN USB AUDIO OUT VIDEO R AUDIO L PC1 DVI PC2 AUDIO IN HDMI DVI VIDEO AUDIO OUT USB AC IN Sistema de seguri dad Kensington HDMI IN RGB OUT RGB IN2 RGB IN1 RS 232C LAN R AUDIO L AUDIO IN PC1 DVI PC2 Altavoces ...

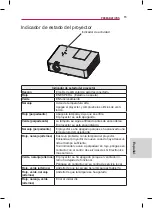
Page 177: ...canzado una temperatura demasiado alta Rojo naranja alternos Existe un problema con la lámpara del proyector Encienda el proyector de nuevo cuando haya transcur rido el tiempo suficiente Si el indicador vuelve a parpadear en rojo póngase en contacto con el centro de servicios de LG Electronics más cercano Verde naranja alternos El proyector se ha apagado porque el ventilador in terno ha dejado de ...

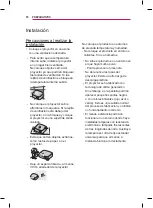
Page 178: ...ededor del proyector No coloque el producto en entornos de elevada temperatura y humedad No coloque el producto en entornos calientes fríos o húmedos y y No sitúe el producto en un entorno en el que haya mucho polvo Podría provocar un incendio y y No abra nunca las tapas del proyector Existe un alto riesgo de descarga eléctrica y y El proyector se ha fabricado con tecnología de última generación S...

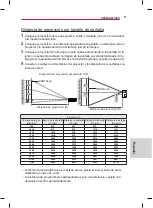
Page 179: ...pared Proporción de proyección ascendente 90 Altura de la pantalla X X 2 X 2 Ancho de la pantalla Y Y 2 Y 2 PANTALLA Distancia de proyección D Distancia de proyección D PANTALLA 95 mm Formato 4 3 Tamaño de la pan talla mm Ancho de la pantalla Y mm Altura de la pantalla X mm Distancia más corta D mm Distancia más larga D mm 762 610 457 873 1052 1016 813 610 1172 1411 1270 1016 762 1471 1771 1524 12...

Page 180: ...obtener más información sobre la instalación y el uso detallado del sistema de seguridad Kensington consulte la guía del usuario suministrada con el sistema de seguridad Kensington y y El sistema de seguridad Kensington es un accesorio opcional y y Qué es Kensington Kensington es una empresa que ofrece sistemas de seguridad para portátiles y otros dispositivos electrónicos Sitio web http www kensi...

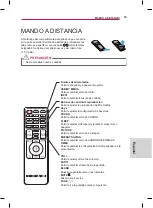
Page 181: ... al modo USB INPUT Permite cambiar la fuente de entrada Botones de control de reproducción Permite ajustar la reproducción de Mis medios Key s Permite ajustar la configuración de Keystone SOUND Permite cambiar el modo SONIDO SLEEP Permite ajustar el tiempo que tardará el proyector en apagarse PICTURE Permite cambiar el modo de imagen ENERGY SAVING Permite cambiar el modo AHORRO DE ENERGÍA TIMER Pe...

Page 182: ...s Establecen configuraciones adicionales para cada menú y y El botón MARK se utiliza cuando es necesario actualizar el software El botón MARK no está dis ponible para un usuario NOTA y y Al usar el mando a distancia el alcance óptimo es inferior a 6 m a izquierda derecha y en un arco de 30 respecto al receptor IR y y Si los cables están conectados el alcance es inferior a 3 m a izqui erda derecha ...

Page 183: ...nterior Para mover la imagen de la pantalla hacia arriba o hacia abajo ajuste la altura del pie de la parte inferior del proyector Botón de ajuste del pie de la parte frontal y y Al presionar el botón de ajuste del pie de la parte frontal podrá ajustar el proyector hacia arriba o hacia abajo hasta que la imagen de la pantalla se sitúe correctamente y y Al soltar el botón de ajuste del pie de la pa...

Page 184: ...centro de servicios de LG Electronics El uso de una lámpara diseñada por otro fabricante podría dañar el proyector y la lámpara y y Quite la lámpara solo cuando vaya a sustituirla y y Mantenga la lámpara fuera del alcance de los niños Mantenga la lámpara alejada de fuentes de calor como radiadores estufas etc Existe el riesgo de incendio o quemaduras y y No exponga la lámpara a líquidos o material...

Page 185: ...osible que se muestre ruido de imagen en los bordes de la pantalla Original muestra las imágenes en el mismo formato que la imagen original Original 4 3 cambia la imagen al formato 4 3 Zoom permite ampliar una imagen de modo que se ajuste al ancho de la pantalla Puede que no aparezcan la parte superior e inferior de la imagen y y Pulse el botón o para acercar o alejar la imagen y y Pulse el botón ...

Page 186: ... 2 Pulse el botón OK cuando haya finalizado el ajuste Mientras se utiliza la opción Patrón de prueba las teclas del panel de control no estarán operativas NOTA Uso de Lista de entrada Uso de Lista de entrada 1 Pulse el botón INPUT para acceder a las fuentes de entrada El modo de la entrada conectada aparece en primer lugar Tenga en cuenta que el componente siempre está activado Lista de entrada Co...

Page 187: ... desplazarse por los siguientes menús Función de imagen blanca Uso de la función de imagen blanca Esta función puede ser útil si tiene que llamar la atención durante una reunión o un curso de formación 1 Pulse el botón BLANK y la pantalla se cubrirá con el color de fondo Consulte en Módulo LAN inalámbrico cómo cambiar el color de fondo 2 Para cancelar la función de imagen blanca pulse cualquier bo...

Page 188: ...rá escribir datos en el dispositivo USB ni eliminarlos Conecte una memoria USB según ilustra la imagen Memoria USB Extracción de un dispositivo USB 1 Pulse el botón Q MENU 2 Use el botón o para desplazarse a Dispositivo USB y a continuación pulse el botón OK 3 Retire el dispositivo USB NOTA y y El dispositivo USB no se puede leer una vez desconectado Retire el dispositivo USB y vuelva a conectarlo...

Page 189: ...erna En caso contrario el dispositivo podría no reconocerse y y Conecte el dispositivo de almacenamiento USB con el cable suministrado por el fabricante Si utiliza otro tipo de cable o un cable excesivamente largo el dispositivo podría no reconocerse y y Algunos dispositivos USB podrían no ser compatibles o no funcionar correctamente y y Si una carpeta o archivo es demasiado grande podrían no reco...

Page 190: ...ión pulse el botón OK 4 Pulse el botón EXIT cuando haya terminado Menú Descripción IMAGEN Ajusta la calidad de la imagen para obtener una visual ización óptima AUDIO Ajusta la calidad del sonido y el nivel del volumen HORA Permite ajustar las opciones relacionadas con la hora OPCIÓN Permite personalizar los ajustes generales ENTRADA Permite seleccionar la fuente de entrada MIS MEDIOS Ofrece acceso...

Page 191: ...uede conectar varios dispositivos externos al proyector HDMI 30 Página Component 1 Component 2 32 Página Entrada AV 32 Página RGB1 RGB2 31 Página Memoria 26 Página Auriculares 33 Página Ordenador de sobremesa portátil Vídeo DVD Dispositivo digital USB Auriculares Consola de juegos ...

Page 192: ...DMI DVI RGB IN 1 RGB IN 2 RGB OUT RS 232C LAN USB AUDIO OUT VIDEO R AUDIO L PC1 DVI PC2 AUDIO IN HDMI DVI 0 Conexión HDMI a DVI Conecte el conector HDMI DVI del proyector al conector de salida DVI mediante un cable HDMI a DVI Para la señal de audio conéctelo mediante un cable de voz Pulse el botón INPUT del mando a dis tancia para seleccionar HDMI RGB IN 1 RGB IN 2 RGB OUT RS 232C LAN USB AUDIO OU...

Page 193: ...RGB IN 1 RGB IN 2 RGB OUT RS 232C LAN USB AUDIO OUT VIDEO R AUDIO L PC1 DVI PC2 AUDIO IN HDMI DVI 8 2 287 5 287 3 RGB IN 1 RGB IN 2 RGB OUT RS 232C LAN USB AUDIO OUT VIDEO R AUDIO L PC1 DVI PC2 AUDIO IN HDMI DVI Conexión RGB a DVI Conecte el conector RGB IN 1 o el conector RGB IN 2 del proyector al conector de salida DVI Para la salida de audio conecte el PC al proyector por medio de un cable de a...

Page 194: ...2 AUDIO IN HDMI DVI RGB IN 1 RGB IN 2 RGB OUT RS 232C LAN USB AUDIO OUT VIDEO R AUDIO L PC1 DVI PC2 AUDIO IN HDMI DVI 9 287 HIW 3 35 5LJKW 8 2 287 Conexión a la entrada AV Conexión a la entrada AV Conecte los puertos de salida de un dispositivo externo y el puerto de en trada AV del proyector Pulse el botón INPuT para seleccionar AV 9 287 HIW 5LJKW 8 2 287 RGB IN 1 RGB IN 2 RGB OUT RS 232C LAN USB...

Page 195: ... auricu lares Puede escuchar el audio a través de unos auriculares RGB IN 1 RGB IN 2 RGB OUT RS 232C LAN USB AUDIO OUT VIDEO R AUDIO L PC1 DVI PC2 AUDIO IN HDMI DVI RGB IN 1 RGB IN 2 RGB OUT RS 232C LAN USB AUDIO OUT VIDEO R AUDIO L PC1 DVI PC2 AUDIO IN HDMI DVI ...

Page 196: ...piar la carcasa del proyec tor desenchufe el cable de aliment ación Para eliminar el polvo o las manchas de la lente use un paño seco y suave que no suelte pelusa No use alcohol benceno disolventes ni otros productos químicos que podrían dañar la carcasa Limpieza de la entrada salida de aire El polvo u otros objetos extraños pu eden acumularse con facilidad en las rejillas de entrada salida de air...

Page 197: ...e de usar el mismo tipo de lámpara para su sustitución El proyector no se encenderá mientras la tapa de la lámpara esté abierta En ese caso compruebe si la lámpara se ha montado correctamente y póngase en contacto con el centro de servicios de LG Electronics Sustitución de la lámpara 1 Apague el proyector y desenchufe el cable de alimentación A continuación colóquelo sobre una mesa o una superfici...

Page 198: ...dancia 16 Ω Potencia de salida 10 mW Grosor del conector 3 5 mm Dispositivo USB 5 V 0 5 A máx Fuentes de aliment ación CA de 100 a 240 V 50 Hz 60 Hz Entorno de funcion amiento Temperatura Funcionamiento 0 C a 40 C Almacenamiento 20 C a 60 C Humedad relativa Funcionamiento 0 75 Almacenamiento 0 85 y y Las imágenes utilizadas en las especificaciones de este manual de usuario están sujetas a cambios ...

Page 199: ... de imagen óptima en el modo PC Pantalla de monitor compatible Resolución Frecuencia horizontal kHz Frecuencia vertical Hz 640 x 350 31 468 70 09 640 x 480 31 469 59 94 720 x 400 31 469 70 08 800 x 600 37 879 60 31 1024 x 768 48 363 60 00 1152 x 864 54 348 60 053 1280 x 800 49 7 59 81 1280 x 1024 63 981 60 02 1400 x 1050 65 3 60 1680 x 1050 65 3 59 95 Modo HDMI DVI DTV WiDi admitido Resolución Fre...

Page 200: ...ierto de este producto visite http opensource lge com Además del código fuente podrá des cargar las condiciones de las licencias exención de responsabilidad de la garantía y avisos de copyright LG Electronics también le proporcio nará código abierto en CD ROM por un importe que cubre los gastos de su distribución como el soporte el envío y la manipulación previa solicitud por correo electrónico a ...

Page 201: ...5 725 a 5 850 MHz fuera de la UE Potencia de salida máx 802 11a 11 dBm 802 11b 14 dBm 802 11g 10 5 dBm 802 11n 2 4 GHz 11 dBm 802 11n 5 GHz 12 5 dBm y y Puesto que el canal de banda utilizado en distintos países puede ser diferente el usuario no puede cambiar ni ajustar la frecuencia de funcionamiento Este producto está configurado para la tabla de frecuencias de la región ...

Page 202: ...El modelo y el número de serie del proyec tor se encuentran en la parte posterior o en un lateral del mismo Anótelos por si alguna vez necesita asistencia MODELO N º DE SERIE ...

Reviews: