2
Connecting
Connecting
15
C
onnecting
2
Connecting to Your TV
Make one of the following connections, depending
on the capabilities of your existing equipment.
y
HDMI connection (page 15)
y
Component Video connection (page 16)
y
Video connection (page 17)
y
Depending on your TV and other
equipment you wish to connect, there are
various ways you could connect the player.
Use only one of the connections described
in this manual.
y
Please refer to the manuals of your TV,
Stereo System or other devices as necessary
to make the best connections.
y
Do not connect the player’s AUDIO OUT
jack to the phono in jack (record player) of
your audio system.
y
Do not connect your player via your VCR.
The image could be distorted by the copy
protection system.
,
Note
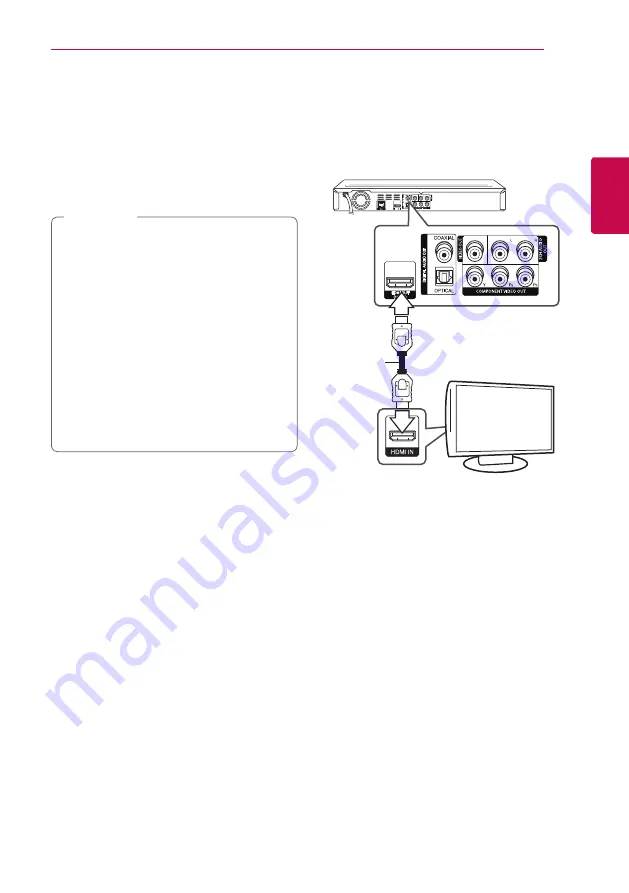
HDMI Connection
If you have a HDMI TV or monitor, you can connect
it to this player using a HDMI cable (Type A, High
Speed HDMI™ Cable). Connect the HDMI jack on
the player to the HDMI jack on a HDMI compatible
TV or monitor.
TV
HDMI
cable
Set the TV’s source to HDMI (refer to TV’s Owner’s
manual).
Additional Information for HDMI
y
When you connect a HDMI or DVI compatible
device make sure of the following:
-
Try switching off the HDMI/DVI device and
this player. Next, switch on the HDMI/DVI
device and leave it for around 30 seconds,
then switch on this player.
-
The connected device’s video input is set
correctly for this unit.
-
The connected device is compatible with
720x480p, 1280x720p, 1920x1080i or
1920x1080p video input.
y
Not all HDCP-compatible HDMI or DVI devices
will work with this player.
-
The picture will not be displayed properly
with non-HDCP device.
Rear of the unit


