LG BD430 Owner'S Manual Download Page 15

15

Part names and functions
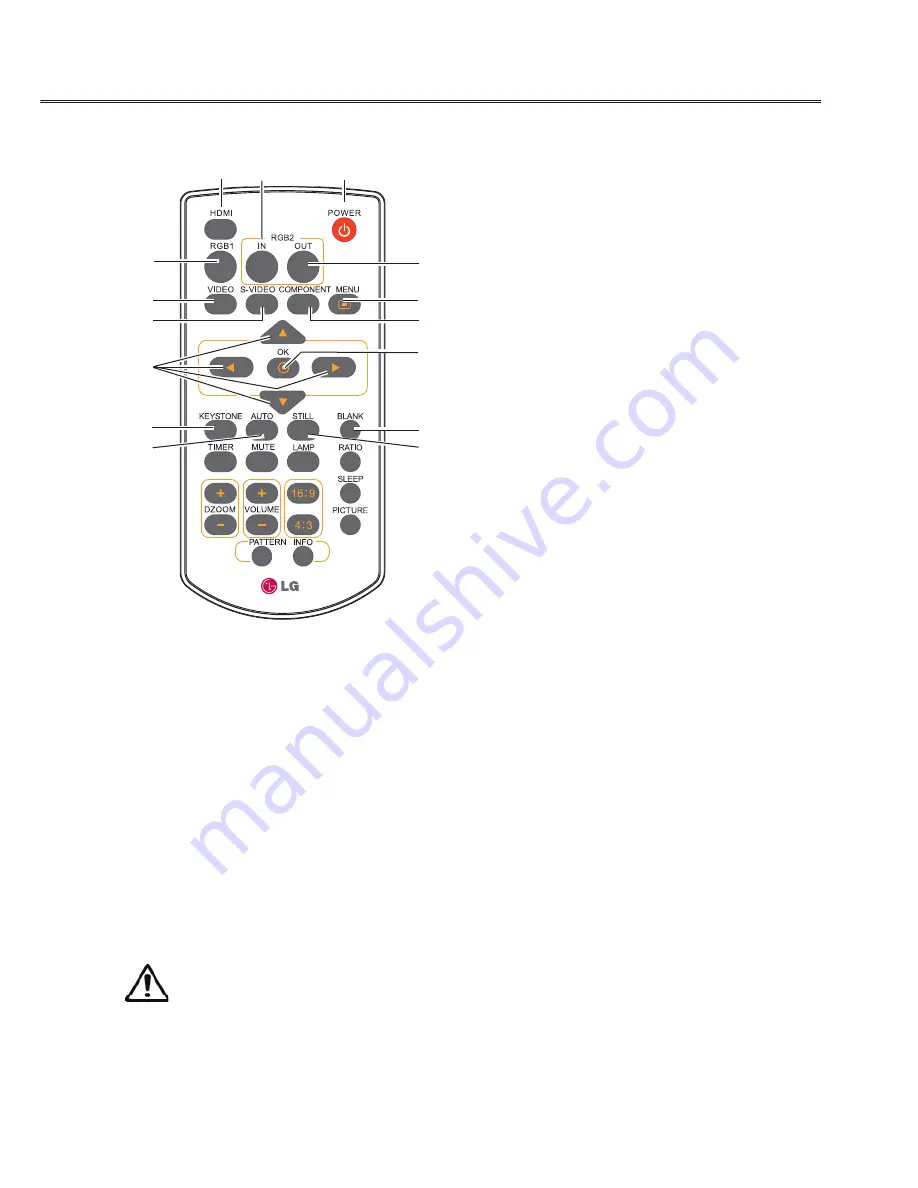
Remote control

HDMI button

    Select HDMI input source.

② 

RGB2 IN button

     Select RGB2 as RGB input.

③ 

POWER button

    Turn the projector on or off .

④ 

RGB1 button

    Select RGB1 input source.

⑤ 

RGB2 OUT button

     Enable RGB2 as  monitor out.

VIDEO  button

    Select VIDEO input source.

MENU button

    Open or close the on screen menu.

S-VIDEO button

    Select S-Video input source.


⑨ 

COMPONENT button

    Select the component input source.

⑩ 

▲▼◄► 

button

    - Select an item or adjust the value in the

      on screen menu.

    - Move the image in Digital zoom + mode.

OK button

    Access the menu or select an item in the

    menu.

KEYSTONE button

    Calibrate keystone distortion.

⑬ 

BLANK button

     Hide the on screen menu.

AUTO button

    Enter the AUTO setup mode.

⑮ 

STILL button

    Still the projected image.

To ensure safe operation, observe the 

following precautions:

- Do not bend, drop or expose the remote

   control to moisture or heat.

- For cleaning, use a soft dry cloth. Do not

   apply benzene, thinner, splay, or any 

   other chemicals.

Please refer to next page for other buttons.

2930058502

Summary of Contents for BD430

Page 1: ...Owner s Manual Model BD430 BD450 BD460 BD470 P N 4100411501 Rev B www lg com LCD Projector ...

Page 2: ...of uninsulated dangerous voltage within the product s enclosure that may be of sufficient magnitude to constitute a risk of electric shock to persons Do not place the projector in direct sunlight or near heat sources such as radiators fires stoves etc This may cause a fire Do not place flammable materials such as aerosols near the projector This may cause a fire Do not allow your children to cling...

Page 3: ...ff the main power remove the power plug which should be positioned so it is easy to access for operation Do not allow a tablecloth or curtain to block the vents This may cause the internal temperature of the projector to rise and cause a fire The distance between the projector and the wall should be more than 30 cm for ventilation purposes Otherwise this may cause the internal temperature of the p...

Page 4: ...o not use other power cords This may cause a fire or an electric shock USING Do not place anything containing liquid such as a vase flowerpot cup cosmetics chemicals decorations or candles etc on top of the projector Possible fire electric shock or falling may cause physical injury In the event that there is a big impact to the projector or the cabinet is damaged switch it off unplug it from the w...

Page 5: ... a distance of more than four times the diagonal length of the screen Make sure that the length of connecting cable is long enough Otherwise the product may fall causing personal injury or damage to the product Do not place a heavy object on the projector It may fall down and cause physical injury Be careful to prevent the lens from heavy impact during transportation Do not touch the lens The lens...

Page 6: ...high humidity Do not spray the projector with water when cleaning Do not allow water to go into the projector or do not allow it to get wet This may cause a fire or an electric shock When there is smoke or a strange smell coming out from the projector or a foreign object falls into the projector please switch it off and unplug it from the power outlet and contact an LG Electronics Service Center I...

Page 7: ... determined by turning the equipment off and on the user is encouraged to try to correct the interference by one or more of the following measures Reorient or relocate the receiving antenna Increase the separation between the equipment and receiver Connect the equipment into an outlet on a circuit different from that to which the receiver is connected Consult the dealer or an experienced radio TV ...

Page 8: ...5 For more detailed information about disposal of Your old batteries accumulators please contact Your city office waste disposal service or the shop where You purchased the product Disposal of waste batteries accumulators 1 When this crossed out wheeled bin symbol is attached to a product it means the product is covered by the European Directive 2002 96 EC 2 All electrical and electronic products ...

Page 9: ...enses visit www lg com HDMI the HDMI logo and High Definition Multimedia Interface are trademarks or registered trademarks of HDMI Licensing LLC Image shown may differ from your projector Your projector s OSD On Screen Display may differ slightly from that shown in this manual NOTE ...

Page 10: ... function 27 Keystone 27 Audio adjustment 28 Remote control operation 29 Computer input 31 Select input source RBG 1 RGB 2 31 Computer system select 32 Auto PC adjustment 33 Manual adjustment via PC 34 Image select 35 Image adjust 36 Screen size adjust 37 Video Input 38 Select input source HDMI Component S video Video 38 Video system select 39 Image select 40 Image adjust 41 Screen size adjust 42 ...

Page 11: ...11 Statement Note The on screen menu and pictures in the manual may slightly differ from the real product The manual is subject to change without prior notice ...

Page 12: ... Bottom Air filter cover Remote receiver Zoom ring Projector lens Lens cap with string Speaker Focus ring Power cord connector Safety lock Terminals and connectors Top control and indicators Lamp cover Adjustable foot Foot adjusting Button ...

Page 13: ... Cb Pr Cr Connect the component signals to these jacks Connect the composite signals to the VIDEO Y jack S VIDEO Used to connect the S video output of video equipment RGB IN 1 Used to connect a computer output RS 232C When using RS 232C to control the projector please connect the serial control line to this terminal HDMI Used to connect the HDMI digital output AUDIO IN PC Connect the audio output ...

Page 14: ...ttons Select an item or adjust the value in the on screen menu Adjust the volume level buttons Move the image in the Digital Zoom mode POWER button To turn on off the projector INPUT button To select an input source POWER TEMP indicator Lights red when the projector is in stand by mode Lights green during operations Blinks green in the Power management mode Blinks orange while projector is cooling...

Page 15: ...ent input source button Select an item or adjust the value in the on screen menu Move the image in Digital zoom mode OK button Access the menu or select an item in the menu KEYSTONE button Calibrate keystone distortion BLANK button Hide the on screen menu AUTO button Enter the AUTO setup mode STILL button Still the projected image To ensure safe operation observe the following precautions Do not b...

Page 16: ...ton Select the digital zoom mode VOLUME button Decrease the volume LAMP button Select a lamp mode SLEEP button Turn off the projector in a specified time 16 9 button Select 16 9 on screen display PICTURE button Select image mode 4 3 button Select 4 3 on screen display PATTERN button Select a test pattern picture INFO button Operate the information function RATIO button Select your required screen ...

Page 17: ...ntrol If the battery has leaked on the remote control carefully wipe the case clean and install new batteries Risk of explosion if a battery is replaced by an incorrect type Dispose of used batteries according to the instructions Point the remote control toward the projector when pressing any button The maximum operating range for the remote control is about 5 meters and 60 degrees MENU AUTO INPUT...

Page 18: ...nal 11 478m 9 556m 6 363m 4 767m 3 171m 100 40 150 200 300 300 Inch Diagonal Center A B 1 255m A B 49 1 Screen size WxH mm 4 3 aspect ratio 40 100 150 200 300 813x610 2032x1524 3048x2286 4064x3048 6096x4572 Maximum 1 172m 2 967m 4 464m 5 960m 8 943m Minimum 1 411m 3 567m 5 363m 7 159m 10 737m Screen size WxH mm 16 10 aspect ratio 40 100 150 200 300 862 x 538 2154x1346 3231x2019 4308x2692 6462x4039...

Page 19: ...e HDMI cable Unplug the power cords of both the projector and external equipment from the AC outlet before connecting the cables HDMI RGB OUT VIDEO Y Pr Cr R L AUDIO IN AUDIO OUT Pb Cb S VIDEO RGB IN 2 RGB IN 1 RS 232C MONO RGB intput RGB cable RGB cable HDMI output RGB output Serial port Serial cable HDMI cable HDMI RGB output RGB 1 input Control port ...

Page 20: ...cable Component cable RCA 3 Unplug the power cords of both the projector and external equipment from the AC outlet before connecting the cables HDMI RGB OUT VIDEO Y Pr Cr R L AUDIO IN AUDIO OUT Pb Cb S VIDEO RGB IN 2 RGB IN 1 RS 232C MONO Component video output Video output S video output HDMI output S video cable Video cable RCA cable Video Y Pb Cb Pr Cr S video HDMI HDMI cable ...

Page 21: ...nection Cables are not supplied with the projector Audio cable HDMI RGB OUT VIDEO Y Pr Cr R L AUDIO IN AUDIO OUT Pb Cb S VIDEO RGB IN 2 RGB IN 1 RS 232C MONO Audio input External Audio Equipment R L R L Audio output Audio output Stereo Audio cable Stereo Audio cable Stereo Note The left and right channels are combined when there is only the L mono is inserted Audio cable AUDIO IN ...

Page 22: ... not in use When the projector is connected to an outlet with AC power cord it is in stand by mode and consumes a little electric power Note on the power cord AC power cord must meet the requirements of the country where you use the projector Confirm the AC plug type with the chart below and proper AC power cord must be used Projector side AC outlet side For the U S A and Canada For Continental Eu...

Page 23: ...tton and then select the correct number by pressing the buttons Repeat this step to complete entering a three digit number After entering the three digit number move the cursor to Set then you can start to operate the projector If you entered an incorrect PIN code the PIN code and the number turn red Enter the correct PIN code all over again What is PIN code PIN Personal Identification Number code...

Page 24: ...s Note When the Auto Power function is On this projector is turned on automatically by connecting the AC power cord to AC outlet Page 47 The running speed of cooling fans is changed according to the temperature inside the projector Do not put the projector in a case before the projector is cooled enough If the POWER TEMP indicator flashes or emits a red light see POWER TEMP indicator Page 52 While...

Page 25: ...utton On screen menu 1 Press the MENU button on the top control or remote control to display the on screen menu 2 Press buttons to select an entry in the main menu and then button to access the submenu 3 Press the buttons to select your required entry and then press OK or the button to set or enter the submenu 4 Press button to adjust settings or switch among the items Press the OK button for corr...

Page 26: ...menu The available image modes are Dynamic Standard Cinema Blackboard green Colorboard and User Image adjust menu If a computer is selected as a signal source the following image adjusting options are available Contrast Brightness Color Temp Red Green Blue Sharpness and Gamma If video equipment is selected as a signal source the following image adjusting options are available Contrast Brightness C...

Page 27: ...an be stored 2930058502 Remote control KEYSTONE button Zoom ring Rear Focus ring Front AUTO button AUTO button Reduce the upper width with the button Reduce the lower width with the button Zoom and focus adjustment Rotate the zoom ring to zoon in or out Rotate the focus ring to adjust the focus of the projected image Top control AUTO INPUT OK MENU Keystone The arrows are white when there is no cor...

Page 28: ...ack Menu operation 1 Press the MENU button to display the on screen menu Press button to move the cursor to the Audio menu icon Press OK or the button to enter the submenu entry 2 Press button to move the cursor to the desired item and then press the OK button Volume Press to turn up the volume and to turn down the volume 0 to 25 Mute Press the OK button to switch the mute function on off After th...

Page 29: ...ightness of the screen Normal Normal brightness Eco Lower brightness reduces the lamp power consumption and extends the lamp life Note See the next page for the description of other buttons Remote control 2930058502 Direct input select buttons Arrow buttons BLANK button DZOOM button 4 3 button STILL button PICTURE button LAMP button 16 9 button BLANK button Press the BLANK button to black out the ...

Page 30: ...tion Press the AUTO button on the remote control to use the auto setup function Press the KEYSTONE button on the remote control to Calibrate keystone distortion Press the PATTERN button on the remote control to select a test pattern image Timer display 02 02 Note See the previous page for the description of other buttons 2930058502 Remote control PATTERN button TIMER button MENU button RATIO butto...

Page 31: ... AUTO INPUT OK MENU RGB 1 button RGB 2 IN button Input icon INPUT button RGB 1 RGB 1 HDMI RGB 2 RGB 2 Component S video Video Menu operation 1 Press the MENU button to display the on screen menu Press button to select the input source icon and press the button or OK button 2 Press button to select RGB 1 or RGB 2 and then press the OK button Input menu RGB2 Input Note If RGB2 can not be selected Pl...

Page 32: ... the Auto PC Adjustment function works to display proper images If the image is not projected properly a manual adjustment is required There is no signal input from computer Check the connection between your computer and projector Auto Select computer system manually The system can also be selected manually 1 Press the MENU button to display the on screen menu Use the buttons to select the input s...

Page 33: ... and then press the OK button To store the adjusted parameters The system parameters adjusted in the Auto PC Adjustment can be stored in the projector PC adjust menu PC adjust icon Note Phase Total dots H Position and V Position of some computers cannot be fully adjusted with this Auto PC adj function When the image is not provided properly with this operation manual adjustments are required Phase...

Page 34: ...licker from the image displayed from 0 to 31 Total dots Press to adjust the total dots for a cycle so that it can match the image on computer H position Press to adjust the horizontal position of the image V position Press to adjust the vertical position of the image Reset To re set the adjusted data you should select the initial state and then press OK Click Yes when the dialogue box appears for ...

Page 35: ...ndard This is the default image mode Cinema This mode limited the brightness and more detail can be seen It is suitable for seeing a film in a dark environment Blackboard Green This mode can be used to project the image on a green board to enhance the image quality It mainly functions on a green board not black board Colorboard This mode is suitable for projecting the image onto the red blue yello...

Page 36: ...Cool Medium Warm Red White balance Press to make the red color lighter and press to make it stronger from 0 to 63 Green White balance Press to make the green color lighter and press to make it stronger from 0 to 63 Blue White balance Press to make the blue color lighter and press to make it stronger from 0 to 63 Sharpness Press to soften the image and press to sharpen it from 0 to 15 Gamma Press t...

Page 37: ...een You can press to select the items to be adjusted Scale H V To adjust the horizontal vertical proportion of the screen H V When this item is enabled the width height proportion will be locked The vertical proportion is displayed in gray meaning disabled You can adjust the horizontal proportion and then modify the proportion of the screen on the basis of the width height proportion If you reset ...

Page 38: ... to select the icon for input source Then press or press OK 3 Press to select the input source and press OK Input menu RGB2 Input When input signal is connected to the Component jack select Component When input signal is connected to the Videojack select Video When input signal is connected to the S Video jack select S Video When input signal is connected to the HDMI jack select HDMI Video S Video...

Page 39: ...he input video system If the projector can t reproduce the image you should select a specific component video signal format from 480i 576i 480p 576p 720p and 1080i The projector can automatically detect the input video system and optimize its own state PAL SECAM NTSC NTSC4 43 PAL M PAL N The projector if can t reproduce the image you should select a specific signal format from PAL SECAM NTSC NTSC ...

Page 40: ...ewed in a bright room select this mode Standard This is the default image mode Cinema This mode limited the brightness and more detail can be seen It is suitable for seeing a film in a dark environment Blackboard Green This mode can be used to project the image on a green board to enhance the image quality It mainly functions on a green board not black board User This is the image mode pre set by ...

Page 41: ... and press to make it stronger from 0 to 63 Blue White balance Press to make the blue color lighter and press to make it stronger from 0 to 63 Sharpness Press to soften the image and press to sharpen it from 0 to 15 Gamma Press to adjust the grey level to achieve better contrast and balance from 0 to 15 Image adjust menu Image adjust icon Noise reduction Enable this item to reduce the snow interfe...

Page 42: ...ith a width height proportion 4 3 Custom This item can help users manually adjust the proportion and position of the screen Adjustable range depends on the input signal formats Some have a limitation to adjust When this item is selected press The indication of self definition will appear on the screen You can press to select the items to be adjusted Scale H V To adjust the horizontal vertical prop...

Page 43: ... Press to select the desired item and then press OK Language Selects a desired Menu Language Menu position You can use this function to change the position of on screen menu To do that select menu position and press OK Each time you press OK menu s position on the screen in the order below Upper left Upper right Center Lower left Lower right Upper left Option menu 1 3 2 3 Automatic Standby Off Sle...

Page 44: ... the keystone correction when the AC power cord is unplugged Use the Point buttons to switch between each option Store Keep the keystone correction even when the AC power cord is unplugged Reset Release the keystone correction when the AC power cord is unplugged To correct keystone distortion press the OK button Keystone appears on the screen Use the Point buttons to correct keystone distortion Bl...

Page 45: ... use it for a starting up display or interval of presentations Select Screen Capture and press the OK button A confirmation box appears and select Yes to capture the projected image After capturing the projected image go to the Logo select function and set it to User Then the captured image will be displayed the next time you turn on the projector Note Screen Capture can be operated on the resolut...

Page 46: ...hanges to If you fixed an incorrect number use the Point button to move the pointer to the number you want to correct and then enter the correct number Repeat this step to complete entering a three digit number After entering the three digit number move the pointer to Set Press the OK button so that you can start to operate the projector If you entered an incorrect Logo PIN code Logo PIN code and ...

Page 47: ... signal is reconnected or any button on the top control or remote control is pressed Shut down When the lamp has been fully cooled down the power will be shut down Off Power management function is off Timer If the input signal is interrupted and no button is pressed for more than 30 seconds the timer display with No signal appears It starts the countdown until the lamp is turned off Press buttons ...

Page 48: ...ion of the top control except the power button To unlock use the remote control Remote Control Lock the operation of the remote control except the power button To unlock use the top control If the top control accidentally becomes locked and you do not have the remote control nearby or there is something wrong with your remote control contact the dealer where you purchased the projector or the serv...

Page 49: ... the next box The number changes to If you fixed an incorrect number use the Point button to move the pointer to the number you want to correct and then enter the correct number Repeat this step to complete entering a three digit number After entering the three digit number move the pointer to Set Press OK button so that you can start to operate the projector If you entered an incorrect PIN code P...

Page 50: ...ly Timer Display the time to cleaning the filter Off 100h 200h 300h Filter counter reset Reset the filter counter after filter is cleaned Filter counter This function is used to set a frequency for the filter cleaning When the projector reached a specified time between cleanings a Filter warning icon appears on the screen notifying the cleaning is necessary After cleaning the filter be sure to sel...

Page 51: ...al frequency of the input signal is displayed in KHz or KHz when no signal V sync freq The vertical frequency of the input signal is displayed in Hz or Hz when no signal Numbers of Hz doubles when during Interlace Lamp Mode The selected lamp mode is displayed Screen The selected screen size is displayed Language The selected OSD language is displayed Lamp Time The used time of the lamp is displaye...

Page 52: ...her the site where installed is well ventilated and whether the vent is blocked Whether installed near the vent of air conditioner it can not be installed at that place Whether the filter is clean You should clean it regularly Projector is in OFF state and POWER TEMP indicator flashes red When any abnormity is detected The projector will be automatically powered off to protect its internal parts A...

Page 53: ...wise dust will be accumulated on lens and thus affect the image quality Never attempt to place any objects to the air intake vents Otherwise the projector may malfunction Resetting the filter counter 1 Press Menu on the remote control to display the on screen menu Press to select the icon for the option menu Then press or press OK 2 Press to select Filter counter reset and then press or press Sele...

Page 54: ...ean cloth and then use it to wipe the lens gently Or you can use cleaning paper or commercial blower to clean the lens Maintenance Avoid excessive use of cleaning agent Abrasive cleaning agent solvent or other coarse chemicals may scratch the lens When not used you should put it into a box to avoid dust and scratch Cleaning the projector s cabinet Unplug the AC power cord before cleaning Use a pie...

Page 55: ...mp is set properly Close the lamp cover and secure the screw 5 Plug the AC power cord and power on the projector As temperature inside the projector is high you should cool the projector for at least 45 minutes before you open the lamp cover When the lamp isn t illuminated it may indicate that the lamp has been damaged When you replace the lamp in a projector installed on the ceiling you should st...

Page 56: ...ith the LAMP REPLACE indicator lighted may increase the risk of lamp explosion A Lamp may explode as a result of vibration shock or degradation as a result of hours of use as its lifetime draws to an end Risk of explosion may differ according to the environment or conditions in which the projector and lamp are being used IF A LAMP EXPLODES THE FOLLOWING SAFETY PRECAUTIONS SHOULD BE TAKEN If a lamp...

Page 57: ...nction of input source properly Input signal switches automatically Make sure Input search function is adjusted properly When the projector is on the filter warning icon appears Clean the filter immediately When the projector is on the lamp replacement icon appears Replace the lamp immediately Image is out of focus Adjust focus of the projector Provide proper distance between the projector and the...

Page 58: ...n t be effective when 480p 576p 720p 480i 576i or 1080i is selected Power management doesn t work Power management function can not work while BLANK function is running The PIN code dialog box popes up in the startup process A PIN code is set for locking Remote control doesn t work Check the battery of the remote control Make sure there is no obstacle between the projector and the remote control T...

Page 59: ...n lamp is being cooled down The projector cannot be turned on until cooling is completed and the POWER TEMP indicator is off Can t be powered on because error is detected You should unplug the power cord Then insert it again and power on the projector If the projector is powered off again you should cut off the power and contact the local distributor or repair center In this case stop the projecto...

Page 60: ...00 600 53 67 85 06 56 25 SVGA 13 1024 768 48 363 60 65 XGA 14 1024 768 56 476 70 07 75 XGA 15 1024 768 60 02 75 03 78 75 XGA 16 1024 768 68 68 85 94 5 XGA 17 1152 864 67 5 75 108 XGA 18 1280 1024 63 981 60 02 108 SXGA 19 1280 1024 79 98 75 02 135 SXGA 20 1280 768 47 776 59 87 79 5 WXGA 21 1280 768 60 29 74 89 102 25 WXGA 22 1280 768 68 63 84 84 117 5 WXGA 23 1360 768 47 71 60 02 85 5 WXGA 24 1366 ...

Page 61: ... output 6 Grounding red 14 Vertical synchronizing input output 7 Grounding green 15 DDC Clock 8 Grounding blue 1 TMDS Data2 11 TMDS Clock Shield 2 TMDS Data2 Shield 12 TMDS Clock 3 TMDS Data2 13 CEC 4 TMDS Data1 14 Reserved N C on device 5 TMDS Data1 Shield 15 SCL 6 TMDS Data1 16 SDA 7 TMDS Data0 17 DDC CEC Ground 8 TMDS Data0 Shield 18 5V Power 9 TMDS Data0 19 Hot Plug Detect 10 TMDS Clock 1 2 RX...

Page 62: ...0 and BD470 Lamp power 230w Terminal Component input terminal RCA x 3 S video input terminal DIN 4 pin x 1 RGB IN 1 terminal D sub 15 pin x 1 RGB IN 2 RGB OUT terminal D sub 15 pin x 1 VIDEO input terminal RCA x 1 AUDIO IN L MONO R terminal RCA x 2 HDMI terminal HDMI A interface 19 pin x 1 AUDIO IN terminal Mini plug stereo x 1 AUDIO OUT terminal Mini plug stereo x 1 RS 232C terminal D sub 9 pin x...

Page 63: ...hat contents of hazardous substances in all homogeneous materials in this part don t exceed Required Limitations specified in SJ T11363 2006 It means that contents of hazardous substances in at least one homogeneous material in this part exceed Required Limitations specified in SJ T11363 2006 Accessories User s Manual CD ROM AC power cord Remote control and battery RGB cable Lens Cover Lens cover ...

Page 64: ...he ceiling Screw M6 Depth 10 0 Appendix PIN code memorandum Write down the PIN code in the blank below and keep it please contact the repair center PIN code lock Logo PIN code lock Factory default PIN code 111 Factory default PIN code 111 If this 3 digit number is changed the factory default number will be ineffective ...

Page 65: ...le to female pins for projector computer control 1 Connection 1 1 Port Setting 1 1 Wiring RS232 cross cable is used Item Value Method Asynchronous communication Bits per seconds 19200 Data bits 8 Parity none Stop bits 1 Flow control none PC Projector COM Control Port D Sub 9 Pin D Sub 9 Pin ...

Page 66: ...ut AW SCREEN NORMAL Normal AW TERMINAL MONITOR RGB 2 Output AW SCREEN CUSTOM Custom A8E Keystone A19 Dynamic A8F Keystone A11 Standard Image select A1C Menu on A12 Cinema A1D Menu off A39 Colorboard AR1 Input mode read A3A Navigation right AW AUTOSETUP START Auto setup A3B Navigation left A43 Still on A3C Navigation up A44 Still off A3D Navigation down A0D Blank on A3F Select A0E Blank off AW SCRE...

Page 67: ...ut to Video Return OK CR NG CR Command A34 CR Hex 0x41 0x33 0x34 0x0d Details Change the input to S Video Return OK CR NG CR Command AW TERMINAL COMPUTER CR Hex 0x41 0x57 0x20 0x54 0x45 0x52 0x4D 0x49 0x4E 0x41 0x4C 0x20 0x43 0x4F 0x4D 0x50 0x55 0x54 0x45 0x52 0x0d Details Change to RGB 2 Input Return OK 000 CR NG CR 2 9 HDMI Command A36 CR Hex 0x41 0x33 0x36 0x0d Details Change the input to HDMI ...

Page 68: ...0x0d Details Close the on screen menu Return OK CR NG CR Command AR1 CR Hex 0x41 0x52 0x31 0x0d Details Get the current input mode 1 HDMI 2 RBG 1 3 RBG 2 4 Component 5 S Video 6 Video Return OK 1 CR HDMI 2 CR RGB 1 3 CR RGB 2 4 CR Component 5 CR S Video 6 CR Video NG CR 2 18 Still on Command A43 CR Hex 0x41 0x34 0x33 0x0d Details Stil on Return OK CR NG CR 2 17 Auto setup Command AW AUTOSETUP STAR...

Page 69: ...video mute Return OK CR NG CR Command A8A CR Hex 0x41 0x38 0x41 0x0d Details Start Stop Off Start Return OK CR NG CR Command A0B CR Hex 0x41 0x30 0x42 0x0d Details Mute on Return OK CR NG CR 2 24 Mute off Command A0C CR Hex 0x41 0x30 0x43 0x0d Details Mute off Return OK CR NG CR 2 25 Lamp mode normal Command AW LAMPMODE NORMAL CR Hex 0x41 0x57 0x20 0x4C 0x41 0x4D 0x50 0x4D 0x4F 0x44 0x45 0x20 0x4E...

Page 70: ...x 0x41 0x57 0x20 0x4C 0x41 0x4D 0x50 0x4D 0x4F 0x44 0x45 0x20 0x45 0x43 0x4F 0x0d Details Change the input to Eco Return OK 000 CR NG CR 2 27 Digital Zoom Command A30 CR Hex 0x41 0x33 0x30 0x0d Details Digital zoom Return OK CR NG CR 2 32 4 3 Command AW SCREEN FULL CR Hex 0x41 0x57 0x20 0x53 0x43 0x52 0x45 0x45 0x4E 0x20 0x46 0x55 0x4C 0x4C 0x0d Details Screen 4 3 size Return OK 000 CR NG CR 2 31 ...

Page 71: ... 0x4E 0x4F 0x52 0x4D 0x4C 0x0d Details Screen Normal size Return OK 000 CR NG CR Command AW SCREEN CUSTOM CR Hex 0x41 0x57 0x20 0x53 0x43 0x52 0x45 0x45 0x4E 0x20 0x43 0x55 0x53 0x54 0x4F 0x4D 0x0d Details Screen Custom size Return OK 000 CR NG CR 2 39 Navigation Command A3A CR Hex 0x41 0x33 0x41 0x0d Details Return OK CR NG CR 2 37 Cinema Command A12 CR Hex 0x41 0x31 0x32 0x0d Details Image selec...

Page 72: ...urn OK CR NG CR Appendix 2 44 Full 2 45 Natural wide Command AW SCREEN 1610FULL CR Hex 0x41 0x57 0x20 0x53 0x43 0x52 0x45 0x45 0x4E 0x20 0x01 0x06 0x01 0x00 0x46 0x55 0x4C 0x4C 0x0d Details Screen Full size Return OK 000 CR NG CR Command AW SCREEN NATURAL WIDE CR Hex 0x41 0x57 0x20 0x53 0x43 0x52 0x45 0x45 0x4E 0x20 0x4E 0x41 0x54 0x55 0x52 0x41 0x4C 0x20 0x57 0x49 0x44 0x45 0x0d Details Screen Na...

Page 73: ...ocated on the back or bottom side of the projector Record it below should you ever need service Declaration of Conformity Trade Name LG Mode BD430 BD450 BD460 BD470 Responsible Party LG Electronics Inc Address 1000 Sylvan Ave Englewood Cliffs NJ 07632 U S A TEL 201 266 2534 ...

Reviews: