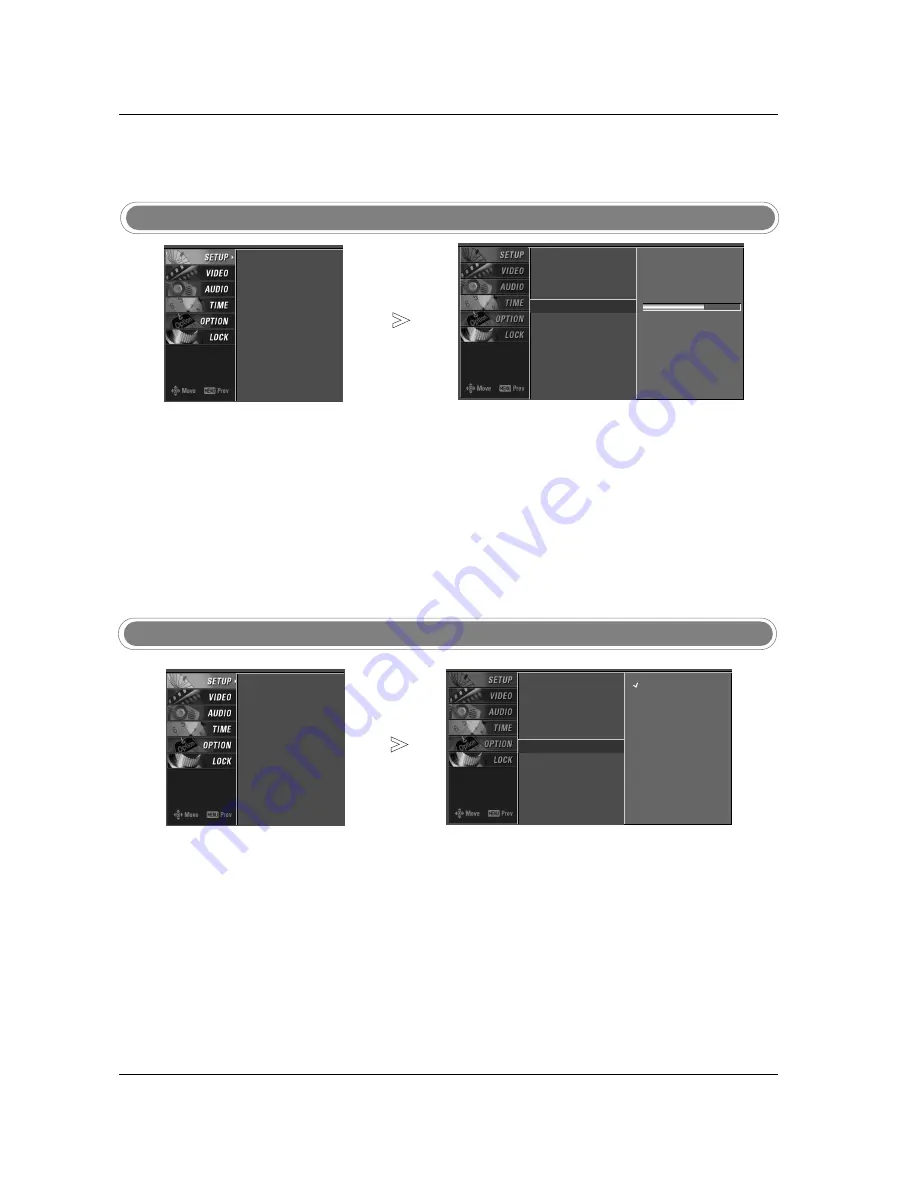
background image

33

Operation

DTV Signal Strength

- Shows how strong your DTV sig-

nal is and whether you need to
adjust your antenna or digital
cable input. The higher the signal
strength, the less likely you are
to experience picture degrada-
tion.

- DTV Signals: Only when the

input signal is DTV or CADTV,
this function is available.

Press the 

MENU

button and then use 

D


E

E

button to select the 

SETUP

menu.

Press the

G

G

button and then use 

D


E

E

button to select 

DTV Signal

.

View the on-screen signal strength monitor to see the quality of the signal
being received. 

Press 

EXIT 

button to return to TV viewing or press 

MENU

button to

return to the previous menu.

1

2

3

4

- Changes the picture source so

you can watch your TV, cable TV,
VCR, DVD, or any other devices
that are connected to your TV. 

Input Source

Press the 

MENU

button and then use 

D


E

E

button to select the 

SETUP

menu.

Press the

G

G

button and then use 

D


E

E

button to select 

Input Source

.

Press the

G

G

button and then use 

D


E

E

button to select the source:

TV, AV1, AV2, Component1, Component2, RGB-PC, HDMI1/DVI, or
HDMI2.

Press 

EXIT 

button to return to TV viewing or press 

MENU

button to

return to the previous menu.

1
2

3

4

Setup Menu Options continued

Setup Menu Options continued

EZ Scan

Manual Scan

Channel Edit

DTV Signal

Input Source

Input Label

Set ID

Bad

Normal

Good

EZ Scan

Manual Scan

Channel Edit

DTV Signal

Input Source

Input Label

Set ID

EZ Scan

Manual Scan

Channel Edit

DTV Signal

Input Source

Input Label

Set ID

EZ Scan

Manual Scan

Channel Edit

DTV Signal

Input Source

G

Input Label

Set ID

TV

AV1

AV2

Component1

Component2

RGB-PC

HDMI1/DVI

HDMI2

Summary of Contents for 60PC1DC

Page 1: ...es 4 REV NO MM DD YY SIGNATURE CHANGE NO CHANGE CONTENTS 1 2 3 4 5 7 6 SUFFIX 60PC1D LG 38289U0527F 0707 REV08 1 Origin Notification LGESY China LGEVN Vietnam LGEEG Egypt LGEAZ Brazil LGENP China LGETH Thailand LGEMA Poland LGEIN Indonesia LGEIL India LGERA Russia LGEDI Indonesia LGEAK Kazakhstan LGERS Mexico 8 9 Special Instructions 3 Product Name 60PC1D UE 10 KIM WON MI 06 06 20 KANG KWANG SUK 0...

Page 2: ...Pagination sheet Pagination sheet P NO 38289U0527F Total pages 68 pages 2 3 LG EN P No 68 Front cover Rear cover LG EN ...

Page 3: ...is a set of power saving guidelines issued by the U S Environmental Protection Agency EPA As an ENERGY STAR Partner LGE U S A Inc has determined that this product meets the ENER GY STAR guidelines for energy efficiency P NO 38289U0527F 0707 REV08 Printed in Korea OWNER S MANUAL LCD TV MODELS 32LC2D 32LC2DU 37LC2D 42LC2D PLASMA TV MODELS 42PC3D 42PC3DC 42PC3DV 50PC3D 60PC1D 60PC1DC Internet Home Pa...

Page 4: ...l interference in a residential installation This equipment generates uses and can radiate radio frequency energy and if not installed and used in accordance with the instructions may cause harmful interference to radio communications However there is no guarantee that interference will not occur in a particular installation If this equipment does cause harmful interference to radio or television ...

Page 5: ...l near any heat sources such as radiators heat registers stoves or other apparatus including amplifiers that produce heat 9 Do not defeat the safety purpose of the polarized or grounding type plug A polarized plug has two blades with one wider than the other A grounding type plug has two blades and a third grounding prong The wide blade or the third prong is provided for your safety When the provi...

Page 6: ...mal there is noth ing wrong with TV Some minute dot defects may be visible on the screen appearing as tiny red green or blue spots However they have no adverse effect on the monitor s performance Avoid touching the LCD screen or holding your finger s against it for long periods of time Doing so may produce some temporary distortion effects on the screen CAUTION concerning the Power Cord Most appli...

Page 7: ...k Level 39 Video Reset 40 Audio Language 41 Auto Sound Control EZ Sound 41 42 Manual Sound Control EZ Sound User option 43 Balance 43 TV Speakers On Off Setup 2 Warning 3 4 Safety Instructions 7 Accessories 8 11 Controls Connection Options 12 13 Remote Control Key Functions 14 Attaching the TV to a wall 15 Desktop Pedestal Installation 16 17 Basic Connection 18 Antenna or Cable Connection 19 20 VC...

Page 8: ...2PC3D 3DC 3DV 50PC3D 60PC1D 1DC Only 50 ISM Image Sticking Minimization Method 42PC3D 3DC 3DV 50PC3D 60PC1D 1DC Only 51 52 Parental Lock Setup 53 58 External Control Device Setup 59 60 IR Codes 61 Programming the Remote 62 63 Programming Codes 64 65 Troubleshooting Checklist 65 Maintenance 66 67 Product Specifications Option Menu Features Lock Menu Options Operation Time Menu Options ...

Page 9: ...V brackets 2 Wall brackets 2 TV Bracket Bolts For 32 37 42LC2D 32LC2DU For 42PC3D 3DC 3DV 50PC3D Twister Holder Arrange the wires with the twister holder Cable Management Refer p 16 2 Wall brackets 42PC3D 3DC 3DV only 2 bolts Refer p 14 4 bolts for stand assembly See below for detail information 32LC2D U only 42LC2D only Polishing Cloth Polish the TV with the cloth Carefully place the product scre...

Page 10: ...ANNEL E E D D Buttons Power Standby Indicator Illuminates red in stand by mode Illuminates white when the set is switched on MENU Button ENTER ENTER Remote Control Sensor CH CH VOL OL ENTER ENTER MENU MENU INPUT INPUT CHANNEL D E Buttons VOLUME F G Buttons ENTER Button MENU Button INPUT Button Remote Control Sensor Power Standby Indicator illuminates red in standby mode illuminates green when the ...

Page 11: ... 8 3 9 1 1 10 COMPONENT IN Connect a component video audio device to these jacks AV OUT Connect a second TV or monitor AV Audio Video IN 1 Connect audio video output from an external device to these jacks S VIDEO Connect S Video out from an S VIDEO device ANTENNA CABLE IN Connect over the air signals to this jack Connect cable signals to this jack DIGITAL AUDIO OUT Connect digital audio from vario...

Page 12: ...ENTER MENU MENU INPUT INPUT CHANNEL D E Buttons VOLUME F G Buttons ENTER Button MENU Button INPUT Button Remote Control Sensor Power Standby Indicator illuminates red in standby mode illuminates green when the set is switched on Power Button Swivel Stand 42LC2D Only Swivel Stand 42LC2D Only R The TV can be conveniently swivelled on its stand 30 to the left or right to provide the optimum viewing a...

Page 13: ...T IN Connect a component video audio device to these jacks AV OUT Connect a second TV or monitor AV Audio Video IN 1 Connect audio video output from an external device to these jacks S VIDEO Connect S Video out from an S VIDEO device ANTENNA CABLE IN Connect over the air signals to this jack Connect cable signals to this jack DIGITAL AUDIO OUT Connect digital audio from various types of equip ment...

Page 14: ...odes rotate in regular sequence TV AV1 2 Component 1 2 RGB PC HDMI1 DVI or HDMI2 AV 1 2 Component 1 2 RGB PC HDMI1 DVI or HDMI2 input sources are linked automatically only if these are con nected EXIT Clears all on screen displays and returns to TV viewing from any menu TIMER G G p 45 Lets you select the amount of time before your TV turns itself off automatically RATIO G G p 47 Changes the aspect...

Page 15: ...e Favorite channels MUTE G G p 29 Switches the sound on or off CHANNEL UP DOWN Selects available channels found with EZ scan and Manual scan VOLUME UP DOWN Increases decreases the sound level VOL CH POWER 1 2 3 4 5 6 7 8 0 9 MENU MUTE FAV BRIGHT VCR TV DVD ENTER ADJUST SAP EZ SOUND EZ PIC CC FLASHBK EXIT TIMER RATIO INFO AUDIO CABLE STB MODE TV INPUT INPUT BRIGHT DASH Used to enter a program numbe...

Page 16: ... sturdy rope not provided as parts of the product must purchase sepa rately to tie the product It is safer to tie the rope so it becomes horizontal between the wall and the product 42PC3D 3DC 3DV 50PC3D 32 37 42LC2D 32LC2DU Open the battery compartment cover on the back side and install the batteries matching cor rect polarity with with Install two 1 5V AA batteries Don t mix old or used batteries...

Page 17: ...omewhat different from your TV GROUNDING Ensure that you connect the earth ground wire to prevent possible electric shock If grounding methods are not possible have a qualified electrician install a separate circuit breaker Do not try to ground the unit by connecting it to telephone wires lightening rods or gas pipes DESKTOP PEDESTAL INSTALLATION 4 inches 4 inches 4 inches 4 inches 4 inches 4 inch...

Page 18: ...les using the sup plied twister holder 3 Basic Connection For 32 37 42LC2D 32LC2DU Basic Connection For 32 37 42LC2D 32LC2DU 32LC2D U Cable holder 37 42LC2D 32LC2D U 37 42LC2D 32LC2D U 37 42LC2D Do not hold the CABLE MANAGEMENT when moving the product If the product is dropped you may be injured or the product may be broken How to remove the CABLE MANAGEMENT Hold the CABLE MANAGEMENT with both han...

Page 19: ...sic Connection Basic Connection C Hold the CABLE MANAGEMENT with both hands and push it as shown Connect the cables as necessary To connect an additional equipment see the External equipment Connections section Reinstall the CABLE MANAGEMENT as shown 1 2 3 Image shown here may be slightly different from your set When closing the stand for storage First remove the screws in the holes B on the botto...

Page 20: ...e antennas Cable TV Wall Jack RF Coaxial Wire 75 ohm Bronze Wire Bronze Wire Turn clockwise to tighten Antenna RF Coaxial Wire 75 ohm In a poor signal area to improve picture quality purchase and install a sig nal amplifier If the antenna needs to be split for two TV s install a 2 Way Signal Splitter in the connections If the antenna is not installed properly contact your dealer for assistance VID...

Page 21: ...4 OUTPUT SWITCH ANT OUT ANT IN HDMI DVI IN ANTENNA CABLE IN REMOTE CONTROLIN RS 232C IN CONTROL SERVICE RGB IN PC AUDIO IN RGB DVI VIDEO VIDEO AUDIO AUDIO VIDEO VIDEO AUDIO AUDIO MONO S VIDEO S VIDEO AV IN 1 AV OUT COMPONENT COMPONENT IN DIGITALAUDIO OUT OUT OPTICAL PTICAL SERVICE VCR 1 2 3 Connect the AUDIO VIDEO jacks between TV and VCR Match the jack colors Video yellow Audio Left white and Aud...

Page 22: ...o the VCR owner s manual Select AV1 input source with using the INPUT button on the remote control If connected to AV IN2 select AV2 input source Do not connect to both Video and S Video at the same time In the event that you connect both Video and the S Video cables only the S Video will work R L AUDIO VIDEO Camcorder Video Game Set 1 1 2 3 Connect the AUDIO VIDEO jacks between TV and external eq...

Page 23: ... s manual for operating instructions When connecting with a HDMI cable 1 2 3 Connect the HDMI output of the DVD to the HDMI IN 1 DVI or 2 jack on the set Select HDMI1 DVI or HDMI2 input source with using the INPUT button on the remote control Refer to the DVD player s manual for operating instructions ANTENNA ANTENNA CABLE IN CABLE IN VIDEO AUDIO VIDEO AUDIO S VIDEO AV IN 1 AV OUT COMPONENT IN DIG...

Page 24: ...he remote control If connected to COMPONENT IN 2 select Component 2 input source Refer to the DVD player s manual for operating instructions Component Input ports To get better picture quality connect a DVD player to the component input ports as shown below Y PB PR Component ports on the TV Y Y Y Y Pb B Y Cb PB Pr R Y Cr PR Video output ports on DVD player HDMI DVI IN ANTENNA CABLE IN VIDEO AUDIO ...

Page 25: ... AUDIO IN RGB DVI HDMI DTV OUTPUT REMOTE CONTROLIN RS 232C IN CONTROL SERVICE RGB IN PC AUDIO IN RGB DVI REMOTE REMOTE CONTROLIN CONTROLIN RS 232C IN RS 232C IN CONTROL CONTROL SER SERVICE VICE RGB IN RGB IN PC PC AUDIO IN AUDIO IN RGB DVI RGB DVI AUDIO IDEO AUDIO AV IN 1 AV OUT COMPONENT IN SERVICE SERVICE SERVICE HDMI IN HDMI IN 1 DVI 2 HDMI IN 1 DVI 2 1 When connecting with a Component cable 1 ...

Page 26: ...32C IN RS 232C IN CONTROL CONTROL SER SERVICE VICE RGB IN RGB IN PC PC AUDIO IN AUDIO IN RGB DVI RGB DVI RS 232C IN CONTROL SERVICE VIDEO AUDIO VIDEO AUDIO S VIDEO AV IN 1 AV OUT COMPONENT IN DIGITALAUDIO OUT OPTICAL SERVICE SERVICE 1 DVI HDMI IN HDMI IN 1 DVI 1 DVI 2 Digital Set top Box 1 2 If the digital set top box has a DVI output and no HDMI output a separated audio connection is nec essary I...

Page 27: ...io equipment stereo system via the Digital Audio Output Optical port CAUTION Do not look into the optical output port Looking at the laser beam may damage your vision 1 2 AV Out Setup 1 2 Connect the second TV or monitor to the TV s AV OUT jacks See the Operating Manual of the second TV or monitor for further details regarding that device s input settings S VIDEO IN R AUDIO L VIDEO VIDEO VIDEO AUD...

Page 28: ... DVI RVICE AUDIO 1 2 PC When connecting with a HDMI to DVI cable 1 2 3 4 Connect the DVI output of the PC to the HDMI IN 1 DVI jack on the set Connect the audio outputs of the PC to the AUDIO IN RGB DVI jack on the set Turn on the PC and the set Select HDMI1 DVI input source with using the INPUT button on the remote control DVI PC OUTPUT REMOTE CONTROL IN RS 232C IN CONTROL SERVICE RGB IN PC AUDIO...

Page 29: ...DMI DVI mode If noise is present change the PC or HDMI DVI mode to another resolution change the refresh rate to another rate or adjust the brightness and contrast on the menu until the picture is clear If the refresh rate of the PC graphic card can not be changed change the PC graphic card or consult the manufacturer of the PC graphic card 6 Avoid keeping a fixed image on the TV s screen for a lo...

Page 30: ...input this function is used After connecting RGB PC or HDMI DVI to PC input and checking the screen quality Press the ADJUST button and then use D D E E button to select Resolution POSITION SIZE or PHASE Press ENTER button and then use D D E E F F G G buttons to make appropriate adjustments The PHASE adjustment range is 16 16 In HDMI DVI PC mode PHASE is not available The SIZE adjustment range is ...

Page 31: ...he MUTE or VOL D D E E button Press the CH D D E E or NUMBER buttons to select a channel number The menus can be shown on the screen in the selected language First select your language On Screen Menus Language Selection Volume Adjustment Turning on the TV Channel Selection Press the MENU button and then use D D E E button to select the OPTION menu Press the G G button and then use D D E E button t...

Page 32: ...y differ slightly from what is shown in this manual How to adjust the OSD screen EZ Scan Manual Scan Channel Edit DTV Signal Input Source Input Label Set ID EZ Picture Color Temperature XD Advanced Video Reset Audio Language EZ Sound Balance TV Speaker Auto Clock Manual Clock Off Timer On Timer Sleep Timer Auto Off Aspect Ratio Caption Text Caption Option Language ISM Method Low Power Lock System ...

Page 33: ...on to add or delete for the channel number Press EXIT button to return to TV viewing or press MENU button to return to the previous menu 1 2 3 4 5 6 Automatically finds all channels available through antenna or cable inputs and stores them in memory on the channel list Run EZ Scan again after any Antenna Cable connection changes A password is required to gain access to EZ Scan menu if the Lock Sys...

Page 34: ...ted and then you can add or delete the channel to from the Favorite List Channel Edit Press the MENU button and then use D D E E button to select the SETUP menu Press the G G button and then use D D E E button to select Channel Edit Press the G G button You will now see a screen filled with channel num bers and a preview picture Use D D E E F F G G button to select a channel and then use the ENTER...

Page 35: ...TV cable TV VCR DVD or any other devices that are connected to your TV Input Source Press the MENU button and then use D D E E button to select the SETUP menu Press the G G button and then use D D E E button to select Input Source Press the G G button and then use D D E E button to select the source TV AV1 AV2 Component1 Component2 RGB PC HDMI1 DVI or HDMI2 Press EXIT button to return to TV viewin...

Page 36: ...utton and then use D D E E button to select the source AV1 2 Component1 2 RGB PC HDMI1 DVI or HDMI2 Press the F F G G button to select the label Press EXIT button to return to TV viewing or press MENU button to return to the previous menu 1 2 3 4 5 EZ Scan Manual Scan Channel Edit DTV Signal Input Source Input Label Set ID EZ Scan Manual Scan Channel Edit DTV Signal Input Source Input Label G Set ...

Page 37: ...nd User 2 your own set tings You can also use the VIDEO menu to adjust EZ Picture Press the EXIT button to save and return to TV viewing 1 2 Color Temperature Control Choose one of three automatic color adjustments Set to warm to enhance hotter colors such as red or set to cool to see less intense colors with more blue Press the MENU button and then use D D E E button to select the VIDEO menu Pres...

Page 38: ...Red 0 G Green 0 Blue 0 Press the MENU button and then use D D E E button to select the VIDEO menu Press the G G button and then use D D E E button to select Color Temperature Press the G G button and then use D D E E button to select User Press the G G button and then use D D E E button to select Red Green or Blue Press the G G button and then use F F G G button to make appropri ate adjustments Th...

Page 39: ...MENU button and then use D D E E button to select the VIDEO menu Press the G G button and then use D D E E button to select XD Press the G G button and then use D D E E button to select Auto or Manual Press EXIT button to return to TV viewing or press MENU button to return to the previous menu Selecting the Manual 1 Press the G G button and then use F F G G button to select XD Contrast XD Color or...

Page 40: ...Color Temperature XD Advanced Video Reset EZ Picture Color Temperature XD Advanced G Video Reset Cinema 3 2 Mode Off Black Level Low Press the MENU button and then use D D E E button to select the VIDEO menu Press the G G button and then use D D E E button to select Advanced Press the G G button and then use D D E E button to select Cinema 3 2 Mode or Black Level Press EXIT button to return to TV ...

Page 41: ...on to select the VIDEO menu Press the G G button and then use D D E E button to select Video Reset Press the G G button to reset the Video menu options to original values 1 2 3 Video Reset EZ Picture Color Temperature XD Advanced Video Reset EZ Picture Color Temperature XD Advanced Video Reset G Selection G or resets to the factory settings default ...

Page 42: ...button to select the AUDIO menu Press the G G button and then use D D E E button to select Audio Language Press the G G button and then use D D E E button to select English Spanish or French Press EXIT button to return to TV viewing or press MENU button to return to the previous menu 1 2 3 4 Audio Language G EZ Sound Balance TV Speaker English Spanish French Audio Language EZ Sound Balance TV Spea...

Page 43: ...unded environ ment Press the EZ SOUND button repeatedly to select the appropriate sound setup as shown below Normal Stadium News Music Theater and User your own settings You can also adjust EZ Sound in the AUDIO menu Press EXIT button to save and return to TV viewing 1 2 Press the MENU button and then use D D E E button to select the AUDIO menu Press the G G button and then use D D E E button to s...

Page 44: ...ious menu 6 SRS TruSurround XT Takes advantage of any multi channel format without needing to add extra speakers or equipment Dialog clarity bass enrichment and the addition of stereo audio enhancement produces an immersive sound experience from standard stereo material Note When SRS Sound Retrieval System TruSurround XT is selected Audio Balance function is disable and set to 0 When Off is select...

Page 45: ...urn to TV viewing or press MENU button to return to the previous menu Balance Balance 1 2 3 4 TV Speakers On Off Setup Turn TV speakers off if using external audio equipment Feature turns the TV Speakers option On or Off Press the MENU button and then use D D E E button to select the AUDIO menu Press the G G button and then use D D E E button to select TV Speaker Press the G G button and then use ...

Page 46: ...then use D D E E button to select the TIME menu Press the G G button and then use D D E E button to select Manual Clock Press the G G button and then use F F G G button to select either the year date or time option Once selected use the D D E E button to set the year date and time options Press EXIT button to return to TV viewing or press MENU button to return to the previous menu 1 2 3 4 The curr...

Page 47: ...n to set the hour Press the G G button and then use D D E E button to set the minutes For only On Timer function Press the G G button and then use D D E E button to select the channel at turn on Press the G G button and then use D D E E button to set the sound level at turn on Press EXIT button to return to TV viewing or press MENU button to return to the previous menu 1 2 3 4 5 6 7 Press the TIME...

Page 48: ...Press the G G button and then use D D E E button to select Auto Off Press the G G button and then use D D E E button to select Off or On Press EXIT button to return to TV viewing or press MENU button to return to the previous menu 1 2 3 4 Auto Clock Manual Clock Off Timer On Timer Sleep Timer Auto Off Auto Clock Manual Clock Off Timer On Timer Sleep Timer Auto Off G Off On TV will be automatically...

Page 49: ...er picture proportion to match the source s image 4 3 Choose 4 3 when you want to view a picture with an original 4 3 aspect ratio 16 9 Adjust the picture horizontally in a linear proportion to fill the entire screen Horizon The screen size is more enlarged at both sides to create a spectacular view Zoom 1 Choose Zoom 1 when you want to view the picture with out any alteration However the top and ...

Page 50: ... G button and then use D D E E button to select available cap tion languages English Spanish or French Press EXIT button to return to TV viewing or press MENU button to return to the previous menu 1 2 3 4 Press the MENU button and then use D D E E button to select the OPTION menu Press the G G button and then use D D E E button to select Caption Text Press the G G button and then use D D E E butto...

Page 51: ...t a color for the edges Press EXIT button to return to TV viewing or press MENU button to return to the previous menu 1 2 3 4 5 Low power reduces the power consumption of plasma display Low Power 42PC3D 3DC 3DV 50PC3D 60PC1D 1DC only Press the MENU button and then use D D E E button to select the OPTION menu Press the G G button and then use D D E E button to select Low Power Press the G G button ...

Page 52: ...SM is not necessary set to Normal White Wash White Wash removes permanent images from the screen Note An excessive permanent image may be impossible to clear entirely with White Wash To return to normal viewing press the any button Orbiter Orbiter may help prevent ghost images However it is best not to allow any fixed image to remain on the screen To avoid a permanent image on the screen the image...

Page 53: ...y cautioned R Restricted NC 17 No one 17 and under admitted X Adult only If you set PG 13 G and PG movies will be avail able PG 13 R NC 17 and X will be blocked Ratings for Television programs including made for TV movies TV G General audience TV PG Parental guidance suggested TV 14 Parents strongly cautioned TV MA Mature audience only TV Y All children TV Y7 Children 7 years and older TV Rating C...

Page 54: ...ildren cannot view certain movies You can set the ratings limit by blocking out all the movies with the rat ings above a specified level Keep in mind that the movie ratings limit only applies to movies shown on TV not TV programs such as soap operas TV Rating Children Prevents children from watching certain chil dren s TV programs according to the ratings limit set The children rating does not app...

Page 55: ...dard D Sub 9 3 2 5 4 6 7 8 TV D Sub 9 Connect the RS 232C input jack to an external control device such as a computer or an A V control system and control the Monitor s functions externally Connect the serial port of the control device to the RS 232C jack on the TV back panel RS 232C connection cables are not supplied with the TV T Type of Connector D Sub 9 Pin Male ype of Connector D Sub 9 Pin Ma...

Page 56: ...rotocol OK Acknowledgement The Monitor transmits ACK acknowledgement based on this format when receiving normal data At this time if the data is data read mode it indicates present status data If the data is data write mode it returns the data of the PC computer Command2 Set ID OK Data x Error Acknowledgement The Monitor transmits ACK acknowledgement based on this format when receiving abnormal da...

Page 57: ...at using the RATIO button on remote control or in the Option menu Transmission k c Set ID Data Cr Acknowledgement c Set ID OK Data x 04 Screen Mute Command2 d G To select screen mute on off Transmission Data 0 Screen mute off Picture on 1 Screen mute on Picture off k d Set ID Data Cr Acknowledgement d Set ID OK Data x 06 Volume Control Command2 f G To adjust volume You can also adjust volume with ...

Page 58: ... Cr Acknowledgement k Set ID OK Data x 12 OSD Select Command2 l G To select OSD On Screen Display on off Transmission k l Set ID Data Cr Acknowledgement Data 0 OSD off 1 OSD on l Set ID OK Data x 14 Treble Command2 r G To adjust treble You can also adjust treble in the Audio menu Transmission Data Min 0 Max 64 Refer to Real data mapping See page 55 k r Set ID Data Cr Acknowledgement r Set ID OK Da...

Page 59: ...is case using phys ical channel bit must be low 0 But if the channel band is ATSC air or ATSC cable there are two cases that physical channel enable or disable If the physical channel sending is meaningful you should set this bit low 0 If the physical channel sending is meaningless you should set this bit high 1 Example 1 Analog channel NTSC cable channel number 35 main pic ture Command ma 00 23 x...

Page 60: ...el Add m b Set ID Data Cr b Set ID OK Data x b Set ID NG Data x Acknowledgement 22 Key Command m c G To send IR remote key code Transmission Data Key code Refer to page 60 m c Set ID Data Cr c Set ID OK Data x Acknowledgement b Set ID OK NG Data x Acknowledgement Data Structure DATA Hex INPUT 00 DTV Antenna 01 10 11 20 21 40 41 60 90 DTV Cable Analog Antenna Analog Cable AV1 AV2 Component 1 Compon...

Page 61: ...de Data code Data code TC Tf T1 C0 Carrier frequency FCAR 1 TC fOSC 12 Duty ratio T1 TC 1 3 Repeat frame C1 C2 C3 C4 C5 C6 C7 C0 C1 C2 C3 C4 C5 C6 C7 D0 D1 D2 D3 D4 D5 D6 D7 D0 D1 D2 D3 D4 D5 D6 D7 Repeat code 9 ms 4 5 ms 0 55 ms 9 ms 2 25 ms G Bit description G Frame interval Tf The waveform is transmitted as long as a key is depressed Bit 0 Tf Tf Tf 108ms 455KHz 0 56 ms 0 56 ms 1 12 ms Bit 1 2 2...

Page 62: ... Code TV Input Selection Discrete IR Code AV1 Input Selection Discrete IR Code AV2 Input Selection Discrete IR Code Component1 Input Selection Discrete IR Code Component2 Input Selection Discrete IR Code RGB PC Input Selection Discrete IR Code HDMI DVI Input Selection Discrete IR Code HDMI2 Input Selection Discrete IR Code Only 4 3 Mode Discrete IR Code Only 16 9 Mode Discrete IR Code Only Zoom1 M...

Page 63: ...st the POWER button to see if the component responds properly If not the remote requires pro gramming to operate the device Turn on the component to be programmed then press the correspond ing MODE button on the remote control Press the MENU and MUTE buttons simultaneously for 2 seconds the button selected component lights on the remote control If you don t press any button for 20 seconds the butt...

Page 64: ...SEARS 003 008 009 010 013 014 017 020 031 042 073 081 101 SHARP 031 054 149 SHINTOM 024 SONY 003 009 031 052 056 057 058 076 077 078 149 SOUNDESIGN 034 STS 013 SYLVANIA 031 033 034 059 067 SYMPHONIC 034 TANDY 010 034 TATUNG 039 043 TEAC 034 039 043 TECHNICS 031 033 070 TEKNIKA 019 031 033 034 101 THOMAS 034 TMK 006 TOSHIBA 008 013 042 047 059 082 112 131 TOTEVISION 040 101 UNITECH 040 VECTOR RESEA...

Page 65: ...s Brand Codes Brand Codes Brand Codes Brand Codes Brand Codes Brand Codes Brand Codes AIWA 014 028 070 096 125 129 139 229 230 AKAI 163 ANAM 003 014 017 023 059 106 189 216 217 235 236 BURMECTER 252 CARVER 086 CLARION 199 DAEWOO 027 053 060 084 102 148 198 221 DENON 015 075 130 143 FANTASIA 071 FINEARTS 022 FISHER 089 099 LG GOLDSTAR 001 021 024 029 087 107 108 110 190 191 192 210 211 212 239 HAIT...

Page 66: ...cing problems tune to another station Station signal is weak reorient antenna to receive weaker station Check for sources of possible interference Lines or streaks in pictures Check antenna Change the direction of the antenna Check whether the product is turned on Try another channel The problem may be with the broadcast Is the power cord inserted into wall power outlet Check your antenna directio...

Page 67: ...correct position Work the Auto configure or adjust clock phase or H V position Option 1 Here s a great way to keep the dust off your screen for a while Wet a soft cloth in a mixture of lukewarm water and a little fabric softener or dish washing detergent Wring the cloth until it s almost dry and then use it to wipe the screen 2 Make sure the excess water is off the screen and then let it air dry b...

Page 68: ...Dimensions Width x Height x Depth Weight with stand without stand with stand without stand 42PC3DV 42PC3DV UE 44 4 x 29 5x 15 0 inches 1129 0 x 748 5 x 380 0 mm 44 4 x 27 4 x 4 1 inches 1129 0 x 695 x 103 7 mm 62 6 pounds 28 4 kg 54 0 pounds 24 5 kg Dimensions Width x Height x Depth Weight with stand without stand with stand without stand 50PC3D 50PC3D UE 51 3 x 34 3 x 14 0 inches 1302 6 x 872 0 x...

Page 69: ...nd with stand without stand 37LC2D 37LC2D UE 37 2 x 28 7 x 11 3 inches 944 x 729 x 286 mm 37 2 x26 0 x 5 1 inches 944 0 x 659 3 x 129 7 mm 65 0 pounds 29 5 kg 54 9 pounds 24 9 kg Dimensions Width x Height x Depth Weight with stand without stand with stand without stand 42LC2D 42LC2D UE 41 5 x 32 0 x 11 9 inches 1054 x 813 x 302 mm 41 5 x 29 4x 5 4 inches 1054 0 x 746 0 x 136 8 mm 81 6 pounds 37 0 ...

Page 70: ......

Reviews: