background image

56 DLP Projection TV

Operation

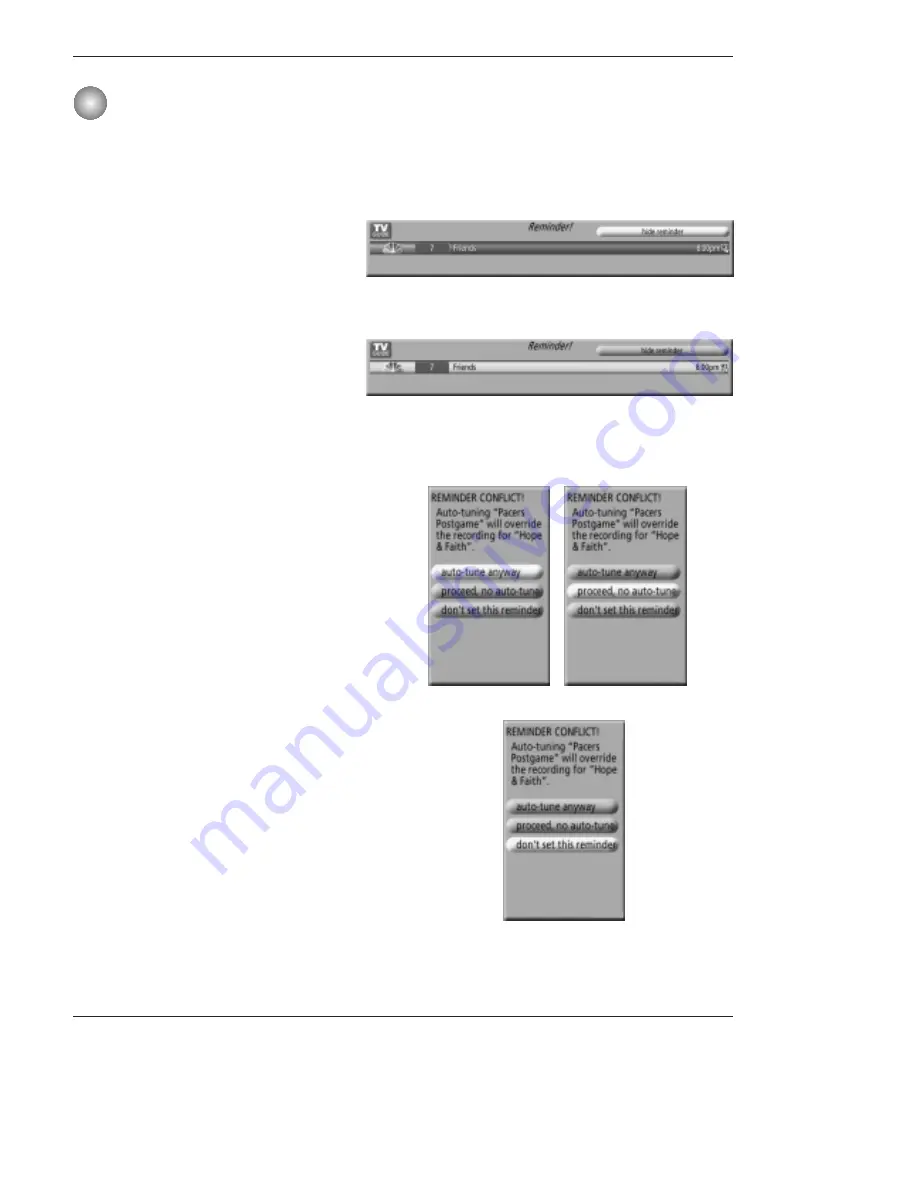
Based on your option settings, a notification screen will

appear, if your TV is On at the reminder time. You can

then choose to hide the reminder, or highlight the show,

and press 

ENTER

to tune to the show. If there is no activ-

ity for 3 minutes, the notification screen automatically

closes and completes the highlighted item (hide

reminders).

If you choose Hide Reminders, the window closes for the

show or shows, but does not affect other Reminders you

set.

Note:

If more than 2 reminders are set for the same time,

arrows appear on the Reminder screen. Use the 

D  

E

buttons to view the shows.

Remind Conflict

A conflict message appears for the following reasons:

• a show set with an Auto-Tune Reminder has the same

start time as an existing Auto-Tune Reminder.

• If you are using a cable box, a show set with an Auto-

Tune Reminder overlaps with a Recording already

scheduled.

Select one of these options:

W  

auto-tune anyway - this show will override an exist-

ing show set to auto-tune

W  

proceed, no auto-tune - set the show as a Reminder

but do not auto-tune

W  

don't set this reminder - cancel the Reminder

TV Guide On Screen

TV Guide On Screen

TM

System

System

Summary of Contents for 52SX4D

Page 1: ...ease read this manual carefully and completely before operating your TV Retain this manual for future reference Record model number and serial number of the TV in the spaces provided below See the label attached on the back cover and relate this information to your dealer if you require service Model Number Serial Number ...

Page 2: ...d and found to comply with the limits for a Class B digital device pursuant to Part 15 of the FCC Rules These limits are designed to provide reasonable protection against harmful interference in a residential installation This equipment generates uses and can radiate radio frequency energy and if not installed and used in accordance with the instructions may cause harmful interference to radio com...

Page 3: ...al Inc and is used under license by Gemstar TV Guide International Inc The TV Guide On Screen system is protected by one or more of the following issued United States patents 6 498 895 6 418 556 6 331 877 6 239 794 6 154 203 5 940 073 4 908 713 4 751 578 4 706 121 The TV Guide On Screen system is manufactured under license from Gemstar TV Guide International Inc and or one of its affiliates Use of...

Page 4: ... Follow all instructions 5 Do not use this apparatus near water 6 Clean only with dry cloth 7 Do not block any ventilation openings Install in accordance with the manufacturer s instructions 8 Do not install near any heat sources such as radiators heat registers stoves or other apparatus including ampli fiers that produce heat 9 Do not defeat the safety purpose of the polarized or grounding type p...

Page 5: ...ll outlets Overloaded wall outlets loose or damaged wall outlets extension cords frayed power cords or damaged or cracked wire insulation are dangerous Any of these conditions could result in electric shock or fire Periodically examine the cord of your appliance and if its appearance indicates damage or deterioration unplug it discontinue use of the appliance and have the cord replaced with an exa...

Page 6: ...Sound Control Custom Option 63 Front Surround 64 TV Speakers On Off Setup 64 Stereo SAP Broadcasts Setup 64 Time Menu Options Auto Clock Setup 65 Manual Clock Setup 65 On Off Timer Setup 65 Sleep Timer Auto Off 66 Option Menu Options Aspect Ratio Control 67 Cinema 3 2 Mode Setup 67 Caption 68 Caption Text 68 Caption Option 69 EZ Demo 69 Lock Menu Options Parental Lock Setup 71 CableCARDTM Function...

Page 7: ...er Cord is connected TV is in standby mode Green TV turns on Red blinking Power Cord is connected TV is in booting sequence White Rolling Preparing operation in standby mode Orange Projection lamp is reaching the end of its life and needs to be replaced with a new lamp Contact your service center Red blinking There is a problem with the lamp or around it Contact an authorized service center Green ...

Page 8: ...put port VARIABLE AUDIO OUT Used to connect either an external amplifier or add a sub woofer to your surround sound system COMPONENT INPUT 1 2 Connect a component video audio device to these jacks Refer to your DVD manual for further information VIDEO 1 or 2 Connects the video sig nals from various types of equipment Left Right AUDIO Used for stereo sound from various types of equipment IEEE1394 C...

Page 9: ... of jacks on the rear jackpack may be connect ed to the front connection panel To use the side jacks as the signal source select them using Main Input menu as described on page 61 They will be named Front Video in the Main Input menu If you input both Front Video and S Video only the S Video will work If you re connecting a video game device make sure to change the picture settings with the EZ Pic...

Page 10: ...t work in the mode Controls the DVHS or Camcorder of IEEE 1394 mode RATIO Changes the aspect ratio POWER Turns your TV or any other programmed equipment on or off depending on mode CC Select a closed caption Off CC1 4 Text1 4 THUMBSTICK Up Down Left Right ENTER Allows you to navigate the on screen menus and adjust the system settings to your pref erence CHANNEL UP DOWN Selects available channels f...

Page 11: ...ters or exits a Panel Menu in the TV Guide On Screen system PIP Switches to PIP POP Picture out of Picture and Twin picture modes in regu lar sequence Switches the video window locking or unlocking in the Listings Grid PIPCH PIPCH Changes to the next higher lower PIP channel PIP INPUT Selects the input source for the sub pic ture in PIP Twin picture mode SWAP Exchanges the main sub images in PIP T...

Page 12: ...able ANTENNA Multi family Dwellings Apartments Connect to wall antenna socket Single family Dwellings Houses Connect to wall jack for outdoor antenna Outdoor Antenna Wall Antenna Socket VHF Antenna UHF Antenna RF Coaxial Wire 75 ohm Bronze Wire Turn clockwise to tighten Bronze Wire Be careful not to bend the bronze wire when connecting the antenna Bronze Wire Cable TV Wall Jack RF Coaxial Wire 75 ...

Page 13: ...and Audio Right red If you connect an S VIDEO output from VCR to the S VIDEO input the picture quality is improved compared to connecting a regular VCR to the Video input 2 Insert a video tape into the VCR and press PLAY on the VCR Refer to the VCR owner s manual 3 Select the input source with using the TV VIDEO button on the remote control Note that this TV finds the connected input sources autom...

Page 14: ...ITOR OUTPUT VIDEO INPUT2 VIDEO INPUT1 DIGITAL AUDIO OPTICAL INPUT1 COMPONENT2 DIGITAL AUDIO OPTICAL INPUT2 DVI IEEE1394 DIGITAL AUDIO OPTICAL OUTPUT ANTENNA VARIABLE AUDIO OUT G LINK UPGRADE PORT R AUDIO L S VIDEO B R R AUDIO L DIGITAL AUDIO OPTICAL HDMI1 DVI HDMI2 C a b l e C A R D DVD Notes Digital Audio will not work for Component 1 input source Digital Audio operation has priority if Digital A...

Page 15: ... top box 2 Use TV VIDEO on the remote control to select Component 1 Component 2 RGB DTV or HDMI DVI source HDSTB Setup HDSTB Setup This TV can receive Digital Over the air Cable signals without an external digital set top box However if you do receive Digital signals from a digital set top box or other digital external device refer to the figure as shown below This TV supports HDCP High bandwidth ...

Page 16: ...the PC to RGB INPUT port of this TV with a RGB cable not supplied with this product 2 If the PC or the sound card of the PC has an analog audio output connector connect the PC s audio output to AUDIO INPUT port located on the right side of RGB INPUT port How To Use 1 To get the best picture quality adjust the PC graphics card to 1024x768 60 Hz 2 Select RGB PC input source in main input option of S...

Page 17: ...VD INPUT L R AUDIO ANTENNA DIGITAL AUDIO OPTICAL INPUT1 COMPONENT2 DIGITAL AUDIO OPTICAL INPUT2 DVI IEEE 1394 DIGITAL AUDIO OPTICAL OUTPUT C A B L E C A R D DVI G LINK HDMI HDMI1 DVI HDMI2 C a b l e C A R D Hook up Variable Audio Output L Audio R to Amplifier system for Left Right front speaker sound How to connect 1 Locate the Variable Audio Out jacks on the back of your TV and the Input jacks on...

Page 18: ...n is necessary How To Use If the source device supports Auto HDMI function the output resolution of the source device will be automatically set to 1280x720p If the source device does not support Auto HDMI you need to set the output resolution appropriately To get the best picture quality adjust the output resolution of the source device to 1280x720p Select HDMI1 DVI or HDMI2 input source in main i...

Page 19: ...ith the product HDMI to DVI Cable not supplied with the product Fiber Optic Digital Audio Cable not supplied with the product Analog Audio Cable RCA type not supplied with the product Analog Audio Cable Stereo to RCA type not supplied with the product Reference Reference ...

Page 20: ...ut output PC Resolution VGA SVGA XGA Position and Size may not fit to Screen As shown the picture below press the ADJUST button to adjust the screen Position of TV SET and contact an PC graphics card service center When Source Devices connected with HDMI1 DVI Input output TV SET Resolution 480p 720p 1080i and TV SET Display fit EIA CEA 861 B Specification to Screen If not refer to the Manual of HD...

Page 21: ...WITCH ANT IN ANT OUT HDMI1 DVI HDMI2 C A B L E C A R D IEEE 1394 VCR Rear VCR Front VCR Rear VCR Front TV Guide On Screen Setup TV Guide On Screen Setup The TV Guide On Screen system uses Setup information to provide you with show listings and lineups in your area which are updated several times a day Once you set up the TV according to manufacturer s instructions you are ready to set up the TV Gu...

Page 22: ...E1394 DIGITAL AUDIO OPTICAL OUTPUT ANTENNA VARIABLE AUDIO OUT G LINK UPGRADE PORT S VIDEO OUT IN R AUDIO L VIDEO 3 4 OUTPUT SWITCH ANT IN ANT OUT HDMI1 DVI HDMI2 C A B L E C A R D PC DTV XGA 480p 720p 1080i S VIDEO PR PB Y MONO CABLE RGB INPUT COMPONENT INPUT2 INPUT1 DTV DVD INPUT RGB DVI INPUT L R AUDIO L R AUDIO VIDEO L R AUDIO L R AUDIO MONITOR OUTPUT VIDEO INPUT2 VIDEO INPUT1 DIGITAL AUDIO OPT...

Page 23: ... Remind me to set up later returns you to watching TV Don t remind me again returns you to watching TV and stops the reminder screen from appearing upon power On How to use 1 Screen 1 Country This screen asks you the location of your TV Use the D E button to highlight a country Press ENTER to display Screen 2 The TV Guide On Screen system s Welcome Screen appears by pressing the TV Guide key when ...

Page 24: ...o move to another field Press ENTER to display Screen 3 Option 2 If you selected Canada in Screen 1 you see the Postal Code screen You input characters by using the D E button and then the F G button to move to another field Press ENTER to display Screen 3 3 Screen 3 Do you have Cable Service connected If you select Yes you see Screen 4 If you select No you see Screen 12 4 Screen 4 Do you have a C...

Page 25: ...le Box Configuration Diagram The diagram shows the correct way to install the G LINK Cable from the back of the device to the cable box Make sure the G LINKTM Cable is properly installed Press ENTER to display Screen 8 5 Screen 5 Which TV input is the cable box plugged into If you select Cable you see Screen 6 If you make any other choice you see Screen 7 ...

Page 26: ...ructions and press ENTER to display Screen 10 10 Screen 10 Cable Box Code Testing When testing is done Screen 11 displays automatically 11 Screen 11 Cable Box Tuned to Channel 9 If you select Yes you see Screen 12 If you select No a different code is tested in Screen 10 Note Many Cable Boxes require testing more than one code If you select Test this code again the same code is tested again in Scre...

Page 27: ... settings correct If you select Yes you see Screen 14 If you select No you see Screen 1 12 Screen 12 Do you have an antenna connected If you select Yes you see Screen 13 Note If you selected No in Screen 3 then you must select Yes in this screen to receive a channel lineup and listings If you select No you see Screen 13 ...

Page 28: ... Screen 18 16 Screen 16 VCR Configuration Diagram This screen shows the correct way to install the G LINKTM Cable from the back of the TV to the Recording device Make sure the G LINKTM Cable is properly installed Press ENTER and you see Screen 17 15 Screen 15 Is a VCR Connected If you select Yes you see Screen 16 If you select No you see Screen 21 ...

Page 29: ...creen 19 VCR Code Testing When testing is done Screen 20 displays automatically 20 Screen 20 VCR Tuned to Channel 9 If you select Yes you see Screen 21 If you select No a different code is tested in Screen 19 Notes Many VCRs require testing more than one code If you select Test this code again the same code is tested again in Screen 19 ...

Page 30: ...e On Screen system Press ENTER to watch TV Notes The TV Guide On Screen system receives program listings data through your cable or over the air video signal In order to receive regular program listings please remember to do the following 1 Turn OFF your TV when it is not in use Do not unplug the power cord 2 If you have a Cable box connected leave it ON 3 If you have a VCR connected turn it OFF w...

Page 31: ...ethods are available as shown below 1 When connecting the DVHS or the MicroMV Camcorder as shown in the a or b figure press the button to show the control panel IEEE 1394 Functions IEEE 1394 Functions 1394 Note When connecting the DVHS and the MicroMV Camcorder in case of showing input error it s okay a TV DVHS Connect the IEEE1394 Cable Connect the IEEE1394 Cable b TV MicroMV Camcorder TV TV DVHS...

Page 32: ...arrangement of connected device 2 When connecting the DVHS and the MicroMV Camcorder as shown in the c or d figure press the button to show the control panel and then select the DVHS or the MicroMV Camcorder 1394 c TV DVHS MicroMV Camcorder Connect the IEEE1394 Cable TV DVHS MicroMV Camcorder Connect the IEEE1394 Cable d Daisy Chain Connection TV DVHS MicroMV Camcorder Generic Connect the IEEE1394...

Page 33: ... shape Icon Tape in or not Lock shape Icon Writable or not 8 Initializing Play Time 9 DVHS Play Pause Stop Search Skip Notes Skip This function is for a fast search It searches the program s start Skip point and then plays On skipping Search FF GG Pause II and Skip Play G are displayed on the Control Panel In some models it s not Skip available to operate the Skipping IFF GGI function Supported DV...

Page 34: ...8 1 2 Notes In memory mode of MicroMV Camcorder it doesn t apply to connect the IEEE1394 Regardless of a mode of MicroMV Camcorder if the tape is ejected it doesn t apply to connect the IEEE1394 W WV How to play the MicroMV Camcorder MicroMV Camcorder MicroMV Camcorder 1 Connect the IEEE 1394 jack at the TV to the IEEE 1394 jack at the MicroMV Camcorder with IEEE 1394 Cable TV MicroMV Camcorder 2 ...

Page 35: ...er and DVHS MicroMV Camcorder and DVHS 1 Synchronously connect the IEEE 1394 jack of the TV to the IEEE 1394 jack of the DVHS and the MicroMV Camcorder with IEEE 1394 Cable 2 Press the D E button to select device then press ENTER button to play it And then selected device will be showed OSD ...

Page 36: ... and displays OSD and plays to stream of a remote control by using a con nection of IEEE1394 Connect the IEEE1394 Cable 2 When watching the TV press the and then D E buttons to select the DTV Link supported device and then use the ENTER button 1394 TV 3 Press the TV INPUT button to stop the IEEE1394 function Note On a condition of connecting the IEEE 1394 you can control the DTV Link device while ...

Page 37: ...oMV Camcorder Connect the IEEE1394 Cable Connect the IEEE1394 Cable b When connecting the 4 devices and over the 1394 will not work properly Notes On a condition of connecting the IEEE 1394 you can control the DTV Link device while watching the OSD through DTV and DTV remote control ex change of channel play record a show of recording list etc Analog channel is not supported ...

Page 38: ...de etc Intuitive up down left right navigation using your remote control Set shows to Record Schedule show Reminders Search shows by category e g Movies Sports Children etc Search for shows based on keywords or alphabetically by title Direct tuning to a channel Show information while watching TV Streamlined System Setup and default setting options Channel lineup customization Help screens while in...

Page 39: ...es Current Service Label indented to indicate current Service displayed Tile displays show title Highlight indicates an active tile Info Box provides information for a highlighted item Info Button cycles through the various Info Box sizes Channel Logo identifies network Record Remind Icons indicates a show is set to Record or set as a Reminder Panel Ad location where show or product specific infor...

Page 40: ...ss the highlight is on an odometer where these arrows change the odometer choice Pressing ENTER from an odometer or number entry box moves the highlight to the default command button of that Panel Menu for example Schedule Reminder Pressing ENTER from a highlighted command button executes the action and closes the Panel Menu e g Schedule Reminder Cancel Select Cancel to cancel any changes and pres...

Page 41: ...ck and unlock the Video Window Access Panel and Channel Ads Use the D E F G buttons to move the highlight within Listings to Notes There may be times when the TV Guide On Screen system could display partial or no program list ings The reasons for this include Program schedule information was not provided to TV Guide On Screen The transmission of the program listings was inter rupted The phrase No ...

Page 42: ...ional News Variety Series HDTV or by Keyword With Search highlighted press the Info button to display a Help screen Press the Info button again to close the screen Category Search Example Movies 1 From Search use the E button to highlight Movies Search Search TV Guide On Screen TV Guide On ScreenTM System System ...

Page 43: ... menu changes no infor mation and returns to the Search Service Bar Tune to Channel exits the Guide and tunes to the chan nel of the highlighted show show airs in the future Note This option reads Watch Now if the show is cur rently airing Set Recording displays the Record Options menu from which you can set frequency start and end time etc Set Reminder displays the Remind Options menu from which ...

Page 44: ...h and press ENTER button 3 The Search Options menu is displayed 4 Highlight Category and use the F G buttons to select a category to search e g All HDTV Children Sports etc When finished use the E button to high light Enter Keyword 5 Highlight Enter Keyword and press ENTER Then the keyboard is displayed 6 Use the D E F G buttons to highlight a character and press ENTER to display it When complete ...

Page 45: ...A Confirm menu is displayed Yes deletes the Search No closes the panel menu Cancel closes the menu changes no information and returns to the highlighted show 7 A list of all matching shows for that keyword is dis played Like the Category Search Example you can highlight a show and press ENTER to display all airings You can then highlight a specific listing and press ENTER to watch if On now or the...

Page 46: ...time the show airs on the same channel and starts at the same time W Weekly sets a show reminder each time the show airs on the same day of the week on the same channel and starts at the same time W Off keeps the show in the list but will not remind until the frequency is changed Highlight an event and press the Menu key for options Go to Service Bar closes the menu changes no information and retu...

Page 47: ... Confirming Your Settings screen You see your current settings Choose one of the options press ENTER and follow the on screen instructions With Setup highlighted press the Info button to display a Help screen Press the Info button again to close the screen Setup Setup Notes If the stations in the Listings grid don t match the channel num bers in your area choose the option Yes but my channel lineu...

Page 48: ...ges Highlight Cancel to close the menu change no information and return to the highlighted channel Change Channel Display Change Channel Display lets you edit channel information that appears in Listings With Change Channel Display you can Change the position number to indicate where in the Listings the channel displays Change the tune channel number Switch a channel W On the channel is always dis...

Page 49: ...powered On Choices are On and Off Default On Highlight General Default Options and press the Menu key to dis play the General Default Options menu Highlight Go to Service Bar to close the menu change no infor mation and return to the Setup Service Bar When finished press ENTER to highlight Done Press ENTER again to close the menu and accept the changes Highlight Cancel to close the menu change no ...

Page 50: ... Default Options lets you set defaults for the following Power On the TV if Off when a Reminder is scheduled Choices are Yes and No Default No Automatically tune the TV to the channel TV must be On when a Reminder is scheduled Choices are Yes and No Default No When to display the reminder screen Choices are 30 seconds to 15 minutes early to 30 seconds to 15 minutes late to On time Default 1 min ea...

Page 51: ...remote to record the show Once with current default settings Start and End recording On Time Each time you press the Record button you change the record frequency but not the default settings among Once default Regularly Weekly Off and then Cancel Note The proper Record icon appears on the show tile as the Record button is pressed 2 From a Panel Menu Highlight a show and press Menu to display the ...

Page 52: ...Schedule Service label and press Menu to display the Schedule Options menu Use the D E F G buttons to move through the options Use the number or the D E F G buttons to change the informa tion as necessary Highlight New Manual Recording and press ENTER to display the Record Options menu Current information i e date start and end times channel input is displayed Recorder choice Please choose the VCR...

Page 53: ...o Record overlaps with a show previously set to auto tune Select one of these options W record anyway this show will override an existing show set to Record or auto tune W don t record this show cancel the Recording Before a recording begins a notification screen appears if you are using a Cable box and your TV is On At that time you can choose to start or cancel recording If the TV is not On the ...

Page 54: ...he same day of the week on the same channel and starts at the same time W Off keeps the show in the list but will not remind until the frequency is changed Power On the TV if Off when a Reminder is scheduled Choices are Yes and No Default No Automatically tune the TV to the channel TV must be On when a Reminder is scheduled Choices are Yes and No Default No When to display the reminder screen Choi...

Page 55: ...ly reminds for the time channel input destination combination Monday through Friday W Weekly sets a show reminder for the time channel input destination combination once a week on this selected day of the week W Off not cancel keeps the time channel input destina tion combination in the list without reminding until the frequency is changed Power On the TV if Off when a Reminder is scheduled Choice...

Page 56: ...ote If more than 2 reminders are set for the same time arrows appear on the Reminder screen Use the D E buttons to view the shows Remind Conflict A conflict message appears for the following reasons a show set with an Auto Tune Reminder has the same start time as an existing Auto Tune Reminder If you are using a cable box a show set with an Auto Tune Reminder overlaps with a Recording already sche...

Page 57: ...Screen Display may be different from your TV s because it is just an example to help you with the TV operation Turning on the TV just after installation Turning on the TV power cord is still connected 1 Connect power cord correctly 2 Press the POWER button on the TV At this moment the TV is switched to standby mode Press the TV INPUT TV VIDEO CH D E Number 0 9 button on the remote control or press...

Page 58: ...e OPTION menu 2 Press the G button and then use D E button to select Language 3 Press the G button and then use D E button to select your desired language From this point on the on screen menus will be shown in the selected lan guage 4 Press EXIT button to return to TV viewing or press MENU button to return to the previous menu On screen Menus Language Selection On screen Menus Language Selection ...

Page 59: ...n 3 Press the G button and then use D E button to select TV CADTV CATV DTV 4 Press the G button and then use D E button to select channel number you want to add or delete 5 Press the ENTER button to add or delete for the channel number 6 Press EXIT button to return to TV viewing or press MENU button to return to the previous menu Manual Scan Manual Scan Notes This channel number is a physical chan...

Page 60: ... Channel Edit 3 Press the G button You will now see a screen filled with channel numbers and a preview picture 4 Use D E F G button to select a channel and then use the ENTER button to add or delete it Press FAV to add or delete the channel to the Favorite List 5 Press EXIT button to return to TV viewing or press MENU button to return to the previous menu Channel Edit Channel Edit Shows how strong...

Page 61: ...button to select the source Video1 Video2 Front Video Component1 Component2 RGB HDMI1 DVI or HDMI2 4 Press EXIT button to return to TV viewing or press MENU button to return to the previous menu Input Label Input Label Choose preset labels for your channels If a channel label is provided on the signal from the broadcasting station the TV displays a short name for a DTV chan nel even if you didn t ...

Page 62: ...gory When adjusting Video menu options contrast brightness color sharpness tint and color temperature manually EZ Picture automatically changes to Custom Daylight Normal Night Time Movie Video Game and Sports settings are preset for optimum picture quality at the factory and are not adjustable V Video Menu Options ideo Menu Options Use to quickly reset all the Video menu options to their original ...

Page 63: ...wing or press MENU button to return to the previous menu Audio Language Audio Language EZ Sound lets you enjoy the best sound without any special adjustment because the TV sets the appropriate sound options based on the program content When adjusting sound options treble bass and front surround manually EZ Sound automatically switches Custom Normal Stadium News Music and Theater are preset for goo...

Page 64: ... menu TV Speaker On Of TV Speaker On Off Setup f Setup Turn TV speaker off if using external audio equipment Feature turns the TV Speaker option On or Off 1 Use the SAP button to select your desired MTS mode in analog signal Each time you press the SAP button Mono Stereo or SAP appear in turn If other languages available on the digital signal select them with the SAP button 2 Press EXIT button to ...

Page 65: ...des information for the current time provided by the broadcasting station Set the clock manually if the current time is set incorrectly by the auto clock function When you set up TV Guide Auto Clock menu is not selected 1 Press the MENU button and then use D E button to select the TIME menu 2 Press the G button and then use D E button to select Auto Clock 3 Press the G button and then use D E butt...

Page 66: ...he TV off at the preset time Note that this setting is cleared when the TV is turned off You can also set up the Sleep Timer in the TIME menu 1 Press the TIMER button repeatedly to select the number of minutes First the Off option appears on the screen followed by the following sleep timer options 10 20 30 60 90 120 180 and 240 minutes 2 When the number of minutes you want is displayed on the scre...

Page 67: ...y Program Selects the proper picture proportion to match the source s image 4 3 4 3 16 9 16 9 4 3 Choose 4 3 when you want to view a picture with an original 4 3 aspect ratio with black bars appearing at both the left and right sides 16 9 Choose 16 9 when you want to adjust the picture horizontally in a linear proportion to fill the entire screen Horizon Choose Horizon when you want to adjust the ...

Page 68: ...ta service generally not program related Caption Text if provided by the broadcaster would be available for both digital and analog channels on the Antenna Cable This TV is programmed to remember the caption text mode it was last set to when you turn the power off 1 Press the MENU button and then use D E button to select the OPTION menu 2 Press the G button and then use D E button to select Captio...

Page 69: ... typeface for the words Text Color Choose a color for the text Text Opacity Specify the opacity for the text color Bg Background Color Select a background color Bg Background Opacity Select the opacity for the background color Edge Type Select an edge type Edge Color Select a color for the edges 5 Press EXIT button to return to TV viewing or press MENU button to return to the previous menu EZ Demo...

Page 70: ...ies use the Movie Rating System MPAA only Ratings for Movies previously shown in theaters Movie Ratings Blocking Off Permits all programs G General audience PG Parental guidance suggested PG 13 Parents strongly cautioned R Restricted NC 17 No one 17 and under admitted X Adult only If you set PG 13 G and PG movies will be available PG 13 R NC 17 and X will be blocked Ratings for Television programs...

Page 71: ...ut all the movies with the ratings above a specified level Keep in mind that the movie ratings limit only applies to movies shown on TV not TV programs such as soap operas TV Rating Children Prevents children from watching certain children s TV programs according to the ratings limit set The children rating does not apply to other TV programs Unless you block certain TV programs intend ed for matu...

Page 72: ... of Scientific Atlanta CableCARD 1 Press the MENU button and then use D E button to select the CABLE menu 2 Press the G button and then use D E button to select your desired item 3 Press the G button 4 Press EXIT button to return to TV viewing SETUP VIDEO AUDIO TIME OPTION LOCK CABLE Previous SA CableCARD Diag Screen G SA CableCARD Host ID Screen MENU Exit In order to start cable service for this ...

Page 73: ...Action Notification Hurricane will be coming Cable Channel List Cable Channel List Emergency Emergency Alert Message Alert Message 1 If you enter the Channel Edit after running the EZ Scan without CableCARDTM you can see the cable channel list as the picture 3 above 2 Insert the CableCARDTM Then the TV receive a new cable channel list which is usually one part channel It takes about 2 3 minutes to...

Page 74: ...event it from static shock The stored data may be changed or lost as a result of misuse static electricity Do not turn the power off while the memory card is in operation Don t eject the memory card while in use Otherwise it may cause a data loss or card damage Insert only one card to each slot To prevent a change or loss for stored data don t misuse the TV or don t let static electricity or elect...

Page 75: ...e file name is longer than 8 characters it will be truncated at 6 digits and 1 2 3 and 4 will be appended to the 7 8th position mp3 Memory card capacity Unsupported or damaged file CF 2GB Microdrive 2GB Magicstor 2 2GB MMC 256MB SD 512MB SMC 128MB XD 512MB MS 128MB MS PRO 1GB Music File MP3 Slot 1 MMC MultiMedia Card SD Secure Digital SMC Smart Media Card Slot 2 MultiMediaCardTM Secure Digtal TM S...

Page 76: ...wly 2 Press the button to enter the mode Press the button again to exit the mode W W Ejecting a card 1 Press the M C EJECT button on the remote control 2 Press D E button to Select the Memory 1 Eject or Memory 2 Eject based on the inserted card location If selecting Cancel OSD is disappeared 3 Eject the card with the hand Notes Screen saver will be work if you don t eject the memory card with the ...

Page 77: ...rd with the hand If there is any error in a memory card it s impossible to enter mode Memory 1 Please select where to move MS Pro Photo Music Memory 2 CF MD Photo Music Exit When you plug a memory card or press the button the below screens will be displayed Select the Photo or Music Media Select the Photo or Music Media In this manual the OSD On Screen Display may be different from your TV s becau...

Page 78: ...NTER button The selected image will display on entire screen When you select Photo in entry menu you will now see a screen filled with thumbnail photo media JPEG File V JPEG File Viewing Options iewing Options Screen Components Screen Components Left Menu Marked JPEG file number Current page Total page Direct Buttons Usable Card memory Total Card memory Card type View Slide Show Delete Cancel Phot...

Page 79: ...ery file is selected If you select Unmark All the selection for every file is released 3 Press the ENTER button and then G button to return to the photo list W W Mark Unmark for some file Press the MARK button repeatedly to mark or unmark some JPEG file Jump Media Jump Media 1 In photo media press F button repeatedly to enter the left menu 2 Press the D E button to select Jump media and then press...

Page 80: ...ect previous image If you mark for a file you can see only the marked image Image Rotation Press the D E button to rotate the image D Rotate clockwise E Rotate counterclockwise It s unavailable to rotate the enlarged image Image Zoom In Out Press the CH D E button to enlarge or reduce the image 2 or 4 times Press the D E F G button to move the enlarged image Go to the Menu Press the EXIT button to...

Page 81: ...shown If you mark for a file slide show works only the marked image F G Prev Next Pause Go to Menu 1 15 Hide Help Next previous Image Selection Press the G button to select next image Press the F button to select previous image Image Pause Press the II button to pause the cur rent image Press the button to restart the slide show By pressing F G button you can also select the next or previous image...

Page 82: ...NTER button Press the D D E E F F G G EXIT G play II Å IFF GGI INFO CH D E MARK buttons to release the screen saver If you don t press any button about 30 secondes while displaying the photo list the screen saver is worked View Slide show Delete Cancel File name DTRC0029 JPG Date 2004 12 13 16 47 02 File Size 603KB Resolution 1600 x 1200 Pixel Information OK JPEG File V JPEG File Viewing Options i...

Page 83: ...letion function don t work while playing the music If pressing any button except button on the remote control while playing the music the music playing is stopped Moves from the current 8 files list to the next files list with CH D E button Purchased MP3 music files may contain copyright restrictions Playback of these files may not be supported by this model MP3 File Playing Operation MP3 File Pla...

Page 84: ...very file is selected If you select Unmark All the selection for every file is released 3 Press the ENTER button and then G button to return to the music list W W Mark Unmark for some file Press the MARK button repeatedly to mark or unmark some MP3 file You can mark unmark the file to play the desired file only It s available to use left menu during stopping the music MP3 File Playing Operation MP...

Page 85: ...1 In music media press the F button 2 Press the D E button to select Jump media and then press the ENTER button 3 Press the D E F G button to select desired media and then press the ENTER button The screen dis plays each media list Use this funcion to jump to other media during using music media If you don t press any button about 30 secondes the screen saver is worked Jump Media Jump Media Screen...

Page 86: ... button When Do you want to delete the file message is displayed select Yes Yes or No with F G button The file is deleted all the fol lowing files are shifted up one position 3 To return to the music list press the D E button to select Cancel and then press the ENTER button File name DTRC0029 JPG Length 3 37 File Size 5 25KB Bitrate 193Kbps Information OK MP3 file deletion and Cancel MP3 file dele...

Page 87: ...ct DTV for main and sub picture simultaneously Repeatedly use the SWAP button to switch the main and sub pictures Component 1 Component 2 RGB PC or RGB DTV HDMI DVI input sources for the main picture can t be used to swap the main and sub pictures Use the PIP INPUT button to select the input source for the sub picture Each press of PIP INPUT button changes the PIP source You can also select source...

Page 88: ... DTV on Sub pictures are in channel scanning However when watching DTV on Main picture only TV on Sub picture is in channel scanning 2 Press the EXIT button to cancel POP mode Use POP to search the programs of all the memorized channels one by one on the 3 PIP screen display while the main picture source remains the current channel The pictures of all the programmed channels are searched with the ...

Page 89: ... once As shown below the screen is divided to 4 split 2 Use the D E F G button to navigate 4 EZ Pictures 3 By pressing the ENTER button you can select the desired mode 4 Press EXIT button to return to TV viewing Notes While operating the 4 split any button except APM ENTER EXIT VOLUME D E MUTE button on the remote control are not available If you don t press any button for 30 seconds APM screen is...

Page 90: ...Dialogue L Language S Sex V Violence FV Fantasy Violence 480i 480p 720p 1080i CC Operation Watching TV DTV CATV CADTV Watching Video1 Video2 Video3 Watching IEEE 1394 In Component1 Component2 RGB HDMI DVI modes INFO button is not working Function Show the present screen information On Watching with the upper Input signal press the INFO button Press the INFO button or EXIT button to exit A Banner i...

Page 91: ...e the image may become distorted If you set the Caption on nothing to do with MUTE button Caption function operates as Caption on or off When you repeatedly press the MUTE button the screen is displayed in turn Refer to the lower picture Note EZ Mute only operates in DTV Analog Video Front Video Mute EZ Mute 24 Freeze Magnify EZ Mute Mute Sound is muted Mute Off Sound is enabled EZ Mute a special ...

Page 92: ...put and select HDMI DVI input this function is used In RGB DTV mode SIZE and PHASE is not available Screen Setup for PC mode After connecting RGB PC or HDMI DVI to PC input and checking the screen quality Display PC Adjust Menu using ADJUST button Position Adjust the screen position After displaying the Adjust select the screen position Size Adjust the screen size Phase Adjust the phase of Pixel c...

Page 93: ...erly and the remote need not to be pro grammed If not the remote should be programmed to operate the device The programming procedures are explained below 2 Press the MENU and MUTE button continuously at the same time for 2 seconds the current selected device button will be illu minated If you don t press any button for 20 seconds the light on the device button will be turned off In that case you ...

Page 94: ... 134 SCOTT 017 037 112 129 131 SEARS 003 008 009 010 013 014 017 020 031 042 073 081 101 SHARP 031 054 149 SHINTOM 024 SONY 003 009 031 052 056 057 058 076 077 078 149 SOUNDESIGN 034 STS 013 SYLVANIA 031 033 034 059 067 SYMPHONIC 034 TANDY 010 034 TATUNG 039 043 TEAC 034 039 043 TECHNICS 031 033 070 TEKNIKA 019 031 033 034 101 THOMAS 034 TMK 006 TOSHIBA 008 013 042 047 059 082 112 131 TOTEVISION 0...

Page 95: ... 082 083 084 091 120 HDSTB HDSTB Brand Codes Brand Codes Brand Codes Brand Codes Brand Codes Brand Codes Brand Codes Brand Codes AIWA 014 028 070 096 125 129 139 229 230 AKAI 163 ANAM 003 014 017 023 059 106 189 216 217 235 236 BURMECTER 252 CARVER 086 CLARION 199 DAEWOO 027 053 060 084 102 148 198 221 DENON 015 075 130 143 FANTASIA 071 FINEARTS 022 FISHER 089 099 LG GOLDSTAR 001 021 024 029 087 1...

Page 96: ...minutes the screen gets dark The remote control doesn t work Check to see if there is any object between the TV and the remote control causing obstruction Are batteries installed with correct polarity to to Refer to p 11 Correct remote operating mode set TV VCR etc Install new batteries Refer to p 11 Picture OK No sound Press the VOLUME G button Sound muted Press MUTE button Picture appears slowly...

Page 97: ...an adjust the RATIO button or Aspect Ratio in the OPTION menu No output from one of the speakers Adjust Balance in the AUDIO menu Refer to p 63 Unusual sound from inside the TV A change in ambient humidity or temperature may result in an the DLP display is turned on or off and does not indicate a fault with the TV My Guide listings disappeared after a power failure You should begin to receive list...

Page 98: ...ned Off before the recording begins Make sure there is a tape Check the Schedule menu and verify that the show is listed before recording begins Check the placement of the IR cable in front of your recorder I have not received any Guide listings Listings usually appear within 24 hours after a successful Setup It may take up to a week to fill the Listings grid with the full 8 days of listings If yo...

Page 99: ...abinet with a soft dry lint free cloth Please be sure not to use a wet cloth If you expect to leave your TV dormant for a long time such as a vacation it s a good idea to unplug the power cord to protect against possible damage from lightning or power surges Early malfunctions can be prevented Careful and regular cleaning can extend the amount of time you will have your new TV Be sure to turn the ...

Page 100: ...hes Height inches Depth inches Weight lbs Power requirement Television System Program Coverage Power Consumption W Antenna Audio Output W Supplied Accessories AC120V 60Hz NTSC M ATSC VHF 2 13 UHF 14 69 CATV 1 135 CADTV 1 135 DTV 2 69 260W 75 ohm External Terminal for VHF UHF 20Wx2 Remote control 2 size AA batteries D sub 15 pin Cable G LINK cable 52SX4D UB 62SX4D UB 63 4 40 4 19 5 108 55 7 35 8 15...

Page 101: ...Owner s Manual 101 Notes Notes ...

Page 102: ...102 DLP Projection TV Notes Notes ...

Page 103: ... we discover a safety or reliability problem that could affect you FOR SERVICE For warranty service information please contact the LG Brand Customer Support telephone number listed below When calling for service please have your product model number serial number and the date of purchase or the date of original installation available If a replacement unit is required under some circumstances you m...

Page 104: ... Repair Parts are warranted for the remaining portion of the original unit s warranty period EFFECTIVE DATE OF WARRANTY Your warranty period begins on the date of sale to the original consumer end user KEEP THE DEALER S DATED BILL OF SALE OR PROOF OF DELIVERY as evidence of the purchase date You will be required to submit a legible copy of your bill of sale or proof of delivery when requesting war...

Reviews:

Related manuals for 52SX4D