background image

- 20 -

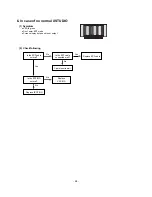
4. No Raster

(1) Symptom

¯

Does’t minute discharge at module. 

¯

It maintains the condition where the front LED is green.

(2) Check following

Is the Power Board

normal?

Replace the

Power Board.

Is output the normality Low/High

voltage except Stand-by 5V?

Yes

No

No

Is the each connector

normal?

Replace the

connector.

Replace

Y-Board.

After connecting well each connector,

the normality it operates? 

Yes

No

No

Is the 

Ctrl Board normal?

Replace

X-Board.

Is the output voltage normal after

remove P1, 2, 4, 9, 10 connector of

Ctrl-B/D?

Yes

No

Yes

Is the Y-Board

normal?

Is the output voltage
normal after remove

P5, P6 connector of

Y-B/D?

Is the Fuse(FS2) normal on Y-B/D?

(In case of open is replace)

Yes

No

Yes

Yes

Replace

Z-Board.

Is the 

Z- Board normal?

Is normal the output

voltage after remove

P1 connector of 

Z-B/D?

Is the Fuse(FS1, FS2) normal on

Z-B/D? (In case of open is replace)

Yes

No

Yes

Is the 

X- Board normal?

Is the output voltage normal after

remove P1, 2, 3, 4, 5 connector of

X-B/D?

After remove P1, P2, P3 output voltage
normality: Replace Right X-B/D
After remove P4, P5 output voltage
normality: Replace the Left X-B/D

Yes

No

Yes

Is the 

VSC Board normal?

Is the output voltage normal after

remove P1001, P1100?

After crisis COF of each board, check the normality operates.
If in case normality operates, correspondence COF Fail is
replace the module.

After remove P1001, P1100 normal
operation: Replace the VSC Board

Yes

No

Is the COF of X, Y, Z

normal?

No

Yes

Yes

Summary of Contents for 50PX4R

Page 1: ...V SERVICE MANUAL CAUTION BEFORE SERVICING THE CHASSIS READ THE SAFETY PRECAUTIONS IN THIS MANUAL CHASSIS MF 056B MODEL 50PX4R 50PX4R ZB website http biz LGservice com e mail http www LGEservice com techsup html ...

Page 2: ...ONS 3 DESCRIPTION OF CONTROLS 4 SPECIFICATIONS 9 ADJUSTMENT INSTRUCTIONS 11 TROUBLE SHOOTING GUIDE 16 BLOCK DIAGRAM 24 EXPLODED VIEW 26 EXPLODED VIEW PARTS LIST 27 REPLACEMENT PARTS LIST 28 SCHEMATIC DIAGRAM PRINTED CIRCUIT BOARD ...

Page 3: ... With the instrument AC plug removed from AC source connect an electrical jumper across the two AC plug prongs Place the AC switch in the on position connect one lead of ohm meter to the AC plug prongs tied together and touch other ohm meter lead in turn to each exposed metallic parts such as antenna terminals phone jacks etc If the exposed metallic part has a return path to the chassis the measur...

Page 4: ... picture SWAP Alternates between main and sub picture PIP INPUT Selects the input mode for the sub picture SIZE Adjusts the sub picture size POSITION Moves the sub picture to D D E E or F F G G direction INPUT Selects the TV AV1 AV2 S Video AV3 AV4 AV5 Component RGB or HDMI modes switches the set on from standby MODE Selects another device VCR BUTTONS Controls a video cassette recorder These butto...

Page 5: ...selection or displays the current mode 6 D D E E Programme Up Down Selects a programme or a menu item Switches the set on from standby F F G G Volume Up Down Adjusts the volume Adjusts menu settings 7 INDEX Switches FRONT Display on or off 8 Power Indicator Illuminates red in standby mode illuminates green when the set is turned on 9 Intelligent Eye Adjusts picture according to the surrounding con...

Page 6: ...T Connect DVD video outputs to Y PB PR of COMPONENT INPUT and audio outputs to Audio sockets of AUDIO INPUT AUDIO VIDEO IN SOCKETS AV4 Connect the audio video out sockets of external equipment to these sockets S VIDEO AUDIO IN SOCKETS Connect the S VIDEO out socket of an VCR to the S VIDEO socket Connect the audio out sockets of the VCR to the audio sockets as in AV4 5 VARIABLE AUDIO OUTPUT 6 EURO...

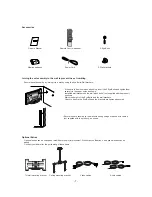
Page 7: ...s Tilt wall mounting bracket Video cables Audio cables Ceiling mounting bracket 40 42 50 42 40 Secure the set assembly by joining it to a wall by using the Eye Bolts Wall brackets Joining the set assembly to the wall to prevent the set tumbling If the set is to be mounted on a desk top insert the 2 Eye Bolts and tighten them securely in the upper holes as shown Install the wall brackets on the wal...

Page 8: ... accordance with BOM 5 The receiver must be operated for about 20 minutes prior to the adjustment V Test Method 1 Performance LGE TV test method followed 2 Demanded other specification Safety CE IEC specification EMC CE IEC V General Specification Module Specification Remark Safety IEC EN60065 EMI EN55013 EMS EN55020 Model Name 50PX4R ZB Market EU Remark PDP Maker NBK Mitsui LG Chemical LGE SPEC M...

Page 9: ...Wired Control 1EA Audio variable out 1EA No 1 2 3 4 5 6 7 8 9 10 11 12 13 Specification EU PAL B G I D K NTSC BAND PAL NTSC VHF UHF C1 C69 2 83 CATV S1 S47 1 71 Upper Heterodyne PAL SECAM NTSC PAL SECAM NTSC PAL SECAM NTSC Y Cb Cr Y Pb Pr RGB PC RGB DTV HDMI PC HDMI DTV PC Audio Component 1EA AV 2EA Remark 4 System PAL SECAM NTSC PAL60 5 System PAL SECAM NTSC PAL60 6 System PAL SECAM NTSC PAL60 L ...

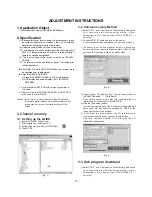
Page 10: ...the screen 3 Channel memory 3 1 Setting up the LGIDS 1 Install the LGIDS idsinst exe 2 After installation restart your PC 3 Extract files zip to folder c LGIDS files 4 Start LGIDS 3 2 Channel memory Method 1 Select PDP and Hurricane on Model dialog And check your connection in Communication dialog If your connection is NG then set your PORT COM1 2 3 correctly 2 Connect RS 232C cable and turn on th...

Page 11: ... 2 Vs Adjustment 1 Connect terminal of D M M to Vs pin of P807 connect terminal to GND pin of P805 2 After turning RV401 voltage of D M M adjustment as same as Va voltage which on label of panel right top Deviation 0 5V 5 EDID The Extended Display Identification Data DDC Display Data Channel download 5 1 Required Test Equipment 1 Adjusting PC with S W for writing EDID Data S W EDID TESTER Ver 2 5 ...

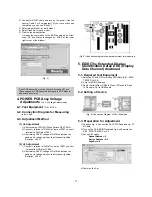
Page 12: ...strument only for auto adjustment 4 AV Pattern Generator 7 2 Connecting diagram of equipment for measuring For Auto Adjustment W Auto adjustment Map RS 232C 7 3 Adjustment of White Balance O Operate the zero calibration of the CA 100 then stick sensor to PDP module surface when you adjust O For manual adjustment it is also possible by the following sequence 1 Select white pattern of heat run mode ...

Page 13: ...p 100 Color Bar signal into Component1 or Component2 2 Set the PSM to Standard mode in Picture menu 3 Press INSTART key on R C for adjustment 4 Press the G Vol key operate To set then it becomes automatically 5 Auto RGB OK means complete adjustment 9 Auto RGB Color Balance 9 1 Requirement O It is very import to use correct adjustment pattern like Fig11 Within the pattern color sequence should be a...

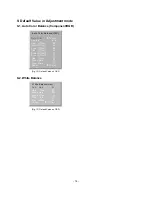
Page 14: ... Hex Red Gain 82 Red Offset 80 Green Gain 86 Green Offset 7D Blue Gain 7E Blue Offset 80 Reset G To Set Fig 12 Default Value on OSD Auto Color Balance HEX Auto RGB G To Set Source Cortez Red Offset1 22 Green Offset1 24 Blue Offset1 23 Red Offset2 45 Green Offset2 43 Blue Offset2 37 Red Gain 14 Green Gain 31 Blue Gain 11 Reset G To Set ...

Page 15: ...Doesn t the high tension output come out Doesn t the VSC signal Vs ON come out Yes Yes Does high tension output voltage Drop occur When the Y B D Module input connector is removed does output voltage drop occur When the Y Z B D Module input connector is remove does Power Board hightension output voltage Drop occur Yes No No 9 Check the Power Board Output high tension circuit Yes 10 Check the Z B D...

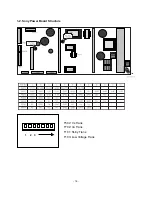
Page 16: ... 16 1 2 Sony Power Board Structure 1 2 3 T502 Vs Trans T702 Va Trans T101 St by Trans T103 Low Voltage Trans ...

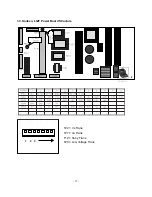
Page 17: ... 17 1 3 Sanken LGIT Power Board Structure 1 2 3 T221 Vs Trans T271 Va Trans T121 St by Trans T201 Low Voltage Trans ...

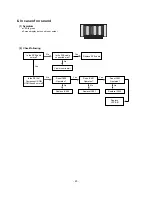
Page 18: ...er and Power Board Cable connected Connect the Cable Yes No Is the Fuse F101 on Power Board normal Replace the Fuse Yes No Is the Power Board and 7P of VSC Board Cable connected Connect the Cable Yes No After the cable connect is remved to Power Board except the CN101 connection cable the AC voltage marking is authorized on manual When ST BY 5V is not operated replace Power Board ...

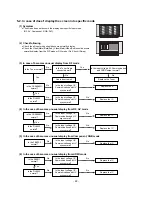
Page 19: ... normal after remove P5 P6 connector of Y B D Is the Fuse FS2 on Y B D normal In case of open is replace Yes No Yes Yes Replace Z Board Is the Z Board normal Is the output voltage normal after remove P1 connector of Z B D Is the Fuse FS1 FS2 on Z B D normal In case of open is replace Yes No Yes Is the X Board normal Is the output voltage normal after remove P1 2 3 4 5 connector of X B D After remo...

Page 20: ... Is the Fuse FS2 normal on Y B D In case of open is replace Yes No Yes Yes Replace Z Board Is the Z Board normal Is normal the output voltage after remove P1 connector of Z B D Is the Fuse FS1 FS2 normal on Z B D In case of open is replace Yes No Yes Is the X Board normal Is the output voltage normal after remove P1 2 3 4 5 connector of X B D After remove P1 P2 P3 output voltage normality Replace ...

Page 21: ...ed continuously becomes accomplished from module 2 Check following Is the LVDS cable normal Is the VSC Board normal Is the LVDS cable connected well Cable inserts well Yes No No Yes Does the FIL8532 IC IC800 Operates Replace FIL8532 IC IC800 No Is the Ctrl Board of Module normal Replace Ctrl B D No No Yes Replace VSC B D Replace the cable Yes ...

Page 22: ...he Tuner Cable connected well Cable inserts well Yes No No Yes Is the FIL8532 normal Replace the Tuner No Is the Input voltage IIC Communication and CVBS output normal Yes Is the Input voltage IIC Communication and HV sync normal No Replace the IC No Is the Input voltage IIC Communication and HV sync normal No Replace the IC No Is the CXA2069Q normal Yes Is the FIL8532 normal Is the Input voltage ...

Page 23: ...ollowing Is the SPK cable normal Is the SPK cable connected well Cable inserts well No No Replace IC400 No Replace IC401 No Replace SPK cable Yes Yes Is the RF AV Component RGB HDMI sound normal No Does IC400 Operates Does IC401 Operates Replace IC402 No Does IC402 Operates Replace VSC B D Yes Yes ...

Page 24: ... green Don t enter EPF mode Screen display but sound is not output 2 Check following Is the EPF cable normal Is the EPF cable connected well Cable inserts well No No Replace IEPF B D No Replace EPF cable Yes Yes Is the EPF B D normal No Replace VSC B D ...

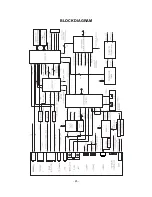
Page 25: ... 25 BLOCK DIAGRAM WIRED ...

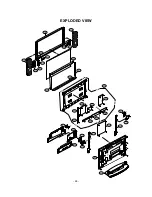
Page 26: ... 26 EXPLODED VIEW 301 304 303 208 201 302 580 410 400 430 401 520 200 201 203 300 121 601 600 120 531 530 550 205 204 206 501 700 570 102 101 101 103 207 420 ...

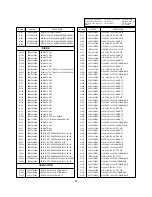
Page 27: ...40C SUPPORTER ASSY AL FILTER BOT 50PX40 303 4980V01142B 4980V01142C SUPPORTER ASSY AL FILTER SIDE R 50PX40 304 4980V01144B 4980V01144C SUPPORTER ASSY AL FILTER SIDE L 50PX40 305 5230V00017B 5230V00017B FILTER MECH LGM50 03 MITSUI 50 CLASS B GLASS FILTER 400 3809V00515G 3809V00515S BACK COVER ASSEMBLY 401 3301V00087F 3301V00087F PLATE ASSEMBLY ASSY 3300V00531 COVER ASSY RZ 50PX41S 410 4980V01194C 4...

Page 28: ...A 0TR387500AA 0TR387500AA 0TR387500AA 0TR150400BA 0TR387500AA 0TR387500AA 0TR150400BA 0TR150400BA 0TR387500AA 0TR150400BA 0TR150400BA 0TR387500AA 0TR387500AA 0TR387500AA 0TR387500AA 0TR387500AA 0TR150400BA 0TR387500AA 0TR387500AA 0TR387500AA 0TR387500AA 0TR387500AA 0TR102008AA 0TR387500AA 0TR102008AA 0TR387500AA 0TR387500AA BSS83 TP N CHANNEL S W TR BSS83 TP N CHANNEL S W TR BSS83 TP N CHANNEL S W...

Page 29: ...9 C107 C1071 C1073 C108 C108 C1082 C1083 C1084 C1085 C1087 C109 C109 C1098 C1099 C110 C1102 C1105 C1107 C1108 C111 C1110 C1115 C1116 C1117 C1118 C1119 C112 C1120 C1126 0CE107SF6DC 0CK104CF56A 0CE107SF6DC 0CE476SF6DC 0CK104CF56A 0CE107SF6DC 0CE4763F618 0CK104CF56A 0CE476SF6DC 0CK104CF56A 0CE476SF6DC 0CE477SF6DC 0CE476SF6DC 0CK104CF56A 0CE477SF6DC 0CE477SF6DC 0CK104CF56A 0CE476SF6DC 0CE476SF6DC 0CE4...

Page 30: ...6V 20 SMD R TP LOCA NO PART NO DESCRIPTION C131 C1311 C1312 C1313 C1314 C1315 C1316 C1317 C1318 C1333 C1334 C1335 C1338 C135 C1414 C1415 C1419 C1420 C1424 C1425 C1428 C1438 C1441 C1506 C201 C202 C203 C203 C204 C204 C205 C206 C207 C208 C208 C209 C210 C211 C214 C215 C221 C238 C241 C300 C301 C302 C303 C304 C304 C305 C305 C306 0CE476SF6DC 0CE107SF6DC 0CE107SF6DC 0CE107SF6DC 0CE107SF6DC 0CE107SF6DC 0CE...

Page 31: ... 16V 20 SMD R TP 0 1UF 1608 16V 10 R TP X7R LOCA NO PART NO DESCRIPTION C507 C508 C509 C510 C511 C511 C512 C513 C514 C515 C516 C517 C518 C518 C519 C520 C520 C521 C522 C522 C523 C524 C525 C526 C527 C527 C528 C529 C530 C531 C532 C533 C534 C610 C614 C615 C620 C621 C622 C728 C729 C730 C731 C735 C737 C739 C745 C750 C752 C760 C762 C764 0CE476SF6DC 0CK104CF56A 0CE226SF6DC 0CK104CF56A 0CE107SF6DC 0CE476SF...

Page 32: ...AR1201 AR1202 AR1203 AR1204 AR1205 AR1301 AR1302 AR1303 AR1304 AR1305 AR1306 AR700 AR701 AR702 AR703 AR704 AR705 AR806 AR807 AR808 AR809 AR810 AR811 AR812 AR813 AR814 6630C00010B 6630C00012C 6630G70016A 6630G70017A 6602T12002M 6630VF01810 366 921J 6602T12007D 6630VF00710 366 932C 366 932B 6602V12001H 6630VF01810 6602T12007D 366 932B 366 932C 366 932B 366 932C 366 932B 366 932C 6602T12006M 366 932E...

Page 33: ...L1113 L1115 L1116 L1117 L1118 L1119 L1120 L1121 L1122 L1123 L1125 L1126 L1127 L1128 L1129 L1130 L114 L115 L119 L120 L1204 L1205 L1206 L1207 L1208 L1209 L121 L122 L123 L124 L125 L126 L1301 L1301 L200 L201 L202 L203 L204 L300 L301 L302 L400 L401 6200J000013 6200J000013 6200J000013 6200J000013 6200J000013 6200J000013 6200J000013 6200J000013 6200J000013 6200J000013 6200J000013 6200J000013 6200J000013 ...

Page 34: ...500P N2 R TP 500 OHM MLB 321611 0500P N2 R TP 500 OHM MLB 321611 0500P N2 R TP 500 OHM MLB 321611 0500P N2 R TP 500 OHM RESONATOR CRYSTAL SX 1SMD 12 0MHZ RESONATOR CRYSTAL ABLS 18 5625MHZ RESONATOR CRYSTAL ABLS 27 000MHZ RESONATOR CERAMIC CSBLA500KECZF09 RESONATOR CRYSTAL HC49U 18 432MHZ RESONATOR CRYSTAL ABLS 19 6608MHZ RESONATOR CRYSTAL ABLS 19 6608MHZ UPJ R1 031 S T SCART SHIELD SPRING UPJ R1 0...

Page 35: ......

Page 36: ......

Page 37: ......

Page 38: ...PRINTED CIRCUIT BOARD MAIN TOP MAIN BOTTOM EPF TOP EPF BOTTOM CONTROL TOP SIDE A V TOP LED TOP SIDE A V BOTTOM LED BOTTOM CONTROL BOTTOM ...

Page 39: ...Jul 2005 Printed in Korea P NO 3828VD0209M ...

Reviews: