background image

Owner’s Manual   39

IR Codes

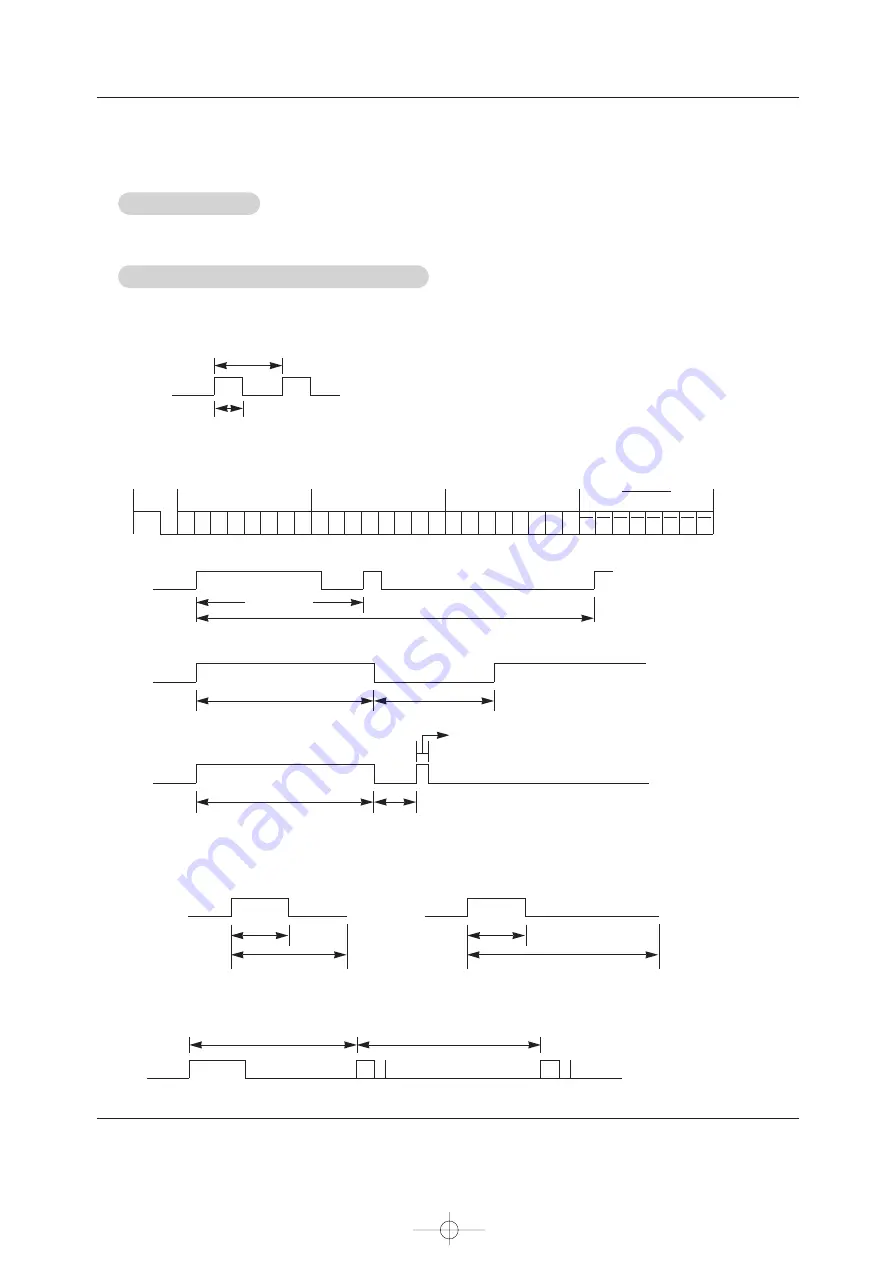
Output waveform

Single pulse, modulated with 37.917KHz signal at 455KHz

Configuration of frame

Repeat code

Lead code

• 

1st frame

Low 
custom code

Lead
code

High 
custom code

Data code

Data code

T

C

T

f

T1

C0

Carrier frequency

F

CAR

= 1/T

C

= f

OSC

/12

Duty ratio = T1/T

C

= 1/3

• 

Repeat frame

C1 C2 C3 C4 C5 C6 C7 C0 C1 C2 C3 C4 C5 C6 C7 D0 D1 D2 D3 D4 D5 D6 D7 D0 D1 D2 D3 D4 D5 D6 D7

Repeat code

9 ms

4.5 ms

0.55 ms

9 ms

2.25 ms

Bit description

Frame interval : Tf

The waveform is transmitted as long as a key is depressed.

• 

Bit “0”

Tf

Tf

Tf=108ms @455KHz

0.56 ms

0.56 ms

1.12 ms

• 

Bit “1”

2.24 ms

How to Connect

How to Connect

Remote Control IR Code

Remote Control IR Code

IR Codes

IR Codes

Connect your wired remote control to the Remote Control port on the Monitor. 

U514Aen  97/10/26 3:11 AM  Page 39

Summary of Contents for 50PM3MV

Page 1: ...for future reference Record model number and serial number of the Monitor in the spaces provided below See the label attached on the back cover and relate this infor mation to your dealer if you require service Model Number Serial Number MODELS 42PM1M 42PM3MV 50PM3MV 42PM1M UC 42PM3MV UC 50PM3MV UC U514Aen 97 10 26 3 11 AM Page 1 ...

Page 2: ...e harmful interference to radio communications However there is no guarantee that interference will not occur in a particular installation If this equipment does cause harmful interference to radio or television reception which can be determined by turning the equipment off and on the user is encouraged to try to correct the interference by one or more of the following measures Reorient or relocat...

Page 3: ...safety instruction 1 Read these instructions 2 Keep these instructions 3 Heed all warnings 4 Follow all instructions 5 Do not use this apparatus near water 6 Clean only with dry cloth 7 Do not block any ventilation openings Install in accor dance with the manufacturer s instructions 8 Do not install near any heat sources such as radiators heat registers stoves or other apparatus including ampli fi...

Page 4: ... outlets Overloaded wall outlets loose or damaged wall outlets extension cords frayed power cords or damaged or cracked wire insulation are dangerous Any of these conditions could result in electric shock or fire Periodically examine the cord of your appliance and if its appearance indicates damage or deteri oration unplug it discontinue use of the appliance and have the cord replaced with an exac...

Page 5: ... 19 Audio Adjustment DASP Digital Auto Sound Processing 20 BBE 20 AVL Auto Volume Leveler 21 Manual Sound Control Off option 21 TV speaker Setup 21 Time Setting Clock Setup 22 On Off Timer Setup 22 Auto Off Sleep Timer 23 Optional Features Key Lock 24 ISM Image Sticking Minimization Method 24 Low Power 25 XD Demo 25 OSD Rotate 25 Screen Adjustment Auto Adjustment 26 Setting Picture Format 26 Manua...

Page 6: ...angle over 160 degrees This means that the display is clear and visible to viewers anywhere in the room who can see the screen Wide Screen The screen of the Plasma Display is so wide that your viewing experience is as if you are in a theater Multimedia Connect your plasma display to a PC and you can use it for conferencing games and Internet browsing The Picture in Picture feature allows you to vi...

Page 7: ...E RE VIE W FC R A P RO G PL AY ST ILL ST OP RE CO RD RE W FF PO WE R Remote Control Controls Controls Front Panel Controls Front Panel Controls This is a simplified representation of front panel Here shown may be somewhat different from your Monitor OK 1 Remote Control Sensor 2 Power Standby Indicator Illuminates red in standby mode Illuminates green when the Set is turned on 3 VOLUME F F G G Butt...

Page 8: ... You can watch the RGB signal on another set connect RGB OUTPUT to another set s PC input port 5 VARIABLE AUDIO OUTPUT 6 EXTERNAL SPEAKER 8 ohm output Connect to optional external speaker s For further information refer to Speaker Speaker Stand manual 7 COMPONENT INPUT Connect a component video audio device to these jacks 8 VIDEO AUDIO IN OUT SOCKETS Connect the video audio out sockets of external...

Page 9: ...elects menu options ENTER Accepts your selection or displays the current mode POWER Turns your Monitor on or off Not functional EXIT Clears all on screen displays and returns to monitor viewing from any menu DASP Selects the sound appropriate for the pro gram s character Not functional ARC Changes the picture format VCR DVD BUTTONS Control some video cassette recorders or DVD player RECORD button ...

Page 10: ...by connecting it to telephone wires lightening rods or gas pipes Power Supply Short circuit Breaker Desktop Pedestal Installation Desktop Pedestal Installation For proper ventilation allow a clearance of 4 on each side and the top 2 36 on the bottom and 2 from the wall Detailed installation instructions are included in the optional Desktop Stand Installation Speakers shown are optional and are sho...

Page 11: ...t both Video and the S Video cables only the S Video will work AUDIO VARIABLE AUDIO OUT S VIDEO COMPONENT INPUT 2 COMPONENT INPUT 1 AUDIO VIDEO R L AUDIO VIDEO R MONITOR OUT A V INPUT L MONO S VIDEO OUT IN R AUDIO L VIDEO 3 4 OUTPUT SWITCH ANT OUT ANT IN After subscribing to a cable TV service from a local provider and installing a converter you can watch cable TV programming The set cannot displa...

Page 12: ...ure 2 If your DVD only has an S Video output jack connect this to the S VIDEO input on the set and connect the DVD audio outputs to the AUDIO INPUT jacks on the set as shown in the figure NOTE If your DVD player does not have component video output use S Video How to use 1 Turn on the DVD player insert a DVD 2 Use the INPUT or MULTIMEDIA button on the remote control to select Component 1 or Compon...

Page 13: ...A on the remote control to select Component 1 Component 2 RGB or HDMI source To watch digitally broadcast programs purchase and connect a digital set top box RS 232C INPUT CONTROL SERVICE AUDIO AUDIO L R REMOTE CONTROL AUDIO INPUT RGB INPUT HDMI DVI VIDEO RGB OUTPUT CO CO AUDIO VIDEO R L VARIABLE AUDIO OUT EXTERNAL SPEAKER R L RGB DTV OUTPUT R AUDIO L DVI DTV OUTPUT HDMI OUTPUT B R R AUDIO L Digit...

Page 14: ...mode to another resolution change the refresh rate to another rate or adjust the brightness and contrast on the menu until the picture is clear If the refresh rate of the PC graphic card can not be changed change the PC graphic card or consult the manufacturer of the PC graphic card PC PC Setup Setup Note Check the image on your TV There may be noise associated with the resolution vertical pattern...

Page 15: ... connected Cable or poor cable connection No signal OSD dis play in HDMI DVI Input In case that Video Resolution is not supported SET output in HDMI DVI Source Devices Invalid Format OSD display Refer to the Manual of HDMI DVI Source Devices or contact your service cen ter Resolution 640x350 720x400 640x480 848x480 800x600 Horizontal Frequency KHz Vertical Frequency Hz 852x480 832x624 1024x768 115...

Page 16: ...by mode 2 Press the r r I INPUT SELECT button on the set or press the POWER MULTIMEDIA INPUT on the remote control and then the set will switch on If the set was turned off with the remote control power button and the r r I button on the set Press the r r I INPUT SELECT button on the set or press the POWER MULTIMEDIA INPUT on the remote control and then the set will switch on Basic Operation Basic...

Page 17: ...ment Adjustment PICTURE Prev APC ACC ACM Contrast 80 Brightness 60 Color 50 Sharpness 50 PICTURE MENU SOUND Prev DASP BBE AVL Balance 0 Treble 50 Bass 50 TV speaker SOUND MENU TIMER Prev Clock Off timer On timer Auto off TIMER MENU AM SPECIAL Prev Input Language Key lock ISM Method Low power Set ID Caption Text Demo OSD Rotate SPECIAL MENU SCREEN Prev Auto config Manual config VGA Mode ARC Zoom Po...

Page 18: ... to default settings select the Normal option 1 Press the MENU button and then use D D E E button to select the PICTURE menu 2 Press the G G button and then use D D E E button to select ACC 3 Press the G G button and then use D D E E button to select either Cool Preset Normal Default or Warm Preset 4 Press the ENTER button to save Manual Color Temperature Control ACC set to Off option You can adju...

Page 19: ... On or Off 4 Press the ENTER button to save Adjust the ACM to select the desired skin color option This function works in the following mode VIDEO COMPONENT1 2 RGB DTV HDMI DTV It s not available to use this function in XD Off mode 1 Press the MENU button and then use D D E E button to select the PICTURE menu 2 Press the G G button and then use D D E E button to select ACM 3 Press the G G button a...

Page 20: ...ram content If you adjust sound options Treble and Bass manually DASP automatically changes to Off 1 Press the MENU button and then use D D E E button to select the SOUND menu 2 Press the G G button and then use D D E E button to select BBE 3 Press the G G button and then use D D E E button to select On or Off 4 Press the ENTER button to save BBE High Definition Sound restores clarity and presence...

Page 21: ...f 4 Press the ENTER button to save 1 Press the MENU button and then use D D E E button to select the SOUND menu 2 Press the G G button and then use D D E E button to select TV speaker 3 Press the G G button and then use D D E E button to select On or Off 4 Press the ENTER button to save You can adjust internal speaker status If you want to use your external hi fi stereo system turn off the interna...

Page 22: ...n and then use D D E E button to set the hour 5 Press the G G button and then use D D E E button to set the minutes 6 For only On timer function Press the G G button and then use D D E E button to set sound level 7 Press the ENTER button to save If current time setting is wrong reset the clock manually 1 Press the MENU button and then use D D E E button to select the TIMER menu 2 Press the G G but...

Page 23: ...EEP button repeatedly to select the number of min utes First the Off option appears on the screen followed by the following sleep timer options 10 20 30 60 90 120 180 and 240 minutes 2 When the number of minutes you want is displayed on the screen press the OK button The timer begins to count down from the number of minutes selected 3 To check the remaining minutes before the Monitor turns off pre...

Page 24: ...G G button and then use D D E E button to select ISM Method 3 Press the G G button and then use D D E E button to select either Normal White wash Orbiter or Inversion Normal If image sticking is never a problem ISM is not necessary set to Normal White wash White Wash removes permanent images from the screen Note An excessive permanent image may be impossible to clear entirely with White Wash To re...

Page 25: ...n and then use D D E E button to select Low power 3 Press the G G button and then use D D E E button to select On or Off When you select On the screen darkens 4 Press the ENTER button to save 1 Press the MENU button and then use D D E E button to select the SPECIAL menu 2 Press the G G button and then use D D E E button to select Demo 3 Press the G G button to begin XD Demo 4 Press the MENU button...

Page 26: ...creen If the position of the image is still not correct try Auto adjustment again 4 In RGB PC mode if the image needs to be adjusted more after using Auto config you can make further adjustments with the Manual config option Caution If a 4 3 fixed image is on the screen for a long time it may remain visible Set every aspect ratio for Video Component 480i sources Use 4 3 or 16 9 for other RGB PC HD...

Page 27: ...hen use D D E E button to select the SCREEN menu 2 Press the G G button and then use D D E E button to select Zoom 3 Press the G G button and then use D D E E F F G G button to adjust the position 4 Press the ENTER button to save SCREEN Prev Auto config Manual config VGA Mode ARC Zoom Position G G Cinema NR Reset SCREEN MENU D D F F G G E E SCREEN Prev Auto config Manual config VGA Mode ARC Zoom G...

Page 28: ...LIT ZOOM button repeatedly to select either 2 4 or 9 Split Zoom 2 Press the number button corresponding to the section you wish to enlarge You can move within the enlarged pic ture using the D D E E F F G G button To return to normal viewing press the SPLIT ZOOM button again Example of choosing 5 Section 5 is enlarged to fill the screen 1 4 2 Split zoom 1 4 2 5 4 Split zoom 1 2 3 4 5 6 7 8 9 9 Spl...

Page 29: ...n programs including made for TV movies TV G General audience TV PG Parental guidance suggested TV 14 Parents strongly cautioned TV MA Mature audience only TV Y All children TV Y7 Children 7 years older Lock Adjustment 1 After inputting the password use the D D E E button to choose Lock System 2 Press the G G button and then use the D D E E to select On or Off When you select the Lock System is en...

Page 30: ... limit by blocking out all the movies with the ratings above a specified level Keep in mind that the movie ratings limit only applies to movies shown on TV not TV programs such as soap operas 1 After inputting the password use the D D E E button to choose MPAA 2 Press the G G button and then use the D D E E to select G above PG above PG 13 above R above NC 17 above or X Unblocked Permits all progr...

Page 31: ...tting the password use the D D E E button to choose Age block 2 Press the G G button and then use the D D E E to select General or Children 3 Press EXIT button to return to TV viewing or press MENU button to return to the previous menu Content block Content block LOCK Prev Lock on off Set password MPAA Age block Content block G G Aux block LOCK MENU Dialogue Language Sex scene Violence F Violence ...

Page 32: ...assword use the D D E E button to choose Aux block 2 Press the G G button and then use the D D E E to select a source 3 Press the G G button and then use the D D E E to select Blocked or Unblocked on the each source 4 Press EXIT button to return to TV viewing or press MENU button to return to the previous menu Note If you ever forget your password key in 7 7 7 7 on the remote control RGB HDMI Comp...

Page 33: ...5 4 6 7 8 RXD TXD GND DTR DSR RTS CTS TXD RXD GND DTR DSR RTS CTS PC 3 Wire Configurations Not standard D Sub 9 3 2 5 4 6 7 8 PDP D Sub 9 Connect the RS 232C input jack to an external control device such as a computer or an A V control system and control the Monitor s functions externally Connect the serial port of the control device to the RS 232C jack on the Monitor back panel RS 232C connection...

Page 34: ...t returns the data of the PC computer Command2 Set ID OK Data x Error Acknowledgement The Monitor transmits ACK acknowledgement based on this format when receiving abnormal data from non viable functions or communication errors Command2 Set ID NG Data x Transmission Receiving Protocol Command Reference List When setting the 22 27 a menu doesn t display on screen Data 1 Illegal Code 2 not support f...

Page 35: ...ontrol Command 2 f G To adjust volume You can also adjust volume with the volume buttons on remote control Transmission Data Min 0 Max 64 Refer to Real data mapping 1 k f Set ID Data Cr Ack f Set ID OK Data x 02 Input Select Command 2 b G To select input source for the monitor You can also select an input source using the INPUT but ton on the Monitor s remote control Transmission Data 0 RGB 1 HDMI...

Page 36: ...Command 2 i G To adjust the screen color You can also adjust color in the PICTURE menu Transmission Data Min 0 Max 64 Refer to Real data mapping 1 See page 36 k i Set ID Data Cr Ack i Set ID OK Data x 10 Tint Command 2 j option G To adjust the screen tint You can also adjust tint in the PICTURE menu Transmission Data Red 0 Green 64 Refer to Real data mapping 1 See page 36 k j Set ID Data Cr Ack j ...

Page 37: ...ure Command 2 u G To adjust color temperature You can also adjust ACC in the PICTURE menu Transmission Data 0 Cool 1 Normal 2 Warm 3 User k u Set ID Data Cr Ack u Set ID OK Data x 16 Bass Command 2 s G To adjust bass You can also adjust bass in the SOUND menu Transmission Data Min 0 Max 64 Refer to Real data mapping 1 See page 36 k s Set ID Data Cr Ack s Set ID OK Data x 15 Treble Command 2 r G To...

Page 38: ... OK Data x 24 Low Power Command 1 j Command 2 q G To reduce the power consumption of the monitor You can also adjust Low Power in SPECIAL menu Transmission Data 0 Off 1 On j q Set ID Data Cr Ack q Set ID OK Data x 25 Orbiter Time Setting Command 1 j Command 2 r G To adjust orbiter operation time term Transmission Data Min 1 Max FE Refer to Real data mapping 1 See page 36 j r Set ID Data Cr Ack r S...

Page 39: ...e C1 C2 C3 C4 C5 C6 C7 C0 C1 C2 C3 C4 C5 C6 C7 D0 D1 D2 D3 D4 D5 D6 D7 D0 D1 D2 D3 D4 D5 D6 D7 Repeat code 9 ms 4 5 ms 0 55 ms 9 ms 2 25 ms G Bit description G Frame interval Tf The waveform is transmitted as long as a key is depressed Bit 0 Tf Tf Tf 108ms 455KHz 0 56 ms 0 56 ms 1 12 ms Bit 1 2 24 ms How to Connect How to Connect Remote Control IR Code Remote Control IR Code IR Codes IR Codes G Co...

Page 40: ...ut COMPONENT1 Selection Discrete IR Code Input COMPONENT2 Selection Discrete IR Code Input HDMI Selection Discrete IR Code Input RGB Selection R C Button R C Button R C Button R C Button R C Button R C Button R C Button R C Button Discrete IR Code Only 4 3 mode Discrete IR Code Only 16 9 mode Discrete IR Code Only Zoom mode Discrete IR Code Discrete IR Code D E VOL G VOL F POWER POWER ON POWER OFF...

Page 41: ...tor and the VCR Activate any function to restore the brightness of the picture If still picture is on the screen for more than 5 minutes the screen gets dark The remote control doesn t work Check to see if there is any object between the Monitor and the remote con trol causing obstruction Are batteries installed with correct polarity to to Refer to p 8 Correct remote operating mode set Monitor VCR...

Page 42: ...F 0 40 C Less than 80 Width inches mm Height inches mm Depth inches mm Weight pounds kg Resolution Power requirement Operating Temperature Range Operating Humidity Range 42PM1M UC 42PM3MV UC 50PM3MV UC 41 4 1050 24 8 630 3 6 91 5 64 29 852 x 480 Dot AC100 240V 50 60Hz 32 104 F 0 40 C Less than 80 Width inches mm Height inches mm Depth inches mm Weight pounds kg Resolution AC100 240V 50 60Hz 32 104...

Page 43: ... states do not allow the exclusion or limitation of incidental or consequential damages or limitations on how long an implied warranty lasts so the above exclusion or limitation may not apply to you This warranty gives you specific legal rights and you may also have other rights that vary from state to state WARRANTY PERIOD LABOR and PARTS 2 YEARS from the Date of Purchase Your unit will be repair...

Page 44: ...re returning any product to the LGE Service Center Contact the Customer Interactive Center for details CUSTOMER INTERACTIVE CENTER NUMBERS To obtain customer assistance product information or Dealer or Service locations Call 1 201 816 2000 24 hours a day 365 days per year THIS LIMITED WARRANTY DOES NOT APPLY TO The cost of repair or replacement under these excluded circumstances shall be borne by ...

Reviews: