background image

39

ENG

ENGLISH

PENTOUCH

6

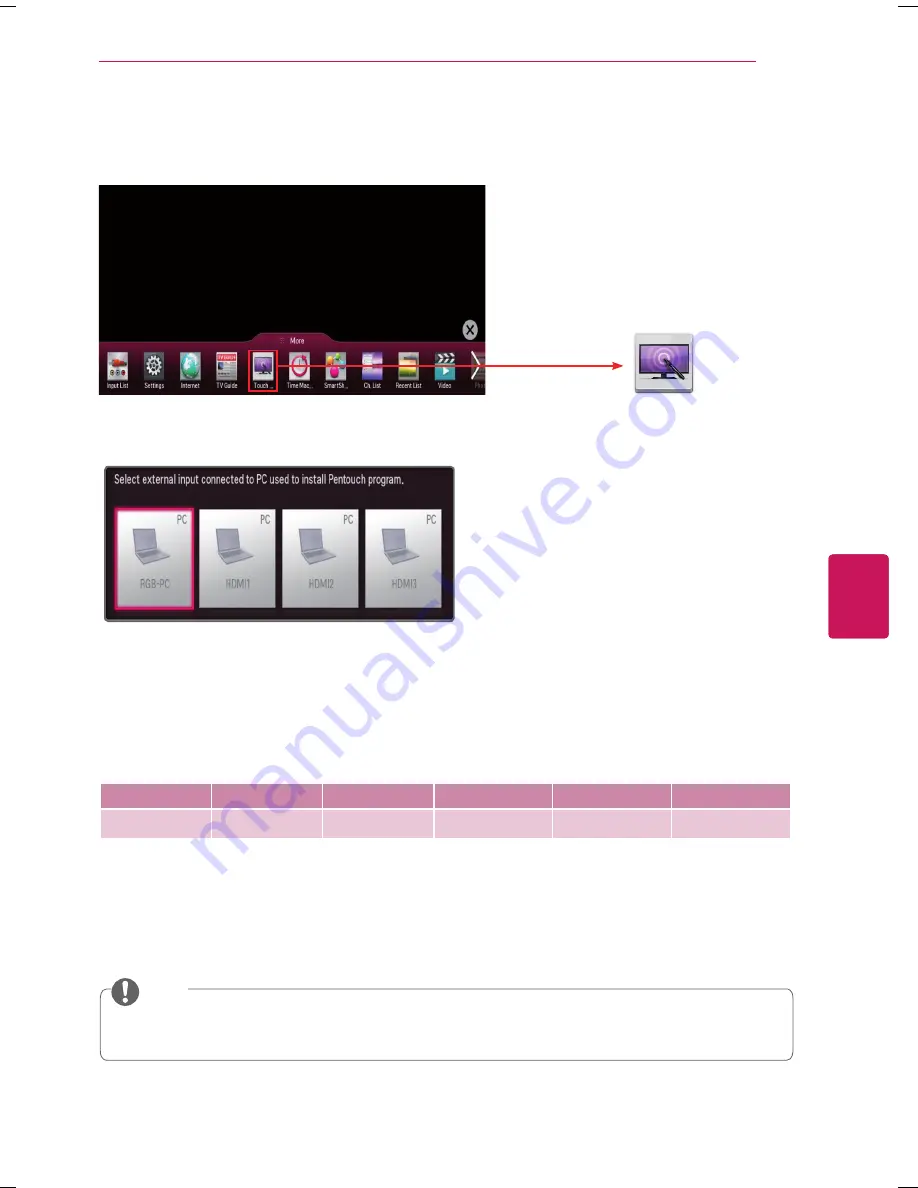
  Run the touch monitor function on the TV as shown below.

Windows 7 Starter Edition and Home  

Basic Edition are not supported.

Select Touch Home in the portal menu as shown below or press the TOUCH HOME button on the remote control.

Select the input connected to the PC.

Method 1 : 
On your laptop, press the "Fn" + "switch screen" key on the keyboard to display the computer screen on your TV 
screen,
then set the display resolution to 1024 x 768 for 50PH470H and 1920 x 1080 for 60PH670H models.
* The switch screen key of the laptop may be subject to change by the manufacturer.

LG

SAMSUNG

TG

HP

TOSHIBA

Sony

Fn+F7

Fn+F4

Fn+F7

Fn+F5

Fn+F5

Fn+F7

Method 2 : 
Open the control panel of the graphics card on your computer.
Set [Display Mode] to the [Single Display] mode, then select [LG TV] for the display to use.
* Set the display resolution to1024 x 768 for 50PH470H and 1920 x 1080 for 60PH670H models.

For laptops, see the Laptop Owner's Manual and set the laptop to display its screen on the TV screen.

y

y

The Pentouch function is not supported in [Extend these displays] mode. Display the same screen on 
both the laptop and the TV screen, or display it only on the TV.

       NOTE

Touch Home

Summary of Contents for 50PH470H

Page 1: ...www lg com P NO MFL67705305 1308 REV01 50PH470H 60PH670H Please read this manual carefully before operating your set and retain it for future reference OWNER S MANUAL PLASMA TV ...

Page 2: ...uctions Keep these instructions Heed all warnings Follow all instructions WARNING If you ignore the warning message you may be seriously injured or there is a possibility of accident or death CAUTION If you ignore the caution message you may be slightly injured or the product may be damaged NOTE The note helps you understand and use the product safely Please read the note carefully before using th...

Page 3: ...y It is recommended that appliances be placed upon a dedicated circuit that is a single outlet circuit which powers only that appliance and has no additional outlets or branch circuits Check the specification page of this owner s manual to be certain Do not connect too many appliances to the same AC power outlet as this could result in fire or electric shock Do not overload wall outlets Overloaded...

Page 4: ...mp Grounding Conductor NEC Section 810 21 Antenna Lead in Wire Electric Service Equipment Antenna Discharge Unit NEC Section 810 20 Ground Clamp Power Service Grounding Electrode System NEC Art 250 Part H NEC National Electrical Code y y Cleaning When cleaning unplug the power cord and wipe gently with a soft cloth to prevent scratching Do not spray water or other liquids directly on the TV as ele...

Page 5: ...e amount of current to operate a product It varies depending on the product This generated sound does not affect the performance and reliability of the product y y Take care not to touch the ventilation openings When watching the TV for a long period the ventilation openings may become hot This does not affect the performance of the product or cause defects in the product Preventing Image burn or ...

Page 6: ...r those who suffer from stereo blindness or stereo anomaly Double images or discomfort in viewing may be experienced y y If you have strabismus cross eyed amblyopia weak eyesight or astigmatism you may have trouble sensing depth and easily feel fatigue due to double images It is advised to take frequent breaks y y If your eyesight varies between your right and left eye you may experience eye strai...

Page 7: ...ter than one of adults Therefore they will perceive more stereoscopic depth compared to adults for the same 3D image y y Teenagers Advise teenagers under the age of 19 not to watch 3D videos for a long time when they are tired y y Elderly The elderly may perceive less of a 3D effect than the youth Do not sit closer to the TV than the recommended distance Cautions when using the 3D glasses y y Only...

Page 8: ...tration DivX Certified to play DivX video up to HD 1080p including premium content DivX DivX Certified and associated logos are trademarks of Rovi Corporation or its subsidiaries and are used under license Covered by one or more of the following U S patents 7 295 673 7 460 668 7 515 710 7 519 274 Manufactured under license under U S Patent Nos 5 956 674 5 974 380 6 487 535 other U S and worldwide ...

Page 9: ...OL 34 WATCHING TV 34 Turning the TV on for the first time 35 PENTOUCH 35 Before Using 36 Using the Touch Pen with a TV 38 Using the Touch Pen with a PC 38 Recommended Computer Specifications 38 Installing the Pentouch Program 40 Using the Touch Pen 40 Things to Know Before Pairing 40 Removing a Touch Pen in Use How to reset a Touch Pen 40 Touch Pen Functions If the dongle is connected to the PC 40...

Page 10: ...al product and item CAUTION y y Do not use any unapproved items to ensure the safety and product life span y y Any damages or injuries by using unapproved items are not covered by the warranty y y Some models appear to have a thin film on the screen It is actually part of the screen do not remove it y y The items supplied with your product may vary depending on the model y y Product specifications...

Page 11: ...wer Cord Stand Body Stand Base See p 15 Stand Screws 7 EA M5 x 16 See p 15 For 50PH470H Power Cord Holder Depending on model See p 19 Eye bolt Wall bracket 2 EA See p 18 Protection Cover See p 16 Ho me Tou ch CD Specifications and Precautions for Using Pentouch Touch Pen Cradle See p 35 New Tip See p 40 Ho me Tou ch Touch Pen Dongle See p 35 Charging Cable See p 40 ...

Page 12: ...mprovement without any notification Contact your dealer to buy these items These devices only work with certain models The model name or design may be changed manufacturer s circumstances or policies Ho me To uc h AG S3 3D Glasses LG Audio Device AN TP300 Touch Pen Cradle Ho m e To uc h AN TD200 Touch Pen Dongle ...

Page 13: ...through the saved channels Adjusts the volume level Selects the highlighted menu option or confirms an input Accesses the main menus or saves your input and exits the menus Changes the input source Turns the power on or off Screen Buttons Speakers Remote Control Sensors Power Indicator ...

Page 14: ...Before moving or lifting the TV disconnect the power cord and all cables y y When holding the TV the screen should face away from you to avoid damage y y Hold the top and bottom of the TV frame firmly Make sure not to hold the transparent part speaker or speaker grill area y y When transporting a large TV there should be at least 2 people y y When transporting the TV by hand hold the TV as shown i...

Page 15: ...e not mounting the TV to a wall use the following instructions to attach the stand y y When attaching the stand to the TV set place the screen facing down on a cushioned table or flat surface to protect the screen from scratches y y Make sure that the screws are fastened tightly If they are not fastened securely enough the TV may tilt forward after being installed y y Do not tighten the screws wit...

Page 16: ...H470H M5 x 16 1 EA Protection Cover 1 2 y y Remove the stand before installing the TV on a wall mount by performing the stand attachment in reverse y y When installing the wall mounting bracket use the Protection cover This will protect the opening from accumulating dust and dirt NOTE ...

Page 17: ...all causing damage or injury Mounting on a Wall An optional wall mount can be used with your LG Television Consult with your local dealer for a wall mount that supports the VESA standard used by your TV model Carefully attach the wall mount bracket at the rear of the TV Install the wall mount bracket on a solid wall perpendicular to the floor If you are attaching the TV to other building materials...

Page 18: ... moving or installing the TV y y If you install the TV on a ceiling or slanted wall it may fall and result in severe injury Use an authorized LG wall mount and contact the local dealer or qualified personnel y y Do not over tighten the screws as this may cause damage to the TV and void your warranty y y Use only screws and wall mounts that meet the VESA standard Any damages or injuries by misuse o...

Page 19: ...h the cable holder Cable Holder Power Cord Holder Depending on model Caution y y Do not move the TV by holding the cable holder and power cord holder as the cable holders may break and injuries and damage to the TV may occur y y If you install the TV on a wall please detach the cable holder from stand body and attach it to the protection cover or to the back cover to help keep the cables organize ...

Page 20: ...port y y If you connect a gaming device to the TV use the cable supplied with the gaming device y y Refer to the external equipment s manual for operating instructions Connecting to an Antenna or Cable Connect an antenna cable or cable box to watch TV while referring to the following The illustrations may differ from the actual items and a RF cable is optional ANTENNA IN CABLE IN Wall Jack Coaxial...

Page 21: ...rol function y y High Speed HDMI Cables are tested to carry an HD signal up to 1080p and higher y y HDMI Audio Supported Format DTS 44 1 kHz 48 kHz AC3 32 kHz 44 1 kHz 48 kHz L PCM 32 kHz 44 1 kHz 48 kHz 96 kHz 192 kHz HDMI 1 IN ARC IN 3 MHL IN 2 PC Not Provided DVD Blu Ray HD Cable Box HD STB Choose any HDMI IN input port to connect It does not matter which port you use ARC Audio Return Channel y...

Page 22: ... to the TV Connect the external device and the TV with the DVI HDMI cable as shown in the following illustration To transmit an audio signal connect an audio cable y y When using the HDMI DVI cable Single link is only supported NOTE 8 2 287 9 287 IN 2 PC AUDIOIN PC Not Provided Not Provided DVD Blu Ray HD Cable Box ...

Page 23: ...ones to television sets y y Connect the mobile phone to the HDMI IN 3 MHL port to view the phone screen on the TV y y This only works for the MHL enabled phone y y With some MHL supporting mobile phones you can use the TV remote to control the phone y y The MHL passive cable is needed to connect the TV and a mobile phone NOTE Not provided MHL cable Mobile phone IN 3 MHL ...

Page 24: ...ollowing illustration NOTE y y If cables are installed incorrectly it could case the image to display in black and white or with distorted color y y Check to ensure each cable is matched with the corresponding color connection COMPONENT IN VIDEO PB PR AUDIO L R Y VIDEO AUDIO R L MONO AV IN AUDIO VIDEO L R Not Provided Not Provided DVD Blu Ray HD Cable Box VCR GREEN GREEN BLUE BLUE RED RED RED WHIT...

Page 25: ... device and the TV with the composite cable as shown in the following illustration NOTE y y If you have a mono VCR connect the audio cable from the VCR to the AUDIO L MONO jack of the TV COMPONENT IN VIDEO AUDIO L PB PR R Y VIDEO AUDIO R L MONO AV IN VIDEO MONO AUDIO L R VCR DVD Blu Ray HD Cable Box VCR YELLOW WHITE RED YELLOW WHITE RED Not Provided ...

Page 26: ...the graphics card DOS mode video may not work if a HDMI to DVI Cable is in use y y In PC mode there may be noise associated with the resolution vertical pattern contrast or brightness If noise is present change the PC output to another resolution change the refresh rate to another rate or adjust the brightness and contrast on the PICTURE menu until the picture is clear y y The synchronization inpu...

Page 27: ...RGB Connection Method B DVI to HDMI Connection 8 2 287 9 287 IN 2 PC AUDIOIN PC 5 287 3 8 2 287 AUDIOIN PC RGB IN PC 8 2 287 9 287 IN 2 PC AUDIOIN PC 5 287 3 8 2 287 AUDIOIN PC RGB IN PC Not Provided Not Provided Not Provided Not Provided PC PC ...

Page 28: ...stead of the built in speaker Digital Optical Audio Connection Transmits a digital audio signal from the TV to an external device Connect the external device and the TV with the optical audio cable as shown in the following illustration OPTICAL AUDIO IN OPTICAL DIGITAL AUDIO OUT Not Provided Digital Audio System ...

Page 29: ...y external hard drive or a USB memory card reader to the TV NOTE y y To use the Time Machine II function make sure that your USB storage device is connected to the USB IN port labeled Time Machine Ready USB IN 2 USB IN 3 1 USB IN Time Machine Ready USB Not Provided Choose any USB input port to connect It does not matter which port you use Not Provided Not Provided ...

Page 30: ...ctions in reverse Caution y y Do not mix old and new batteries as this may damage the remote control This remote uses infrared light When in use it should be pointed in the direction of the TV s remote sensor Or Number button Enters numbers LIST Accesses the saved channel list Dash Inserts a dash between numbers such as 2 1 and 2 2 Q VIEW Alternates between the two last channels selected pressing ...

Page 31: ...ms your input ꕣ BACK Returns to the previous level EXIT Clears all on screen displays and returns to TV viewing REC Accesses the AV devices connected to the TV Opens the SIMPLINK menu REC REC Adjusts Time Machine II mode Control buttons Controls the Premium contents Smart Share menus or the SIMPLINK compatible devices USB SIMPLINK Freeze Freezes the current frame Not supported when using USB Mode ...

Page 32: ...IST Q VIEW EXIT OK Q MENU MUTE GUIDE REC LIVE TV PORTAL INFO BACK SETTINGS AV MODE TOUCH HOME VOL Adjusts the volume level FAV Accesses your favorite channel list Used for viewing 3D video MUTE Mutes all sounds CH Scrolls through the saved channels REC PAGE REC Moves to the previous or next screen Depending on model POWER Turns the TV on or off TV Returns to the last TV channel REC RATIO Resizes a...

Page 33: ...LIVE TV REC REC Adjusts Time Machine II mode SETTINGS Accesses the main menu REC Accesses the AV devices connected to the TV Opens the SIMPLINK menu INFO REC Shows information on the current program TOUCH HOME Enters Touch Home when the dongle is connected to TV If you connect the dongle to PC you can use Pentouch PC functions PORTAL Shows the list of Apps Q MENU Accesses the quick menu Navigation...

Page 34: ...ing screen appears Select a language and customize the basic settings 1 Connect the power cord to a power outlet 2 In Standby mode press the power button on the remote control to turn the TV on The Initial setting screen appears when you turn the TV on for the first time y y You can also access Initial Setting by accessing OPTION in the main menu NOTE 3 Follow the on screen instructions to customi...

Page 35: ...To use the Touch Pen in WiDi mode connect the dongle to your TV NOTE Touch Pen H o m e To uc h 1 4 2 3 No Description 1 Power button LED indicator 2 USB charging port 3 Touch Home button 4 Touch pen tip switch 1 Powering on b Press the Power button once The indicator LED of the pen will turn green 2 Powering off b Press and hold the Power button for over 3 sec onds and release it The indicator LED...

Page 36: ... Place the Touch Pen within 10 cm of the dongle 3 Press the Power button of the Touch Pen once 4 The indicator LED of the Touch Pen will turn green when pairing is complete y y For a newly purchased or replaced Touch Pen you need to pair it with the dongle again y y If the indicator LED is turned off pairing has not been successful Please try pairing again y y Once paired the indicator LED will tu...

Page 37: ...rogram will start as below Touch Home Touch Home Touch the TV screen with the Touch Pen once and select Touch Home when the picture below appears Press the Touch Home button on the Touch Pen H o m e To uc h y y For details of the Pentouch functions see the CD manual y y Connect a wired wireless HID compliant mouse sold separately or keyboard sold separately to the USB port to make Internet use eas...

Page 38: ...ted version NOTE Installing the Pentouch Program 1 Insert the enclosed installation CD into the PC and install the program 2 Check the Language settings and its progress during the installation process Restart your computer after the installation 3 Insert the dongle into the USB port of the PC The dongle detects the device driver and automatically installs the driver 4 Check if the indicator LED o...

Page 39: ...een key of the laptop may be subject to change by the manufacturer LG SAMSUNG TG HP TOSHIBA Sony Fn F7 Fn F4 Fn F7 Fn F5 Fn F5 Fn F7 Method 2 Open the control panel of the graphics card on your computer Set Display Mode to the Single Display mode then select LG TV for the display to use Set the display resolution to1024 x 768 for 50PH470H and 1920 x 1080 for 60PH670H models For laptops see the Lap...

Page 40: ...nds the red light will blink three times and the reset is completed Touch Pen Functions If the dongle is connected to the PC Once paired you can use the Touch Pen in the following ways 1 Pressing the Touch Home button while using the Touch Pen b In the Pentouch program Shows or hides the toolbar of the Sketchbook feature b In Windows Works in the same way as the right click function Point the Touc...

Page 41: ...remote control to select SETTINGS Picture Screen RGB PC then select Auto Config to adjust the screen y y If the PC and TV are only connected by a PC RGB signal cable there will be no sound from the TV Please connect the PC and the TV with a PC audio cable as well y y The Play Video function in Photo Editor may not work as intended depending on the codecs installed on your computer y y Eraser funct...

Page 42: ...ications may be changed without prior notice due to upgrade of product functions MODELS 50PH470H 50PH470H SA Dimensions Width x Height x Depth With stand 1 168 mm x 755 4 mm x 292 7 mm Without stand 1 168 mm x 698 6 mm x 57 mm Weight With stand 25 4 Kg Without stand 24 0 Kg Current Value Power Consumption 2 75 A 275 W MODELS 60PH670H 60PH670H SA Dimensions Width x Height x Depth With stand 1 386 8...

Page 43: ... 5 dBm 802 11n 2 4GHz 15 5 dBm 802 11n 5GHz 16 5 dBm y y Because band channel used by the country could be different the user can not change or adjust the operating frequency and this product is set for the regional frequency table y y Contains FCC ID BEJWN8122E1 y y Contains IC 2703H WN8122E1 Bluetooth module BM LDS401 specification Standard Bluetooth Version 3 0 Frequency Range 2400 2483 5 MHz O...

Page 44: ...ntal Frequency kHz Vertical Frequency Hz Playable 3D video format HDMI 1080p 54 00 24 F P L A 67 50 30 27 00 24 T B S S 33 75 30 67 50 60 1080i 67 50 60 F P F A 33 75 S S T B S S Full 720p 90 00 F P L A 45 00 S S T B S S Full 480p 63 00 F P L A 31 50 T B S S S S Full USB 1080p 33 75 30 S S T B C B MPO Photo DLNA S S Side by Side T B Top Bottom F P Frame Packing F A Field Alternative L A Line Alter...

Page 45: ...C B R I C I 60Hz F S 704 x 480i Over 2D to 3D S S T B 704 x 480 Under 2D to 3D USB DLNA Photo 320 x 240 Over 2D to 3D S S T B 320 x 240 Under 2D to 3D Miracast WiDi 1024 x 768p 2D to 3D S S T B 1280 x 720p 1920 x 1080p Others 2D to 3D RGB PC 1024 x 768 2D to 3D S S T B 1360 x 768 1920 x 1080 Others 2D to 3D S S Side by Side T B Top Bottom F P Frame Packing F A Field Alternative L A Line Alternativ...

Page 46: ... a dry clean and soft cloth To remove major dirt wipe the surface with a soft cloth dampened in clean water or a diluted mild detergent Then wipe immediately with a dry cloth y y Do not push rub or hit the surface with your fingernail or a sharp object as this may result in scratches on the screen and image distortions y y Do not use any chemicals such as waxes benzene alcohol thinners insecticide...

Page 47: ...red on y y Set the computer screen to display only on the TV The touch pen does not work from time to time y y Connect the touch pen dongle to another USB port on your computer and try using the Touch Pen again The TV screen doesn t look normal when using Pentouch y y Check that the computer is correctly connected to the TV y y Check that you are using the optimal resolution FHD 1920 x 1080 HD 102...

Page 48: ...ower R C Button 72 Red R C Button 09 MUTE R C Button 79 RATIO R C Button 0B INPUT R C Button 7E Simplink R C Button 0F TV R C Button 8E Forward R C Button 10 19 Number Key 0 9 R C Button 8F Rewind R C Button 1A Q VIEW R C Button AA INFO R C Button 1E FAV R C Button B0 Play R C Button 28 BACK R C Button B1 ꕗ Stop Live TV R C Button 30 AV Mode R C Button BA ꕘ Freeze Slow Play Pause R C Button 40 Λ A...

Page 49: ...SERVICE y y RS 232C on this unit is intended to be used with third party RS 232C control hardware and software The instructions below are provided to help with programming software or to test functionality using telenet software RS 232C connection cables are not supplied with the product NOTE Set ID 1 Press SETTINGS to access the main menus 2 Press the Navigation buttons to scroll to option and pr...

Page 50: ... Volume Mute k e 00 to 01 16 Energy Saving j q 00 to 05 05 Volume Control k f 00 to 64 17 Tune Command m a See p 53 06 Contrast k g 00 to 64 18 Channel Programme Add Del Skip m b 00 to 01 07 Bright ness k h 00 to 64 19 Key m c Key Codes 08 Color Colour k i 00 to 64 20 Control Back Light Control Panel Light m g 00 to 64 09 Tint k j 00 to 64 21 Input select x b See p 55 10 Sharp ness k k 00 to 32 22...

Page 51: ... OK Data x The set transmits ACK acknowledgement based on this format when receiving normal data At this time if the data is data read mode it indicates present status data If the data is data write mode it returns the data of the PC computer Error Acknowledgement Command2 Set ID NG Data x The set transmits ACK acknowledgement based on this format when receiving abnormal data from non viable funct...

Page 52: ... based on model and is supported for DTV fully and ATV AV partially 03 Screen Mute Command k d To select screen mute on off Transmission k d Set ID Data Cr Data 00 Screen mute off Picture on Video mute off 01 Screen mute on Picture off 10 Video mute on Ack d Set ID OK NG Data x In case of video mute on only TV will display On Screen Display OSD But in case of Screen mute on TV will not display OSD...

Page 53: ...nce You can also adjust balance in the AUDIO menu Transmission k t Set ID Data Cr Data Min 00 to Max 64 Ack t Set ID OK NG Data x 14 Color Colour Temperature Command x u To adjust colour temperature You can also adjust Color Colour Temperature in the PICTURE menu Transmission x u Set ID Data Cr Data Min 00 to Max 64 Ack u Set ID OK NG Data x 15 ISM Method Command j p Only Plasma TV To control the ...

Page 54: ... Cable Data 00 Physical Channel Number Terrestrial ATV 02 45 Decimal 2 69 Cable CATV 01 0E 7D Decimal 1 14 125 Data 01 04 Major Minor Channel Number Data 01 02 xx Don t care Data 03 04 xx Don t care Data 05 Input Source Analogue 00 Terrestrial TV ATV 01 Cable TV CATV Digital Terrestrial Cable Data 00 xx Don t care Data 01 Data 02 Major Channel Number Data 01 High byte Channel Data Data 02 Low byte...

Page 55: ... Command m b To skip current channel programme for next time Transmission m b Set ID Data Cr Data 00 Del ATSC ISDB Skip DVB 01 Add Ack b Set ID OK NG Data x Set the saved channel status to del ATSC ISDB skip DVB or add 19 Key Command m c To send IR remote key code Transmission m c Set ID Data Cr Data Key code See p 50 Ack c Set ID OK NG Data x 20 Control Back Light Command m g For LCD TV LED TV To...

Page 56: ...ding to broadcasting video signal Data 00 Data 01 Data 02 Data 03 00 O O X 01 X X X 02 X X X 03 X X O X don t care Ack t Set ID OK Data00 Data01 Data02 Data03 x t Set ID NG Data00 x 24 Extended 3D Command x v only 3D models Depending on model To change 3D option for TV Transmission x v Set ID Data 00 Data 01 Cr Data 00 3D option 00 3D Picture Correction 01 3D Depth 3D Mode is Manual Only 02 3D Vie...

Page 57: ......

Page 58: ...The model and serial number of the TV is located on the back and or one side of the TV Record it below should you ever need service MODEL SERIAL ...

Reviews: