background image

W

A

TCHING TV / CHANNEL CONTR

OL

58

WATCHING TV / CHANNEL CONTROL

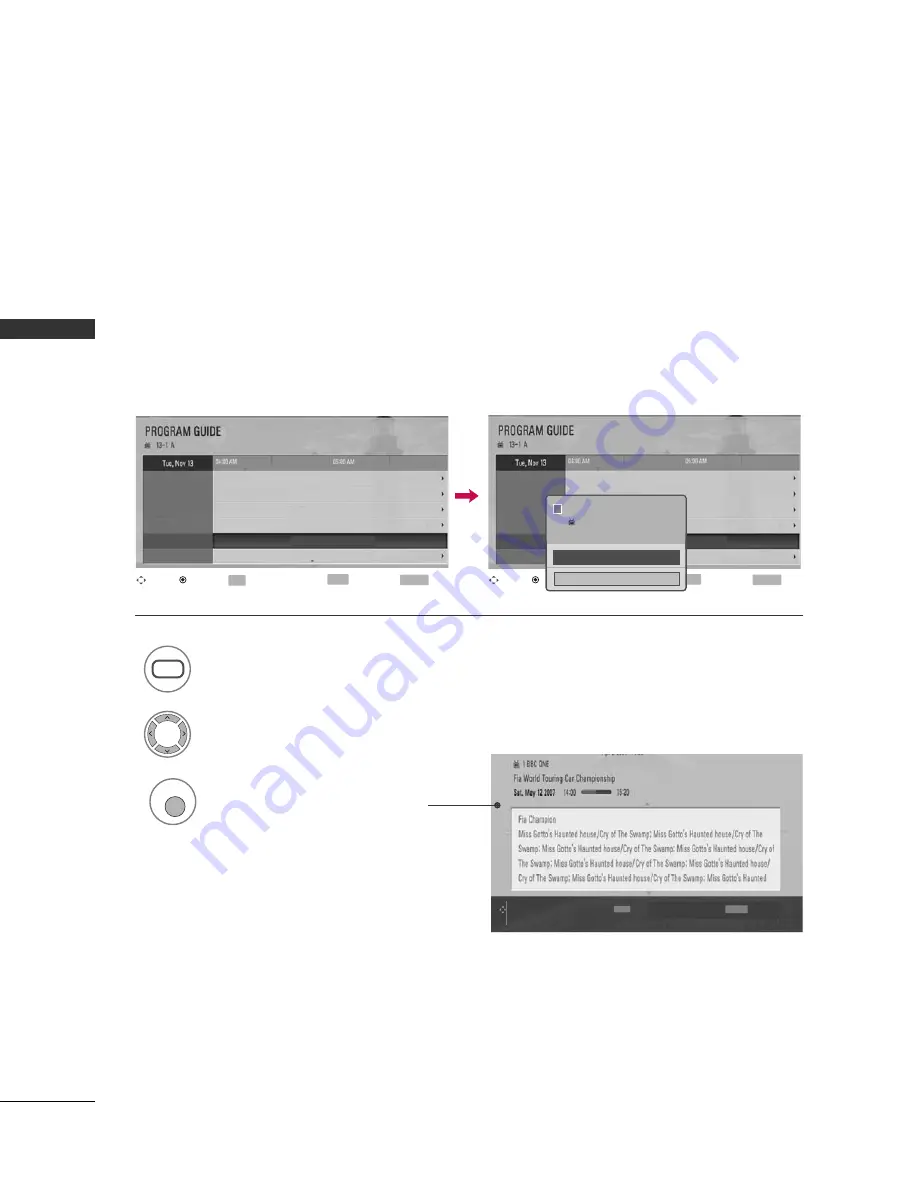
This system has an Electronic Program Guide (EPG) to help your navigation through all the possible viewing
options.

The EPG supplies information such as program listings, start and end times for all available services. In addition,
detailed information about the program is often available in the EPG (the availability and amount of these pro-
gram details will vary, depending on the particular broadcaster).

This function can be used only when the EPG information is broadcast by broadcasting companies

The EPG displays the program details for next 8 days.

EPG (ELECTRONIC PROGRAM GUIDE)
(IN DIGITAL MODE)

Display the P

PR

RO

OG

GR

RA

AM

M   G

GU

UIID

DE

E.

1

GUIDE

Nov 29 2007 09:47 AM

No Information

TV2: Farmen

No Information

Kungskonsumente

1-1

YLE TV1

2-1

YLE TV2

3-1 

TV..

5-1

YLE FST

9-2

CNN

11-1

YLE24

Tela Quente

Select the desired program.

2

Nov 29 2007 09:47 AM

No Information

TV2: Farmen

No Information

Kungskonsumente

1-1

YLE TV1

2-1

YLE TV2

3-1 

TV..

5-1

YLE FST

9-2

CNN

11-1

YLE24

Tela Quente

Display the detailed information.

INFO

II N

N FF O

O G

Grriid

de

e  G

Gu

uiid

de

e

N

Naavviig

gaatte

e

R

RE

ET

TU

UR

RN

N EExxiitt

3

CH. Change

Date

FF GG

Navigate

Information

INFO

Exit

RETURN

Now & Next

GUIDE

CH. Change

Date

FF GG

Navigate

Information

INFO

Exit

RETURN

Now & Next

GUIDE

Go to this CH.

Cancel

ii

Tela Quente

5-1 Globo HD

Mon,  Nov 29 09:50AM 

~

10:30AM 

Summary of Contents for 50PG60D

Page 1: ...t on the front or back of this manual 42LB7DF 47LB7DF 32LG50D 37LG50D 42LG50D 47LG50D 52LG50FD 42LG70YD 47LG70YD 52LG70YD 32LG80FD 42LG80FD 42PG60D 50PG60D 50PG70FD 60PG70FD 42PG30D 50PG30D PLASMA TV LCD TV OWNER S MANUAL serviço de atendimento ao consumidor 4004 5400 Capitais e Regiões Metropolitanas 0800 707 5454 Demais localidades EM CASO DE DÚVIDA CONSULTE NOSSO SAC W W W L G E C O M B R SAC ...

Page 2: ......

Page 3: ... the manufacturer s option a picture or drawing that illustrates the intent of a specific safety instruction may be placed immediately adjacent to that safety instruction Read these instructions Keep these instructions Heed all warnings Follow all instructions Do not use this apparatus near water Clean only with dry cloth Do not block any ventilation openings Install in accordance with the manufac...

Page 4: ...oving the cart apparatus combination to avoid injury from tip over Never touch this apparatus or antenna during a thunder or lighting storm Do not allow a impact shock or any objects to fall into the product and do not drop onto the screen with something You may be injured or the product can be damaged Refer all servicing to qualified service personnel Servicing is required when the apparatus has ...

Page 5: ...lked upon Pay particular attention to plugs wall outlets and the point where the cord exits the appliance Outdoor Use Marking WARNING To Reduce The Risk Of Fire Or Electric Shock Do Not Expose This Appliance To Rain Or Moisture Wet Location Marking Apparatus shall not be exposed to dripping or splashing and no objects filled with liquids such as vases shall be placed on or over apparatus GROUNDING...

Page 6: ...me Adjustment 42 Quick Menu 43 Initial Setting 44 On Screen Menus Selection 46 Channel Setup Auto Scan Auto Tuning 47 Add Delete Channel Manual Tuning 48 Channel Editing 49 Scan Option 50 System Color 51 Input List 52 SIMPLINK 53 Input Label 56 AV Mode 57 EPG 58 Schedule List 60 USB To Use the USB Device 61 Photo List 62 Music List 66 PICTURE CONTROL Picture Size Aspect Ratio Control 69 Preset Pic...

Page 7: ...Caption Mode 95 TIME SETTING Clock Setup Auto Clock Setup 96 Manual Clock Setup 97 Auto On Off Time Setting 98 Sleep Timer Setting 99 Auto Shut off Setting 100 PARENTAL CONTROL RATINGS Set Password Lock System 101 Block Channel 104 Rating Movie Rating 105 External Input Blocking 106 Key Lock 107 APPENDIX Troubleshooting 108 Maintenance 109 Product Specifications 1 10 Programming the Remote Control...

Page 8: ...0p resolutions LG s own special digital image generator consisting of a full digital image processor six different main picture quality factors LG TV with this logo has ambient light sensor that adjusts the picture to fit room atmosphere It is the movie quality mode for watching a movie just like at the theater even at home You can watch any movie with the best quality without any user s adjustmen...

Page 9: ...th Do not wipe roughly when removing stain Please be cautions of that excessive pressure may cause scratch or discoloration Polishing Cloth This feature is not available for all models Only 50PG60 50 60PG70 x 4 x 4 Only 32LG50 32 42LG80 Screw for stand fixing Refer to P 16 Bolts for stand assembly Refer to P 15 x 4 Cable Holder Protection cover Refer to p 17 This accessories can be differ ent from...

Page 10: ...V with a cloth If a polishing cloth is included with your TV use it Plasma TV Models CH VOL MENU INPUT ENTER CHANNEL E E D D Buttons VOLUME Buttons MENU Button ENTER Button INPUT Button CH VOL MENU INPUT ENTER CH VOL MENU INPUT ENTER Remote Control Sensor POWER Button Power Standby Indicator Illuminates red in standby mode Illuminates green when the set is switched on ...

Page 11: ... in standby mode Illuminates green when the set is switched on LCD TV Models 42 47LB7DF LCD TV Models 32 42LG80 Remote Control Sensor Power Standby Indicator illuminates red in standby mode illuminates blue when the TV is switched on Note You can adjust P Po ow we er r I In nd di ic ca at to or r in the Option menu CHANNEL Buttons VOLUME Buttons ENTER Button MENU Button INPUT Button POWER Button C...

Page 12: ...s switched on Can be adjusted using P Po ow we er r I In nd di ic ca at to or r in the Option menu CH VOL MENU INPUT ENTER CHANNEL Buttons VOLUME Buttons ENTER Button MENU Button INPUT Button Intelligent Sensor Adjusts picture according to the surrounding conditions Remote Control Sensor LCD TV Models 42 47 52LG70 POWER Button Power Standby Indicator Illuminates red in standby mode Illuminates blu...

Page 13: ...I Input Connect a HDMI signal to HDMI IN AUDIO VIDEO Input Connect audio video out put from an external device to these jacks RGB IN COMPONENT IN AUDIO RGB DVI RGB PC 1 2 RS 232C IN CONTROL SERVICE VIDEO AUDIO VIDEO OPTICAL MONO AUDIO S VIDEO DIGITALAUDIO OUT AV IN 1 HDMI DVI IN AUDIO OUT ANTENNA IN CABLE IN 1 2 1 3 2 5 6 7 8 9 ...

Page 14: ...DEO AUDIO VIDEO OPTICAL COAXIAL MONO AUDIO S VIDEO DIGITALAUDIO OUT AV IN 1 HDMI DVI IN 1 2 3 AV OUT AUDIO OUT USB IN ANTENNA IN CABLE IN 1 3 4 2 5 6 7 8 9 AV IN 2 L MONO R AUDIO VIDEO S VIDEO ANTENNA IN DIGITAL IN ANTENNA IN DIGITAL IN S VIDEO Input Connect S Video out from an S VIDEO device AUDIO VIDEO Input Connect audio video output from an external device to these jacks ...

Page 15: ...O AUDIO HDMI IN 3 HDMI IN 3 VIDEO VIDEO LCD TV Models 32 37 42 47 52LG50 42 47 52LG70 USB Input HDMI Input Connect a HDMI signal to HDMI IN AUDIO VIDEO Input Connect audio video output from an external device to these jacks 5 LCD TV Models 32 42LG80 10 AV IN 2 L MONO R AUDIO HDMI IN 3 VIDEO S VIDEO AV IN 2 L L MONO MONO R AUDIO AUDIO HDMI IN 3 HDMI IN 3 VIDEO VIDEO USB Input HDMI Input Connect a H...

Page 16: ...n a PC ANTENNA IN CABLE IN Connect over the air signals to this jack Connect cable signals to this jack DIGITAL AUDIO OUT or DIGITAL AUDIO OUT COAXIAL Connect digital audio to various types of equipment Note In standby mode these ports do not work AUDIO OUT Connect analog audio to various types of equipment AV Audio Video IN 1 Connect audio video output from an external device to these jacks S VID...

Page 17: ... from damage Assemble the TV as shown Fix the 4 bolts securely using the holes in the back of the TV 1 2 3 G G When assembling the desk type stand check whether the bolt is fully tightened If not tightened fully the product can tilt forward after the product installation If you tighten the bolt with excessive force the bolt can deviate from abrasion of the tightening part of the bolt NOTE ...

Page 18: ...A DESK Only 32LG50 42LG70 32 42LG80 If you wish to attach the TV to a desk it must be securely fastened to the desk using a metal screw as shown below Failure to securely attach the TV may result in the TV falling which may cause damage to the TV and serious personal injury 1 Screw provided as parts of the product Desk Stand G G When assembling the desk type stand check whether the bolt is fully t...

Page 19: ...g the stand install the included p pr ro ot te ec ct ti io on n c co ov ve er r over the hole for the stand Press the P PR RO OT TE EC CT TI IO ON N C CO OV VE ER R into the TV until you hear it click Plasma TV Models LCD TV Models 32 37 42 47 52LG50 42 47 52LG70 42LG80 Detech the protection cover after pressing the left right buttons A LCD TV Models 32LG80 How to remove the portection cover G G P...

Page 20: ...has CABLE HOLDER fix it as shown and bundle the cables 2 How to remove the CABLE MANAGEMENT CLIP G G Hold the CABLE MANAGEMENT CLIP with both hands and pull it upward CABLE MANAGEMENT CLIP CABLE MANAGEMENT CLIP How to remove the CABLE MANAGEMENT CLIP G G Hold the CABLE MANAGEMENT CLIP with both hands and pull it upward Connect the cables as necessary To connect additional equipment see the EXTERNA...

Page 21: ...les inside the CABLE MANAGEMENT CLIP and snap it closed 3 42 47LB7DF Connect the cables as necessary To connect additional equipment see the EXTERNAL EQUIPMENT SETUP section Install the C CA AB BL LE E M MA AN NA AG GE EM ME EN NT T C CL LI IP P as shown How to remove the CABLE MANAGEMENT CLIP G G Hold the C CA AB BL LE E M MA AN NA AG GE EM ME EN NT T C CL LI IP P with both hands and pull it back...

Page 22: ...V brackets and bolts to tighten the product to the wall as shown in the picture If your product has the bolts in the eye bolts position before inserting the eye bolts loosen the bolts Secure the wall brackets with the bolts not provided as parts of the product must purchase separately to the wall Match the height of the bracket that is mounted on the wall to the holes in the product Ensure the eye...

Page 23: ...ation instructions are available from your dealer see the optional Tilt Wall Mounting Bracket Installation and Setup Guide This part mainly use picture for Plasma TV model Here shown may be somewhat different from your TV 4 inches 4 inches 4 inches 4 inches 4 inches 4 inches 4 inches 4 inches 4 inches G G Ensure adequate ventilation by following the clearance recommendations G G Do not mount near ...

Page 24: ...hen the analog cable and digital channel scans are complete NOTE To improve the picture quality in a poor signal area please purchase a signal amplifier and install properly If the antenna needs to be split for two TV s install a 2 Way Signal Splitter If the antenna is not installed properly contact your dealer for assistance Antenna UHF Signal Amplifier VHF CABLE IN ANTENNA IN ANTENNA IN CABLE IN...

Page 25: ... C Co om mp po on ne en nt t 1 1 input source on the TV with using the I IN NP PU UT T button on the remote control If connected to C CO OM MP PO ON NE EN NT T I IN N2 2 input select C Co om mp po on ne en nt t 2 2 input source on the TV To prevent the equipment damage never plug in any power cords until you have finished connecting all equipment This part of EXTERNAL EQUIPMENT SETUP mainly use pi...

Page 26: ...o connect 2 How to use Turn on the digital set top box Refer to the owner s manual for the digital set top box Select H HD DM MI I1 1 H HD DM MI I2 2 or H HD DM MI I3 3 input source on the TV with using the I IN NP PU UT T button on the remote control 2 1 1 HDMI DTV mode Horizontal Vertical Frequency KHz Frequency Hz 31 47 60 00 31 47 59 94 44 96 59 94 45 00 60 00 33 72 59 94 33 75 60 00 26 97 23 ...

Page 27: ...the digital set top box to the H HD DM MI I D DV VI I I IN N1 1 2 2 or H HD DM MI I I IN N3 3 jack on the TV Connect the audio output of the digital set top box to the A AU UD DI IO O R RG GB B D DV VI I jack on the TV 1 How to connect Turn on the digital set top box Refer to the owner s manual for the digital set top box Select H HD DM MI I1 1 H HD DM MI I2 2 or H HD DM MI I3 3 input source on th...

Page 28: ...rs Y green PB blue and PR red Connect the audio outputs of the DVD to the C CO OM MP PO ON NE EN NT T I IN N A AU UD DI IO O1 1 jacks on the TV 1 How to connect 2 How to use Turn on the DVD player insert a DVD Select C Co om mp po on ne en nt t 1 1 input source on the TV with using the I IN NP PU UT T button on the remote control If connected to C CO OM MP PO ON NE EN NT T I IN N 2 2 input select ...

Page 29: ...ow to use Turn on the DVD player insert a DVD Select A AV V1 1 input source on the TV with using the I IN NP PU UT T button on the remote control If connected to A AV V I IN N2 2 select A AV V2 2 input source Refer to the DVD player s manual for operating instructions 2 1 T IN UDIO B DVI RS 232C IN CONTROL SERVICE AUDIO AUDIO OUT OPTICAL MONO AUDIO S VIDEO AV IN 1 VIDEO L R S VIDEO AUDIO DIGITALAU...

Page 30: ...the TV No separated audio connection is necessary HDMI supports both audio and video 1 How to connect 2 How to use Select H HD DM MI I1 1 H HD DM MI I2 2 or H HD DM MI I3 3 input source on the TV with using the I IN NP PU UT T button on the remote control Refer to the DVD player s manual for operating instructions 2 1 COMPONEN A R RGB PC 1 2 VIDEO HDMI DVI IN 1 2 HDMI DVD OUTPUT 1 ...

Page 31: ... TVs and is not covered by warranty Connect the RF antenna out socket of the VCR to the A AN NT TE EN NN NA A I IN N socket on the TV Connect the antenna cable to the RF antenna in socket of the VCR 1 How to connect Set VCR output switch to 3 or 4 and then tune TV to the same channel number Insert a video tape into the VCR and press PLAY on the VCR Refer to the VCR owner s manual 2 How to use 2 1 ...

Page 32: ...Connection Connect the S VIDEO output of the VCR to the S S V VI ID DE EO O input on the TV Connect the audio outputs of the VCR to the A AU UD DI IO O input jacks on the TV 1 How to connect 2 How to use Insert a video tape into the VCR and press PLAY on the VCR Refer to the VCR owner s manual Select A AV V1 1 input source on the TV with using the I IN NP PU UT T button on the remote control If co...

Page 33: ...and external equipment Match the jack colors Video yellow Audio Left white and Audio Right red 1 How to connect 2 How to use Select A AV V2 2 input source on the TV with using the I IN NP PU UT T button on the remote control If connected to A AV V I IN N1 1 input select A AV V1 1 input source on the TV Operate the corresponding external equipment 1 1 ...

Page 34: ...VGA output of the PC to the R RG GB B P PC C jack on the TV Connect the PC audio output to the A AU UD DI IO O R RG GB B D DV VI I jack on the TV 1 How to connect 2 How to use Turn on the PC and the TV Select R RG GB B P PC C input source on the TV with using the I IN NP PU UT T button on the remote control 2 1 DVI IN COMPONENT IN 1 2 CO VIDEO AUDIO S VIDEO RGB IN AUDIO RGB DVI RGB PC RGB OUTPUT A...

Page 35: ...G GB B D DV VI I jack on the TV 1 How to connect 2 How to use Turn on the PC and the TV Select H HD DM MI I1 1 H HD DM MI I2 2 or H HD DM MI I3 3 input source on the TV with using the I IN NP PU UT T button on the remote control 2 1 COMPONENT IN AV IN 1 1 2 RS 232C IN CONTROL SERVICE VIDEO AUDIO AUDIO OUT OPTICAL VIDEO MONO AUDIO S VIDEO HDMI DVI IN 1 2 RGB IN AUDIO RGB DVI DVI PC OUTPUT RGB PC DI...

Page 36: ...n the screen for a long period of time The fixed image could become permanently imprinted on the screen NOTES Supported Display Specifications RGB PC HDMI PC Resolution 720x400 1360x768 640x350 640x480 800x600 1024x768 1280x1024 1600x1200 1920x1080 1280x768 RGB PC mode only Horizontal Vertical Frequency KHz Frequency Hz 31 468 70 09 31 469 70 08 31 469 59 94 37 500 75 00 37 861 72 80 35 156 56 25 ...

Page 37: ...cting Resolution Select P PI IC CT TU UR RE E Select S Sc cr re ee en n R RG GB B P PC C Select R Re es so ol lu ut ti io on n Select the desired resolution 1024 x 768 1280 x 768 1360 x 768 Resolution G Position Size Phase Reset Enter Move Advanced Control Picture Reset Screen RGB PC PICTURE E Screen RGB PC SCREEN Move Prev MENU 1MENU 3 4 2 ENTER ENTER 5 ENTER ...

Page 38: ...Ph ha as se e Make appropriate adjustments G F D E SCREEN Move Prev MENU 1MENU 3 4 2 ENTER ENTER P Po os si it ti io on n This function is to adjust picture to left right and up down as you prefer S Si iz ze e This function is to minimize any vertical bars or stripes visible on the screen back ground And the horizontal screen size will also change P Ph ha as se e This function allows you to remove...

Page 39: ...C mode Screen Reset Reset to original factory values Select P PI IC CT TU UR RE E Select S Sc cr re ee en n R RG GB B P PC C 3 Select R Re es se et t 5 To Set SCREEN Move Prev MENU Enter Move Advanced Control Picture Reset Screen RGB PC PICTURE E Screen RGB PC 2 ENTER ENTER ENTER Yes No Select Y Ye es s 4 ENTER Resolution Position Size Phase Reset G ...

Page 40: ...UIPMENT SETUP USB CONNECTION 2 3 Connect the USB device to the U US SB B I IN N jack on the side of TV or on the back of TV 1 How to connect 1 2 How to use After connecting the U US SB B I IN N jack you use the USB function G G p p 6 61 1 1 ...

Page 41: ...f D DI IG GI IT TA AL L A AU UD DI IO O O OU UT T Connect the other end of the optical or coaxial cable to the digital audio input on the audio equipment Set the TV Speaker option Off in the AUDIO menu See the external audio equipment instruction manual for operation 1 How to connect 2 3 1 Connect audio outputs to the TV s A AU UD DI IO O O OU UT T jacks Set the TV Speaker option Off in the AUDIO ...

Page 42: ...e G G p p 4 43 3 Displays the main menu Clear all on screen displays and return to TV viewing from any menu Shows the present screen information VCR DVD USB SIMPLINK Control buttons Control video cassette recorders or DVD players Control USB menu PHOTO LIST and MUSIC LIST Control the SIMPLINK compatible devices Shows program schedule G G p p 5 58 8 GUIDE TV INPUT POWER DVD VCR RATIO POWER INPUT PI...

Page 43: ...er a program number for multiple program channels such as 2 1 2 2 etc Tune to the last channel viewed Installing Batteries Open the battery compartment cover on the back and install the batteries matching cor rect polarity with with Install two 1 5V AAA batteries Do not mix old or used batteries with new ones Close cover THUMBSTICK Up Down Left Right ENTER Navigate the on screen menus and adjust t...

Page 44: ...lect the viewing source by using the I IN NP PU UT T button on the remote con trol This TV is programmed to remember which power state it was last set to even if the power cord is out When finished using the TV press the P PO OW WE ER R button on the remote con trol The TV reverts to standby mode 1 2 3 Press the C CH H or or N NU UM MB BE ER R buttons to select a channel number 1 VOLUME ADJUSTMENT...

Page 45: ...set picture depend on the viewing environ ment S So ou un nd d M Mo od de e Selects the factory preset sound for type of program M Mu ul lt ti i A Au ud di io o S SA AP P Selects MTS sound Analog signal or changes the audio lan guage Digital signal C Ca ap pt ti io on n Select a closed caption Analog signal S Slle ee ep p T Tiim me er r Select the amount of time before your TV turns off automatica...

Page 46: ...ile inspecting the TV but the TV will automatically return to the picture quality set this company after some minutes H Ho om me e M Mo od de e Picture mode is set to V Vi iv vi id d and user can change it to whatever they wish Select H Ho om me e Mode 1 2 ENTER Select A Au ut to o or M Ma an nu ua al l Select desired time option 1 3 ENTER 2 Year Current Time Setting 2007 Month 11 Date 15 Hour 5 P...

Page 47: ...the O OP PT TI IO ON N menu Select O OP PT TI IO ON N Select I In ni it ti ia al l S Se et tt ti in ng g 1MENU 3 2 ENTER ENTER NOTE Enter Move Set ID 1 Power Indicator Initial Setting OPTION Initial Setting E G G The default selection is Home We recommend setting the TV to Home mode for the best picture in your home environment G G In store mode is only intended for use in retail environments Cust...

Page 48: ...t AUDIO E L R Enter Move Clock Nov 27 200702 15AM Off Time Off On Time Off Sleep Timer Off Auto Sleep Off TIME Enter Move Photo List Music List USB Enter Move Antenna Cable AV1 AV2 Component1 Component2 RGB PC HDMI1 INPUT E Enter Move Lock System Off Set Password Block Channel Rating Input Block LOCK Enter Move Language English Input Label Schedule List SIMPLINK On Key Lock Off Caption Off ISM Met...

Page 49: ...nual Tuning Channel Edit Scan Option Primary Channel System Color Multi SETUP Auto Tuning Enter Move Auto Tuning Manual Tuning Channel Edit Scan Option Primary Channel System Color Multi SETUP Auto Tuning Press Yes button to begin auto tuning Yes No 1MENU 3 2 ENTER ENTER 4 ENTER Auto Scan Auto Tuning Next TV Close Processing auto tuning DTV Ch 23 Found Channel s 16 ANTENNA CABLE ANTENA CABO ANTENA...

Page 50: ...on Primary Channel System Color Multi SETUP Manual Tuning Enter Move Auto Tuning Manual Tuning Channel Edit Scan Option Primary Channel System Color Multi SETUP Manual Tuning Select channel type and RF channel number Channel DTV 2 1 CH BLOCKED Bad Normal Good F F DTV G G 30 Close Delete 1MENU 3 4 2 ENTER ENTER Add Delete Channel Manual Tuning Select channel you want to add or delete 5 ENTER ENTER ...

Page 51: ...l is highlighted you can add or delete the channel by referring to the small window at the top right corner of the screen You can create your own Favorite List Use the F FA AV V button on the remote control when a channel is highlight ed and then add or delete the channel to from your Favorite List Select S SE ET TU UP P Select C Ch ha an nn ne el l E Ed di it t Select a channel Enter Move Auto Tu...

Page 52: ...n nn ne el l Enter Move Auto Tuning Manual Tuning Channel Edit Scan Option Primary Channel System Color Multi SETUP Scan Option Primary Channel Enter Move Auto Tuning Manual Tuning Channel Edit Booster On System Color Multi SETUP Scan Option Primary Channel Primary Channel All Channel All Channel 1MENU 3 2 ENTER ENTER 4 ENTER 5 Whether to search all channels or the first channel of virtual channel...

Page 53: ...N NT TS SC C Enter Move Auto Tuning Manual Tuning Channel Edit Scan Option Primary Channel System Color Multi SETUP System Color Multi Enter Move Auto Tuning Manual Tuning Channel Edit Scan Option Primary Channel System Color Multi SETUP System Color Multi PAL M PAL N NTSC Multi 1MENU 3 2 ENTER ENTER 4 ENTER 5 This function set color suited the each signal Return to the previous menu RETURN MENU R...

Page 54: ...quipment C Co om mp po on ne en nt t 1 1 2 2 Select them to watch DVD or a Digital set top box R RG GB B P PC C Select it to view PC input H HD DM MI I1 1 3 3 Select them to watch high definition devices Antenna Cable AV1 AV2 Component1 HDMI3 HDMI2 HDMI1 RGB PC Component2 You can also select the desired input source in the I IN NP PU UT T menu ENTER Antenna Cable AV1 AV2 Component1 Input Label Q M...

Page 55: ...ther products with HDMI CEC function This allows you to control and play other AV devices connected with HDMI cable without additional cables and settings Select O OP PT TI IO ON N Select S SI IM MP PL LI IN NK K Select O On n or O Of ff f Enter Move Language English Input Label Schedule List SIMPLINK On Key Lock Off Caption Off ISM Method Normal Power Saving Level 0 OPTION E Off On On SIMPLINK On...

Page 56: ...he ENTER G A l l l l FF and GG buttons P Po ow we er r o of ff f a al ll l d de ev vi ic ce es s When you power off the TV all connected devices are turned off This option only applied when the devices are stoped S Sw wi it tc ch h a au ud di io o o ou ut t Offers an easy way to switch audio out A device which is connected to TV through HDMI cable but does not support SimpLink does not provide thi...

Page 57: ...tom of the screen V VC CR R p pl la ay yb ba ac ck k Play and control the con nected VCR H HD DD D R Re ec co or rd di in ng gs s p pl la ay yb ba ac ck k Play and control recordings stored in HDD A Au ud di io o O Ou ut t t to o H HT T s sp pe ea ak ke er r A Au ud di io o O Ou ut t t to o T TV V Select HT speaker or TV speaker for Audio Out 1 2 3 4 5 G G Selected Device G G When no device is con...

Page 58: ...w external deviece is connected this popup menu is displayed automatically If selecting Y Ye es s you can select input source that you want to appreciate But when selecting S SI IM MP PL LI IN NK K O On n in HDMI mode this popup menu is may not displayed No Yes New external device is connected Do you want to enjoy this Select input source that you want to appreciate AV1 AV2 Component1 Select O OP ...

Page 59: ... Sport G G T TH HX X C Ci in ne em ma a It is the movie quality mode for watching a movie just like at the theater even at home You can watch any movie with the best quality without any user s adjustment The optimized quality can be presented at the THX Cinema mode when it is watched at the dark environment as possible When the THX Cinema mode is set at the HD level 720p 1080i 1080p video the Scre...

Page 60: ...ys EPG ELECTRONIC PROGRAM GUIDE IN DIGITAL MODE Display the P PR RO OG GR RA AM M G GU UI ID DE E 1 GUIDE Nov 29 2007 09 47 AM No Information TV2 Farmen No Information Kungskonsumente 1 1 YLE TV1 2 1 YLE TV2 3 1 TV 5 1 YLE FST 9 2 CNN 11 1 YLE24 Tela Quente Select the desired program 2 Nov 29 2007 09 47 AM No Information TV2 Farmen No Information Kungskonsumente 1 1 YLE TV1 2 1 YLE TV2 3 1 TV 5 1 ...

Page 61: ...ID DE E button again on the EPG screen switch the N NO OW W N NE EX XT T guide mode Schedule Cancel i i Tela Quente 5 1 Globo HD Mon Nov 30 09 50AM 10 30AM If you select next program it can be reserved to view and the is marked at the selected program 5 ENTER Move to the selected corrent broadcast program ...

Page 62: ...can see the program information or cancel the reservation 1MENU 3 2 ENTER ENTER 4 Enter Move Language English Input Label Schedule List SIMPLINK On Key Lock Off Caption Off ISM Method Normal Power Saving Level 0 OPTION E Enter Move Language English Input Label Schedule List SIMPLINK On Key Lock Off Caption Off ISM Method Normal Power Saving Level 0 OPTION E Schedule List Schedule List 5 Return to ...

Page 63: ...it may not be recognized G G Please connect power to a USB storage device which requires an external power supply If not the device may not be recognized G G Please connect a USB storage device with cable is offered by USB maker If connected with cable is not offered by USB maker or an excessively long cable the device may not be recognized G G Some USB storage devices may not be supported or oper...

Page 64: ... marked photos Usable USB memory Corresponding buttons on the remote control 1 4 5 6 3 PHOTO LIST Supported photo file JPG Baseline width 15360 height 8640 You can play JPEG files only Only baseline scan is supported among JPEG Non supported files are displayed in the form of icon USB Device Page 2 3 No Marked PHOTO LIST Upper Free Space 150MB 1366x768 125KB Star 3 4 5 6 1 Select U US SB B Select ...

Page 65: ...y the selected item G G M Ma ar rk k A Al ll l Mark all photos on the screen G G U Un nm ma ar rk k A Al ll l Deselect all marked photos G G D De el le et te e Delete the selected photo item G G C Ca an nc ce el l Close the pop up menu Select the target folder or drive Select the desired photos 2 Show the PopUp menu 3 1 Use the C CH H button to navigate in the thumbnail photo page Use the M MA AR ...

Page 66: ...t the target folder or drive Select the desired photos Show the PopUp menu 5 Select V Vi ie ew w The selected photo is displayed in full size 2 3 1 4 ENTER ENTER ENTER USB Device Page 2 3 No Marked PHOTO LIST Upper Free Space 150MB 1366x768 125KB USB Device Page 2 3 No Marked PHOTO LIST Upper Free Space 150MB 1366x768 125KB OST My Father Navigate Move Page Mark Exit CH FAV RETURN PopUp Menu Naviga...

Page 67: ... Fo ol ld de er r Use button and E En nt te er r button to set values Then go to and press E En nt te er r to save the settings You cannot change M Mu us si ic c F Fo ol ld de er r while BGM is playing G G H Hi id de e Hide the menu on the full sized screen To see the menu again on the full sized screen press E En nt te er r button to display Select the S Sl li id de es sh ho ow w B BG GM M R Ro o...

Page 68: ...24000 22050Hz USB Device Page 2 3 No Marked MUSIC LIST Upper Free Space 150MB Mark 1 340 120KB Upper 3 4 5 1 Moves to upper level file Preview If any album jacket for the file exists this jack et is displayed Currrent page Total pages Total number of marked musics Usable USB memory Corresponding buttons on the remote control 1 3 4 5 2 Select U US SB B Select M Mu us si ic c L Li is st t 1 2 Music ...

Page 69: ...e el le et te e Delete the selected musics G G C Ca an nc ce el l Close the pop up menu Use the C CH H button to navigation in the music list Use M MA AR RK K button to mark or unmark a music file If no music is marked all the music in the folder will be played in sequence When one or more music files are marked the marked music files will be played in sequence If you want to listen to only one so...

Page 70: ... NOTE G G When music is playing is displayed in front of the music play time G G A damaged or corrupted music file that does not play displays 00 00 as the play time G G Music files with copy protection will not play G G Press E EN NT TE ER R A A button to stop the screen saver G G The P PL LA AY Y G G P Pa au us se e I II I A A FF or GG buttons on the remote control are also available in this mod...

Page 71: ...ars will normally dissipate after a few minutes You can also adjust A As sp pe ec ct t R Ra at ti io o in the Q Q M Me en nu u Press the R RA AT TI IO O button repeatedly to select the desired picture format Only 42 50PG30 Enter Move PICTURE E Aspect Ratio 16 9 Picture Mode Standard Backlight 50 Contrast 50 Brightness 50 Sharpness 50 Color 50 Tint 0 R G Set By Program 4 3 16 9 Zoom1 Zoom2 Zoom3 Ju...

Page 72: ...icture taking a halfway trade off between alteration and screen coverage Zoom 3 With this function when the SD screen is sent to the HD with black at the left side and the right side this screen can be extended to be fully dis played with no black area It is enabled only at the DTV HD broadcasting It is the reference for displaying HD at the channel banner if the height is greater than 480 Just Sc...

Page 73: ... Tint 0 PICTURE E Picture Mode Standard Intelligent Sensor Vivid Standard Cinema Sport Game Expert1 Expert2 Standard 1MENU 3 2 ENTER ENTER R G There are factory presets for picture settings available in the user menus You can use a preset change each setting manually or let the Intelligent Sensor 4 When selecting I In nt te el ll li ig ge en nt t S Se en ns so or r Only 32 37 42 47 52LG50 42 47 52...

Page 74: ... more blue Select P PI IC CT TU UR RE E Select A Ad dv va an nc ce ed d C Co on nt tr ro ol l Select C Co ol lo or r T Te em mp pe er ra at tu ur re e Select C Co oo ol l M Me ed di iu um m or W Wa ar rm m ColorTemperature F F Medium G G Fresh Contrast On Fresh Color On Noise Reduction Low Gamma Medium Real Cinema Low Black Level Off Close 1MENU 3 4 2 ENTER ENTER Eye Care Off 5 Return to TV viewin...

Page 75: ...ust the picture appearance to suit your preference and viewing situations This feature is disable in P Pi ic ct tu ur re e M Mo od de e I In nt te el ll li ig ge en nt t S Se en ns so or r Backlight 60 E E E E E E E E Enter 6 Return to TV viewing RETURN MENU Return to the previous menu Select P Pi ic ct tu ur re e M Mo od de e 2 ENTER Select V Vi iv vi id d S St ta an nd da ar rd d C Ci in ne em m...

Page 76: ... 2 ENTER ENTER 4 ENTER 5 ENTER 6 Enter Move Aspect Ratio 16 9 Picture Mode Standard Backlight 80 Contrast 70 Brightness 50 Sharpness 60 Color 60 Tint 0 PICTURE E Picture Mode Standard 7 Return to TV viewing RETURN MENU Return to the previous menu F F Off G G Fresh Contrast Noise Reduction Off Gamma Medium Black Level High Off Real Cinema Color Standard SD White Balance Red Contrast 128 Green Contr...

Page 77: ...elect P PI IC CT TU UR RE E Select A Ad dv va an nc ce ed d C Co on nt tr ro ol l Select F Fr re es sh h C Co on nt tr ra as st t F Fr re es sh h C Co ol lo or r N No oi is se e R Re ed du uc ct ti io on n or G Ga am mm ma a Select your desired Source ColorTemperature F F On G G Fresh Contrast Medium Fresh Color On Noise Reduction Low Close 1MENU 5 4 ENTER ENTER 6 7 Return to TV viewing RETURN MEN...

Page 78: ...vies When you operate Real Cinema Film Mode 3 2 Pull Down Mode or Cinema Correction Mode the TV will adjust 24 fps video from movies to 30 fps video for display It s not available to use this function in RGB PC ColorTemperature F F Off G G Fresh Contrast Medium Fresh Color On Noise Reduction Low Real Cinema On Close 1MENU 3 2 ENTER ENTER 4 5 Return to TV viewing RETURN MENU Return to the previous ...

Page 79: ...R RE E Select A Ad dv va an nc ce ed d C Co on nt tr ro ol l Select B Bl la ac ck k L Le ev ve el l Select L Lo ow w or H Hi ig gh h L Lo ow w The reflection of the screen gets darker H Hi ig gh h The reflection of the screen gets brighter B Bl la ac ck k L Le ev ve el l can be adjusted at each video mode except THX Cinema by the above method ColorTemperature F F Low G G Fresh Contrast Medium Fres...

Page 80: ...a ar re e Select O On n or O Of ff f ColorTemperature F F Off G G Fresh Contrast Medium Fresh Color On Noise Reduction Low On Close 1MENU 3 2 ENTER ENTER 4 Eye Care The Eye Care limits the brightness of the LCD It reduces the eye dazzling by lowering the backlight voltage to decrease the brightness if the APL Average Picture Level is too high When selecting Picture Mode Standard Game and Sport you...

Page 81: ... noise may appear on the screen If this occurs set TruMotion to Off Enter Move Advanced Control Reset Screen RGB PC PICTURE Advanced Control Enter Move Advanced Control Reset Screen RGB PC PICTURE E E Advanced Control ColorTemperature Off Fresh Contrast Medium Fresh Color On Noise Reduction Low On Eye Care Gamma Medium Real Cinema Low Black Level Off TruMotion F F High G G Close Select P PI IC CT ...

Page 82: ... s Advanced TruMotion 100Hz technology provides ima LG s Advanced TruMotion 100Hz technology provides im Exit RETURN Enter Move Advanced Control Reset Screen RGB PC TruMotion Demo PICTURE E TruMotion Demo Select P PI IC CT TU UR RE E Select T Tr ru uM Mo ot ti io on n D De em mo o Display T Tr ru uM Mo ot ti io on n O ON N or T Tr ru uM Mo ot ti io on n O OF FF F 1MENU 3 2 ENTER ENTER 4 Stop T Tr ...

Page 83: ... Cinema mode this function is disabled Select P PI IC CT TU UR RE E Select R Re es se et t Initialize the adjusted value Enter Move Advanced Control Reset Screen RGB PC PICTURE Reset Enter Move Advanced Control Reset Screen RGB PC PICTURE E E Reset 1MENU 3 2 ENTER ENTER 4 Return to TV viewing MENU Resetting video configuration i i ...

Page 84: ... Select S St ta an nd db by y L Li ig gh ht t or P Po ow we er r L Li ig gh ht t 3 ENTER Select your desired options 4 5 RETURN Return to the previous menu MENU Return to TV viewing S St ta an nd db by y L Li ig gh ht t If you select On the Power Button LED will turn red in Stand By mode P Po ow we er r L Li ig gh ht t If you select On the screen will turn on and the brightness will go down 50 If ...

Page 85: ...evel 0 OPTION ISM Method Normal Normal Orbiter Inversion White wash Normal 1MENU 3 2 ENTER ENTER 4 E Return to TV viewing RETURN MENU Return to the previous menu N No or rm ma al l If image sticking is never a problem ISM is not necessary set to Normal O Or rb bi it te er r Orbiter may help prevent ghost images However it is best not to allow any fixed image to remain on the screen To avoid a ghos...

Page 86: ...ge English Input Label Schedule List SIMPLINK On Key Lock Off Caption Off ISM Method Normal Power Saving Level 0 OPTION Power Saving Level 0 Enter Move Language English Input Label Schedule List SIMPLINK On Key Lock Off Caption Off ISM Method Normal Power Saving Level 0 OPTION Power Saving Level 0 Level 0 Level 1 Level 2 Level 3 Level 4 Level 0 Level 0 Level 1 Level 2 Level 3 Level 4 You can also ...

Page 87: ... Au ut to o V Vo ol lu um me e Select O On n or O Of ff f Enter Move Auto Volume Off Clear Voice On Balance 0 Sound Mode Standard SRS TruSurround XT On Treble 0 Bass 0 Reset AUDIO E L R Auto Volume Off Enter Move Auto Volume Off Clear Voice On Balance 0 Sound Mode Standard SRS TruSurround XT On Treble 0 Bass 0 Reset AUDIO E L R Auto Volume Off Off On On 1MENU 3 2 ENTER ENTER 4 Return to TV viewing...

Page 88: ... me e Enter Move Auto Volume Off Clear Voice On Balance 0 Sound Mode Standard SRS TruSurround XT On Treble 0 Bass 0 Reset AUDIO E L R Sound Mode Standard Enter Move Auto Volume Off Clear Voice On Balance 0 Sound Mode Standard SRS TruSurround XT On Treble 0 Bass 0 Reset AUDIO E L R Sound Mode Standard Standard Music Cinema Sport Game Standard You can also adjust S So ou un nd d M Mo od de e in the ...

Page 89: ...r re eb bl le e or B Ba as ss s Make appropriate adjustments 1MENU 4 2 ENTER Select S St ta an nd da ar rd d M Mu us si ic c C Ci in ne em ma a S Sp po or rt t or G Ga am me e 3 ENTER ENTER 5 Select A AU UD DI IO O Select S SR RS S T Tr ru uS Su ur rr ro ou un nd d X XT T Select O On n or O Of ff f 1MENU 3 2 ENTER ENTER S SR RS S T Tr ru uS Su ur rr ro ou un nd d X XT T Takes advantage of any mult...

Page 90: ...e 0 Bass 0 Reset AUDIO E L R Clear Voice Off Enter Move Auto Volume Off Clear Voice On Balance 0 Sound Mode Standard SRS TruSurround XT On Treble 0 Bass 0 Reset AUDIO E L R Clear Voice Off Off On On Select O On n or O Of ff f 1MENU 3 2 ENTER ENTER If you select C Cl le ea ar r V Vo oi ic ce e O On n S SR RS S T Tr ru uS Su ur rr ro ou un nd d X XT T feature will not work You can also adjust C Cl l...

Page 91: ...nce 0 Sound Mode Standard SRS TruSurround XT On Treble 0 Bass 0 Reset AUDIO E Balance 0 BALANCE Adjust the left right sound of speaker to suit your taste and room situations Select A AU UD DI IO O Select B Ba al la an nc ce e Make appropriate adjustments Close Balance 0 L R F F G G L R 1MENU 3 2 ENTER ENTER ENTER Select C Cl lo os se e to confirm it 4 5 Return to TV viewing RETURN MENU Return to t...

Page 92: ...nal audio equipment Feature turns the TV Speakers option On or Off Select A AU UD DI IO O Select T TV V S Sp pe ea ak ke er r Enter Move AUDIO E TV Speaker Off Enter Move AUDIO E TV Speaker Off Off On On Select O On n or O Of ff f 1MENU 3 2 ENTER ENTER 4 Return to TV viewing RETURN MENU Return to the previous menu ...

Page 93: ...ONO Off Eject Aspect Ratio Power Saving Clear Voice Picture Mode Sound Mode SAP Caption Sleep Timer Add Channel USB Eject Plasma TV Models LCD TV Models F F Mono G G Q Menu Close 0 16 9 Standard on Standard MONO Off Eject Aspect Ratio Backlight Clear Voice Picture Mode Sound Mode SAP Caption Sleep Timer Add Channel USB Eject F F Mono G G Select S SA AP P Select M Mo on no o S St te er re eo o or S...

Page 94: ...Auto Volume Off Clear Voice On Balance 0 Sound Mode Standard SRS TruSurround XT On Treble 0 Bass 0 Reset AUDIO Reset Reset Returns to the default factory setting for Sound Mode Auto Volume and Balance Select A AU UD DI IO O Select R Re es se et t Initialize the adjusted value AUDIO RESET 1MENU 3 2 ENTER ENTER L R L R E E 4 Return to TV viewing MENU Resetting audio configuration i i ...

Page 95: ...e es se e AUDIO LANGUAGE 1MENU 3 4 2 ENTER ENTER Enter Move Language English Input Label Schedule List SIMPLINK On Key Lock Off Caption Off ISM Method Normal Power Saving Level 0 OPTION Language English Enter Move Language English Input Label Schedule List SIMPLINK On Key Lock Off Caption Off ISM Method Normal Power Saving Level 0 OPTION Language English Menu Audio English Inglês F F English G G C...

Page 96: ...EN MENUS LANGUAGE SELECTION 1MENU 3 4 2 ENTER ENTER Enter Move Language English Input Label Schedule List SIMPLINK On Key Lock Off Caption Off ISM Method Normal Power Saving Level 0 OPTION Language English Enter Move Language English Input Label Schedule List SIMPLINK On Key Lock Off Caption Off ISM Method Normal Power Saving Level 0 OPTION Language English Menu Audio English F F English Inglês G ...

Page 97: ...rovided on a program Analog caption displays information at any position on the screen and is usually the program s dialog Caption Text if provided by the broadcaster would be available for analog channels on the Antenna Cable This TV is programmed to memoririze the caption text mode which was last set when you turn the power off This function is only available when C Ca ap pt ti io on n Mode is s...

Page 98: ...ng area observes Daylight Saving time 5 ENTER Select C Cl lo os se e to confirm it 6 7 Return to TV viewing RETURN MENU Return to the previous menu Fernando de Noronha Northeast Brasilia North Mato Grosso Acre Amazonas extreme West I Is sl la an nd ds s Trindade Martin Vaz Atol das Rocas Penedos de São Pedro e São Paulo Fernando de Noronha S St ta at te es s Amapá AP Tocantins TO Alagoas AL Bahia ...

Page 99: ... Time Off Sleep Timer Off Auto Sleep Off TIME Enter Move Clock Nov 27 200702 15AM Off Time Off On Time Off Sleep Timer Off Auto Sleep Off TIME Clock Nov 27 200702 15AM Clock Nov 27 200702 15AM 1MENU 3 4 2 ENTER ENTER Manual Clock Setup Date 14 Month 11 Hour 1AM Minute 04 Time Zone Brasilia Close F F Manual G G Year 2007 Daylight Saving Auto ENTER Select C Cl lo os se e to confirm it 5 6 Return to ...

Page 100: ...ff On Time Off Sleep Timer Off Auto Sleep Off TIME Enter Move Clock Nov 27 200702 15AM Off Time Off On Time Off Sleep Timer Off Auto Sleep Off TIME On Time Off On Time Off Repeat F F Once G G Hour 0 Minute 00 Input TV Channel TV2 Volume 30 Close 1MENU 3 4 2 ENTER 5 ENTER Select C Cl lo os se e to confirm it 6 ENTER Select O Of ff f O On nc ce e E Ev ve er ry yd da ay y M Mo on n F Fr ri i M Mo on ...

Page 101: ...lock Nov 27 200702 15AM Off Time Off On Time Off Sleep Timer Off Auto Sleep Off TIME Enter Move Clock Nov 27 200702 15AM Off Time Off On Time Off Sleep Timer Off Auto Sleep Off TIME Sleep Timer Off Sleep Timer Off 1MENU 3 2 ENTER ENTER Select S Sl le ee ep p T Ti im me er r Close F F Off G G ENTER Select C Cl lo os se e to confirm it 4 You can also adjust S Sl le ee ep p T Ti im me er r in the Q Q...

Page 102: ...r O On n Enter Move Clock Nov 27 200702 15AM Off Time Off On Time Off Sleep Timer Off Auto Sleep Off TIME Enter Move Clock Nov 27 200702 15AM Off Time Off On Time Off Sleep Timer Off Auto Sleep Off TIME Auto Sleep Off Auto Sleep Off Off On TV will be automatically turned off in case of No Signal for 10 minutes On 1MENU 3 2 ENTER ENTER 4 Return to TV viewing RETURN MENU Return to the previous menu ...

Page 103: ... program and the categories It is also possible to block all program viewing for a time period To use this function the following must be done 1 Set ratings and categories to be blocked 2 Specify a password 3 Enable the lock SET PASSWORD LOCK SYSTEM Set up blocking schemes to block specific channels ratings and external viewing sources A password is required to gain access to this menu Setting up ...

Page 104: ...e entered re enter the same 4 digits on the C Co on nf fi ir rm m Enter Move Lock System Off Set Password Block Channel Rating Input Block LOCK Enter Move Lock System Off Set Password Block Channel Rating Input Block LOCK Set Password Off Set Password Off New Confirm 1MENU 4 3 ENTER 1 4 5 6 7 8 0 9 2 3 Set Password Close 5 Return to TV viewing RETURN MENU Return to the previous menu 2 1 4 5 6 7 8 ...

Page 105: ...LOCK Lock System Off Lock System Off Off On On Enables or disables the blocking scheme you set up previously Lock System Select L LO OC CK K Select L Lo oc ck k S Sy ys st te em m Select O On n or O Of ff f 1MENU 4 3 ENTER 2 1 4 5 6 7 8 0 9 2 3 Input the password ENTER 5 Return to TV viewing RETURN MENU Return to the previous menu When you select O On n the Lock System is enable ...

Page 106: ...lect B Bl lo oc ck k C Ch ha an nn ne el l Select a program to be locked Enter Move Lock System Off Set Password Block Channel Rating Input Block LOCK Block Channel 1MENU 4 3 ENTER 5 6 Return to TV viewing MENU RETURN Return to the previous menu Block Unblock Move Page CH Navigate Previous MENU Exit RETURN 2 1 4 5 6 7 8 0 9 2 3 Input the password ENTER ENTER Block or unblock a channel ...

Page 107: ...1 18 8 1 16 6 1 14 4 1 12 2 or 1 10 0 1MENU 4 3 ENTER 18 16 14 12 10 Close This program is unblocked Blocks movies according to the movie ratings limits specified so children cannot view certain movies You can set the ratings limit by blocking out all the movies with the ratings above a specified level Keep in mind that the movie ratings limit only applies to movies shown on TV not TV programs suc...

Page 108: ...Block Input Block Select L LO OC CK K Select I In np pu ut t B Bl lo oc ck k Select a source 1MENU 4 3 ENTER Select O On n or O Of ff f 5 Enables you to select a source to block from the external source devices you have hooked up 6 Return to TV viewing RETURN MENU Return to the previous menu F F Off G G Off Off Off Off Off Off Off Close AV1 AV2 Component1 Component2 RGB PC HDMI1 HDMI2 HDMI3 2 1 4 ...

Page 109: ...ct O On n or O Of ff f 3 ENTER With the K Ke ey y L Lo oc ck k O On n the display K Ke ey y L Lo oc ck k O On n appears on the screen if any button on the front panel is pressed while viewing the TV 4 RETURN Return to the previous menu MENU Return to TV viewing Enter Move Language English Input Label Schedule List SIMPLINK On Key Lock Off Caption Off ISM Method Normal Power Saving Level 0 OPTION E...

Page 110: ...may be with the broadcast Is the power cord inserted into wall power outlet Check your antenna direction and or location Test the wall power outlet plug another product s power cord into the outlet where the product s power cord was plugged in This is normal the image is muted during the product startup process Please contact your service center if the picture has not appeared after five minutes A...

Page 111: ...ry another channel The problem may be with the broadcast Are the audio cables installed properly Adjust Balance in menu option A change in ambient humidity or temperature may result in an unusual noise when the product is turned on or off and does not indicate a fault with the product Check HDMI cable over version 1 3 Check USB cable over version 2 0 This feature is not available for all models Pi...

Page 112: ... water and a little fabric softener or dish washing detergent Wring the cloth until it s almost dry and then use it to wipe the screen Make sure the excess water is off the screen and then let it air dry before you turn on your TV Cleaning the Cabinet To remove dirt or dust wipe the cabinet with a soft dry lint free cloth Please be sure not to use a wet cloth Extended Absence G G If you expect to ...

Page 113: ... 144 3 x 825 5 x 306 4mm 45 1 x 29 7 x 4 1 inches 1 144 3 x 754 7 x 10³ 0 mm 70 8 pounds 32 1 kg 57 3 pounds 26 0 kg 40 7 x 29 5x 1 1 3 inches 1033 4 x 750 0 x 287 6mm 40 7 x 27 0 x3 5 inches 1033 4 x 686 8 x 88 5 mm 54 9 pounds 24 9 kg 45 0 pounds 20 4 kg 3 32 2L LG G5 50 0D D 32LG50D SA 32 0 x 23 5 x 9 1 inches 813 8 x 598 8 x 231 9 mm 45 1 x 21 2 x 3 1 inches 813 8 x 540 4 x 78 9 mm 27 7 pounds...

Page 114: ...nge Operating Humidity Range Storage Temperature Range Storage Humidity Range 5 52 2L LG G5 50 0F FD D 52LG50FD SA 50 8 x 35 1 x 13 5 inches 1291 7 x 892 1 x 342 9 mm 50 8 x 32 1 x 4 5 inches 1291 7 x 817 0 x 1 15 3 mm 87 0 pounds 39 5 kg 76 9 pounds 34 9kg 4 42 2L LG G7 70 0Y YD D 42LG70YD SA 4 47 7L LG G7 70 0Y YD D 47LG70YD SA 5 52 2L LG G7 70 0Y YD D 52LG70YD SA 1 152 8 x 868 6 x 434 5 mm 45 4...

Page 115: ...6 0 x 307 6 mm 40 9 x 26 5 x 3 3 inches 1039 5 x 673 7 x 84 0 mm 61 7 pounds 28 0 kg 55 1 pounds 25 0 kg 5 50 0P PG G3 30 0D D 50PG30D SA 48 5 x 33 4 x 14 3 inches 1232 0 x 850 0 x 363 6 mm 48 5 x 31 2 x 3 3 inches 1232 0 x 793 0 x 84 0 mm 93 2 pounds 42 3 kg 84 4 pounds 38 3 kg Width x Height x Depth With Stand inches mm Without Stand Weight pounds kg With Stand Without Stand Width x Height x Dep...

Page 116: ...control is ready to be programmed with the code Enter a code number using the number buttons on the remote control Programming code numbers for the corresponding component can be found on the following pages If the code is correct the device will turn off Press the M ME EN NU U button to store the code Test the remote control functions to see if the component responds correctly If not repeat from ...

Page 117: ...MINOLTA 013 020 MITSUBISHI 013 020 045 046 049 051 059 061 151 MTC 034 040 MULTITECH 024 034 NEC 012 023 039 043 048 NORDMENDE 043 OPTONICA 053 054 PANASONIC 066 070 074 083 133 140 145 PENTAX 013 020 031 033 063 PHILCO 031 034 067 PHILIPS 031 033 034 054 067 071 101 PILOT 101 PIONEER 013 021 048 PORTLAND 108 PULSAR 072 QUARTZ 01 1 014 QUASAR 033 066 075 145 RCA 013 020 033 034 040 041 062 063 107...

Page 118: ... C4 C5 C6 C7 D0 D1 D2 D3 D4 D5 D6 D7 D0 D1 D2 D3 D4 D5 D6 D7 Lead code Low custom code High custom code Data code Data code Repeat code Tf 4 5 ms 9 ms 2 25 ms 9 ms 0 55 ms 0 56 ms 1 12 ms 0 56 ms 2 24 ms Tf Tf Tf 108ms 455KHz Bit 0 Bit 1 1 How to Connect Connect your wired remote control to the Remote Control port on the TV 2 Remote Control IR Codes Output waveform Single pulse modulated with 37 9...

Page 119: ...ON R C BUTTON R C BUTTON R C BUTTON R C BUTTON R C BUTTON R C BUTTON R C BUTTON R C BUTTON R C BUTTON R C BUTTON R C BUTTON R C BUTTON R C BUTTON R C BUTTON R C BUTTON R C BUTTON R C BUTTON 08 0B AA 7E 43 45 07 06 40 41 44 5B 30 02 03 00 01 1E 09 10 19 4C 1A A9 B0 BA B1 BD 8F 8E POWER INPUT INFO SIMPLINK MENU Q MENU ENTER RETURN AV MODE VOL VOL CH CH FAV MUTE Number Key 0 9 Dash REVIEW GUIDE PLAY ...

Page 120: ...d software The instructions below are provided to help with programming software or to test functionality using telenet software RGB IN COMPONENT IN AUDIO RGB DVI RGB PC 1 2 RS 232C IN CONTROL SERVICE VIDEO AUDIO VIDEO OPTICAL MONO AUDIO S VIDEO DIGITALAUDIO OUT AV IN 1 HDMI DVI IN 1 DVI 2 AUDIO OUT ANTENNA IN CABLE IN Type of Connector D Sub 9 Pin Male No Pin Name 1 No connection 2 RXD Receive da...

Page 121: ...ired TV ID number The adjustment range of Set ID is 1 99 Enter Move Set ID 1 Power Indicator Initial Setting OPTION E Set ID F F 1 G G Close 1MENU 3 2 ENTER ENTER Enter Move Set ID 1 Power Indicator Initial Setting OPTION Set ID E RS 232C Configurations Either cable below can be used PC TV RXD 2 3 TXD TXD 3 2 RXD GND 5 5 GND DTR 4 6 DSR DSR 6 4 DTR RTS 7 8 CTS CTS 8 7 RTS D Sub 9 D Sub 9 PC TV RXD...

Page 122: ... standby mode O OK K A Ac ck kn no ow wl le ed dg ge em me en nt t The TV transmits ACK acknowledgement based on this for mat when receiving normal data At this time if the data is data read mode it indicates present status data If the data is data write mode it returns the data of the PC computer In this model TV will not send the status during the standby mode Data Format Command 2 Use as comman...

Page 123: ...t te e C Co om mm ma an nd d k k d d To select screen mute on off Transmission k d Set ID Data Cr Data 0 Screen mute off Picture on Data 1 Screen mute on Picture off Acknowledgement d Set ID OK NG Data x 0 05 5 V Vo ollu um me e M Mu ut te e C Co om mm ma an nd d k k e e To control volume mute on off You can also adjust mute using the MUTE button on remote control Transmission k e Set ID Data Cr D...

Page 124: ...ta 0 Lock off Data 1 Lock on Acknowledgement m Set ID OK NG Data x If you re not using the remote control and front panel controls on the TV use this mode When main power is on off remote control lock is released 1 14 4 T Tr re eb blle e C Co om mm ma an nd d k k r r To adjust treble You can also adjust treble in the Audio menu Transmission k r Set ID Data Cr Data Min 0 Max 64 transmit by Hexadeci...

Page 125: ...D OK NG Data x 2 22 2 B Ba ac ck klliig gh ht t C Co om mm ma an nd d m m g g Only LCD TV model To adjust screen back light Transmission m g Set ID Data Cr Data Min 0 Max 64 transmit by Hexadecimal code Refer to Real data mapping 1 See page 122 Acknowledgement g Set ID OK NG Data x 2 23 3 C Ch ha an nn ne ell T Tu un niin ng g C Co om mm ma an nd d m m a a To tune channel to following physical maj...

Page 126: ...se signal type Tune Command Examples 1 Tune to the analog cable channel 35 Data 0 Physical of 35 23 Data 1 2 No Major 00 00 Data 3 4 No Minor 00 00 Data 5 0000 0001 in binary 01 Total ma 00 23 00 00 00 00 01 2 Tune to the digital local channel 30 3 Data 0 Don t know Physical 00 Data 1 2 Major is 30 00 1E Data 3 4 Minor is 3 00 03 Data 5 0010 0010 in binary 22 Total ma 00 00 00 1E 00 03 22 Acknowle...

Page 127: ... three 3 years from the date of the distribution of this product by LG Electronics You can obtain a copy of the GPL LGPL licenses from http www gnu org licenses and a copy of MPL license from http www mozilla org MPL Also you can obtain the translation of GPL LGPL licenses from http www gnu org licenses old licenses gpl 2 0 translations html http www gnu org licenses old licenses lgpl 2 1 translat...

Page 128: ...serviço de atendimento ao consumidor 4004 5400 Capitais e Regiões Metropolitanas 0800 707 5454 Demais localidades EM CASO DE DÚVIDA CONSULTE NOSSO SAC W W W L G E C O M B R SAC ...

Reviews: