background image

ENGLISH

11

Other connections

Connect your TV to external devices. For the best picture and audio 
quality, connect the external device and the TV with the HDMI cable. 
Some separate cable is not provided.

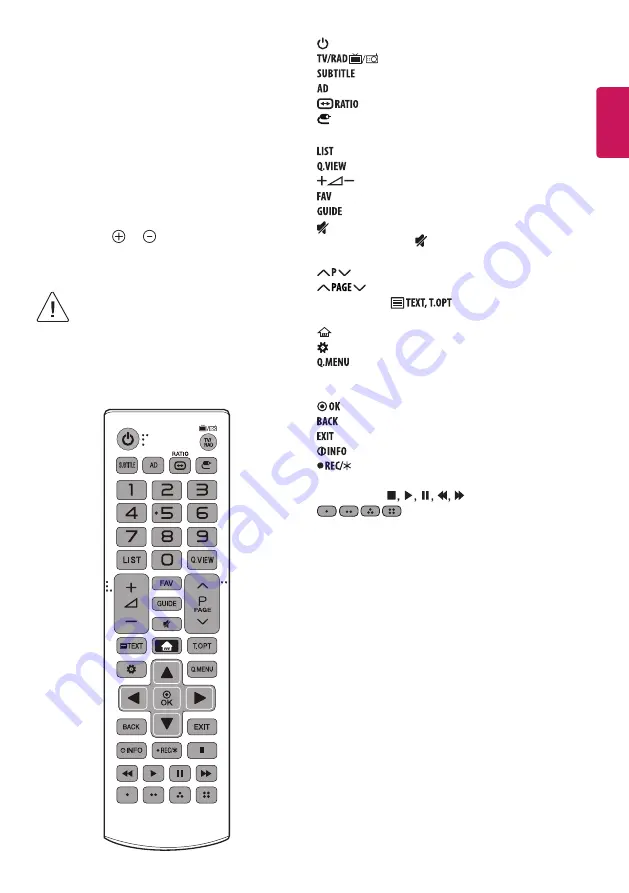
Remote control

The descriptions in this manual are based on the buttons on the remote 
control. Please read this manual carefully and use the TV correctly.
To replace batteries, open the battery cover, replace batteries (1.5 
V AAA) matching the   and   ends to the label inside the 
compartment, and close the battery cover. To remove the batteries, 
perform the installation actions in reverse.

•  In Analogue TV and some countries, some remote 

control buttons may not work.

Make sure to point the remote control toward the remote control sensor 
on the TV. 

(Depending on model)

 (POWER)

  Turns the TV on or off.


Selects Radio, TV and DTV programme.

  Recalls your preferred subtitle in digital mode.

  Audio descriptions function will be enabled. 


  Resizes an image. 


(INPUT)

 Changes the input source.

Number buttons

  Enters numbers.


Accesses the saved programme list.

  Returns to the previously viewed programme.


Adjusts the volume level.

  Accesses your favourite programme list.


Shows programme guide.

 (MUTE)

  Mutes all sounds.  

- Pressing and holding the   button accesses the 

Accessibility


menu.


Scrolls through the saved programmes.


  Moves to the previous or next screen.

Teletext buttons (  

)  

These buttons are used for 

teletext.

 (HOME)  

Accesses the Home menu. 


(Settings)  

Accesses the Settings menu.

  Accesses the Quick menus.

Navigation buttons (up/down/left/right)

  Scrolls through menus 

or options.


  Selects menus or options and confirms your input.


Returns to the previous level.

  Clears on-screen displays and returns to TV viewing.


Views the information of the current programme and screen. 


Starts to record and displays record menu. (Only Time 

Machine

Ready

 supported model) (Depending on model)

Control buttons


(

)  

Controls media contents.


  These access special functions in some menus.

Summary of Contents for 43LV340C-GB

Page 1: ...LED TV LV34 www lg com AAA 32LV34 43 49LV34 X 2 M4 X L16 32LV34 X 4 M4 X L16 43 49LV34 ...

Page 2: ......

Page 3: ...32LV34 1 3 4 2 ...

Page 4: ...43 49LV34 A B A B B B A B A B B A B A 1 B A 5 B A B A 3 2 B A B A A B 4 ...

Page 5: ...HDMI IN USB IN H P OUT ANTENNA CABLE IN IA CARD SLOT OPTICAL DIGITAL AUDIO OUT ...

Page 6: ...PCMCIA CARD SLOT OPTICAL DIGITAL AUDIO OUT Satellite IN ...

Page 7: ...VIDEO Y PB PR L MONO AUDIO R COMPONENT IN AV IN VIDEO L MONO AUDIO R VIDEO AUDIO VIDEO Y PB PR L MONO AUDIO R ...

Page 8: ...AUDIO OUT DVI OUT HDMIIN VIDEO Y PB PR L MONO AUDIO R HDMI DVI IN AUDIO OUT RGB OUT RGBIN VIDEO Y PB PR L MONO AUDIO R RGB IN ...

Page 9: ...1 2 4 3 ...

Page 10: ...1 2 0 D A F G E C B A B C D E F F G 32LV340C GB 32LV340H GB 739 472 168 441 84 4 90 4 85 43LV340C GB 43LV340H GB 974 625 220 571 79 4 9 3 9 2 49LV340C GB 49LV340H GB 1107 701 235 645 79 4 11 42 11 30 ...

Page 11: ...lly before operating your set and retain it for future reference Safety and Reference OWNER S MANUAL www lg com LED TV Disclaimer LG LED TV applies LCD screen with LED backlights Copyright 2018 LG Electronics Inc All Rights Reserved ...

Page 12: ...tself on power cables Otherwise this may result in fire or electric shock Bend antenna cable between inside and outside building to prevent rain from flowing in This may cause water damaged inside the Product and could give an electric shock When mountingTV onto wall make sure to neatly install and isolate cabling from rear ofTV as to not create possibility of electric shock fire hazard Do not plu...

Page 13: ...all theTV on a stand you need to take actions to prevent the product from overturning Otherwise the product may fall over which may cause injury If you intend to mount the product to a wall attachVESA standard mounting interface optional parts to the back of the product When you install the set to use the wall mounting bracket optional parts fix it carefully so as not to drop Only use the attachme...

Page 14: ...he apparatus has been exposed to rain or moisture does not operate normally or has been dropped Do not use high voltage electrical goods near theTV e g electric mosquito swatter This may result in product malfunction When cleaning the product and its components unplug the power first and wipe it with a soft cloth Applying excessive force may cause scratches or discolouration Do not spray with wate...

Page 15: ...the following advice to prevent theTV from being scratched or damaged and for safe transportation regardless of its type and size It is recommended to move theTV in the box or packing material that theTV originally came in Before moving or lifting theTV disconnect the power cord and all cables When holding theTV the screen should face away from you to avoid damage Hold the top and bottom of theTV ...

Page 16: ... button is on the screen pressing and holding the button will let you exit the Menu 2 You can access and adjust the menu by pressing the button when TV is on 3 You can use the function when you access menu control Adjusting the menu Depending on model When theTV is turned on press the button one time You can adjust the Menu items using the button Turns the power off Accesses the settings menu Clea...

Page 17: ...rniture that can safely support the television Ensuring the television is not overhanging the edge of the supporting furniture Not placing the television on tall furniture for example cupboards or bookcases without anchoring both the furniture and the television to a suitable support Not standing the televisions on cloth or other materials placed between the television and supporting furniture Edu...

Page 18: ...rt theTV securely Brackets bolts and ropes are not provided You can obtain additional accessories from your local dealer Adjusting the angle of the TV to suit view This feature is not available for all models Swivel 20 degrees to the left or right and adjust the angle of theTV to suit your view 20 20 When adjusting the angle of the product watch out for your fingers Personal injury may occur if ha...

Page 19: ...ct theTV signal input cable to theTV through a DVD recorder orVCR For more information of recording refer to the manual provided with the connected device Refer to the external equipment s manual for operating instructions If you connect a gaming device to theTV use the cable supplied with the gaming device In PC mode there may be noise associated with the resolution vertical pattern contrast or b...

Page 20: ...o not connect your headphones or earphones to the port for connecting an external speaker Method ofVolume control port Depending on model Cable Spec GND Up Down Each Up Down pin is pulled to 3 3V with CPU GPIO CPU detects transition from 3 3V to GND level for volume control Network setup Wired network connection Depending on model ThisTV can be connected to a Pro Centric server via the LAN port Af...

Page 21: ...in digital mode Audio descriptions function will be enabled Resizes an image INPUT Changes the input source Number buttons Enters numbers Accesses the saved programme list Returns to the previously viewed programme Adjusts the volume level Accesses your favourite programme list Shows programme guide MUTE Mutes all sounds Pressing and holding the button accesses the Accessibility menu Scrolls throu...

Page 22: ...xt screen Shows programme guide Displays and removes hotel interactive menu Views the information of the current programme and screen Navigation buttons up down left right Scrolls through menus or options Selects menus or options and confirms your input Accesses the main menus BACK Returns to the previous level Clears on screen displays and returns toTV viewing These access special functions in so...

Page 23: ... to you on CD ROM for a charge covering the cost of performing such distribution such as the cost of media shipping and handling upon email request to opensource lge com This offer is valid for a period of three years after our last shipment of this product This offer is valid to anyone in receipt of this information Troubleshooting The software version can be updated for improvement in performanc...

Page 24: ...t right top down This phenomenon occurs due to the characteristic of the panel It is not related with the product performance and it is not malfunction Displaying a still image for a prolonged period of time may cause image sticking Avoid displaying a fixed image on theTV screen for a long period of time Generated Sound Cracking noise A cracking noise that occurs when watching or turning off theTV...

Page 25: ... C Storage Humidity Less than 85 1 Only Satellite models SatelliteTV Depending on model DigitalTV Depending on Country model AnalogueTV Depending on Country Television system DVB S S2 DVB C DVB T T2 PAL B B PAL B G PAL D K PAL I SECAM B G SECAM D K NTSC M Programme coverage C Band Ku Band VHF UHF VHF UHF CATV Maximum number of storable programmes 6 000 2 000 External antenna impedance 75 Ω ...

Page 26: ... 768 48 363 60 00 1152 x 864 54 348 60 053 1360 x 768 47 712 60 015 1280 x 10241 FHD only 63 981 60 020 1920 x 10801 FHD only 66 587 67 50 59 934 60 00 1 Except for 32LV34 HDMI DVI PC supported mode Use HDMI IN 1 for PC mode Resolution Horizontal Frequency kHz Vertical Frequency Hz 640 x 350 31 468 70 09 720 x 400 31 469 70 08 640 x 480 31 469 59 94 800 x 600 37 879 60 31 1024 x 768 48 363 60 00 1...

Page 27: ...264 AVC VC1 WMV3 WVC1 MP43 Audio WMA Standard WMA9 Pro MP3 AAC AC3 divx avi Video MPEG 2 MPEG 4 Part2 DivX3 11 DivX4 DivX5 DivX6 XViD H 264 AVC Audio HE AAC LPCM ADPCM MPEG 1 Layer I MPEG 1 Layer II Dolby Digital MPEG 1 Layer III MP3 ts trp tp mts m2ts Video H 264 AVC MPEG 2 H 265 HEVC Audio MPEG 1 Layer I MPEG 1 Layer II MPEG 1 Layer III MP3 Dolby Digital Dolby Digital Plus AAC HE AAC vob Video M...

Page 28: ...ype 15360 W x 8640 H Maximum ProgressiveType 1920 W x 1440 H Category BMP Photo size Minimum 64 x 64 Maximum 9600 x 6400 Category PNG Available file type Interlace Non Interlace Photo size Minimum 64 x 64 Maximum Interlace 1200 x 800 Maximum Non Interlace 9600 x 6400 BMP and PNG format files may be slower to display than JPEG Non standard photo image file may not be displayed ...

Page 29: ...20 Remote control Button 21 Remote control Button 43 SETTINGS Remote control Button 45 Remote control Button AA Remote control Button 5B Remote control Button 28 BACK Remote control Button 44 Remote control Button 40 Remote control Button 41 Remote control Button 07 Remote control Button 06 Remote control Button Code Hexa Function Note 72 Remote control Button 71 Remote control Button 63 Remote co...

Page 30: ...xternally Connect the serial port of the control device to the RS 232C jack on the product back panel RS 232C connection cables are not supplied with the product RS 232CIN CONTROL SERVICE Not Provided Type of Connector D Sub 9 Pin Male 6 1 5 9 No Pin name 1 3 5V 2 RXD Receive data 3 TXD Transmit data 4 IR OUT fromTV 5 GND 6 No Connection 7 No Connection 5V available in some models 8 No Connection ...

Page 31: ...mal 01 Power k a 00 to 01 02 Aspect Ratio k c See p 4 03 Screen Mute k d See p 5 04 Volume Mute k e 00 to 01 05 Volume Control k f 00 to 64 06 Contrast k g 00 to 64 07 Brightness k h 00 to 64 08 Colour k i 00 to 64 09 Tint k j 00 to 64 10 Sharpness k k 00 to 32 11 OSD Select k l 00 to 01 12 Remote Control Lock Mode k m 00 to 01 13 Balance k t 00 to 64 14 Colour Temperature x u 00 to 64 15 Energy S...

Page 32: ... non viable functions or communication errors Data 00 Illegal Code 01 Power Command k a To control Power On Off of the set Transmission k a Set ID Data Cr Data 00 Power Off 01 Power On Ack a Set ID OK NG Data x To ShowTV is Power On Off Transmission k a Set ID FF Cr Ack a Set ID OK NG Data x Similarly if other functions transmit 0 x FF data based on this format Acknowledgement data feed back prese...

Page 33: ...mute on Volume off 01 Volume mute off Volume on Ack e Set ID OK NG Data x 05 Volume Control Command k f To adjust volume You can also adjust volume with the volume buttons on remote control Transmission k f Set ID Data Cr Data Min 00 to Max 64 Refer to Real data mapping Ack f Set ID OK NG Data x 06 Contrast Command k g To adjust screen contrast You can also adjust contrast in the PICTURE menu Tran...

Page 34: ... remotely Transmission k l Set ID Data Cr Data 00 OSD off 01 OSD on Ack l Set ID OK NG Data x 12 Remote control lock mode Command k m To lock the front panel controls on the monitor and remote control Transmission k m Set ID Data Cr Data 00 Lock off 01 Lock on Ack m Set ID OK NG Data x If you are not using the remote control use this mode When main power is on off external control lock is released...

Page 35: ...It works only in RGB PC mode Transmission j u Set ID Data Cr Data 01 To set Ack u Set ID OK NG Data x 17 Equalize Command j v To adjust equalize Transmission j v Set ID Data Cr MSB LSB Frequency Data 0 0 0 0 0 0 0 0 7 6 5 Frequency 4 3 2 1 0 Step 0 0 0 1st Band 0 0 0 0 0 0 decimal 0 0 1 2nd Band 0 0 0 0 1 1 decimal 0 1 0 3rd Band 0 1 1 4th Band 1 0 0 1 1 19 decimal 1 0 0 5th Band 1 0 1 0 0 20 deci...

Page 36: ... 21 Control Back Light Command m g To control the backlight Transmission m g Set ID Data Cr Data Min 00 to Max 64 Ack g Set ID OK NG Data x 22 Input select Command x b Main Picture Input To select input source for main picture Transmission x b Set ID Data Cr Data Structure MSB LSB External Input Input Number 0 0 0 0 0 0 0 0 External Input Data 0 0 0 0 DTV 0 0 0 1 Analogue 0 0 1 0 AV 0 1 0 0 Compon...

Page 37: ...ENGLISH 9 Real data mapping 00 Step 0 A Step 10 Set ID 10 F Step 15 Set ID 15 10 Step 16 Set ID 16 64 Step 100 6E Step 110 73 Step 115 74 Step 116 CF Step 199 FE Step 254 FF Step 255 ...

Page 38: ...Record the model number and serial number of the TV Refer to the label on the back cover and quote this information to your dealer when requiring any service MODEL SERIAL ...

Reviews: