background image

14

ENGLISH

C

8


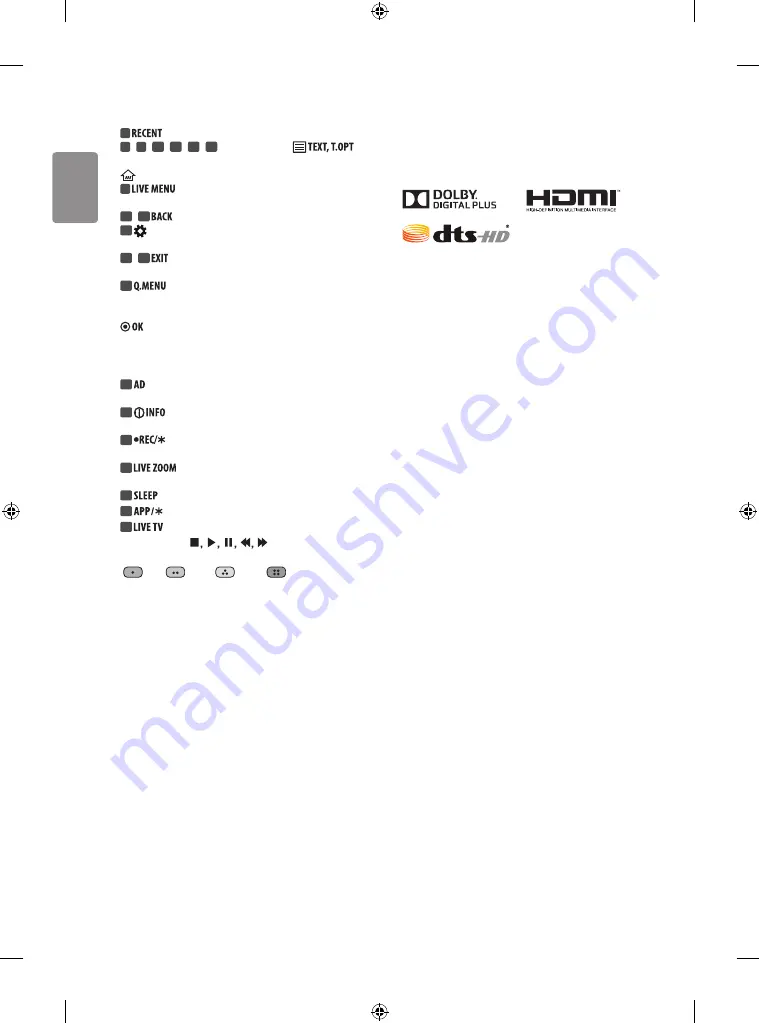
Shows the previous history. (Depending on model)

8

 , 

9

 , 

10

 , 

11

 , 

12

 , 

13


Teletext buttons (  

These buttons are used for teletext. (Depending on model)

 (HOME) 

Accesses the Home menu.

9


Shows the list of Recommended, Programmes, 

Search and Recorded. (Depending on model)

10

 , 

12


Returns to the previous level. (Depending on model)

10


 (Q. Settings) 

Accesses the Quick Settings. (Depending on 

model)

11


13


Clears on-screen displays and returns to TV viewing. 

(Depending on model)

11


 Accesses the Quick menus. (Depending on model)

Navigation buttons (up/down/left/right)

 Scrolls through menus 

or options.


 Selects menus or options and confirms your input.

D

14


By pressing the AD button, audio descriptions function will be 

enabled. (Depending on model)

14


Views the information of the current programme and 

screen. (Depending on model)

15


Starts to record and displays record menu.  

(Only Time Machine

Ready

 supported model) (Depending on model)

15


 By zooming in on the selected area, you can view it 

in full screen. (Depending on model)

15


 Set the sleep timer. (Depending on model)

15


Selects the MHP TV menu source. (Depending on model)

16


 Returns to LIVE TV. (Depending on model)

Control buttons


(

Controls media contents.

Coloured buttons

 These access special functions in some menus.   

(

: Red, 

: Green, 

: Yellow, 

: Blue)

Licenses

Supported licenses may differ by model. For more information about 
licenses, visit 

www.lg.com

.

Open source software 

notice information

To obtain the source code under GPL, LGPL, MPL and other open source 
licenses, that is contained in this product, please visit

 http://opensource.

lge.com.

In addition to the source code, all referred license terms, warranty 
disclaimers and copyright notices are available for download.
LG Electronics will also provide open source code to you on CD-ROM 
for a charge covering the cost of performing such distribution (such 
as the cost of media, shipping, and handling) upon email request to 
[email protected]. This offer is valid for three (3) years from the date 
on which you purchased the product.

External control device 

setup

To obtain the external control device setup information, please visit 

www.lg.com

.

Summary of Contents for 43LH604V-ZA

Page 1: ... on model в зависимости от модели залежно від моделі Үлгіге байланысты Rusumiga qarab Загвараас хамаарна LED TV LH60 LH61 LH63 AAA a b X 4 M5 X L20 12 14 16 20 X 4 M4 X L20 43 49LH60 43 49LH61 43 49LH63 X 4 M4 X L20 55LH60 55LH61 55LH63 43 49LH60 43 49LH61 43 49LH63 ...

Page 2: ......

Page 3: ...4 A b a 5 1 2 a b 3 43 49LH60 43 49LH61 43 49LH63 4 B 55LH60 55LH61 55LH63 ...

Page 4: ...HDMI IN LAN USB IN H P OUT ANTENNA CABLE IN HDMI IN ARC ...

Page 5: ...VIDEO Y PB PR L MONO AUDIO R COMPONENT IN AV IN VIDEO Y PB PR L MONO AUDIO R LAN H P OUT Satellite IN OPTICAL DIGITAL AUDIO OUT PCMCIA CARD SLOT ...

Page 6: ...VIDEO Y PB PR L MONO AUDIO R COMPONENT IN AV IN VIDEO L MONO AUDIO R VIDEO AUDIO VIDEO Y PB PR L MONO AUDIO R ...

Page 7: ...1 2 3 1 2 4 ...

Page 8: ......

Page 9: ... ZA 43LH604V ZA 43LH630V ZJ 974 625 245 571 79 4 10 7 9 2 49LH610V ZA 49LH6107 ZA 49LH604V ZA 49LH630V ZJ 1107 702 282 645 79 4 13 5 11 8 55LH610V ZA 55LH6107 ZA 55LH604V ZA 55LH630V ZJ 1241 775 282 720 63 0 18 0 16 3 1 2 0 D B E C A F G ...

Page 10: ... режима Для полного отключения телевизора отсоедините его от сети питания Модель Удельная мощность рабочего режима Вт см2 Потребляемая мощность изделием в режиме ожидания Вт Потребляемая мощность изделием в выключенном режиме 43LH604V ZA 0 016 0 5 отсутствует 49LH604V ZA 0 013 0 5 отсутствует 55LH604V ZA 0 015 0 5 отсутствует ...

Page 11: ......

Page 12: ... MFL69311643 ...

Page 13: ...s manual carefully before operating your set and retain it for future reference Safety and Reference OWNER S MANUAL LED TV LG LED TV applies LCD screen with LED backlights MFL69311719 P NO MFL69311719 1603 REV00 Printed in Korea ...

Page 14: ...wet hands Additionally if the cord pin is wet or covered with dust dry the power plug completely or wipe dust off You may be electrocuted due to excess moisture Make sure to connect Mains cable to compliant AC mains socket with Grounded earth pin Except for devices which are not grounded on earth Otherwise possibility you may be electrocuted or injured Insert power cable plug completely into wall ...

Page 15: ...metal objects conductors like a metal chopstick cutlery screwdriver between power cable plug and inputWall Socket while it is connected to the input terminal on the wall Additionally do not touch the power cable right after plugging into the wall input terminal You may be electrocuted Depending on model Do not put or store inflammable substances near the product There is a danger of combustion exp...

Page 16: ...ust can cause fire hazard and insulation deterioration can cause electric leakage shock fire Apparatus shall not be exposed to dripping or splashing and no objects filled with liquids such as vases shall be placed on the apparatus Do not install this product on a wall if it could be exposed to oil or oil mist This may damage the product and cause it to fall If water enters or comes into contact wi...

Page 17: ...s fix it carefully so as not to drop Only use the attachments accessories specified by the manufacturer When installing the antenna consult with a qualified service technician If not installed by a qualified technician this may create a fire hazard or an electric shock hazard We recommend that you maintain a distance of at least 2 to 7 times the diagonal screen size when watchingTV If you watchTV ...

Page 18: ...inue use of the appliance and have the cord replaced with an exact replacement part by an authorized servicer Prevent dust collecting on the power plug pins or outlet This may cause a fire hazard Protect the power cord from physical or mechanical abuse such as being twisted kinked pinched closed in a door or walked upon Pay particular attention to plugs wall outlets and the point where the cord ex...

Page 19: ...ured dots red blue or green at a size of 1 ppm on the panel This does not indicate a malfunction and does not affect the performance and reliability of the product This phenomenon also occurs in third party products and is not subject to exchange or refund You may find different brightness and color of the panel depending on your viewing position left right top down This phenomenon occurs due to t...

Page 20: ...o reduce the electromagnetic interference in the power cord Wind the power cord on the ferrite core once Wall side TV side 10 cm 2 cm This SmartTV is forVOD watching service some smart functions may not be supported including web browser Only LH57 CAUTION Do not use any unapproved items to ensure the safety and product life span Any damage or injuries caused by using unapproved items are not cover...

Page 21: ...pending on model You can simply operate theTV functions pressing or moving the button NOTE LH57 59 series does not have a Joystick functions but has only a power On Off button Joystick Button Dome Button or Basic functions Power On Press Power Off Press and hold 1 Volume Control Programmes Control 1 All running apps will close and any recording in progress will stop Adjusting the menu When theTV i...

Page 22: ...ular to the floor When you attach theTV to other building materials please contact qualified personnel LG recommends that wall mounting be performed by a qualified professional installer We recommend the use of LG s wall mount bracket LG s wall mount bracket is easy to move with cables connected When you do not use LG s wall mount bracket please use a wall mount bracket where the device is adequat...

Page 23: ...rovided item Protective cover When installing the wall mounting bracket it is recommended to cover the stand hole using tape in order to prevent the influx of dust and insects Depending on model Stand hole When attaching a wall mounting bracket to theTV insert the wall mount spacers into theTV wall mount holes to adjust the vertical angle of theTV Only when the item of the following form is provid...

Page 24: ...Antenna connection Connect theTV to a wall antenna socket with an RF cable 75 Ω Use a signal splitter to use more than 2TVs If the image quality is poor install a signal amplifier properly to improve the image quality If the image quality is poor with an antenna connected try to realign the antenna in the correct direction An antenna cable and converter are not supplied Supported DTV Audio MPEG Do...

Page 25: ...criptions function will be enabled Depending on model 3 Views the information of the current programme and screen Depending on model 3 By zooming in on the selected area you can view it in full screen Depending on model 3 Resizes an image Depending on model B Number buttons Enters numbers Alphabet buttons Enters letters Depending on model Accesses the saved programmes list Space Opens an empty spa...

Page 26: ...u can view it in full screen Depending on model 15 Set the sleep timer Depending on model 15 Selects the MHPTV menu source Depending on model 16 Returns to LIVETV Depending on model Control buttons Controls media contents Coloured buttonsThese access special functions in some menus Red Green Yellow Blue Licenses Supported licenses may differ by model For more information about licenses visit www l...

Page 27: ...n model If there is no signal while theTV is on theTV will turn off automatically after 15 minutes of inactivity When connecting to the PC HDMI No signal or Invalid Format is displayed Turn theTV off on using the remote control Reconnect the HDMI cable Restart the PC with theTV on Specifications Wireless module specification As band channels can vary per country the user cannot change or adjust th...

Page 28: ...talTV AnalogueTV Satellite Terrestrial Cable Terrestrial Cable Television system DVB S S2 DVB T DVB T2 DVB C PAL SECAM B G D K I SECAM L Channel coverage Band 950 2150 Mhz VHF III 174 230 Mhz UHF IV 470 606 Mhz UHFV 606 862 Mhz S Band II 230 300 Mhz S Band III 300 470 Mhz 46 862 Mhz 46 862 Mhz Maximum number of storable programmes 6 000 2 000 LH57 3 000 LH59 LH60 LH61 External antenna impedance 75...

Page 29: ......

Page 30: ...Record the model number and serial number of the TV Refer to the label on the back cover and quote this information to your dealer when requiring any service MODEL SERIAL ...

Page 31: ...OWNER S MANUAL EXTERNAL CONTROL DEVICE SETUP Please read this manual carefully before operating the set and retain it for future reference www lg com ...

Page 32: ...7E Simplink R C Button 1E FAV Favorite Channel R C Button 8E Forward R C Button 20 Text Teletext R C Button 8F Rewind R C Button 21 T Opt Teletext Option R C Button AA Info R C Button 28 Return BACK R C Button AB Program Guide R C Button 30 AV Audio Video Mode R C Button B0 Play R C Button 39 Caption Subtitle R C Button B1 ꕗ Stop File List R C Button 40 Λ Arrow Key Cursor Up R C Button B5 RECENT R...

Page 33: ...232C IN CONTROL SERVICE TV TV PC TV PC SERVICE ONLY RS 232C IN CONTROL SERVICE RS 232C IN CONTROL SERVICE 1 3 2 1 3 2 LGTV supports PL2303 chip based Vendor ID 0x0557 Product ID 0x2008 USB to serial converter which is not made nor provided by LG It can be purchased from computer stores that carry accessories for IT support professionals RS 232C With RS232C Cable DE9 D Sub 9pin Type You need to pur...

Page 34: ...C TV PC SERVICE ONLY RS 232C IN CONTROL SERVICE RS 232C IN CONTROL SERVICE 1 3 2 1 3 2 Customer Computer RS 232C configurations 3 Wire Configurations Not standard 1 6 5 9 PC TV RXD 2 2 TXD TXD 3 1 RXD GND 5 3 GND OR RXD 3 2 TXD TXD 2 1 RXD GND 5 3 GND D Sub 9 Phone RS 232C Serial port Set ID For Set ID number see Real Data Mapping on p 6 1 Press SETTINGS to access the main menus 2 Press the Naviga...

Page 35: ... to 05 06 Contrast k g 00 to 64 20 Tune Command m a p 9 07 Brightness k h 00 to 64 21 Channel Programme Add Del Skip m b 00 to 01 08 Color Colour k i 00 to 64 22 Key m c Key Codes 09 Tint k j 00 to 64 23 Control Backlight Control Panel Light m g 00 to 64 10 Sharpness k k 00 to 32 24 Input select Main x b p 11 11 OSD Select k l 00 to 01 25 3D Only 3D models x t p 11 12 Remote Control Lock Mode k m ...

Page 36: ... OK Data x The set transmits ACK acknowledgement based on this format when receiving normal data At this time if the data is data read mode it indicates present status data If the data is data write mode it returns the data of the PC computer Error Acknowledgement Command2 Set ID NG Data x The set transmits ACK acknowledgement based on this format when receiving abnormal data from non viable funct...

Page 37: ...ull wide mode may work differently based on model and is supported for DTV fully and ATV AV partially 03 Screen Mute Command k d To select screen mute on off Transmission k d Set ID Data Cr Data 00 Screen mute off Picture on Video mute off 01 Screen mute on Picture off 10 Video mute on Ack d Set ID OK NG Data x In case of video mute on only TV will display On Screen Display OSD But in case of Scre...

Page 38: ... not turn on by power on key of IR Local Key 13 Treble Command k r To adjust treble You can also adjust in the AUDIO menu Transmission k r Set ID Data Cr Data Min 00 to Max 64 Ack r Set ID OK NG Data x Depending on model 14 Bass Command k s To adjust Bass You can also adjust in the AUDIO menu Transmission k s Set ID Data Cr Data Min 00 to Max 64 Ack s Set ID OK NG Data x Depending on model 15 Bala...

Page 39: ...Antenna TV 00 Result ma 00 00 0a 00 2 Tune to the digital antenna DVB T Channel 01 Set ID All 00 Data 00 01 Channel Data is 1 00 01 Data 02 Digital Antenna TV 10 Result ma 00 00 01 10 3 Tune to the satellite DVB S Channel 1000 Set ID All 00 Data 00 01 Channel Data is 1000 03 E8 Data 02 Digital Satellite TV 40 Result ma 00 03 E8 40 Ack a Set ID OK Data 00 Data 01 Data 02 x a Set ID NG Data 00 x For...

Page 40: ...t care in Satellite Data 03 High byte Channel Data Data 04 Low byte Channel Data Data 05 Input Source Digital Satellite for Japan 02 Antenna TV DTV 07 BS Broadcasting Satellite 08 CS1 Communication Satellite 1 09 CS2 Communication Satellite 2 Tune Command Examples 1 Tune to the digital antenna ISDB T channel 17 1 Set ID All 00 Data 00 Don t know Physical 00 Data 01 02 Major is 17 00 11 Data 03 04 ...

Page 41: ...ng If Data 00 is 00 3D On or 03 2D to 3D Data 03 works when 3D Mode Genre is manual only All 3D pattern options Data 01 may not be available according to broadcasting video signal Data 00 Data 01 Data 02 Data 03 00 O O O 01 X X X 02 X X X 03 X O O X don t care Ack t Set ID OK Data00 Data01 Data02 Data03 x t Set ID NG Data00 x 26 Extended 3D Command x v only 3D models Depending on model To change 3...

Page 42: ...ICE SETUP 27 Auto Configure Command j u Depending on model To adjust picture position and minimize image shaking automatically It works only in RGB PC mode Transmission j u Set ID Data Cr Data 01 Run Auto Configure Ack u Set ID OK NG Data x ...

Reviews: