background image

4

ENG

ENGLISH

4

EXTERNAL CONTROL DEVICE SETUP

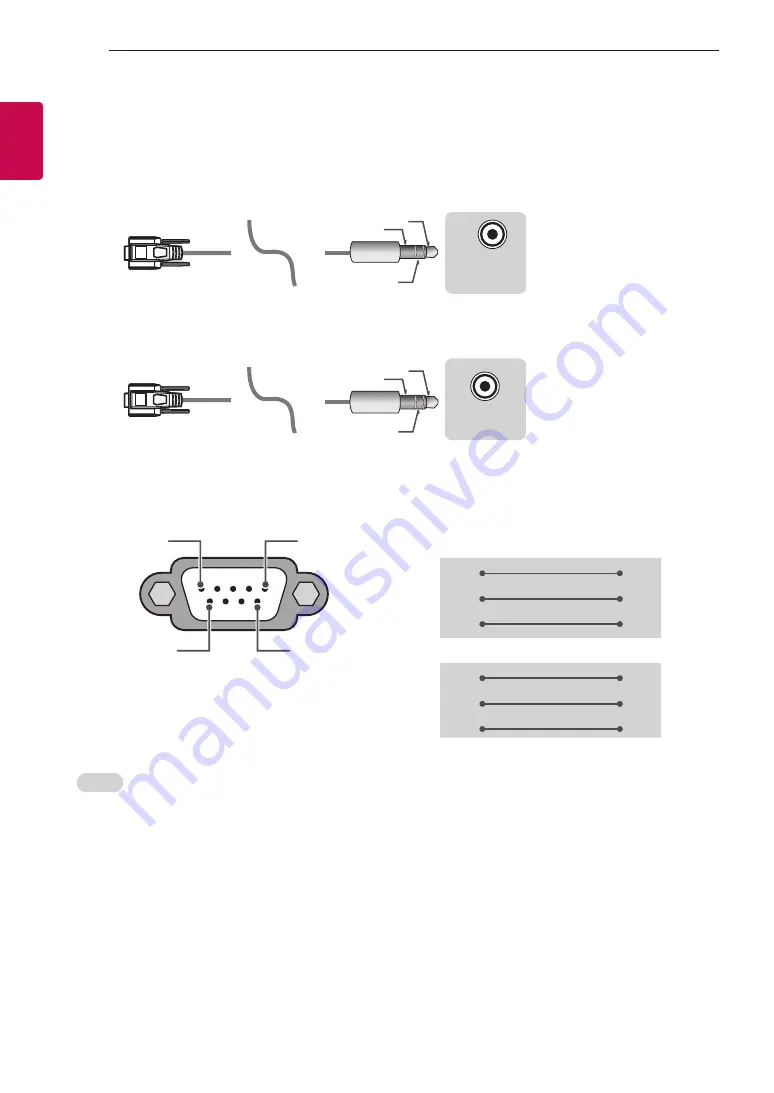
Phone jack Type

• 

You need to purchase the phone-jack to RS-232 cable required for the connection between the PC and 

the TV, which is specified in the manual.

*  For other models, connect to the USB port.
*  The connection interface may differ from your TV.

USB IN

(TV)

(PC)

(PC)

RS-232C IN

(CONTROL & SERVICE)

(TV)

(TV)

(PC)

(TV)

(PC)

SERVICE ONLY

RS-232C IN

(CONTROL & SERVICE)

RS-232C IN

(CONTROL & SERVICE)

1

3

2

1

3

2

- or

USB IN

(TV)

(PC)

(PC)

RS-232C IN

(CONTROL & SERVICE)

(TV)

(TV)

(PC)

(TV)

(PC)

SERVICE ONLY

RS-232C IN

(CONTROL & SERVICE)

RS-232C IN

(CONTROL & SERVICE)

1

3

2

1

3

2

Customer Computer

RS-232C configurations

3-Wire Configurations(Not standard)

1

6

5

9

PC

TV

RXD

2

2

TXD

TXD

3

1

RXD

GND

5

3

GND

OR

RXD

3

2

TXD

TXD

2

1

RXD

GND

5

3

GND

D-Sub 9

Phone

RS-232C

(Serial port)

Set ID

For Set ID number, see "

Real Data Mapping

" on p.6

1. 

Press 

SETTINGS

 to access the main menus.

2. 

Press the Navigation buttons to scroll to 

(*General → About this TV or OPTION)

 and press 

Ok

.

3. 

Press the Navigation buttons to scroll to 

SET ID

 and press 

Ok

.

4. 

Scroll left or right to select a set ID number and select 

CLOSE

. The adjustment range is 1-99.

5. 

When you are finished, press 

EXIT

.

* (Depending on model)

Summary of Contents for 43LF5700-TA

Page 1: ...P No MFL68703213 1501 REV00 Printed in Korea LED TV LF57 AAA X 6 M4 X L14 40LF57 X 8 M4 X L14 43LF57 a b www lg com ...

Page 2: ...i ...

Page 3: ...b a a b a b a b 1 2 3 4 A 4 B 43LF57 40LF57 40LF57 5 A 5 B 43LF57 6 1 ...

Page 4: ...A B 2 IN 2 MHL USB IN H P OUT IN 2 MHL USB IN H P OUT A 40LF57 43LF57 IN 2 MHL USB IN H P OUT USB IN ANTENNA CABLE IN Y VIDEO A ...

Page 5: ...IN 2 MHL USB IN H P OUT IN 2 MHL USB IN H P OUT OPTICAL DIGITAL AUDIO OUT 1 IN Y VIDEO ANTENNA CABLE IN MONO VIDEO Y VIDEO Y VIDEO VIDEO AUDIO VIDEO MONO VIDEO Y B 43LF57 LF57 T LF57 Y ...

Page 6: ...ANTENNA CABLE IN OPTICAL DIGITAL AUDIO OUT 1 IN AUDIO VIDEO VIDEO MONO AUDIO L R VIDEO MONO AUDIO L R IN 2 MHL USB IN H P OUT B LF57 O ...

Page 7: ...3 5 1 2 4 3 4 ...

Page 8: ... 40LF570T TA 40LF570Y TA 40LF5710 TB 40LF571T TB 40LF571Y TB 43LF5700 TA 43LF570T TA 43LF570Y TA 43LF5710 TB 43LF571T TB 43LF571Y TB A x B x C mm 911 x 581 x 189 973 x 625 x 193 A x E x F mm 911 x 528 x 55 3 973 x 573 x 55 1 D kg 9 6 12 7 D G kg 7 5 10 2 MFL68703213 ...

Page 9: ...www lg com Please read this manual carefully before operating your set and retain it for future reference Safety and Reference OWNER S MANUAL MFL68761004 P NO MFL68761004 1501 REV00 Printed in Korea ...

Page 10: ...dry the power plug completely or wipe dust off You may be electrocuted due to excess moisture Make sure to connect Mains cable to compliant AC mains socket with Grounded earth pin Except for devices which are not grounded on earth Otherwise possibility you may be electrocuted or injured Insert power cable plug completely into wall socket otherwise if not secured completely into socket fire ignitio...

Page 11: ... You may be electrocuted Depending on model Do not put or store inflammable substances near the product There is a danger of combustion explosion or fire due to careless handling of the inflammable substances Do not drop metallic objects such as coins hair pins chopsticks or wire into the product or inflammable objects such as paper and matches Children must pay particular attention Electrical sho...

Page 12: ...ult in fire electric shock malfunction or product deformation Never Disassemble the AC adapter or power cord This may result in fire or electric shock CAUTION Install the product where no radio wave occurs There should be enough distance between an outside antenna and power lines to keep the former from touching the latter even when the antenna falls This may cause an electric shock Do not install...

Page 13: ...lug to the wall outlet Do not use the power plug for switch It may cause mechanical failure or could give an electric shock Please follow the installation instructions below to prevent the product from overheating The distance between the product and the wall should be more than 10 cm Do not install the product in a place with no ventilation e g on a bookshelf or in a cupboard Do not install the p...

Page 14: ...ure you turn the power off first Then unplug the power cables antenna cables and all connecting cables TheTV set or power cord may be damaged which may create a fire hazard or cause electric shock When moving or unpacking the product work in pairs because the product is heavy Otherwise this may result in injury Contact the service centre once a year to clean the internal parts of the product Accum...

Page 15: ...t Do not use high voltage electrical goods near theTV e g electric mosquito swatter This may result in product malfunction Viewing 3D imaging Only 3D models WARNING Viewing Environment ViewingTime When watching 3D contents take 5 15 minute breaks every hour Viewing 3D contents for a long period of time may cause headache dizziness fatigue or eye strain Those that have a photosensitive seizure or c...

Page 16: ...hed Always use a soft clean piece of cloth when wiping the lenses Do not scratch the lenses of the 3D glasses with sharp objects or clean wipe them with chemicals Preparing NOTE Image shown may differ from yourTV YourTV s OSD On Screen Display may differ slightly from that shown in this manual The available menus and options may differ from the input source or product model that you are using New ...

Page 17: ... use any chemicals as this may damage the product Do not spray liquid onto the surface If water enters theTV it may result in fire electric shock or malfunction Power cord Remove the accumulated dust or dirt on the power cord regularly Lifting and moving the TV Please note the following advice to prevent theTV from being scratched or damaged and for safe transportation regardless of its type and s...

Page 18: ...oystick button and push it to the up down left or right be careful not to press the joystick button If you press the joystick button first you may not be able to adjust the volume level and saved programmes Mounting on a table Depending on model 1 Lift and tilt theTV into its upright position on a table Leave a 10 cm minimum space from the wall for proper ventilation 10 cm 10 cm 10 cm 10cm 10 cm 2...

Page 19: ...n obtain additional accessories from your local dealer Mounting on a wall Attach an optional wall mount bracket at the rear of theTV carefully and install the wall mount bracket on a solid wall perpendicular to the floor When you attach theTV to other building materials please contact qualified personnel LG recommends that wall mounting be performed by a qualified professional installer We recomme...

Page 20: ... spacers into theTV wall mount holes to adjust the vertical angle of theTV Only when the item of the following form is provided Provided Item Wall Mount Spacer Connections notifications Connect various external devices to theTV and switch input modes to select an external device For more information of external device s connection refer to the manual provided with each device Available external de...

Page 21: ...s for HDMI ULTRA HD Deep Colour 4K 50 60 Hz Support Format Resolution Frame rate Hz Colour Depth Chroma Sampling 8 bit 10 bit 12 bit 3840 x 2160p 4096 x 2160p 50 00 59 94 60 00 YCbCr 4 2 0 YCbCr 4 2 0 YCbCr 4 2 2 YCbCr 4 4 4 RGB 4 4 4 CI module connection Depending on model View the encrypted pay services in digitalTV mode Check if the CI module is inserted into the PCMCIA card slot in the right d...

Page 22: ...ons These buttons are used for teletext Views the information of the current programme and screen Accesses the main menus 6 Use this to view 3D video option Depending on model Accesses the Quick menus Navigation buttons up down left right Scrolls through menus or options Selects menus or options and confirms your input Returns to the previous level Clears on screen displays and returns toTV viewin...

Page 23: ...n source licenses that is contained in this product please visithttp opensource lge com In addition to the source code all referred license terms warranty disclaimers and copyright notices are available for download LG Electronics will also provide open source code to you on CD ROM for a charge covering the cost of performing such distribution such as the cost of media shipping and handling upon e...

Page 24: ...an be set via Gamma method etc Colour Management System This is a system that experts use when they adjust colour with a test pattern They can select from six colour areas Red Green Blue Cyan Magenta Yellow without affecting other colours For normal images adjustments may not result in noticeable colour changes Super Resolution Depending on model Adjusts the resolution to make dim and blurred imag...

Page 25: ...xternal Speaker Optical Audio Out Optical Depending on model Sound is output through the speaker connected to the optical port SimpLink is supported To use Digital Sound Out SETTINGS AUDIO Sound Out External Speaker Optical Audio Out Optical InternalTV Speaker Audio Out Optical Digital Sound Out Depending on model Sets up Digital Sound Out Item Audio Input Digital Audio Ouput Auto MPEG Dolby Digit...

Page 26: ...es When you power off theTV all connected devices are turned off Sync Power on When the equipment with SIMPLINK function connected HDMI terminal starts to play theTV will automatically turn on Speaker Depending on model Select speaker either on the home theatre unit or theTV To set password SETTINGS LOCK Set Password Sets or changes theTV password The initial password is set to 0000 To return Fact...

Page 27: ...EG 1 MPEG 2 Audio Dolby Digital MPEG 1 Layer I MPEG 1 Layer II DVD LPCM mp4 m4v mov Video MPEG 2 MPEG 4 Part2 DivX3 11 DivX4 DivX5 DivX6 XVID H 264 AVC Audio AAC MPEG 1 Layer III MP3 DTS mkv Video MPEG 2 MPEG 4 Part2 DivX3 11 DivX4 DivX5 DivX6 XVID H 264 AVC Audio HE AAC Dolby Digital MPEG 1 Layer III MP3 DTS LPCM motion JPEG Video MJPEG Audio LPCM ADPCM mpg mpeg mpe Video MPEG 1 MPEG 2 Audio MPEG...

Page 28: ...ce setup information please visit www lg com Troubleshooting Cannot control theTV with the remote control Check the remote control sensor on the product and try again Check if there is any obstacle between the product and the remote control Check if the batteries are still working and properly installed to to No image display and no sound is produced Check if the product is turned on Check if the ...

Page 29: ...nts is switched into the 3D screen automatically The method for 3D digital broadcast may differ depending on the signal environment If video is not switched automatically into 3D manually convert the settings to view 3D images Input Signal Resolution Horizontal Frequency kHz Vertical Frequency Hz Playable 3D video format HDMI 720p 1280 x 720 37 5 50 Side by Side half Top and Bottom 45 60 75 50 Fra...

Page 30: ...DMI PC supported mode Use HDMI IN 1 for PC mode Except for UF67 Resolution Horizontal Frequency kHz Vertical Frequency Hz 640 x 350 31 468 70 09 720 x 400 31 469 70 08 640 x 480 31 469 59 94 800 x 600 37 879 60 31 1024 x 768 48 363 60 00 1152 x 864 54 348 60 053 1360 x 768 47 712 60 015 1280 x 1024 63 981 60 020 1920 x 1080 67 50 60 00 3840 x 2160 54 24 00 3840 x 2160 56 25 25 00 3840 x 2160 67 5 ...

Page 31: ......

Page 32: ...Record the model number and serial number of the TV Refer to the label on the back cover and quote this information to your dealer when requiring any service MODEL SERIAL Only DTV ...

Page 33: ...OWNER S MANUAL EXTERNAL CONTROL DEVICE SETUP Please read this manual carefully before operating the set and retain it for future reference www lg com ...

Page 34: ... Simplink R C Button 1A Q View Flashback R C Button 8E Forward R C Button 1E FAV Favorite Channel R C Button 8F Rewind R C Button 20 Text Teletext R C Button AA Info R C Button 21 T Opt Teletext Option R C Button AB Program Guide R C Button 28 Return BACK R C Button B0 Play R C Button 30 AV Audio Video Mode R C Button B1 ꕗ Stop File List R C Button 39 Caption Subtitle R C Button BA ꕘ Freeze Slow P...

Page 35: ...232C IN CONTROL SERVICE TV TV PC TV PC SERVICE ONLY RS 232C IN CONTROL SERVICE RS 232C IN CONTROL SERVICE 1 3 2 1 3 2 LGTV supports PL2303 chip based Vendor ID 0x0557 Product ID 0x2008 USB to serial converter which is not made nor provided by LG It can be purchased from computer stores that carry accessories for IT support professionals RS 232C With RS232C Cable DE9 D Sub 9pin Type You need to pur...

Page 36: ...C TV PC SERVICE ONLY RS 232C IN CONTROL SERVICE RS 232C IN CONTROL SERVICE 1 3 2 1 3 2 Customer Computer RS 232C configurations 3 Wire Configurations Not standard 1 6 5 9 PC TV RXD 2 2 TXD TXD 3 1 RXD GND 5 3 GND OR RXD 3 2 TXD TXD 2 1 RXD GND 5 3 GND D Sub 9 Phone RS 232C Serial port Set ID For Set ID number see Real Data Mapping on p 6 1 Press SETTINGS to access the main menus 2 Press the Naviga...

Page 37: ... to 05 06 Contrast k g 00 to 64 20 Tune Command m a p 9 07 Brightness k h 00 to 64 21 Channel Programme Add Del Skip m b 00 to 01 08 Color Colour k i 00 to 64 22 Key m c Key Codes 09 Tint k j 00 to 64 23 Control Backlight Control Panel Light m g 00 to 64 10 Sharpness k k 00 to 32 24 Input select Main x b p 11 11 OSD Select k l 00 to 01 25 3D Only 3D models x t p 11 12 Remote Control Lock Mode k m ...

Page 38: ... OK Data x The set transmits ACK acknowledgement based on this format when receiving normal data At this time if the data is data read mode it indicates present status data If the data is data write mode it returns the data of the PC computer Error Acknowledgement Command2 Set ID NG Data x The set transmits ACK acknowledgement based on this format when receiving abnormal data from non viable funct...

Page 39: ...ull wide mode may work differently based on model and is supported for DTV fully and ATV AV partially 03 Screen Mute Command k d To select screen mute on off Transmission k d Set ID Data Cr Data 00 Screen mute off Picture on Video mute off 01 Screen mute on Picture off 10 Video mute on Ack d Set ID OK NG Data x In case of video mute on only TV will display On Screen Display OSD But in case of Scre...

Page 40: ... not turn on by power on key of IR Local Key 13 Treble Command k r To adjust treble You can also adjust in the AUDIO menu Transmission k r Set ID Data Cr Data Min 00 to Max 64 Ack r Set ID OK NG Data x Depending on model 14 Bass Command k s To adjust Bass You can also adjust in the AUDIO menu Transmission k s Set ID Data Cr Data Min 00 to Max 64 Ack s Set ID OK NG Data x Depending on model 15 Bala...

Page 41: ...Antenna TV 00 Result ma 00 00 0a 00 2 Tune to the digital antenna DVB T Channel 01 Set ID All 00 Data 00 01 Channel Data is 1 00 01 Data 02 Digital Antenna TV 10 Result ma 00 00 01 10 3 Tune to the satellite DVB S Channel 1000 Set ID All 00 Data 00 01 Channel Data is 1000 03 E8 Data 02 Digital Satellite TV 40 Result ma 00 03 E8 40 Ack a Set ID OK Data 00 Data 01 Data 02 x a Set ID NG Data 00 x For...

Page 42: ... Channel Data Data 04 Low byte Channel Data Data 05 Input Source Digital Satellite for Japan 02 Antenna TV DTV 07 BS Broadcasting Satellite 08 CS1 Communication Satellite 1 09 CS2 Communication Satellite 2 Tune Command Examples 1 Tune to the digital antenna ISDB T channel 17 1 Set ID All 00 Data 00 Don t know Physical 00 Data 01 02 Major is 17 00 11 Data 03 04 Minor Branch is 1 00 01 Data 05 Digit...

Page 43: ...ng If Data 00 is 00 3D On or 03 2D to 3D Data 03 works when 3D Mode Genre is manual only All 3D pattern options Data 01 may not be available according to broadcasting video signal Data 00 Data 01 Data 02 Data 03 00 O O O 01 X X X 02 X X X 03 X O O X don t care Ack t Set ID OK Data00 Data01 Data02 Data03 x t Set ID NG Data00 x 26 Extended 3D Command x v only 3D models Depending on model To change 3...

Page 44: ...OL DEVICE SETUP 27 Auto Configure Command j u Depending on model To adjust picture position and minimize image shaking automatically It works only in RGB PC mode Transmission j u Set ID Data Cr Data 01 To set Ack u Set ID OK NG Data x ...

Reviews: