background image

- 10 -

ADJUSTMENT INSTRUCTIONS

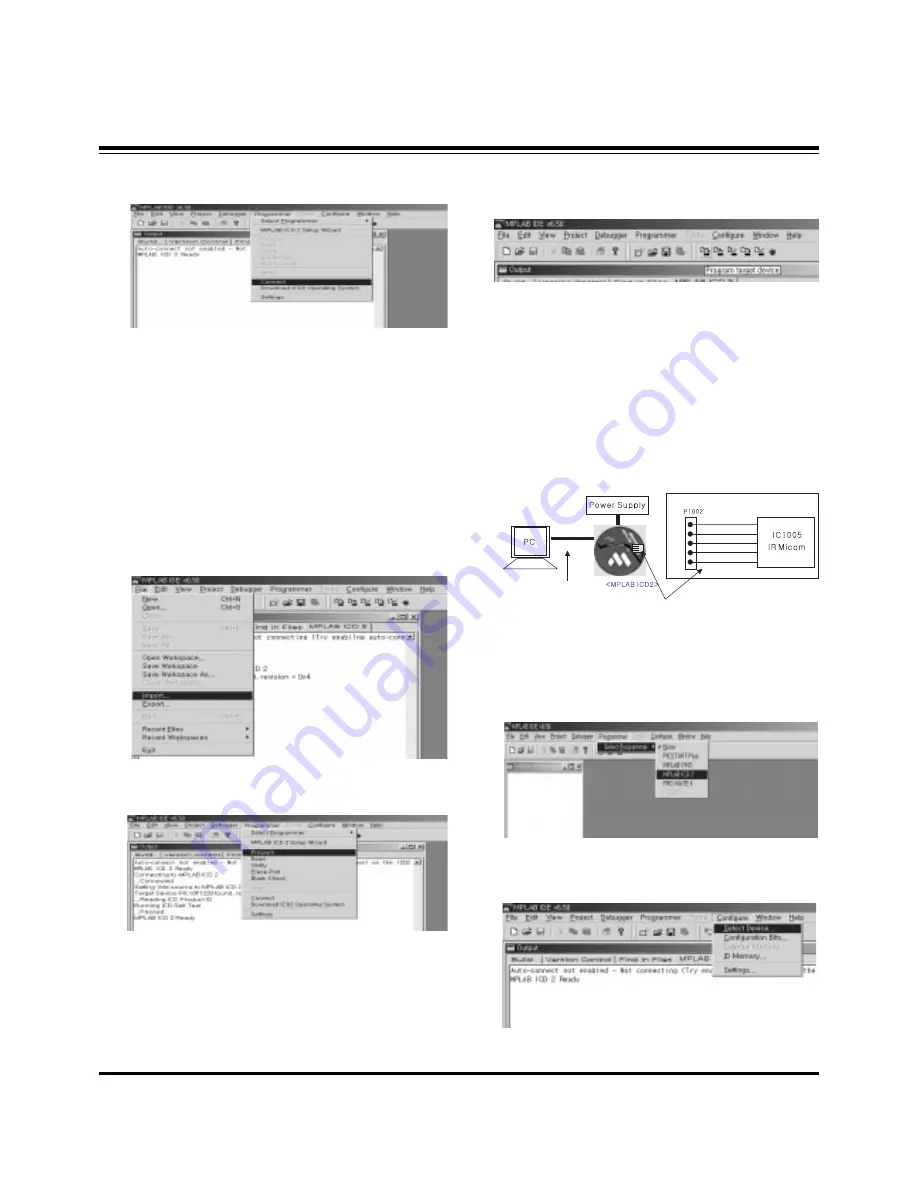
(4) Select "Programmer -> Connect".

When connected with the Micom, the display message on
the Output window appears as below. 

(5) Select "File -> Import", select the Work HEX file and open.

(6) Select "Programmer -> Program".

(7) Download is executed and about 5 seconds later, the

"Programming succeeded" message is displayed on the
Output window and the Download process is ended. 

(8) The execution of process (6) is convenient when using the

short-cut icon. 

5. Gemstar IR Micom Download 

5-1. Preparation for Adjustment

(1) As shown below, connect the MPLAB ICD2 equipment, PC

and Digital Connector.

(2) Turn on the MPLAB ICD2 POWER Supply.
(3) After turn on the PC and MONITOR, select the ‘MPLAB

IDE’ from the screen.

5-2. Adjustment Sequence

(1) When the program is executed, select the MPLAB ICD2

from "Programmer -> Select Programmer" . 

(2) Select "Configure -> Select Device".

+13V

+5V

GND
Data
Clock

<Digital Board>

Connect the MPLAB ICD2 and connector of Digital Board

Connect the RS-232 or USB Cable

Connecting to MPLAB ICD 2

...Connected

Setting Vdd source to MPLAB ICD 2

Target Device PIC18F1220 found, revision = 0x4 

...Reading ICD Product ID

Running ICD Self Test

...Passed

MPLAB ICD 2 Ready

Summary of Contents for 42PX4D

Page 1: ...L CAUTION BEFORE SERVICING THE CHASSIS READ THE SAFETY PRECAUTIONS IN THIS MANUAL CHASSIS AF 05FB MODEL 42PX4D 42PX4D UB CANADA http biz lgservice com USA http www lgservice com http lgservice com techsup html POWER TV GUIDE ...

Page 2: ...to the AC plug prongs tied together and touch other ohm meter lead in turn to each exposed metallic parts such as antenna terminals phone jacks etc If the exposed metallic part has a return path to the chassis the measured resistance should be between 1MΩ and 5 2MΩ When the exposed metal has no return path to the chassis the reading must be infinite An other abnormality exists that must be correct...

Page 3: ...TION OF CONTROLS 4 SPECIFICATIONS 8 ADJUSTMENT INSTRUCTIONS 9 PRINTED CIRCUIT BOARDS 18 BLOCK DIAGRAM 23 EXPLODED VIEW 24 EXPLODED VIEW PARTS LIST 25 REPLACEMENT PARTS LIST 26 SCHEMATIC DIAGRAM TABLE OF CONTENTS ...

Page 4: ... MENU Button TV VIDEO Button VOLUME F F G G Buttons CHANNEL E E D D Buttons INDEX Switches LED Display on or off TV GUIDE Button Remote Control Sensor Power Standby Indicator Illuminates orange in standby mode When the TV is turned on the indicator will blink green for 3 4 seconds before the picture is seen POWER Button Controls Controls Front Panel Controls Front Panel Controls DESCRIPTION OF CON...

Page 5: ...ut Connect digital audio from various types of equipment Note In standby mode these ports will not work DVD DTV Input Component 1 2 Connect a component video audio device to these jacks Monitor Output Connect a second TV or Monitor Remote Control Port Connect your wired remote control here S Video Input Connect S Video out from an S VIDEO device to the S VIDEO input CABLE Input Connect cable signa...

Page 6: ...e SWAP Exchanges the main sub images in PIP Twin picture mode EZ PIC Selects a factory preset picture mode depending on the viewing environment ADJUST Adjusts screen position size and phase in PC mode FREEZE Freezes the currently viewed picture Main picture is frozen in PIP Twin picture mode TV VIDEO External input modes rotate in regular sequence Antenna Cable Video Front Video Component 1 2 RGB ...

Page 7: ...Text1 4 THUMBSTICK Up Down Left Right ENTER Allows you to navigate the on screen menus and adjust the system settings to your pref erence CHANNEL UP DOWN Selects available channels found during Manual scan PAGE UP PAGE DOWN Moves from one full set of screen infor mation to the next one SAP Selects MTS sound Mono Stereo and SAP in Analog mode Change the audio lan guage in DTV mode EZ SOUND Selects ...

Page 8: ...0 256 steps of each R G and B 32 104 F 0 40 C Less than 80 6561 feet 2000m 49 3 1252 27 8 705 5 11 3 286 7 85 3 38 7 1024x768 Dot Width inches mm Height inches mm Depth inches mm Weight pounds kg Resolution Power requirement Television System Program Coverage External Antenna Impedance Color Operating Temperature Range Operating Humidity Range Maximum Elevation 42PX4D UB 42PX5D UB SPECIFICATIONS ...

Page 9: ...er Y Key Display the 100 Full White Pattern Set is activated HEAT RUN without signal generator in this mode If you turn on a still screen more than 20 minutes Especially Digital pattern 13 CH Cross Hatch Pattern an afterimage may occur in the black level part of the screen 3 EPLD Download 1 Test Equipment PC Jig for download 2 Connect the power of VSC B D 3 Execute download program iMPACK of PC 4 ...

Page 10: ...ownload 5 1 Preparation for Adjustment 1 As shown below connect the MPLAB ICD2 equipment PC and Digital Connector 2 Turn on the MPLAB ICD2 POWER Supply 3 After turn on the PC and MONITOR select the MPLAB IDE from the screen 5 2 Adjustment Sequence 1 When the program is executed select the MPLAB ICD2 from Programmer Select Programmer 2 Select Configure Select Device 13V 5V GND Data Clock Digital Bo...

Page 11: ...8 The execution of process 6 is convenient when using the short cut icon 6 POD Certificate Download IEEE1394 DTCP Download 6 1 Preparation for Adjustment 1 Connect the MEMORY JIG and PC 2 Turn on the JIG MAIN POWER SWITCH 3 After turn on the PC and MONITOR execute the Certificate Downloader v1 4 from the screen 6 2 Adjustment Sequence 1 After open the Certificate Downloader v1 4 enter Connection s...

Page 12: ...ndow appears and select the Private key applied to the SET The Private Key file name is on the Label of the Digital Board 6 When the Dialog window appears click OK and the write work will begin 7 When completed click CP Data Download OK When CP Data Download OK does not appear certificate has not Download correctly SET is rebooted and certificate Download work must be repeated 8 Now you may begin ...

Page 13: ...ogram 2 G LINK To PC Card Serial GLINK CN1202 3 VBI Inserter Norpak TES3 Guide Data Discharge Equipment In case of without the VBI Inserter TES3 a VCR may be used 7 2 Preparation for Adjustments 1 In case of with VBI Inserter TES3 Signal uses Cable input and set as below 2 In case of without VBI Inserter TES3 VCR uses Cable input and set as below Factory Test S W must be set to GlinkTo PC Card ON ...

Page 14: ...Enter the EZ adjust menu by pressing Adjust on the Service Remote Control S R C 3 Go to number 2 Cable Check and press the Right key G 4 Confirm items below Name Descrambler Check CableCARD OOB Path FDC_SNR Video Signal Normal OK CableCARDTM is inserted OK Lock OK 20dB above Normal Screen Defective Not OK CableCARDTM is removed Not OK Unlock Not OK 20dB under Black Screen No Picture ...

Page 15: ... read operated in DOS mode 10 2 EDID DATA for AF 05FB EDID for HDMI 1 DDC Display Data Channel Data EDID table 0 1 2 3 4 5 6 7 8 9 A B C D E F _______________________________________________________ 00 00 FF FF FF FF FF FF 00 1E 6D 01 00 01 01 01 01 10 00 0F 01 03 80 73 41 96 0A CF 74 A3 57 4C B0 23 20 09 48 4C 2F CE 00 31 40 45 40 61 40 01 01 01 01 30 01 01 01 01 01 01 01 1D 00 72 51 D0 1E 20 6E ...

Page 16: ...psis AD9883A Set adjustment to set the black level and the Gain of optimum with an automatic movement from the analog digital converter 11 2 Test Equipment Service R C 801GF 802B 802F 802R or MSPG925FA Pattern Generator 720P The Horizontal 100 Color Bar Pattern output will be possible and the output level will accurately have to be revised with 0 7 0 1Vp p 11 3 Adjustment 1 Select Component1 or Co...

Page 17: ...Input connect the HDMI 4 After attaching sensor to center of screen select 5 White Balance of Ez Adjust by pressing the ADJ KEY on the Service R C Then enter adjustment mode by pressing the Right KEY G 5 Adjust the Hight Light using R Gain B Gain B Gain and adjust the Low Light using R Cut G Cut B Cut 6 Adjust using Volume KEY DU 42PX41X R Gain 127 R Cut 63 Fix High Level 150gray Low Level 60gray ...

Page 18: ... 18 PRINTED CIRCUIT BOARD MAIN DIGITAL TOP ...

Page 19: ... 19 PRINTED CIRCUIT BOARD MAIN DIGITAL BOTTOM ...

Page 20: ... 20 PRINTED CIRCUIT BOARD MAIN ANALOG TOP ...

Page 21: ... 21 PRINTED CIRCUIT BOARD MAIN ANALOG BOTTOM ...

Page 22: ... 22 PRINTED CIRCUIT BOARD SIDE A V INDEX TOP INDEX BOTTOM POWER LED TOP POWER LED BOTTOM CONTROL SPDIF TOP SPDIF BOTTOM ...

Page 23: ... 23 BLOCK DIAGRAM ...

Page 24: ... 24 EXPLODED VIEW 303 306 304 307 121 120 610 601 600 305 550 560 570 310 302 301 300 240 400 430 205 206 207 200 103 104 580 201 202 203 204 501 520 530 101 102 590 502 ...

Page 25: ... GLASS FILTER 306 4980V01134B SUPPORTER ASSY AL 42PX4D UB 0 8T LEFT 4980V01134C SUPPORTER ASSY AL 42PX4D UB 0 8T LEFT C SKD 307 4980V01132B SUPPORTER ASSY AL 42PX4D UB 0 8T RIGHT 4980V01132C SUPPORTER ASSY AL 42PX4D UB 0 8T RIGHT C SKD 310 5020V01022A BUTTON CONTROL RZ 42PX40 ABS AF 303S 8KEY NON 5020V01022B BUTTON CONTROL DU 42PX51X ABS AF 303S 8KEY TITAN GRAY SKD 400 3809V00513D BACK COVER ASSEM...

Page 26: ...R TP RS232 LOCA NO PART NO DESCRIPTION IC100 IC1000 IC1001 IC1002 IC1003 IC101 IC101 IC101 IC102 IC1100 IC1101 IC112 IC1200 IC1201 IC1202 IC1203 IC1204 IC1301 IC1302 IC1305 IC1500 IC1502 IC1700 IC1701 IC1702 IC1703 IC1705 IC1706 IC200 IC200 IC201 IC201 IC202 IC203 IC203 IC204 IC204 IC205 IC205 IC206 IC207 IC208 IC209 IC300 IC300 0IPRPBM001B 0IMCRSJ001B 0ICTMLG017A 0IMCRFA013A 0IMCRLT002A 0IMCRSJ00...

Page 27: ...HIP 2SC3875S ALY KEC CHIP 2SC3875S ALY KEC CHIP 2SC3875S ALY KEC CHIP 2SA1504S ASY KEC CHIP 2SA1504S ASY KEC LOCA NO PART NO DESCRIPTION Q203 Q204 Q205 Q206 Q207 Q208 Q209 Q301 Q302 Q303 Q305 Q503 Q504 Q601 Q602 Q603 Q604 Q6603 Q6604 Q6607 Q6608 Q6609 Q800 Q801 Q803 Q804 Q805 Q806 Q807 Q808 D1200 D1201 D1202 D1203 D1204 D200 D204 D301 D505 D506 D800 D801 D900 D901 IC103 LD101 LED150 0TR150400BA 0T...

Page 28: ...0V 5 4 7UF MVG 50V 20 470PF 1608 50V 5 LOCA NO PART NO DESCRIPTION C1211 C1213 C1214 C1216 C1216 C1218 C1219 C1219 C1220 C1221 C1221 C1224 C1225 C1226 C1227 C1228 C1229 C123 C1230 C1231 C1232 C1242 C1255 C1258 C126 C1264 C1266 C1269 C1273 C1277 C1279 C1321 C1322 C1324 C1325 C1327 C1331 C1334 C1335 C1339 C1344 C1345 C144 C148 C149 C150 C1513 C1515 C1516 0CK271CK46A 0CE476SF6DC 0CK105DF64A 0CK102CK5...

Page 29: ...MVG 16V 20 470UF MVG 16V 20 470UF MVG 16V 20 470UF STD 35V 20 470UF MVG 16V 20 470UF MVG 16V 20 22UF MVG 16V 20 LOCA NO PART NO DESCRIPTION C223 C224 C226 C227 C232 C233 C234 C235 C236 C244 C245 C251 C253 C254 C255 C260 C266 C269 C274 C280 C295 C297 C298 C299 C309 C310 C319 C324 C325 C326 C338 C343 C345 C358 C360 C364 C370 C375 C383 C400 C403 C408 C412 C415 C419 C422 C427 C433 C434 0CE477SF6DC 0CE...

Page 30: ...22UF MVG 16V 20 22UF MVG 16V 20 100UF MV 16V 20 LOCA NO PART NO DESCRIPTION C6054 C610 C611 C612 C613 C614 C616 C618 C619 C620 C621 C624 C625 C627 C6605 C6608 C6609 C6609 C6611 C6613 C6615 C6617 C6634 C6634 C6660 C6703 C6706 C6710 C8001 C8002 C8003 C8004 C8005 C8007 C8008 C8009 C8010 C8013 C8014 C8015 C8016 C8017 C8018 C8019 C8024 C8025 C8026 C8028 C8029 0CE106SF6DC 0CE107VF6DC 0CC470CK41A 0CE226S...

Page 31: ... 1 220PF 1608 50V 5 LOCA NO PART NO DESCRIPTION C921 C923 C925 C926 C927 C928 C929 ANT1 ANT2 CN1202 CN800 CN801 JK101 JK402 JK407 JK408 JK409 JK410 JOPT101 JOPT102 JOPT103 C10 C11 C12 C13 C14 C15 C17 C18 C19 C20 C21 C5 C6 C7 C8 C9 CN1101 CN1102 CN1501 CN900 JK300 F1100 0CC221CK41A 0CC331CK41A 0CK334CF56A 0CK334CF56A 0CK334CF56A 0CK334CF56A 0CK473CH56A 6612J00042G 6612J00042G 6612F00055B 6612B00015...

Page 32: ... B401 B403 B502 B503 B800 B801 B802 B803 B804 B805 B806 B807 B808 B810 140 315A 140 315A 140 315A 140 315A 140 315A 140 315A 140 315A 0LCML00003B 0LCML00003B 0LCML00003B 0LCML00003B 0LCML00003B 0LCML00003B 0LCML00003B 0LCML00003B 0LCML00003B 0LCML00003B 0LCML00003B 0LCML00003B 0LCML00003B 0LCML00003B 0LCML00003B 0LCML00003B 0LCML00003B 0LCML00003B 0LCML00003B 0LCML00003B 0LCML00003B 0LCML00003B 0L...

Page 33: ... HM501NT FILTER EMC FBMH3216 HM501NT FILTER EMC FBMH3216 HM501NT FILTER EMC FBMH3216 HM501NT LOCA NO PART NO DESCRIPTION L116 L117 L118 L119 L200 L205 L206 L207 L208 L209 L210 L211 L212 L213 L214 L215 L220 L227 L228 L229 L230 L231 L232 L234 L235 L302 L312 L320 L321 L421 L510 L511 L6602 L6603 L6604 L6605 L6607 L6608 L6609 L6610 L6611 L6615 X1000 X103 X104 X1101 X1200 X1202 X1500 6210VC0005A 6210VC0...

Page 34: ... CRYSTAL SX 1 24 576MHZ RESONATOR CRYSTAL ABLS 27 000MHZ CABLE DVI LVDS UL20276 AWG30 500MM CABLE COAXIAL 100MM UL1365 26 VW 1 CABLE COAXIAL 150MM UL1365 26 VW 1 CABLE USB SERIAL ATA UL2725 AWG26 800MM PCB ASSEMBLY SUB AUDIO REMOTE CONTROLLER RECEIVER 38KHZ ADAPTER RF TASA H301P 75 OHM TUNER TDVS H702P TUNER TAFM H103P TUNER TAEU H018P VARISTOR AVRL161A1R1NT VARISTOR AVRL161A1R1NT VARISTOR AVRL161...

Page 35: ...inted in Korea P NO 3828VD0214B CANADA LG Electronics Canada Inc 550 Matheson Boulevard East Mississauga Ontario L4Z 4G3 USA LG Electronics Alabama Inc P O Box 240007 201 James Record Road Bldg 3 Huntsville AL 35824 ...

Page 36: ......

Page 37: ......

Page 38: ......

Page 39: ......

Page 40: ......

Page 41: ......

Reviews: