background image

- 9 -

LGE Internal Use Only

Copyright  © 

  LG Electronics. Inc. All rights reserved.

Only for training and service purposes

* Auto-control interface and directions

1)  Adjust in the place where the influx of light like floodlight 

around is blocked. (Illumination is less than 100Lux).

2)  Adhere closely  the Color Analyzer ( CA210 ) to the 

module less than 10cm distance, keep it with the surface 

of the Module and Color Analyzer’s Prove vertically.

(80~100°).

3) Aging time  

-  After aging start, keep the power on (no suspension of 

power supply) and heat-run over 5 minutes.

-  Using ‘no signal’ or ‘full white pattern’ or the others, 

check the back light on.   

■  Auto adjustment Map(RS-232C)

RS-232C COMMAND

[ CMD    ID    DATA ]    

   Wb     00       00       White Balance Start

   Wb     00       ff         White Balance End

* Caution 

- Color Temperature : COOL, Medium, Warm.

-  One of R Gain/G Gain/ B Gain should be kept on 0xC0, 

and adjust other two lower than C0. (when R/G/B Gain 

are all C0, it is the FULL Dynamic Range of  Module)

* Manual W/B process using adjusts Remote control.

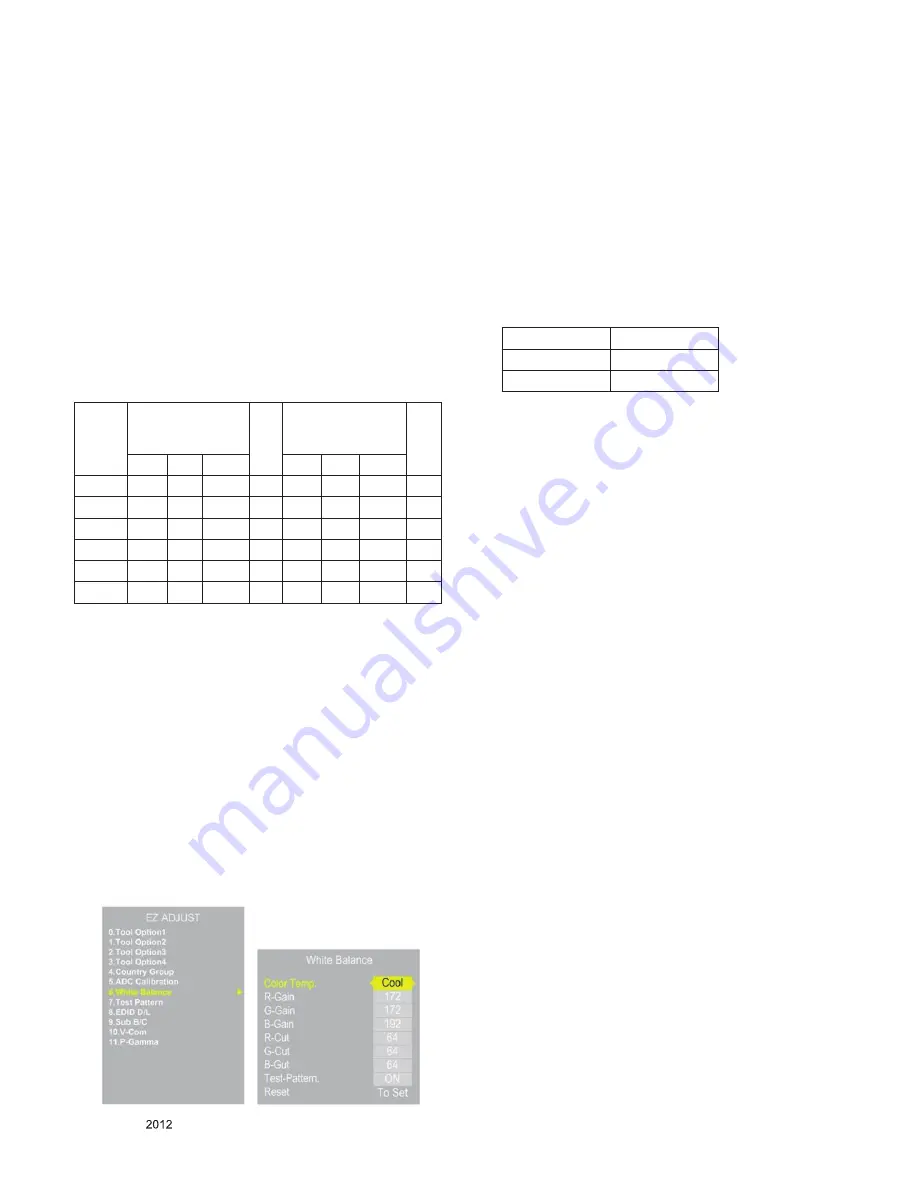
■ After enter Service Mode by pushing “ADJ” key,

■  Enter White Balance by pushing “►” key at “6. White 

Balance”.

■  Stick the sensor to the center of the screen and select 

each items(Red/Green/Blue Gain) using ▲/▼(CH +/-) 

key on R/C.

■ Adjust R/G/B Gain using◄/►(VOL +/-) key on R/C.

■  Adjust three modes all(Cool/Medium/Warm) : Fix the one 

of R/G/B Gain and Change the others.

■ When the adjustment is completed, Enter “COPY ALL”.

■ Exit adjustment mode using EXIT key on R/C.

*  After You finish all adjustments, Press “In-start” button and 

compare Tool option and Area option value with its BOM, if it 

is correctly same then unplug the AC cable.

   If it is not same, then correct it same with BOM and unplug 

AC cable.

  For correct it to the model’s module from factory JIG model.

*  Push The “IN STOP KEY” after completing the function 

inspection. And Mechanical Power Switch must be set “ON”

*  To check the coordinates of White Balance, you have to 

measure at the below conditions.

-  Picture mode : Vivid, Energy Saving : Off, Below the Ad-

vanced control, Dynamic Contrast : Off, Dynamic Colour : Off 

  Colour Temp. 

-> Picture Mode change : Vivid -> Vivid(User)

4.3. DDC EDID Write (HDMI 256Byte) 

      -> Not used any more, Use Auto D/L

■ Connect HDMI Signal Cable to HDMI Jack.

■  Write EDID DATA to EEPROM(24C02) by using DDC2B 

protocol.

■ Check whether written EDID data is correct or not.

*  For SVC main Ass’y, EDID have to be downloaded to Insert 

Process in advance.

4.4. EDID DATA

(1) All Data : HEXA Value

(2) Changeable Data :

     * : Serial No : Controlled / Data:01

     ** : Month : Controlled / Data:00

     *** : Year : Controlled

     **** : Check sum

4.5. EDID DATA Auto Download

(1) Press Adj. key on the Adj. R/C,

(2) Select EDID D/L menu.

(3) By pressing Enter key, EDID download will begin

(4)  If Download is successful, OK is display, but If Download is 

failure, NG is displayed.

(5) If Download is failure, Re-try downloads.


RS-232C 

COMMAND

[CMD ID DATA]

M

I

N

CENTER

(DEFAULT)

M

A

X

Cool Mid Warm

Cool Mid Warm

R Gain

jg

Ja

jd

00

172 192

192

192

G Gain

jh

Jb

je

00

172 192

192

192

B Gain

ji

Jc

jf

00

192 192

172

192

R Cut

64

64

64

128

G Cut

64

64

64

128

B Cut

64

64

64

128

Cool

30

Medium

0

Warm

30

Summary of Contents for 42PN450D

Page 1: ... eic lgservice com Asia Oceania http biz lgservice com Internal Use Only Printed in Korea P NO MFL67682001 1211 REV00 CHASSIS PD31B MODEL 42PN450D 42PN450D ZA CAUTION BEFORE SERVICING THE CHASSIS READ THE SAFETY PRECAUTIONS IN THIS MANUAL PLASMA TV SERVICE MANUAL ...

Page 2: ...opyright LG Electronics Inc All rights reserved Only for training and service purposes CONTENTS CONTENTS 2 SAFETY PRECAUTIONS 3 SPECIFICATION 4 ADJUSTMENT INSTRUCTION 6 BLOCK DIAGRAM 14 EXPLODED VIEW 15 SCHEMATIC CIRCUIT DIAGRAM ...

Page 3: ...hout damage of electrical shock Leakage Current Cold Check Antenna Cold Check With the instrument AC plug removed from AC source connect an electrical jumper across the two AC plug prongs Place the AC switch in the on position connect one lead of ohm meter to the AC plug prongs tied together and touch other ohm meter lead in turn to each exposed metallic parts such as antenna terminals phone jacks...

Page 4: ... models 4 Specification and performance of each parts are followed each drawing and specification by part number in accordance with BOM 5 The receiver must be operated for about 5 minutes prior to the adjustment 3 Test method 1 Performance LGE TV test method followed 2 Demanded other specification Safety CE IEC specification EMC CE IEC 4 Module General Specification 42 2D HD No Item Specification ...

Page 5: ...gramme Coverage EU Digital TV PD31B C are not support SECAM L L Only PD31B support DVB T2 Only PD31C support DVB S2 Analogue TV VHF E2 to E12 UHF E21 to E69 CATV S1 to S20 HYPER S21 to S47 1 PAL SECAM BG 2 PAL SECAM DK 3 PAL I 4 NTSC M 5 DVB T Programme Coverage NON EU Digital TV VHF 04 to 13 UHF 27 to 69 Analogue TV VHF UHF 1 to 78 CATV 01 to 71 3 Receiving system Analog Upper Heterodyne Digital ...

Page 6: ...ODE 1 Press the POWER ON KEY on R C for adjustment 2 OSD display and screen display PATTERN MODE Set is activated HEAT run without signal generator in this mode Single color pattern WHITE of HEAT RUN MODE uses to check panel Caution If you turn on a still screen more than 20 minutes Especially digital pattern cross hatch pattern an after image may be occur in the black level part of the screen 8 P...

Page 7: ...selecting Tool option 3 1 ADC Process 3 1 1 ADC Enter Service Mode by pushing ADJ key Enter Internal ADC mode by pushing key at 5 ADC Calibration Caution Using power on button of the Adjustment R C power on Multi vision ADC Calibration Protocol RS232 Adjust Sequence aa 00 00 Enter Adjust Mode xb 00 40 Component1 Input 480i ad 00 10 Adjust 480i Comp1 aa 00 90 End Adjust mode Required equipment Adju...

Page 8: ...2 Adjustment Preparation Required Equipment Remote controller for adjustment Color Analyzer CS 1000 CA 100 100 CA 210 or same product CH 11 PDP Please adjust CA 210 CA 100 by CS 1000 before measur ing Auto W B adjustment instrument only for Auto adjust ment 9 Pin D Sub Jack RS232C is connected to the AUTO W B EQUIPMENT Before Adjust of White Balance Please press POWER ONLY key Adjust Process will ...

Page 9: ...n R C After You finish all adjustments Press In start button and compare Tool option and Area option value with its BOM if it is correctly same then unplug the AC cable If it is not same then correct it same with BOM and unplug AC cable For correct it to the model s module from factory JIG model Push The IN STOP KEY after completing the function inspection And Mechanical Power Switch must be set O...

Page 10: ...n Never connect HDMI D sub Cable when EDID downloaded Edid data and Model option download RS232 Zender Manual Download Caution Use the proper signal cable for EDID Download Digital EDID Pin3 exists Caution Never connect HDMI D sub Cable at the same time Use the proper cables below for EDID Writing Download HDMI1 HDMI2 separately because HDMI1 is dif ferent from HDMI2 NO Enter download MODE EDID da...

Page 11: ...is failed Buzzer operate If Test is passed execute next process HI pot test Remove A V CORD from A V JACK BOX 5 HI POT test Auto If Test is failed Buzzer operate If Test is passed GOOD Lamp on and move to next process automatically Checkpoint 1 Test voltage 1 3 Poles GND 1 5KV min at 100mA SIGNAL 3KV min at 100mA 2 2 Poles SIGNAL 3KV min at 100mA 2 TEST time 1 second 3 TEST POINT 1 3 Poles GND Tes...

Page 12: ... by Manufacturing Technology Group 3 Serial number D L must be conformed when it is produced in production line because serial number D L is mandatory by D book 4 0 Manual Download Model Name and Serial Number If the TV set is downloaded By OTA or Service man Sometimes model name or serial number is initialized Not always There is impossible to download by bar code scan so It need Manual download ...

Page 13: ...ad CI Key 4 When download succeed you can see OK on 6 Each Chassis has it s own MAC Address Please be careful of download Check the method of RS232C Command 1 into the main ass y mode RS232 aa 00 00 2 check the key download for transmitted command RS232 ci 00 10 3 result value normally status for download OKx abnormally status for download NGx 8 SW Download Guide Put a bin to USB Stick and Turn on...

Page 14: ... 14 LGE Internal Use Only Copyright LG Electronics Inc All rights reserved Only for training and service purposes BLOCK DIAGRAM ...

Page 15: ...VIEW Many electrical and mechanical parts in this chassis have special safety related characteristics These parts are identified by in the Schematic Diagram and EXPLODED VIEW It is essential that these special safety parts should be replaced with the same components as recommended in this manual to prevent X RADIATION Shock Fire or other Hazards Do not modify the original design without permission...

Page 16: ...1 R107 75 CI_ADDR 6 BUF1_FE_TS_CLK PCM_WAIT AR109 33 EU AR110 33 EU R100 33 EU CI_TS_DATA 6 R143 180 EU AV SC1_L_IN AV SC1_CVBS_IN PCM_IRQA 5V CI_OE PCM_A 12 Q103 MMBT3906 NXP EU E B C R101 33 EU AR108 33 EU IC100 TC74LCX244FT EU 3 2Y4 2 1A1 4 1A2 1 1OE 6 1A3 5 2Y3 7 2Y2 8 1A4 9 2Y1 10 GND 11 2A1 12 1Y4 13 2A2 14 1Y3 15 2A3 16 1Y2 17 2A4 18 1Y1 19 2OE 20 VCC PCM_A 0 CI_TS_DATA 7 R111 10K EU CI_WE ...

Page 17: ...LUG D200 5 6V ET_NET JK205 SPG09 DB 010 Commercial 1 RED 2 GREEN 3 BLUE 4 GND_1 5 DDC_GND 6 RED_GND 7 GREEN_GND 8 BLUE_GND 9 NC 10 SYNC_GND 11 GND_2 12 DDC_DATA 13 H_SYNC 14 V_SYNC 15 DDC_CLOCK 16 SHILED R251 75 C213 10uF 10V PC_SER_DATA R262 12K DSUB_VSYNC R214 75 AV2_DET Q200 MMBT3904 NXP E B C R283 22 R290 0 ET_NET CEC_REMOTE R207 33 C226 0 1uF 16V MAX3232 DSUB_HSYNC SIDE_USB_DM R254 470K C220 ...

Page 18: ... DIF N 2 RESET 10 DIF P 4 SDA 1 NC_1 9 IF_AGC 8 NC_3 3 SCL 7 B2 1 8V 6 NC_2 12 SHIELD A1 A1 B1 B1 FE_TS_VAL_ERR R337 0 R318 22 Q301 MMBT3906 NXP E B C TU_GND TU303 TDSS H501F ATSC 5 B1 3 3V 11 DIF N 2 RESET 10 DIF P 4 SDA 1 NC 9 IF_AGC 8 ALIF_ P 3 SCL 7 B2 1 8 6 ALIF_ N 12 SHIELD A1 A1 B1 B1 TU305 TDSN B601F SBTVD 1 RF_S W_CTL 2 RESET_TUNER 3 SCL 4 SDA 5 B1 3 3V 6 SIF 7 B2 1 8V 8 CVBS 9 NC_1 10 NC...

Page 19: ...AB13 TS1VALID GPI96 AC14 TS1SYNC GPIO97 W13 TS0DATA0 GPIO77 AB12 TS0DATA1 GPIO78 AD11 TS0DATA2 GPIO79 W9 TS0DATA3 GPIO80 AE11 TS0DATA4 GPIO81 AB11 TS0DATA5 GPIO82 AE12 TS0DATA6 GPIO83 AC13 TS0DATA7 GPIO84 AB14 TS0CLK GPIO87 AA11 TS0VALID GPIO85 Y11 TS0SYNC GPIO86 AC11 IP AC3 IM AD2 SIFP AD1 SIFM AD3 IF_AGC AC2 GPIO73 AB3 GPIO74 AC4 I2C_SCKM1 GPIO75 AE3 I2C_SDAM1 GPIO76 AE2 IC400 LGE2111C MS PDP_13...

Page 20: ...NC_2 1 HOLD 6 NC_4 5 NC_3 7 CS 8 SO SIO1 9 WP 10 GND 11 NC_5 12 NC_6 13 NC_7 14 NC_8 15 SI SIO0 16 SCLK SPI_SDI SPI_CS 3 3V_ST C557 0 1uF READY 3 3V_ST C547 0 1uF 16V P501 12507WR 06L 1 2 3 4 5 6 7 UART_RXD R520 0 R519 0 UART_TXD P_SDA PC_SER_CLK PC_SER_DATA P_SCL IC503 2 M24256 BRMN6TP ST_OS 3 E2 2 E1 4 VSS 1 E0 5 SDA 6 SCL 7 WC 8 VCC IC503 1 AT24C256C SSHL T Cu ATMEL_OS 3 A2 2 A1 4 GND 1 A0 5 SD...

Page 21: ... C684 330pF 50V C616 10uF 10V C690 0 1uF 50V L601 BLM18PG121SN1D C697 1000pF 50V C610 0 1uF 16V R614 220 5 AUD_LRCK R657 10K READY SPK_R C631 10uF 6 3V P_17V C686 1uF 50V C696 1000pF 50V SPK_R 5V 3 3V C693 0 22uF 50V SPK_R R615 1 FNIM C699 1000pF 50V C605 10uF 10V AUD_MASTER_CLK RL_ON C681 1uF 50V R613 100 5 5V_ST RL_ON C673 2 2uF 10V IC613 AZ1117BH ADJTRE1 OUTPUT INPUT ADJ GND SPK_L 3 3V_ST C619 ...

Page 22: ..._DDR3_DQL2 R24 B_DDR3_DQL3 K23 B_DDR3_DQL4 T25 B_DDR3_DQL5 J23 B_DDR3_DQL6 T24 B_DDR3_DQL7 K24 B_DDR3_DQU0 N21 B_DDR3_DQU1 P22 B_DDR3_DQU2 L22 B_DDR3_DQU3 R21 B_DDR3_DQU4 P20 B_DDR3_DQU5 R22 B_DDR3_DQU6 M22 B_DDR3_DQU7 N22 B_DDR3_CASZ D24 B_DDR3_RASZ B25 B_DDR3_WEZ F22 B_DDR3_DQML L23 B_DDR3_DQMU R20 B_DDR3_ODT C24 B_DDR3_BA0 D25 B_DDR3_BA1 K22 B_DDR3_BA2 E25 B_DDR3_RESET E21 B_DDR3_MCLKE M20 B_DD...

Page 23: ......

Page 24: ...l Table of contents 1 L13 Concept 12 Vs 13 2 L13 Power On Off sequence 3 L13 Power Block 4 L13 I2C MAP 5 L13 Front End Copyright 2012 LG Electronics Inc All rights reserved Only for training and service purposes LGE Internal Use Only ...

Page 25: ... Main processor DDR NAND 50PN6500 60PN6500 206mm Jack ERRC 5 2 4 Tuner 3 LVDS Wafer HDMI Block 1 RGB RS 232C and PC Audio is removed 2 Comp Comp Hybrid Æ Comp Hybrid EU 1ea 3 HDMI 1 Jack is removed 4 Non EU use Video AV Jack intead of SCART Jack Copyright 2012 LG Electronics Inc All rights reserved Only for training and service purposes LGE Internal Use Only 5 Tact Key LED EYE IR 1 11 ...

Page 26: ...Remark RL_On 40ms 0 M_On 80ms 700ms VS_On 250ms 260ms VS_DET Signal Spec min Measure Graph Remark VS_On 0 40ms RL_On 200ms 335ms M_On 30ms 56ms Copyright 2012 LG Electronics Inc All rights reserved Only for training and service purposes LGE Internal Use Only ...

Page 27: ...ure Graph Remark RL_On M_On 80ms 87ms VS_On 250ms 280ms VS_DET Signal Spec min Measure Graph Remark M_On 2500ms 3000ms RL_On 30ms 56ms Copyright 2012 LG Electronics Inc All rights reserved Only for training and service purposes LGE Internal Use Only ...

Page 28: ... Spec min Measure Graph Remark VS_On 250ms 247ms VS_DET 400ms Signal Spec min Measure Graph Remark M_On 2530ms 2600ms Copyright 2012 LG Electronics Inc All rights reserved Only for training and service purposes LGE Internal Use Only ...

Page 29: ...16 17 07V Spec 850mV 12mVrms 116mVpp Audio AMP C690 0 1uF 50V 1608 C695 68uF 35V 8PI 6 3H C686 1uF 50V C681 1uF 50V C680 0 1uF 50V 1608 L616 120 Ohm 5A 2012 17 07V Copyright 2012 LG Electronics Inc All rights reserved Only for training and service purposes LGE Internal Use Only ...

Page 30: ...6V 1005 73 58Vrms 164mVpp 3 29V V_ ST 1 10V_Vddc 16V 1005 C547 0 1uF 16V SUB Ass y Spec 65mV 17Vrms 60mVpp Spec 250mV Spec 250mV 68Vrms 248mVpp Spec 250mV Input DTV Comp HDMI 230mA 220mA 220mA 3 29V Input STBY 0 2mA IC603 5V to 1 23V TPS54231D 2A C621 0 1uF C620 10uF _ 1005 X3 10uF LM1 x7 0 1uF X2 1uF C601 L604 120 Ohm 2A 1608 Q604 MOFET ZXMP3F30 3 0A Spec 250mV 88Vrms 249mVpp 248mVpp 27Vrms 169mV...

Page 31: ...2mA 102mA 102mA 전류안흐름 5 IC604 5V to 1 8V 1 8V_TU C477 0 1uF 16V 1005 2A 1608 Spec 250mV 27Vrms 169mVpp Spec 90mV 5 6Vrms 89mVpp 5 00V AVDD25_PGA 5 V 5V to 1 8V AP1117BH ADJ 850mW C615 10uF 10V C631 10uF 6 3V 1608 C311 0 1uF 16V 1005 Tuner 1 81V 5 00V Input DTV Comp HDMI 150mA 164mA 164mA 1 25V_TU C625 10uF 6 3V 1608 C314 10uF 6 3V 1608 C315 0 1uF 16V 1005 T2 SBTV Tuner C614 10uF 10V IC602 5V to 1 ...

Page 32: ...pec 75mV Input STA380 not working DTV Comp HDMI 30mA 30mA 30mA 5 V 1 5V_DDR IC613 3 3V to 1 5V AP1117BH ADJ 850mW C618 10uF C1251 10uF X4 1uF DDR L1202 500 Ohm 3A 2012 C619 10uF 3 27V 7Vrms 79mVpp Spec 75mV 7 5Vrms 74mVpp Spec 75mV 10Vrms 74mVpp 1 507V 1 50V 3 26V IC605 5 0V to 3 3V AP1117E33G 850mW C627 C611 5 01V 6 3V 10uF 6 3V Spec 75mV Input DTV Comp HDMI 285mA 185mA 185mA Input DTV Comp HDMI ...

Page 33: ... 1 1V Input 220mA DCDC 1 4 LDO LDO 2 5V 102mA 1 8V 164mA 5Vst 1 1V 750mA 3A 1 4 5V 2 5V 102mA LDO 714mW 255mW 5V 1 8V 164mA LDO 850mW 525mW LDO T2 1 25V 400mA 850mW 5V 1 25V 400mA LDO 850mW 1500mW 5V 3 3V 300mA LDO 850mW 510mW 3 3V 300mA 1 5V 300mA LDO LDO 5V 3 3V 300mA LDO 850mW 510mW 3 3V 1 5V 300mA LDO 850mW 480mW LDO 3 3V Copyright 2012 LG Electronics Inc All rights reserved Only for training ...

Page 34: ...TDSQ G605D 0x GPIO49 GPIO50 H6 E6 AMP_SCL AMP_SDA IC606 STA380BW 0x I2S_IN_WS GPIO149 SPDIF_IN GPIO152 B9 B6 P_SCL P_SDA P500 LVDS module 0 1C 3 3V R450 3 3K R451 3 3K I2C_SCKM2 DDCR_CK GPIO72 I2C SDAM2 DDCR DA GPIO71 AA21 AB21 I2C_SCL I2C SDA 0x1C IC503 EEPROM 0xA0 3 3V R452 2 2K R453 2 2K Copyright 2012 LG Electronics Inc All rights reserved Only for training and service purposes LGE Internal Us...

Page 35: ...th out Analog Demod L13 DVB T C Demod A Demod SI2178 PLL With Analog Demod SI2169 DVB T2 C S S2 Demod Si2166B DVB S S2 Demod RDA5815S DVB S S2 PLL L13 DVB T C Demod A Demod UseMstar A Demod Block Diagram Tuner TDSQ G501D L13 Mstar 5815S Tuner TDSS G201D L13 Mstar Tuner TDSQ G605D L13 Mstar TS_ 0 7 Demod SIF IF 2012 ATV DVB T C Diagram SI2156 SI2176 ATV DVB T C DVB T2 CVBS SIF Diagram IF 2012 Tuner...

Page 36: ...TAR_56 T2 C T2 C Digital Demod S NO_DEMOD Digital Demod T C DVBS_SI2169 Analog Demod SI2176 EU AU JA T C S2 Digital Demod S DVB_S7 Digital Demod T C DVBS_SI2166B Analog Demod MSTAR 58 T C S Tuner Area T2 C Tuner Area T C Tuner Area g _ T C Tuner Area Only Setellite Copyright 2012 LG Electronics Inc All rights reserved Only for training and service purposes LGE Internal Use Only ...

Reviews: