background image

GB-09

APPENDIX

Although the Lesser General Public License is Less protective of the users’ freedom, it does ensure that the user of a 

program that is linked with the Library has the freedom and the wherewithal to run that program using a modified version 

of the Library.

The precise terms and conditions for copying, distribution and modification follow. Pay close attention to the difference 

between a “work based on the library” and a “work that uses the library”. The former contains code derived from the 

library, whereas the latter must be combined with the library in order to run. 

GNU LESSER GENERAL PUBLIC LICENSE

TERMS AND CONDITIONS FOR COPYING, DISTRIBUTION AND MODIFICATION

0. This License Agreement applies to any software library or other program which contains a notice placed by the opyright 

holder or other authorized party saying it may be distributed under the terms of this Lesser General Public License (also 

called “this License”). Each licensee is addressed as “you”.

A “library” means a collection of software functions and/or data prepared so as to be conveniently linked with application 

programs (which use some of those functions and data) to form executables. 

The “Library”, below, refers to any such software library or work which has been distributed under these terms. A 

“work based on the Library” means either the Library or any derivative work under copyright law: that is to say, a work 

containing the Library or a portion of it, either verbatim or with modifications and/or translated straightforwardly into 

another language. (Hereinafter, translation is included without limitation in the term “modification”.)

“Source code” for a work means the preferred form of the work for making modifications to it. For a library, complete 

source code means all the source code for all modules it contains, plus any associated interface definition files, plus the 

scripts used to control compilation and installation of the library.

Activities other than copying, distribution and modification are not covered by this License; they are outside its scope. The 

act of running a program using the Library is not restricted, and output from such a program is covered only if its contents 

constitute a work based on the Library (independent of the use of the Library in a tool for writing it). Whether that is true 

depends on what the Library does and what the program that uses the Library does.

1. You may copy and distribute verbatim copies of the Library’s complete source code as you receive it, in any medium, 

provided that you conspicuously and appropriately publish on each copy an appropriate copyright notice and disclaimer 

of warranty; keep intact all the notices that refer to this License and to the absence of any warranty; and distribute a copy 

of this License along with the Library. 

You may charge a fee for the physical act of transferring a copy, and you may at your option offer warranty protection in 

exchange for a fee.

2. You may modify your copy or copies of the Library or any portion of it, thus forming a work based on the Library, and 

copy and distribute such modifications or work under the terms of Section 1 above, provided that you also meet all of 

these conditions:

a) The modified work must itself be a software library.
b) You must cause the files modified to carry prominent notices stating that you changed the files and the date of any 

change.
c) You must cause the whole of the work to be licensed at no charge to all third parties under the terms of this License.
d) If a facility in the modified Library refers to a function or a table of data to be supplied by an application program 

that uses the facility, other than as an argument passed when the facility is invoked, then you must make a good faith 

effort to ensure that, in the event an application does not supply such function or table, the facility still operates, and 

performs whatever part of its purpose remains meaningful.

(For example, a function in a library to compute square roots has a purpose that is entirely well-defined independent of 

the application. Therefore, Subsection 2d requires that any application-supplied function or table used by this function 

must be optional: if the application does not supply it, the square root function must still compute square roots.)

These requirements apply to the modified work as a whole. If identifiable sections of that work are not derived from the 

Library, and can be reasonably considered independent and separate works in themselves, then this License, and its 

terms, do not apply to those sections when you distribute them as separate works. But when you distribute the same 

sections as part of a whole which is a work based on the Library, the distribution of the whole must be on the terms of this 

License, whose permissions for other licensees extend to the entire whole, and thus to each and every part regardless of 

who wrote it.

Summary of Contents for 42LF73 Series

Page 1: ...he TV Refer to the label on the back cover and quote this information to your dealer when requiring service LCD TV OWNER S MANUAL LCD TV MODELS 32LF73 42LF73 32LH33 42LH33 Trade Mark of the DVB Digital Video Broadcasting Project 1991 to 1996 6504 32LF7300 6503 42LF7300 6506 32LH3300 6505 42LH3300 ENGLISH Model Serial No ID Number s ...

Page 2: ......

Page 3: ... FA V or This item is not included for all models Lightly wipe any stains or fingerprints on the surface of the TV with the polishing cloth Polishing Cloth Polishing cloth for use on the screen Do not use excessive force This may cause scratching or discolouration Remote Control Only 32 42LF73 Only 32LF73 32 42LH33 or x 4 AV MO DE ENE RGY SAV ING RETURN EXIT ME NU Q ME NU IN FO GU ID E i M UT E PO...

Page 4: ...nly 32 42LF73 22 PC Setup 23 WATCHING TV PROGRAMME CONTROL Remote Control Key Functions Only 32 42LF73 30 Remote Control Key Functions Only 32 42LH33 32 Turning on the TV 34 Programme Selection 34 Volume Adjustment 34 Quick Menu 35 On Screen Menus Selection and Adjustment 36 Auto Programme Tuning 37 Manual Programme Tuning In Digital Mode 40 Manual Programme Tuning In Analogue Mode 42 Programme Ed...

Page 5: ...TIME SETTING Clock Setup 91 Auto On Off Time Setting 92 Auto Shut Off Setting 93 Sleep Timer Setting 93 PARENTAL CONTROL RATINGS Set Password Lock System 94 Block Programme 95 Parental Control In Digital Mode Only 96 Key Lock 97 TELETEXT Switch On Off 98 Simple Text 98 Fastext 98 Special Teletext Functions 99 APPENDIX Troubleshooting 100 Maintenance 101 Product Specifications 102 OPEN SOURCE LICEN...

Page 6: ...on the TV When the power is turned off with the main power button on the TV it will not be turned on with the remote control PREPARATION Intelligent sensor Adjusts picture according to the surrounding conditions PROGRAMME VOLUME OK MENU INPUT Power Standby Indicator illuminates red in standby mode illuminates blue when the TV is switched on Remote Control Sensor MAIN POWER ...

Page 7: ...power switch is off the TV will not be turned on with the remote control INPUT MENU OK P INPUT MENU OK P PROGRAMME VOLUME OK MENU INPUT INPUT MENU OK P Power Standby Indicator illuminates red in standby mode illuminates blue when the TV is switched on Remote Control Sensor INPUT MENU OK P Main Power Switch Power On Off POWER Standby Operation ...

Page 8: ...AV1 AV2 Connect scart socket input or output from an external device to these jacks HDMI DVI IN Input Connect an HDMI signal to HDMI IN Or DVI VIDEO signal to HDMI DVI port with DVI to HDMI cable RGB IN Input Connect the output from a PC Component Input Connect a component video audio device to these jacks Antenna Input Connect antenna or cable to this jack USB Input Connect USB storage device to ...

Page 9: ...socket input or output from an external device to these jacks HDMI DVI IN Input Connect an HDMI signal to HDMI IN Or DVI VIDEO signal to HDMI DVI port with DVI to HDMI cable RGB IN Input Connect the output from a PC Component Input Connect a component video audio device to these jacks Antenna Input Connect antenna or cable to this jack SERVICE ONLY PORT PCMCIA Personal Computer Memory Card Interna...

Page 10: ...ushioned surface to protect the screen from damage Carefully place the TV screen side down on a cushioned surface to protect the screen from damage Assemble the parts of the Stand Body with the Stand Base of the TV Assemble the TV as shown AV MO DE ENER GYS AVIN G RETURN EXIT ME NU Q M EN U INF O GU IDE i MU TE PO WE R LIS T Q V IEW MA RK FA V Stand Body Stand Base Assemble the TV as shown Fix the...

Page 11: ...H33 The TV must be attached to desk so it cannot be pulled in a forward backward direction potentially causing injury or damaging the product Use only an attached screw 1 Screw provided as parts of the product Stand Desk WARNING To prevent TV from falling over the TV should be securely attached to the floor wall per installation instructions Tipping shaking or rocking the machine may cause injury ...

Page 12: ...rom the TV 2 1 Use the eye bolts or TV brackets bolts to fix the product to the wall as shown in the picture If your TV has bolts in the eyebolts loosen these bolts Insert the eye bolts or TV brackets bolts and tighten them securely in the upper holes Secure the wall brackets with the bolts on the wall Match the height of the bracket that is mounted on the wall 3 Use a sturdy rope to tie the produ...

Page 13: ... necessary To connect additional equipment see the External Equipment Setup section Install the CABLE MANAGEMENT CLIP as shown CABLE MANAGEMENT CLIP Fit the CABLE MANAGEMENT CLIP as shown NOTE Do not use the CABLE MANAGEMENT CLIP to lift the TV If the TV is dropped you may be injured or the TV may be damaged ...

Page 14: ...V you can adjust the TV manually to the left or right direction by 20 degrees to suit your viewing position Not Using the Desk Type Stand Image shown may differ from your TV When installing the wall mounted unit use the protection cover or or Insert the PROTECTION COVER into the TV until clicking sound ...

Page 15: ...d professional installer NOTE Should Install wall mount on a solid wall perpendicular to the floor Should use a special wall mount if you want to install it to ceiling or slanted wall The surface that wall mount is to be mounted on should be of sufficient strength to support the weight of TV set e g concrete natural rock brick and hollow block Installing screw type and length depends on the wall m...

Page 16: ...tenna Socket Outdoor Antenna VHF UHF Multi family Dwellings Apartments Connect to wall antenna socket Single family Dwellings Houses Connect to wall jack for outdoor antenna RF Coaxial Wire 75 ohm ANTENNA IN RGB AV IN 3 L MONO R AUDIO VIDEO H P 2 3 1 DVI UHF VHF Signal Amplifier Terrestrial Antenna In poor signal areas to achieve better picture quality it may be necessary to install a signal ampli...

Page 17: ...er digital external device refer to the diagram as shown below Connecting with a Component Cable Connect the video outputs Y PB PR of the digital set top box to the COMPONENT IN VIDEO jacks on the TV Connect the audio outputs of the digital set top box to the COMPONENT IN AUDIO jacks on the TV Turn on the digital set top box Refer to the owner s manual for the digital set top box Select Component ...

Page 18: ...cable is version 1 3 or higher If the HDMI cables don t support HDMI version 1 3 flickering or no screen display can result Please use the latest cables that support at least HDMI version 1 3 Connecting with an HDMI to DVI Cable Connect the digital set top box to HDMI DVI IN 1 jack on the TV Connect the audio output of the digital set top box to the AUDIO IN RGB DVI jack on the TV Turn on the digi...

Page 19: ...V Turn on the DVD player insert a DVD Select Component input source using the INPUT button on the remote control Refer to the DVD player s manual for operating instructions Component Input ports To achieve better picture quality connect a DVD player to the component input ports as shown below Component ports on the TV Y PB PR Video output ports on DVD player Y Y Y Y PB B Y Cb Pb PR R Y Cr Pr ANTEN...

Page 20: ...watched is Analogue mode Analogue TV AV1 SCART1 CVBS AV1 CVBS RGB AV2 SCART2 CVBS AV2 CVBS Component Mute RGB Mute AV3 CVBS AV3 CVBS HDMI1 Mute HDMI2 Mute HDMI3 Mute HDMI4 Only 32 42LF73 Mute Connecting the HDMI Cable Connect the HDMI output of the DVD to the HDMI DVI IN 1 HDMI IN 2 HDMI IN 3 or HDMI IN 4 Only 32 42LF73 jack on the TV Select HDMI1 HDMI2 HDMI3 or HDMI4 Only 32 42LF73 input source u...

Page 21: ...of the VCR to the ANTENNA IN socket on the TV Connect the terrestrial antenna cable to the ANT IN socket of the VCR Press the PLAY button on the VCR and match the appropriate channel between the TV and VCR for viewing AV IN 3 L MONO R AUDIO VIDEO H P ANTENNA IN RGB ANTENNA IN RGB OUTPUT SWITCH ANT IN R S VIDEO VIDEO ANT OUT L R AUDIO L AUDIO VIDEO Terrestrial Wall jack Terrestrial Antenna ...

Page 22: ...T2 Output Digital TV Mute Digital TV Analogue TV Mute Analogue TV if the TV mode you last watched is Analogue mode Analogue TV AV1 SCART1 CVBS AV1 CVBS RGB AV2 SCART2 CVBS AV2 CVBS Component Mute RGB Mute AV3 CVBS AV3 CVBS HDMI1 Mute HDMI2 Mute HDMI3 Mute HDMI4 Only 32 42LF73 Mute Connecting with a RCA Cable Connect the AUDIO VIDEO jacks between TV and VCR Match the jack colours Video yellow Audio...

Page 23: ... TV to a Home Theater or amp Connect one end of an optical cable to the TV Digital Audio Optical Output port Connect the other end of the optical cable to the digital audio Optical input on the audio equipment Set the TV Speaker option Off in the AUDIO menu p 85 Refer to the external audio equipment instruction manual for operation CAUTION Do not look into the optical output port Looking at the la...

Page 24: ...Audio Right red Select AV3 input source using the INPUT button on the remote control Operate the corresponding external equipment Refer to external equipment operating guide USB Setup Only 32 42LF73 Connect the USB device to the USB IN jack on the side of the TV After connecting the USB IN jack you use the USB function p 59 AV IN 3 L MONO R AUDIO VIDEO H P L R VIDEO Camcorder Video Game Set R AUDI...

Page 25: ...on the TV Turn on the PC and the TV Select RGB input source using the INPUT button on the remote control Connecting with an HDMI to DVI Cable Connect the DVI output of the PC to the HDMI DVI IN 1 jack on the TV Connect the PC audio output to the AUDIO IN RGB DVI jack on the TV Turn on the PC and the TV Select HDMI 1 input source using the INPUT button on the remote control RGB 2 3 1 DVI RGB 2 3 1 ...

Page 26: ...HDMI4 Only 32 42LF73 DTV mode Resolution Horizontal Frequency kHz Vertical Frequency Hz 640 x 480 31 649 31 469 59 9 60 720 x 480 31 47 31 50 59 94 60 720 x 576 31 25 50 00 1280 x 720 37 50 44 96 45 00 50 00 59 94 60 1920 x 1080 28 125 33 72 33 75 27 00 33 750 56 25 67 433 67 50 50 00 59 94 60 24 00 30 50 00 59 94 60 Component mode Resolution Horizontal Frequency kHz Vertical Frequency Hz 720 x 48...

Page 27: ... the best picture quality Connect the signal cable from the monitor output port of the PC to the RGB IN PC port of the TV or the signal cable from the HDMI output port of the PC to the HDMI DVI IN 1 DVI port on the TV Connect the audio cable from the PC to the AUDIO IN RGB DVI on the TV Audio cables are not included with the TV If using a sound card adjust PC sound as required If the graphic card ...

Page 28: ...tion of PC PICTURE Contrast Brightness Sharpness Colour Tint AdvancedControl PictureReset Move OK 90 50 60 60 0 Screen SCREEN Move Prev Resolution AutoConfig Position Size Phase Reset 1 MENU Select PICTURE 2 OK Select Screen 3 OK Select Resolution 4 Select the desired resolution Press the MENU button to return to normal TV viewing Press the RETURN button to return to the previous screen ...

Page 29: ...ve OK 90 50 60 60 0 Screen SCREEN Move Prev Resolution AutoConfig Position Size Phase Reset Toset Yes No 1 MENU Select PICTURE If the picture is not clear after auto configuration adjust the position size or phase of picture manually 2 OK Select Screen 3 OK Select Auto Config 4 OK Select Yes 5 OK Run Auto Config Press the MENU button to return to normal TV viewing Press the RETURN button to return...

Page 30: ...icture phase manually PICTURE Contrast Brightness Sharpness Colour Tint AdvancedControl PictureReset Move OK 90 50 60 60 0 Screen SCREEN Move Prev Resolution AutoConfig Position Size Phase Reset 1 MENU Select PICTURE 2 OK Select Screen 3 OK Select Position Size or Phase 4 Make appropriate adjustments Press the MENU button to return to normal TV viewing Press the RETURN button to return to the prev...

Page 31: ... Tint AdvancedControl PictureReset Move OK 90 50 60 60 0 Screen SCREEN Move Prev Resolution AutoConfig Position Size Phase Reset InitializeSettings Yes No 1 MENU Select PICTURE 2 OK Select Screen 3 OK Select Reset 4 OK Select Yes 5 OK Run Reset Press the MENU button to return to normal TV viewing Press the RETURN button to return to the previous screen ...

Page 32: ...l on screen displays and returns to TV viewing from any menu p 36 Shows programme schedule p 67 Up Down Left Right OK Allows you to navigate the on screen menus and adjust the system settings to your preference Accepts your selection or displays the current mode RETURN EXIT INFO AV MODE Allows the user to move return one step in an interactive application EPG or other user interaction function Sho...

Page 33: ...one full set of screen information to the next one Selects a programme Selects numbered items in a menu Displays the programme table p 54 Returns to the previously viewed programme USB Menu control buttons Controls USB menu Photo List and Music List Installing Batteries Open the battery compartment cover on the rear and install the batteries paying attention to the correct polarity Install two 1 5...

Page 34: ... LIST Q VIEW Selects a programme Selects numbered items in a menu Displays the programme table p 54 Returns to the previously viewed programme Up Down Left Right OK MENU RETURN EXIT Allows you to navigate the on screen menus and adjust the system settings to your preference Accepts your selection or displays the current mode Selects a menu Clears all on screen displays and returns to TV viewing fr...

Page 35: ...ove from one full set of screen information to the next one Q MENU INFO GUIDE MARK Select the desired quick menu source Aspect Ratio Energy Saving Picture Mode Sound Mode Audio Sleep Timer Fav On Off USB Eject p 35 Shows the present screen information Shows programme schedule p 67 Check and un check programmes Installing Batteries Open the battery compartment cover on the rear and install the batt...

Page 36: ... channel searching procedure you may not have all of the channels available In this case you can use the Setup Auto Tuning to search for more channels b Press the RETURN button to change the current OSD to the previous OSD c For those countries without confirmed DTV broadcasting standards some DTV features might not work depending on the DTV broadcasting environment d Home Use mode is the optimal ...

Page 37: ...Selects your desired Energy Saving mode Picture Mode Selects your desired Picture Mode Sound Mode It is a feature to automatically set the sound combination which it deems the best for the images being watched Selects your desired Sound Mode Audio Selects the sound output Sleep Timer Sets the sleep timer Fav On Off Add the programme to the favourite list USB Eject Select Eject in order to remove U...

Page 38: ...nputLabel KeyLock DemoMode Netherlands English English English Off Off Off SETUP PICTURE AUDIO TIME OPTION LOCK INPUT USB TIME Move OK Clock OffTime OnTime SleepTimer AutoSleep Off Off Off Off LOCK Move OK LockSystem SetPassword BlockProgramme ParentalGuidance Off Off INPUT Move OK Antenna AV1 AV2 AV3 Component RGB HDMI1 HDMI2 USB Move OK PhotoList MusicList Only 32 42LF73 Only 32 42LF73 1 MENU Pr...

Page 39: ...agnostics CIInformation Off DigitalProgrammeTuning AnalogueProgrammeTuning Start Close CheckyourantennaConnection The previouschannelinformationwillbe updatedduringAutoTuning 1 MENU Select SETUP If you have selected On in LOCK Lock System menu you will be prompted to enter your password to access Use NUMBER buttons to input a 4 digit password 2 OK Select Auto Tuning 3 OK Select Yes 4 OK Select Ant...

Page 40: ...VAntennaPower SoftwareUpdate Diagnostics CIInformation Off Default Frequency khz Symbolrate kS s Modulation NetworkID 356000 6875 Auto 0 OK Close DigitalProgrammeTuning AnalogueProgrammeTuning Start Close CheckyourantennaConnection The previouschannelinformationwillbe updatedduringAutoTuning 1 MENU Select SETUP 2 OK Select Auto Tuning 3 OK Select Yes 4 OK Select Cable 5 OK Select Default or User O...

Page 41: ...mmes quickly and correctly The commonly used values are provided as default However for correct settings please inquire of the cable service provider Frequency Enter a user defined frequency range Symbol rate Enter a user defined symbol rate Symbol rate Speed at which a device such as modem sends symbols to a channel Modulation Enter a user defined modulation Modulation Loading of audio or video s...

Page 42: ...nualTuning ProgrammeEdit 5VAntennaPower SoftwareUpdate Diagnostics CIInformation Off DTV 21 Yourreceiverwilladdthischannel toyourchannellist UHFCH Bad Good Normal Update Close 1 MENU Select SETUP If you have selected On in LOCK Lock System menu you will be prompted to enter your password to access Use NUMBER buttons to input a 4 digit password 2 OK Select Manual Tuning 3 OK Select DTV 4 Select the...

Page 43: ... 369000 6875 Auto Bad Good Normal Update Close 1 MENU Select SETUP If you have selected On in LOCK Lock System menu you will be prompted to enter your password to access Use NUMBER buttons to input a 4 digit password 2 OK Select Manual Tuning 3 OK Select DTV 4 OK Make appropriate adjustments Frequency Symbol rate and Modulation mode are needed in order to add a programme correctly in DVB cable mod...

Page 44: ...f SETUP Move OK AutoTuning ManualTuning ProgrammeEdit 5VAntennaPower SoftwareUpdate Diagnostics CIInformation Off TV Storage System Band Channel Fine Search Name 1 PAL BG V UHF 1 C01 Store Close 1 MENU Select SETUP If you have selected On in LOCK Lock System menu you will be prompted to enter your password to access Use NUMBER buttons to input a 4 digit password To store another channel repeat ste...

Page 45: ...hoice of the second character and so on You can use an the alphabet A to Z the number 0 to 9 and blank 3 OK Select Close 4 OK Select Store Fine Tuning Normally fine tuning is only necessary if reception is poor 1 Select Fine 2 Fine tune for the best picture and sound 3 OK Select Store Press the MENU button to return to normal TV viewing Press the RETURN button to return to the previous screen ...

Page 46: ...you have selected On in LOCK Lock System menu you will be prompted to enter your password to access Use NUMBER buttons to input a 4 digit password The colour buttons for editing such as Delete Group Select All and Move are not available for digital cable channels Move is available only for analogue channels 2 OK Select Programme Edit 3 OK Enter the Programme Edit Changing a programme 1 Select a pr...

Page 47: ...e the selected programmes Changing groups 1 RED GREEN YELLOW BLUE Switch between TV and Radio groups Moving programmes 1 FAV MARK Select the programme you want to move 2 RED GREEN YELLOW BLUE Shift the cursor to the position you want 3 OK Move the selected programmes to the new location After you finish the edit press the EXIT button to save all the changes Press the MENU button to return to norma...

Page 48: ...t the 5V Antenna Power to On to supply the 5V power into antenna SETUP Move OK AutoTuning ManualTuning ProgrammeEdit 5VAntennaPower SoftwareUpdate Diagnostics CIInformation Off SETUP Move OK AutoTuning ManualTuning ProgrammeEdit 5VAntennaPower SoftwareUpdate Diagnostics CIInformation Off Off On 1 MENU Select SETUP The default value is Off 2 OK Select 5V Antenna Power 3 OK Select On or Off Press th...

Page 49: ...u have selected On in LOCK Lock System menu you will be prompted to enter your password to access Use NUMBER buttons to input a 4 digit password Auto Update and Search Time are not available for this model 2 OK Select Software Update Manual Update 1 OK Select Manual Update During Progress of a Software Update please note the following Power to the TV must not be interrupted The TV must not be swit...

Page 50: ...e without switching to the operation mode 1 OK Select Regular Auto Update 2 Select On 3 OK Select Close If the new software is detected the software update message is displayed when you turn on the TV Select Yes and press the OK button to start the software update The Search Time is preset to 03 00 Press the MENU button to return to normal TV viewing Press the RETURN button to return to the previo...

Page 51: ...updating Detail will be enabled when there is the detail information SystemInformation SystemID LoaderVersion H1 14 1577 0000 DownloadProgress DownloadingSoftware Pleasewaitdownloadinprogress 70 The system restarts automatically and the update is started The progress status is displayed Please wait until it is complete Newsoftwareissuccessfullyinstalled OK After the software update is complete the...

Page 52: ...ate Diagnostics CIInformation Off Manufacturer Model Type UpdateDate SoftwareVersion CI SoftwareVersion LoaderVersion MicomVersion HostID BindedCAMID Strength Quality 87 88 Diagnostics Prev LGElectronicsInc 32LF7300 05Mar 2009 0 00 39 1 00 00 I5 00 00 01 22 1D1852D21C1ED5DC 3F182838D2C15D3C 1 MENU Select SETUP Strength and quality disappear in Analogue mode 2 OK Select Diagnostics 3 OK Display the...

Page 53: ...ule and smart card CI Common Interface functions may not be possible depending upon the country broadcasting circumstances SETUP Move OK Off AutoTuning ManualTuning ProgrammeEdit 5VAntennaPower SoftwareUpdate Diagnostics CIInformation CIInformation Consultations Prebooking Authorizations AboutOCAM CIItem5 CIItem6 CIItem7 Move OK Viaccess 02 24 99 V1 20 uk 2 ViaccessBottomTitle 2 This OSD is only f...

Page 54: ...ay TV channel The TV s start up process may take longer due to the enhanced security for CI compared to a Free to Air channel The TV s start up time may vary depending on the kind of CI CAM Common Interface Plus Conditional Access Module and this is irrelevant to the functionality of the TV Start up process with CI CAM is as follows LG Initial Logo Channel Information Authentication Start Scramble...

Page 55: ... for the first time Authentication Start Audio Video Display Authentication OK Authentication Failed 1 When the authentication is failed an error message appears 2 Check whether The antenna is connected correctly The channel search is complete The current channel is digital 3 Remove the CI CAM and insert it again or turn the TV off and on The authentication will normally start ...

Page 56: ...grammes classified by CAS types Display the list of programmes classified by free channels Displaying the List OK Switch to the selected programme LIST Display or exit the programme list P Change the page Switch between TV and Radio groups Four groups of programme lists are available My TV Favourite HDTV and Scrambled Press the colour buttons assigned to each group to display the programme list of...

Page 57: ...you can move easily among the connected inputs Using MENU button 1 MENU Select INPUT Antenna or Cable Select it when watching the TV DTV Cable is available only when Cable is selected in Auto Tuning AV1 AV2 AV3 Select it when watching the VCR or external equipment Component Select it when using the DVD or the Digital set top box depends on connector RGB Select it when using PC depends on connector...

Page 58: ...V1 AV2 AV3 Component RGB HDMI1 HDMI2 HDMI3 HDMI4 1 MENU Select OPTION 2 OK Select Input Label 3 OK Select the source 4 Select the label AV Mode By pressing AV MODE button repeatedly you can select the optimal images and sounds when connecting AV devices to external input Off Cinema Sport Game If you select Cinema mode in AV mode Cinema mode will be selected both for Picture Mode and Sound Mode in ...

Page 59: ... the programme information banner You can choose from a choice of camera angles to watch the screen from different camera perspectives while watching a sports transmission Different options are provided to view single matches or federal league games Multifeed Portal Motorsport 1 RED GREEN YELLOW BLUE Display the Multifeed popup 2 OK Select an option you want ...

Page 60: ...g FactoryReset English English Off Off Off HomeUse OPTION Move OK AudioLanguage SubtitleLanguage HardofHearing InputLabel KeyLock DemoMode ModeSetting FactoryReset English English Off Off Off HomeUse AllusersettingsandchannelSettings willbereset StillContinue Yes No 1 MENU Select OPTION If you have selected On in LOCK Lock System menu you will be prompted to enter your password to access Use NUMBE...

Page 61: ...he PC The device may cause the product to malfunction or fail to be played Never forget to use only a USB storage device which has normal music files or image files Please use only a USB storage device which was formatted as a FAT32 file system provided with the Windows operating system In case of a storage device formatted as a different utility programme which is not supported by Windows it may ...

Page 62: ...ou can play JPEG files only Only baseline scan is supported among JPEG SOF0 SOF1 only Non supported files are displayed in the form of bitmap Screen Components 1 MENU Select USB 2 OK OK Select Photo List Moves to upper level file Current page Total pages Total number of marked photos Usable USB memory Corresponding buttons on the remote control PhotoList UpFolder Navigation Option PageChange Selec...

Page 63: ...n Unmark All Deselect all marked photos Delete Delete the selected photo item Close Close the pop up menu 1 Select the target folder or drive Use the P button to navigate in the photo page Use the MARK button to mark or unmark a photo When one or more photos are marked you can view individual photos or a slide show of the marked photos If no photos are marked you can view all photos individually o...

Page 64: ...ist UpFolder Navigation Option PageChange Select Exit UpFolder Page 1 1 1file s Marked USBDevice FreeSpace 2GB View UnmarkAll Delete Close The aspect ratio of a photo may change the size of the photo displayed on the screen in full size Press the RETURN button to return to the previous screen 1 Select the target folder or drive Use the P button to navigate in the photo page 2 OK Select the desired...

Page 65: ...round Music Listen to music while viewing photos in full size Set the Music Folder for BGM in Options before using this function Rotate Rotate photos Rotates the photo 90 180 270 360 clockwise It can not be rotate when the width of a picture is bigger than supported height Delete Delete photos Option Set values for Slide Speed and Music Folder for BGM Use button and OK button to set values Then go...

Page 66: ...splay may be different from your TV Images are an example to assist with the TV operation MUSIC MP3 supporting file Bit rate 32 320 Sampling rate MPEG1 layer 3 32 kHz 44 1 kHz 48 kHz Screen Components 1 MENU Select USB 2 OK OK Select Music List Moves to upper level file Current page Total pages Total number of marked musics Usable USB memory Corresponding buttons on the remote control MusicList Up...

Page 67: ... List Mark All Mark all musics in the folder Unmark All Deselect all marked musics Delete Delete the selected musics Close Close the pop up menu PhotoList UpFolder Navigation Option PageChange Select Exit Page 1 1 1file s Marked USBDevice FreeSpace 2GB PlayMarked PlaywithPhoto Unmarked All Delete Close Title 1 Select the target folder or drive Use the P button to navigate in the music page Use the...

Page 68: ...nded period of time NOTE When music is playing is displayed in back of the music title A damaged or corrupted music does not play but displays 00 00 in playtime A music downloaded from a paid service with copyright protection does not start but displays inappropriate information in playtime If you press button screen saver is stopped The PLAY Pause II buttons on the remote control are also availab...

Page 69: ...e for quick search and reminder Table Schedule and Find The On Screen Displays OSD and function may differ based on the TV selected 1 GUIDE Display or exit the TV Guide 2 RED GREEN YELLOW BLUE Move to Schedule mode 3 RED GREEN YELLOW BLUE Move to Find mode 4 RED GREEN YELLOW BLUE Move to Table mode TVGUIDE EPG ELECTRONICPROGRAMMEGUIDE In Digital Mode ...

Page 70: ...te Reservation Information Now RED GREEN YELLOW BLUE OK Change the date Selecting a programme P Change the page 1 Select a programme on air Switch between TV and Radio groups 2 OK Switch to the selected programme Display the programme information Reserving the watching 1 Select a programme in the future 2 OK Reserve the watching of the selected programme To cancel press it again The reserved progr...

Page 71: ...it Add Reminder Channel Date StartTime EndTime Repeat DerAlte 15 09 15 35 16 35 Once OK Cancel Move Change NewReminder Information PageChange OK Edit or add a reminder Editing Adding the reminder RED GREEN YELLOW BLUE Delete a reminder 1 OK Select a reservation and display the Reminder popup P Change the page 2 OK Select each option and enter the values Display the programme information 3 OK Selec...

Page 72: ...vious Pr Change All EveryTime Everyday Keyword Time Day Search Genre All Information PageChange OK Input the Keyword Genre Time Day values and select Search RED GREEN YELLOW BLUE Display the previous inputted values P Change the page Display the programme information Selecting a programme Reserving the watching 1 Select a programme on air 1 Select a programme in the future 2 OK Switch to the selec...

Page 73: ...k to Q Menu 2 Select the desired picture format 16 9 The following selection will allow you to adjust the picture horizontally in linear proportion to fill the entire screen useful for viewing 4 3 formatted DVDs Original When your TV receives a wide screen signal it will auto matically change to the picture format broadcast Just Scan Following Selection will lead to you view the picture of best qu...

Page 74: ...14 9 or a general TV programme in the 14 9 mode The 14 9 screen is viewed in the same way as in 4 3 but is magnified to the left and right Cinema Zoom Choose Cinema Zoom when you want to enlarge the picture in correct proportion NOTE When enlarging or reducing the picture the im age may become distorted or button Adjust enlarge proportion of Cinema Zoom The adjustment range is 1 16 or button Move ...

Page 75: ... Select Auto Except for 32 42LH33 Off Minimum Medium Maximum or Screen Off When selecting Screen off TV turned off after 3 seconds If you adjust Energy Saving Auto Except for 32 42LH33 Minimum Medium Maximum Backlight feature will not work You can also adjust this feature by selecting Energy Saving button on the remote control When selecting Auto Backlight is automatically adjusted through intelli...

Page 76: ...s Colour 16 9 Off Standard AspectRatio EnergySaving PictureMode IntelligentSensor Vivid Standard Natural Cinema Sport Game 1 MENU Select PICTURE Picture Mode adjusts the TV for the best picture appearance Select the preset value in the Picture Mode menu based on the programme category You can also adjust Picture Mode in the Q Menu Intelligent Sensor Except for 32 42LH33 Adjusts picture according t...

Page 77: ... green levels PICTURE Move OK 16 9 Off Standard AspectRatio EnergySaving PictureMode 80 90 50 60 60 Backlight Contrast Brightness Sharpness Colour 1 MENU Select PICTURE It is not available to use this function in Intelligent Sensor Except for 32 42LH33 Benefits of using Backlight The electricity consumption is reduced by up to 60 The black brightness is reduced As the black has greater depth you c...

Page 78: ...s Sharpness Colour Tint AdvancedControl ColourTemperature NoiseReduction BlackLevel EyeCare RealCinema TruMotion Close Medium Medium High Off On Low PICTURE Move OK 80 90 50 60 60 0 Standard PictureMode Backlight Contrast Brightness Sharpness Colour Tint AdvancedControl ColourTemperature NoiseReduction BlackLevel EyeCare RealCinema Close Medium Medium High Off On 1 MENU Select PICTURE 2 OK Select ...

Page 79: ...cture Mode Vivid Cinema Intelligent Sensor Except for 32 42LH33 Real Cinema On Off Makes video clips recorded in film look more natural by eliminating judder effect This function can work when TruMotion is off TruMotion Off Low High Only 32 42LF73 High Provides smoother picture movement Low Provides smooth picture movement Use this setting for standard use Off Use this setting when High and Low se...

Page 80: ...ness Sharpness Colour Tint AdvancedControl PictureReset PICTURE Move OK 90 50 60 60 0 Screen Contrast Brightness Sharpness Colour Tint AdvancedControl PictureReset Resettingvideoconfiguration 1 MENU Select PICTURE 2 OK Select Picture Reset 3 OK Initialize the adjusted value Press the MENU button to return to normal TV viewing Press the RETURN button to return to the previous screen ...

Page 81: ...y MenuLanguage AudioLanguage SubtitleLanguage HardofHearing InputLabel KeyLock DemoMode Netherlands English English English Off Off Off OPTION Move OK Country MenuLanguage AudioLanguage SubtitleLanguage HardofHearing InputLabel KeyLock DemoMode Netherlands English English English Off Off Off Off On 1 MENU Select OPTION 2 OK Select Demo Mode 3 OK Select On to show the various logo of TV 4 OK Return...

Page 82: ...lish English Off Off Off HomeUse OPTION Move OK MenuLanguage AudioLanguage SubtitleLanguage HardofHearing InputLabel KeyLock DemoMode ModeSetting English English English Off Off Off HomeUse Selectingtheenvironment Choosethe settingmodeyouwant HomeUse StoreDemo Select HomeUse tousethisTVathome To usethisTVatstore select StoreDemo 1 MENU Select OPTION 2 OK Select Mode Setting 3 OK Select Store Demo ...

Page 83: ... stable volume levels by making automatic adjustments for each program AUDIO Move OK SRSTruSurroundXT Off 80Hz 220Hz 470Hz 1KHz 0 0 0 0 Off 0 Standard AutoVolume Balance SoundMode AUDIO Move OK SRSTruSurroundXT Off 80Hz 220Hz 470Hz 1KHz 0 0 0 0 Off 0 Standard AutoVolume Balance SoundMode Off On 1 MENU Select AUDIO 2 OK Select Auto Volume 3 OK Select On or Off SOUND LANGUAGE CONTROL Press the MENU ...

Page 84: ...uality sound Music Optimizes sound for listening to music Cinema Optimizes sound for watching movies Sport Optimizes sound for watching sports events Game Optimizes sound for playing games AUDIO Move OK SRSTruSurroundXT Off 80Hz 220Hz 470Hz 1KHz 0 0 0 0 Off 0 Standard AutoVolume Balance SoundMode AUDIO Move OK SRSTruSurroundXT Off 80Hz 220Hz 470Hz 1KHz 0 0 0 0 Off 0 Standard AutoVolume Balance Sou...

Page 85: ...5 OK Set the desired sound level 3 OK Select Standard Music Cinema Sport or Game SRS Trusurround XT Select this option to sound realistic 1 MENU Select AUDIO SRS TruSurround XT TruSurround XT is a patented SRS technology that solves the problem of playing 5 1 multicannel content over two speakers is a trademark of SRS Labs Inc TruSurround XT technology is incorporated under license from SRS Labs I...

Page 86: ...20Hz 470Hz 1KHz 0 0 0 0 Off 0 Standard AutoVolume Balance SoundMode AUDIO Move OK SRSTruSurroundXT Off 80Hz 220Hz 470Hz 1KHz 0 0 0 0 Off 0 Standard AutoVolume Balance SoundMode Close Balance 0 1 MENU Select AUDIO 2 OK Select Balance 3 OK Make desired adjustment Press the MENU button to return to normal TV viewing Press the RETURN button to return to the previous screen ...

Page 87: ...se an external Hi Fi system turn off the TV internal speakers AUDIO Move OK 470Hz 1KHz 2 2KHz 4 7KHz 12KHZ Reset 0 0 0 0 0 DolbyDigital On DigitalAudioOut TVSpeaker AUDIO Move OK 470Hz 1KHz 2 2KHz 4 7KHz 12KHZ Reset 0 0 0 0 0 DolbyDigital On DigitalAudioOut TVSpeaker Off On 1 MENU Select AUDIO 2 OK Select TV Speaker 3 OK Select On or Off Press the MENU button to return to normal TV viewing Press t...

Page 88: ...ll be played AUDIO Move OK 470Hz 1KHz 2 2KHz 4 7KHz 12KHZ Reset 0 0 0 0 0 DolbyDigital On DigitalAudioOut TVSpeaker AUDIO Move OK 470Hz 1KHz 2 2KHz 4 7KHz 12KHZ Reset 0 0 0 0 0 DolbyDigital On DigitalAudioOut TVSpeaker DolbyDigital PCM 1 MENU Select AUDIO Manufactured under license from Dolby Laboratories Dolby and the double D symbol are trademarks of Dolby Laboratories There is a possibility tha...

Page 89: ...aker 470Hz 1KHz 2 2KHz 4 7KHz 12KHZ Reset 0 0 0 0 0 AUDIO Move OK DolbyDigital On DigitalAudioOut TVSpeaker 470Hz 1KHz 2 2KHz 4 7KHz 12KHZ Reset 0 0 0 0 0 Resettingsoundmodeconfiguration 1 MENU Select AUDIO 2 OK Select Reset 3 OK Initialize the adjusted value Press the MENU button to return to normal TV viewing Press the RETURN button to return to the previous screen ...

Page 90: ... Mono MONO Stereo STEREO Dual DUAL I DUAL I I DUAL I I I Mono sound selection If the stereo signal is weak in stereo reception you can switch to mono In mono reception the clarity of sound is improved Language selection for dual language broadcast If a programme can be received in two languages dual language you can switch to DUAL I DUAL II or DUAL I II DUAL I Sends the primary broadcast language ...

Page 91: ...AM STEREO or FM MONO If the stereo signal is weak switch to FM MONO When NICAM dual is received you can select NICAM DUAL I NICAM DUAL II or NICAM DUAL I II or FM MONO Speaker Sound Output Selection In AV Component RGB and HDMI mode you can select output sound for the left and right loudspeakers Select the sound output L R Audio signal from audio L input is sent to the left loudspeaker and audio s...

Page 92: ...uages are roadcast you can select the audio language 1 Q MENU Select Audio Audio Language OSD Information Display Status N A Not Available MPEG Audio Dolby Digital Audio Audio for Visual Impaired Audio for Hearing Impaired Dolby Digital Plus Audio Subtitle Language OSD Information Display Status N A Not Available Teletext Subtitle Subtitle for Hard of Hearing 2 OK Select an audio language 3 Select...

Page 93: ...efore using on off timer function TIME Move OK Clock OffTime OnTime SleepTimer AutoSleep Off Off Off Off TIME Move OK Clock OffTime OnTime SleepTimer AutoSleep Off Off Off Off Date Month Year Hour Minute Close 1 MENU Select TIME 2 OK Select Clock 3 OK Select either the year date or time option 4 Set the year date and time options TIME SETTING Press the MENU button to return to normal TV viewing Pr...

Page 94: ...Move OK Clock OffTime OnTime SleepTimer AutoSleep Off Off Off Off TIME Move OK Clock OffTime OnTime SleepTimer AutoSleep Off Off Off Off Repeat Hour Minute Mode Programme Volume Off Close Thu 1 Jan 2009 07 00 1 MENU Select TIME To cancel On Off Time function select Off For On Time function only 2 OK Select Off Time or On Time 1 Select Mode 3 OK Select Repeat 2 Select TV or DTV 4 Select Off Once Da...

Page 95: ...elect Auto Sleep 3 OK Select Off or On Sleep Timer Setting You do not have to remember to switch the TV off before you go to sleep The sleep timer automatically switches the TV to standby after the preset time has elapsed 1 Q MENU Select Sleep Timer 2 OK Select Off 10 20 30 60 90 120 180 or 240 Min When you switch the TV off the preset sleep timer is cancelled You can also adjust Sleep Timer in th...

Page 96: ... have selected On in LOCK Lock System menu you will be prompted to enter your password to access Use NUMBER buttons to input a 4 digit password If you have forgotten your password press 7777 to reset your password 2 OK Select Lock System 3 OK Select On 4 OK OK Set the password 5 Input a 4 digit password Be sure to remember this number Re enter new password for confirm PARENTAL CONTROL RATINGS Pres...

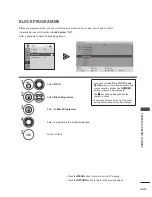
Page 97: ...Lock Select Group 1 MENU Select LOCK If you have selected On in LOCK Lock System menu you will be prompted to enter your password to access Use NUMBER buttons to input a 4 digit password The icon will be displayed when the channel is locked In Analogue Antenna mode it will be saved automatically without the confirm message 2 OK Select Block Programme 3 OK Enter the Block Programme 4 Select a progr...

Page 98: ...o the ratings limit set Enter a password to watch a blocked programme LOCK Move OK LockSystem SetPassword BlockProgramme ParentalGuidance Off Off LOCK Move OK LockSystem SetPassword BlockProgramme ParentalGuidance Off Off Off Close 1 MENU Select LOCK If you have selected On in LOCK Lock System menu you will be prompted to enter your password to access Use NUMBER buttons to input a 4 digit password...

Page 99: ...eLanguage HardofHearing InputLabel KeyLock DemoMode Netherlands English English English Off Off Off Off On 1 MENU Select OPTION In Key Lock On if the TV is turned off press the INPUT P button on the TV or POWER INPUT P or NUMBER buttons on the remote control then the TV will be turned on With the Key Lock On the display Key Lock On appears on the screen if any button on the front panel is pressed ...

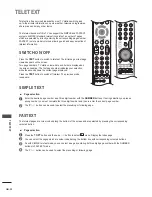
Page 100: ...reappears Simple Text Page selection Enter the desired page number as a three digit number with the NUMBER buttons If during selection you press a wrong number you must complete the three digit number and then re enter the correct page number The P button can be used to select the preceding or following page Fastext The teletext pages are colour coded along the bottom of the screen and are selecte...

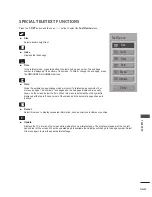
Page 101: ...ub pages The number of sub pages and the sub page displayed is usually shown on the screen below the time When this menu is selected the stop symbol is displayed at the top left hand corner of the screen and the automatic page change is inactive Reveal Select this menu to display concealed information such as solutions to riddles or puzzles Update Displays the TV picture on the screen while waitin...

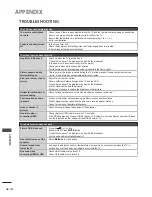
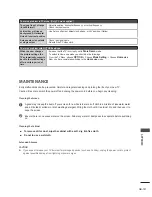
Page 102: ... problem may be with the broadcast Are the video cables installed properly Activate any function to restore the brightness of the picture Horizontal vertical bars or picture shaking Check for local interference such as an electrical appliance or power tool Poor reception on some channels Station or cable channel experiencing problems tune to another station Station signal is weak reposition the an...

Page 103: ...your TV dormant for prolonged periods such as a holiday unplug the power cord to protect against possible damage from lightning or power surges There is a problem in PC mode Only PC mode applied The signal is out of range Invalid format Adjust resolution horizontal frequency or vertical frequency Check the input source Vertical bar or stripe on background Horizontal Noise Incorrect position Use Au...

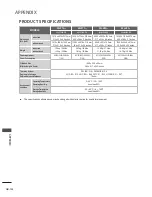
Page 104: ... inches Weight with stand without stand 12 8kg 28 2lbs 11 3kg 24 9lbs 20 7kg 45 6lbs 18 1kg 39 9lbs 12 4Kg 27 3lbs 11 1Kg 24 5lbs 18 6Kg 41 0lbs 16 7Kg 36 8lbs Power requirement Power Consumption AC100 240V 50 60Hz 170W AC100 240V 50 60Hz 215W AC100 240V 50 60Hz 165W AC100 240V 50 60Hz 205W CI Module Size Width x Height x Depth 100 0 x 55 0 x 5 0mm 3 94 x 2 17 x 0 20inches Television System Progra...

Page 105: ...This offer is valid for a period of three 3 years from the date of the distribution of this product by LG Electronics You can obtain a copy of the GPL and LGPL licenses at next pages http www gnu org licenses old licenses gpl 2 0 html Also you can obtain the translation of GPL LGPL licenses from http www gnu org licenses old licenses gpl 2 0 translations html http www gnu org licenses old licenses...

Page 106: ... rights with two steps 1 copyright the software and 2 offer you this license which gives you legal permission to copy distribute and or modify the software Also for each author s protection and ours we want to make certain that everyone understands that there is no warranty for this free software If the software is modified by someone else and passed on we want its recipients to know that what the...

Page 107: ...ch is a work based on the Program the distribution of the whole must be on the terms of this License whose permissions for other licensees extend to the entire whole and thus to each and every part regardless of who wrote it Thus it is not the intent of this section to claim rights or contest your rights to work written entirely by you rather the intent is to exercise the right to control the dist...

Page 108: ...tirely from distribution of the Program If any portion of this section is held invalid or unenforceable under any particular circumstance the balance of the section is intended to apply and the section as a whole is intended to apply in other circumstances It is not the purpose of this section to induce you to infringe any patents or other property right claims or to contest validity of any such c...

Page 109: ...ar name of author This program is free software you can redistribute it and or modify it under the terms of the GNU General Public License as published by the Free Software Foundation either version 2 of the License or at your option any later version This program is distributed in the hope that it will be useful but WITHOUT ANY WARRANTY without even the implied warranty of MERCHANTABILITY or FITN...

Page 110: ...tributor we want to make it very clear that there is no warranty for the free library Also if the library is modified by someone else and passed on the recipients should know that what they have is not the original version so that the original author s reputation will not be affected by problems that might be introduced by others Finally software patents pose a constant threat to the existence of ...

Page 111: ... does and what the program that uses the Library does 1 You may copy and distribute verbatim copies of the Library s complete source code as you receive it in any medium provided that you conspicuously and appropriately publish on each copy an appropriate copyright notice and disclaimer of warranty keep intact all the notices that refer to this License and to the absence of any warranty and distri...

Page 112: ...erial from a header file that is part of the Library the object code for the work may be a derivative work of the Library even though the source code is not Whether this is true is especially significant if the work can be linked without the Library or if the work is itself a library The threshold for this to be true is not precisely defined by law If such an object file uses only numerical parame...

Page 113: ...do not accept this License Therefore by modifying or distributing the Library or any work based on the Library you indicate your acceptance of this License to do so and all its terms and conditions for copying distributing or modifying the Library or works based on it 10 Each time you redistribute the Library or any work based on the Library the recipient automatically receives a license from the ...

Page 114: ...INCIDENTAL OR CONSEQUENTIAL DAMAGES ARISING OUT OF THE USE OR INABILITY TO USE THE LIBRARY INCLUDING BUT NOT LIMITED TO LOSS OF DATA OR DATA BEING RENDERED INACCURATE OR LOSSES SUSTAINED BY YOU OR THIRD PARTIES OR A FAILURE OF THE LIBRARY TO OPERATE WITH ANY OTHER SOFTWARE EVEN IF SUCH HOLDER OR OTHER PARTY HAS BEEN ADVISED OF THE POSSIBILITY OF SUCH DAMAGES END OF TERMS AND CONDITIONS How to Appl...

Page 115: ......

Page 116: ......

Reviews: